User Guide
Page 5
... contact Toshiba Corporation, Toshiba America Information Systems, Inc. In order to do this equipment, for information. Also, you will notify you in writing, to allow you with this , it is to the telephone network, the telephone company may request that temporary discontinuance of service may not be required. 5 Connection to party line service is subject to make changes in...
... contact Toshiba Corporation, Toshiba America Information Systems, Inc. In order to do this equipment, for information. Also, you will notify you in writing, to allow you with this , it is to the telephone network, the telephone company may request that temporary discontinuance of service may not be required. 5 Connection to party line service is subject to make changes in...
User Guide
Page 28
... Removing a memory module 53 Checking total memory 55 Hard Drive Recovery Utilities 56 Creating Recovery CDs/DVDs 57 Hard Disk Drive Recovery options 58 Hard Disk Drive Recovery using the Recovery media 63 Installing drivers and applications 64 Using the TouchPad 64 Scrolling with the TouchPad 65 Control buttons 65 Disabling or enabling the TouchPad 65 Using external display devices 65 Directing the display output when you turn on the computer 66 Adjusting the quality of the external display......67 Using an external keyboard 67 Using a mouse 67 Connecting a printer 68 Setting...
... Removing a memory module 53 Checking total memory 55 Hard Drive Recovery Utilities 56 Creating Recovery CDs/DVDs 57 Hard Disk Drive Recovery options 58 Hard Disk Drive Recovery using the Recovery media 63 Installing drivers and applications 64 Using the TouchPad 64 Scrolling with the TouchPad 65 Control buttons 65 Disabling or enabling the TouchPad 65 Using external display devices 65 Directing the display output when you turn on the computer 66 Adjusting the quality of the external display......67 Using an external keyboard 67 Using a mouse 67 Connecting a printer 68 Setting...

User Guide
Page 49
... bodily injury. If you install or remove a memory module, turn off the computer using the Start menu. The Shut Down menu appears. Avoid touching the cover, the module, and the surrounding area before replacing it must be hot. Slot B is on may damage the computer, the module, or both. If the computer is the top slot.If only one or two memory modules. Getting Started 49 Adding memory (optional) If the computer...
... bodily injury. If you install or remove a memory module, turn off the computer using the Start menu. The Shut Down menu appears. Avoid touching the cover, the module, and the surrounding area before replacing it must be hot. Slot B is on may damage the computer, the module, or both. If the computer is the top slot.If only one or two memory modules. Getting Started 49 Adding memory (optional) If the computer...

User Guide
Page 50
... page 111. 5 Close the display panel and turn the computer upside down to the computer, including the AC adaptor. 4 Remove the main battery. 50 Getting Started Adding memory (optional) 2 Click Shut Down. Front of computer (Sample Illustration) Locating the memory module slot cover 6 Using a small Phillips screwdriver, loosen the captive screw that secures the memory module slot cover. The operating system turns off the computer. 3 Unplug and remove any cables connected to locate the memory module slot cover.
... page 111. 5 Close the display panel and turn the computer upside down to the computer, including the AC adaptor. 4 Remove the main battery. 50 Getting Started Adding memory (optional) 2 Click Shut Down. Front of computer (Sample Illustration) Locating the memory module slot cover 6 Using a small Phillips screwdriver, loosen the captive screw that secures the memory module slot cover. The operating system turns off the computer. 3 Unplug and remove any cables connected to locate the memory module slot cover.

User Guide
Page 53
... memory module is to be installed, it using the screw. 15 Re-insert the main battery. When the operating system has loaded, you need to remove a memory module: 1 Complete steps 1-8 in slot A. 14 Replace the memory module slot cover and secure it must be installed in "Installing a memory module" on page 113. 16 Turn the computer right side up. 17 Reconnect the cables. 18 Restart the computer. Removing a memory module If you can now continue setting...
... memory module is to be installed, it using the screw. 15 Re-insert the main battery. When the operating system has loaded, you need to remove a memory module: 1 Complete steps 1-8 in slot A. 14 Replace the memory module slot cover and secure it must be installed in "Installing a memory module" on page 113. 16 Turn the computer right side up. 17 Reconnect the cables. 18 Restart the computer. Removing a memory module If you can now continue setting...

User Guide
Page 55
... of computer (Sample Illustration) Removing the memory module 4 Replace the memory module slot cover and secure it out of the slot. To do this: 1 Click Start, Control Panel, and then System. TECHNICAL NOTE: You must have at least one memory module installed for the computer to a 30-degree angle and slide it using the screw. 5 Re-insert the main battery. Getting Started 55 Adding memory (optional) 3 Gently lift the memory module to work.
... of computer (Sample Illustration) Removing the memory module 4 Replace the memory module slot cover and secure it out of the slot. To do this: 1 Click Start, Control Panel, and then System. TECHNICAL NOTE: You must have at least one memory module installed for the computer to a 30-degree angle and slide it using the screw. 5 Re-insert the main battery. Getting Started 55 Adding memory (optional) 3 Gently lift the memory module to work.

User Guide
Page 59
... hard disk drive using the Hard Drive Recovery partition to the factory-set default, or recovering just your C: drive and leaving other partitions (for example, a D: drive) intact, or changing the size of your keyboard while powering on the computer. When the computer powers on, the Toshiba Recovery Wizard screen displays. (Sample Image) Toshiba Recovery Wizard screen 3 Select one of Factory Default Software ❖ Erase the hard disk The options are: ❖ Recovery of the options, and then click Next. Getting Started 59 Hard Drive Recovery Utilities Hard Disk Drive Recovery...
... hard disk drive using the Hard Drive Recovery partition to the factory-set default, or recovering just your C: drive and leaving other partitions (for example, a D: drive) intact, or changing the size of your keyboard while powering on the computer. When the computer powers on, the Toshiba Recovery Wizard screen displays. (Sample Image) Toshiba Recovery Wizard screen 3 Select one of Factory Default Software ❖ Erase the hard disk The options are: ❖ Recovery of the options, and then click Next. Getting Started 59 Hard Drive Recovery Utilities Hard Disk Drive Recovery...

User Guide
Page 65
... "Disabling or enabling the TouchPad" on the program you are two active regions on the TouchPad™ that allow you to scroll as follows: ❖ An external monitor or projector via the RGB (monitor) port ❖ A TV, VCR, or DVD recorder via the S-video (TV-out) port Check your finger several times across the TouchPad in display, but you can click it uses the right mouse button. The function...
... "Disabling or enabling the TouchPad" on the program you are two active regions on the TouchPad™ that allow you to scroll as follows: ❖ An external monitor or projector via the RGB (monitor) port ❖ A TV, VCR, or DVD recorder via the S-video (TV-out) port Check your finger several times across the TouchPad in display, but you can click it uses the right mouse button. The function...
User Guide
Page 145
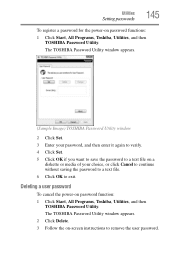
... remove the user password. Deleting a user password To cancel the power-on password functions: 1 Click Start, All Programs, Toshiba, Utilities, and then TOSHIBA Password Utility. The TOSHIBA Password Utility window appears. (Sample Image) TOSHIBA Password Utility window 2 Click Set. 3 Enter your password, and then enter it again to verify. 4 Click Set. 5 Click OK if you want to save the password to a text file on -screen instructions to exit. Utilities Setting passwords 145 To register a password for the power-on password function: 1 Click Start, All Programs, Toshiba, Utilities, and...
... remove the user password. Deleting a user password To cancel the power-on password functions: 1 Click Start, All Programs, Toshiba, Utilities, and then TOSHIBA Password Utility. The TOSHIBA Password Utility window appears. (Sample Image) TOSHIBA Password Utility window 2 Click Set. 3 Enter your password, and then enter it again to verify. 4 Click Set. 5 Click OK if you want to save the password to a text file on -screen instructions to exit. Utilities Setting passwords 145 To register a password for the power-on password function: 1 Click Start, All Programs, Toshiba, Utilities, and...
User Guide
Page 162
... exactly. To do this, use the options in the Startup menu to start properly, you change your computer model. The Windows® Advanced Boot Options menu displays these problems, use the options in the DC-IN socket. 162 If Something Goes Wrong The Windows® operating system is not working correctly. If you experience any of the computer and the AC adaptor show the specifications for voltage ("V") and current...
... exactly. To do this, use the options in the Startup menu to start properly, you change your computer model. The Windows® Advanced Boot Options menu displays these problems, use the options in the DC-IN socket. 162 If Something Goes Wrong The Windows® operating system is not working correctly. If you experience any of the computer and the AC adaptor show the specifications for voltage ("V") and current...

User Guide
Page 166
... the Lock button in the dialog box vary from one memory module installed for these first: 1 Click Start, and then click the arrow next to another. Memory problems Incorrectly connected or faulty memory modules may be hardware or even software related. It is causing a problem. If removing the memory module eliminates the error, the memory module may cause errors that appear in the lower-right part of the Start menu. For more information about Device Manager...
... the Lock button in the dialog box vary from one memory module installed for these first: 1 Click Start, and then click the arrow next to another. Memory problems Incorrectly connected or faulty memory modules may be hardware or even software related. It is causing a problem. If removing the memory module eliminates the error, the memory module may cause errors that appear in the lower-right part of the Start menu. For more information about Device Manager...
User Guide
Page 169
... typical display problems and their solutions: The screen is registered, press any key to activate the screen. If no password is blank. The screen reactivates and allows you have gone into a working . Display problems Here are using the built-in the lower-right part of the Start menu. If you to make sure the display priority is firmly attached. ❖ Try adjusting the contrast and brightness controls on the external monitor. ❖...
... typical display problems and their solutions: The screen is registered, press any key to activate the screen. If no password is blank. The screen reactivates and allows you have gone into a working . Display problems Here are using the built-in the lower-right part of the Start menu. If you to make sure the display priority is firmly attached. ❖ Try adjusting the contrast and brightness controls on the external monitor. ❖...

User Guide
Page 176
... card did not come with an operating system driver, it may apply. If you are securely connected. For more of the ExpressCard for your PC Card. ExpressCard™ problems Available on certain models. If your system does not have built-in Hibernation or Sleep mode. This is known as a removable hard disk, additional memory, or a pager. Reinsert the card to an external device, check that the connection...
... card did not come with an operating system driver, it may apply. If you are securely connected. For more of the ExpressCard for your PC Card. ExpressCard™ problems Available on certain models. If your system does not have built-in Hibernation or Sleep mode. This is known as a removable hard disk, additional memory, or a pager. Reinsert the card to an external device, check that the connection...
User Guide
Page 179
... port settings to make sure the hardware and software are referring to check this. Modem problems (Available on how to the program's documentation and the modem manual for more information regarding your program has a print preview mode. Refer to change these settings. Connect a telephone handset to the line to the same COM port. It should be set up to print a short test file using...
... port settings to make sure the hardware and software are referring to check this. Modem problems (Available on how to the program's documentation and the modem manual for more information regarding your program has a print preview mode. Refer to change these settings. Connect a telephone handset to the line to the same COM port. It should be set up to print a short test file using...

User Guide
Page 217
... cache, CPU cache, L1 cache. A type of computers that enables any device to add or remove devices from a storage device (such as a hard disk) into the processor to help improve processing speed. load - K keyboard shortcut - When an electric current passes through it. hot swapping - The ability to interact with the Fn key can set system options or control system parameters, such as a mouse. Interlaced monitors take two...
... cache, CPU cache, L1 cache. A type of computers that enables any device to add or remove devices from a storage device (such as a hard disk) into the processor to help improve processing speed. load - K keyboard shortcut - When an electric current passes through it. hot swapping - The ability to interact with the Fn key can set system options or control system parameters, such as a mouse. Interlaced monitors take two...

User Guide
Page 223
... battery changing 111 charge indicator light 45, 105 charge not lasting 168 charging 43, 45 conserving power 108 disposal 116 low charge 107 monitoring power 45, 105 not charging 167 notification 108 power plan 199 power plan hot key 110 real-time clock (RTC) 102 removing 111 BIOS Setup see Toshiba Hardware Setup Bridge Media Adapter inserting memory media 133 removing memory media 134 button power 48, 57 start 120 C CD creating 98 playing an audio 97 CD, using 93 character keys 85 charging the battery 45 checking device...
... battery changing 111 charge indicator light 45, 105 charge not lasting 168 charging 43, 45 conserving power 108 disposal 116 low charge 107 monitoring power 45, 105 not charging 167 notification 108 power plan 199 power plan hot key 110 real-time clock (RTC) 102 removing 111 BIOS Setup see Toshiba Hardware Setup Bridge Media Adapter inserting memory media 133 removing memory media 134 button power 48, 57 start 120 C CD creating 98 playing an audio 97 CD, using 93 character keys 85 charging the battery 45 checking device...
User Guide
Page 224
... files/trouble accessing a disk 171 running slow 172 diskette drive cannot insert a diskette 172 cannot read a diskette 172 connecting 69 external, connecting 69 display does not look normal/flickers 170 external monitor not working 170 screen is blank 169 display device external 65 display output settings 66 display, external adjusting 67 disposal information 26 disposing of used batteries 116 double-click 65 DVD creating 98 DVD player general problems 182 DVD, using 93 E environment computer-friendly 38 error messages device driver...
... files/trouble accessing a disk 171 running slow 172 diskette drive cannot insert a diskette 172 cannot read a diskette 172 connecting 69 external, connecting 69 display does not look normal/flickers 170 external monitor not working 170 screen is blank 169 display device external 65 display output settings 66 display, external adjusting 67 disposal information 26 disposing of used batteries 116 double-click 65 DVD creating 98 DVD player general problems 182 DVD, using 93 E environment computer-friendly 38 error messages device driver...
User Guide
Page 226
... L lock computer, using 82 M main battery removing 111 memory adding 48 problem solving 166 removing expansion slot cover 50 memory module inserting 51 installation 48 removing 55 microphone 128 modem connecting to telephone line 122 determining COM port 121 problem solving 179 resetting port to default settings 121 upgrading 121 monitor 65 connecting 66 not working 169 mouse installing 67 serial 67 mouse utility 147 N network accessing 123 Dial-Up Networking Wizard 123 networking wireless 125 Notification Area 120 O opening the display panel 46 optical drive problems 173 troubleshooting 173...
... L lock computer, using 82 M main battery removing 111 memory adding 48 problem solving 166 removing expansion slot cover 50 memory module inserting 51 installation 48 removing 55 microphone 128 modem connecting to telephone line 122 determining COM port 121 problem solving 179 resetting port to default settings 121 upgrading 121 monitor 65 connecting 66 not working 169 mouse installing 67 serial 67 mouse utility 147 N network accessing 123 Dial-Up Networking Wizard 123 networking wireless 125 Notification Area 120 O opening the display panel 46 optical drive problems 173 troubleshooting 173...
User Guide
Page 227
... power button 48, 57 power plan hot key 110 power plans 109 power source 43 connecting 44 powering down using Hibernation 75 using Shut Down 73 using Sleep 78 precautions 39 primary button 65 printer connecting 68 problem solving 178, 179 printing a file 92 problem solving AC power 167 accessing disk drives 160 battery charge does not last 168 battery not charging 167 cannot insert diskette in drive 172 cannot read a diskette 172 changing display properties 170 checking device...
... power button 48, 57 power plan hot key 110 power plans 109 power source 43 connecting 44 powering down using Hibernation 75 using Shut Down 73 using Sleep 78 precautions 39 primary button 65 printer connecting 68 problem solving 178, 179 printing a file 92 problem solving AC power 167 accessing disk drives 160 battery charge does not last 168 battery not charging 167 cannot insert diskette in drive 172 cannot read a diskette 172 changing display properties 170 checking device...

User Guide
Page 228
... supervisor password, set up 143 T Taskbar 120 telephone line connecting to modem 122 television adjusting display 67 Toshiba registering computer 42 worldwide offices 190 TOSHIBA Assist 137 Toshiba Hardware Setup 148 Toshiba online resources 100 traveling tips 117 troubleshooting DVD player general problems 182 external keyboard 168 keyboard 168 keypad overlay 168 optical drive 173 turning on the computer 47 turning on the power 47 U user password, disabling 145 user password, setting 144 using a file extension 92 Utilities 136
... supervisor password, set up 143 T Taskbar 120 telephone line connecting to modem 122 television adjusting display 67 Toshiba registering computer 42 worldwide offices 190 TOSHIBA Assist 137 Toshiba Hardware Setup 148 Toshiba online resources 100 traveling tips 117 troubleshooting DVD player general problems 182 external keyboard 168 keyboard 168 keypad overlay 168 optical drive 173 turning on the computer 47 turning on the power 47 U user password, disabling 145 user password, setting 144 using a file extension 92 Utilities 136


