User Manual
Page 31
... lock 95 Chapter 2: Learning the Basics 96 Computing tips 96 Using the keyboard 97 Character keys 98 Making your keyboard emulate a full-size keyboard 98 Ctrl, Fn, and Alt keys 99 Function keys 99 Special Windows® keys 99 Overlay keys 100 Starting a program 101 Starting a program from the Start menu.........101 Starting a program from...
... lock 95 Chapter 2: Learning the Basics 96 Computing tips 96 Using the keyboard 97 Character keys 98 Making your keyboard emulate a full-size keyboard 98 Ctrl, Fn, and Alt keys 99 Function keys 99 Special Windows® keys 99 Overlay keys 100 Starting a program 101 Starting a program from the Start menu.........101 Starting a program from...
User Manual
Page 32
...disc with the computer on...........112 Removing a disc with the computer off ..........112 Caring for optical discs 113 Toshiba's online resources 113 Chapter 3: Mobile Computing 114 Toshiba's energy-saver design 114 Running the computer on battery power 114 Battery Notice 115 Power management 116 Using ...main battery runs low 120 Setting battery notifications 120 Conserving battery power 121 Power Plans 122 Using a hot key to set the Power Plan 123 Using the TOSHIBA eco power plan 124 Changing the main battery 124 Removing the battery from the computer .......124 Inserting a...
...disc with the computer on...........112 Removing a disc with the computer off ..........112 Caring for optical discs 113 Toshiba's online resources 113 Chapter 3: Mobile Computing 114 Toshiba's energy-saver design 114 Running the computer on battery power 114 Battery Notice 115 Power management 116 Using ...main battery runs low 120 Setting battery notifications 120 Conserving battery power 121 Power Plans 122 Using a hot key to set the Power Plan 123 Using the TOSHIBA eco power plan 124 Changing the main battery 124 Removing the battery from the computer .......124 Inserting a...
User Manual
Page 35
Contents 35 Appendix A: Hot Keys/TOSHIBA Cards 190 Hot Key Cards 190 Using the Hot Key Cards 191 Application Cards 192 Using the Application Cards 193 Card Case 193 Hot key functions 194 Volume Mute 194 Lock (Instant security 195 Power plan 196 Sleep mode 197 Hibernation mode 198 Output (Display switch 199 Display brightness 200 Disabling or enabling wireless devices............201 Disabling or enabling the TouchPad 202 Zoom (Display resolution 203 Keyboard hot key functions 204 Appendix B: Power Cord/Cable Connectors 205 Glossary 206 Index 221
Contents 35 Appendix A: Hot Keys/TOSHIBA Cards 190 Hot Key Cards 190 Using the Hot Key Cards 191 Application Cards 192 Using the Application Cards 193 Card Case 193 Hot key functions 194 Volume Mute 194 Lock (Instant security 195 Power plan 196 Sleep mode 197 Hibernation mode 198 Output (Display switch 199 Display brightness 200 Disabling or enabling wireless devices............201 Disabling or enabling the TouchPad 202 Zoom (Display resolution 203 Keyboard hot key functions 204 Appendix B: Power Cord/Cable Connectors 205 Glossary 206 Index 221

User Manual
Page 54
Position the module toward the socket, aligning the connector's notch with the matching key in Slot A. 11 Pick up the memory module by its sides, avoiding any contact with the socket 12 Firmly press the memory module into the ...memory slot's socket at approximately a 30-degree angle (to be installed, it must be installed in the socket. notch latch connector latch key (Sample Illustration) Aligning the memory module with its connector. 54 Getting Started Adding memory (optional) NOTE For this model, Slot A is the top slot. If...
Position the module toward the socket, aligning the connector's notch with the matching key in Slot A. 11 Pick up the memory module by its sides, avoiding any contact with the socket 12 Firmly press the memory module into the ...memory slot's socket at approximately a 30-degree angle (to be installed, it must be installed in the socket. notch latch connector latch key (Sample Illustration) Aligning the memory module with its connector. 54 Getting Started Adding memory (optional) NOTE For this model, Slot A is the top slot. If...
User Manual
Page 61
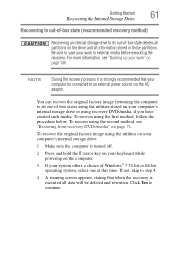
... be deleted and rewritten. NOTE During the recovery process it is strongly recommended that when the recovery is turned off. 2 Press and hold the 0 (zero) key on your system offers a choice of Windows® 7 32-bit or 64-bit operating system, select one at this time. You can recover the original...
... be deleted and rewritten. NOTE During the recovery process it is strongly recommended that when the recovery is turned off. 2 Press and hold the 0 (zero) key on your system offers a choice of Windows® 7 32-bit or 64-bit operating system, select one at this time. You can recover the original...
User Manual
Page 63
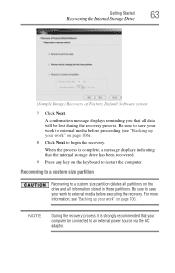
... to save your computer be lost during the recovery process. A confirmation message displays reminding you that the internal storage drive has been recovered. 9 Press any key on the drive and all information stored in those partitions. Getting Started 63 Recovering the Internal Storage Drive (Sample Image) Recovery of Factory Default Software...
... to save your computer be lost during the recovery process. A confirmation message displays reminding you that the internal storage drive has been recovered. 9 Press any key on the drive and all information stored in those partitions. Getting Started 63 Recovering the Internal Storage Drive (Sample Image) Recovery of Factory Default Software...
User Manual
Page 64
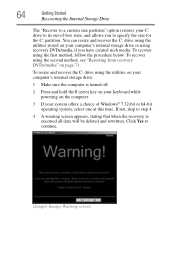
... continue. (Sample Image) Warning screen Click Yes to step 4. 4 A warning screen appears, stating that when the recovery is turned off. 2 Press and hold the 0 (zero) key on your keyboard while powering on page 71. To recover using the first method, follow the procedure below. 64 Getting Started Recovering the Internal Storage...
... continue. (Sample Image) Warning screen Click Yes to step 4. 4 A warning screen appears, stating that when the recovery is turned off. 2 Press and hold the 0 (zero) key on your keyboard while powering on page 71. To recover using the first method, follow the procedure below. 64 Getting Started Recovering the Internal Storage...
User Manual
Page 66
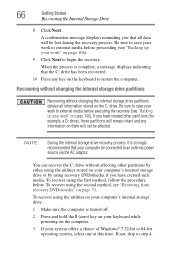
... " on page 71. NOTE During the internal storage drive recovery process it is turned off. 2 Press and hold the 0 (zero) key on your keyboard while powering on your computer be connected to step 4. You can recover the C: drive without changing the internal storage drive ...computer's internal storage drive: 1 Make sure the computer is strongly recommended that all information stored on them will remain intact and any key on page 106). A confirmation message displays reminding you have created such media. Recovering without changing the internal storage drive partitions Recovering ...
... " on page 71. NOTE During the internal storage drive recovery process it is turned off. 2 Press and hold the 0 (zero) key on your keyboard while powering on your computer be connected to step 4. You can recover the C: drive without changing the internal storage drive ...computer's internal storage drive: 1 Make sure the computer is strongly recommended that all information stored on them will remain intact and any key on page 106). A confirmation message displays reminding you have created such media. Recovering without changing the internal storage drive partitions Recovering ...
User Manual
Page 68
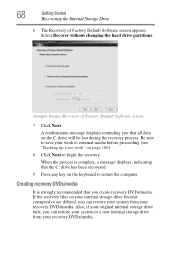
... external media before proceeding (see "Backing up your recovery DVDs/media. When the process is strongly recommended that the C: drive has been recovered. 9 Press any key on page 106). 8 Click Next to restart the computer. Creating recovery DVDs/media It is complete, a message displays, indicating that you can restore your system...
... external media before proceeding (see "Backing up your recovery DVDs/media. When the process is strongly recommended that the C: drive has been recovered. 9 Press any key on page 106). 8 Click Next to restart the computer. Creating recovery DVDs/media It is complete, a message displays, indicating that you can restore your system...
User Manual
Page 72
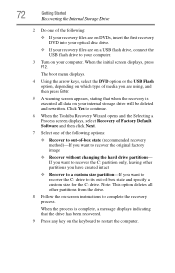
Click Yes to continue. 6 When the Toshiba Recovery Wizard opens and the Selecting a Process screen displays, select Recovery of Factory...using, and then press Enter. 5 A warning screen appears, stating that the drive has been recovered. 9 Press any key on the keyboard to restart the computer. Note: This option deletes all data on your internal storage drive will be ...deleted and rewritten. The boot menu displays. 4 Using the arrow keys, select the DVD option or the USB Flash option, depending on which type of media you want to recover...
Click Yes to continue. 6 When the Toshiba Recovery Wizard opens and the Selecting a Process screen displays, select Recovery of Factory...using, and then press Enter. 5 A warning screen appears, stating that the drive has been recovered. 9 Press any key on the keyboard to restart the computer. Note: This option deletes all data on your internal storage drive will be ...deleted and rewritten. The boot menu displays. 4 Using the arrow keys, select the DVD option or the USB Flash option, depending on which type of media you want to recover...
User Manual
Page 73
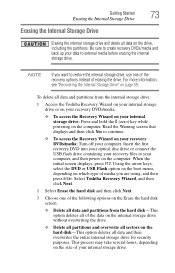
...of the following options on the Erase the hard disk screen: ❖ Delete all data and partitions from the internal storage drive: 1 Access the Toshiba Recovery Wizard on your internal storage drive or on your recovery DVDs/media. ❖ To access the Recovery Wizard on your internal storage drive: ... and then click Yes to your computer. Using the arrow keys, select the DVD or USB Flash option on the boot menu, depending on the hard disk-This option deletes all sectors on which type of erasing the drive. Select Toshiba Recovery Wizard, and then click Next. 2 Select Erase the...
...of the following options on the Erase the hard disk screen: ❖ Delete all data and partitions from the internal storage drive: 1 Access the Toshiba Recovery Wizard on your internal storage drive or on your recovery DVDs/media. ❖ To access the Recovery Wizard on your internal storage drive: ... and then click Yes to your computer. Using the arrow keys, select the DVD or USB Flash option on the boot menu, depending on the hard disk-This option deletes all sectors on which type of erasing the drive. Select Toshiba Recovery Wizard, and then click Next. 2 Select Erase the...
User Manual
Page 74
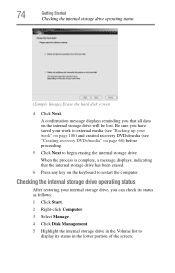
... internal storage drive in the lower portion of the screen. A confirmation message displays reminding you that the internal storage drive has been erased. 6 Press any key on the internal storage drive will be lost.
... internal storage drive in the lower portion of the screen. A confirmation message displays reminding you that the internal storage drive has been erased. 6 Press any key on the internal storage drive will be lost.
User Manual
Page 81
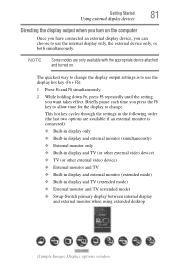
The quickest way to use the internal display only, the external device only, or both simultaneously. This hot key cycles through the settings in display and TV (extended mode) ❖ External monitor and TV (extended mode) ❖ Swap-Switch primary display between internal display ... the appropriate device attached and turned on the computer Once you have connected an external display device, you can choose to use the display hot key (Fn + F5): 1 Press Fn and F5 simultaneously. 2 While holding down Fn, press F5 repeatedly until the setting you press the F5...
The quickest way to use the internal display only, the external device only, or both simultaneously. This hot key cycles through the settings in display and TV (extended mode) ❖ External monitor and TV (extended mode) ❖ Swap-Switch primary display between internal display ... the appropriate device attached and turned on the computer Once you have connected an external display device, you can choose to use the display hot key (Fn + F5): 1 Press Fn and F5 simultaneously. 2 While holding down Fn, press F5 repeatedly until the setting you press the F5...
User Manual
Page 82
... an external keyboard If you can attach one from your computer through the USB ports. 82 Getting Started Using an external keyboard 3 Release the Fn key. Read the documentation that came with your printer. To make the connection, you may need a suitable USB cable which may automatically recognize the printer; You...
... an external keyboard If you can attach one from your computer through the USB ports. 82 Getting Started Using an external keyboard 3 Release the Fn key. Read the documentation that came with your printer. To make the connection, you may need a suitable USB cable which may automatically recognize the printer; You...
User Manual
Page 97
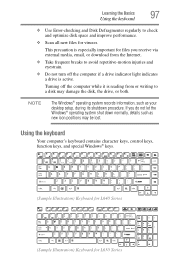
... information, such as new icon positions may damage the disk, the drive, or both. Using the keyboard Your computer's keyboard contains character keys, control keys, function keys, and special Windows® keys. (Sample Illustration) Keyboard for L640 Series (Sample Illustration) Keyboard for files you do not let the Windows® operating system shut down...
... information, such as new icon positions may damage the disk, the drive, or both. Using the keyboard Your computer's keyboard contains character keys, control keys, function keys, and special Windows® keys. (Sample Illustration) Keyboard for L640 Series (Sample Illustration) Keyboard for files you do not let the Windows® operating system shut down...
User Manual
Page 98
...a print screen of the time, this does not matter. A standard full-size keyboard includes two Enter, Ctrl, and Alt keys; cursor positioning keys; Using the Fn key, you to emulate a full-size keyboard. To capture only the active window displayed, press Fn + ALT while simultaneously pressing the... PRTSC key. (Sample Illustration) PRTSC key on a typewriter, except that: ❖ The space bar creates a space character instead of just passing over an area of the page. ...
...a print screen of the time, this does not matter. A standard full-size keyboard includes two Enter, Ctrl, and Alt keys; cursor positioning keys; Using the Fn key, you to emulate a full-size keyboard. To capture only the active window displayed, press Fn + ALT while simultaneously pressing the... PRTSC key. (Sample Illustration) PRTSC key on a typewriter, except that: ❖ The space bar creates a space character instead of just passing over an area of the page. ...
User Manual
Page 99
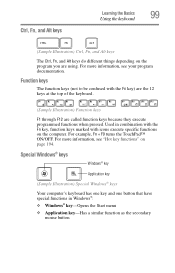
... function as the secondary mouse button Special Windows® keys Windows® key Application key (Sample Illustration) Special Windows® keys Your computer's keyboard has one key and one button that have special functions in combination with the Fn key, function keys marked with the Fn key) are the 12 keys at the top of the keyboard. (Sample Illustration...
... function as the secondary mouse button Special Windows® keys Windows® key Application key (Sample Illustration) Special Windows® keys Your computer's keyboard has one key and one button that have special functions in combination with the Fn key, function keys marked with the Fn key) are the 12 keys at the top of the keyboard. (Sample Illustration...
User Manual
Page 100
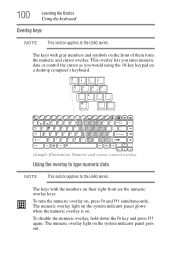
... overlay is on , press Fn and F11 simultaneously. This overlay lets you enter numeric data or control the cursor as you would using the 10-key keypad on the system indicator panel goes out. The numeric overlay light on a desktop computer's keyboard. (Sample Illustration) Numeric and cursor control overlay Using the... overlay to type numeric data NOTE This section applies to the L640 series. To disable the numeric overlay, hold down the Fn key and press F11 again. The keys with the numbers on the front of them form the numeric and cursor overlay.
... overlay is on , press Fn and F11 simultaneously. This overlay lets you enter numeric data or control the cursor as you would using the 10-key keypad on the system indicator panel goes out. The numeric overlay light on a desktop computer's keyboard. (Sample Illustration) Numeric and cursor control overlay Using the... overlay to type numeric data NOTE This section applies to the L640 series. To disable the numeric overlay, hold down the Fn key and press F11 again. The keys with the numbers on the front of them form the numeric and cursor overlay.
User Manual
Page 101
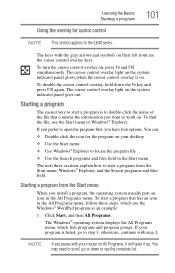
..., you prefer to see the complete list. If you have four options. The cursor control overlay light on . The keys with your mouse on All Programs, it up or down the Fn key and press F10 again. To turn the cursor control overlay on their left front are the cursor control overlay...
..., you prefer to see the complete list. If you have four options. The cursor control overlay light on . The keys with your mouse on All Programs, it up or down the Fn key and press F10 again. To turn the cursor control overlay on their left front are the cursor control overlay...
User Manual
Page 108
... video signal. NOTE Use of the audio signal, use the internal speakers, click on the Speakers tab and click Set Default. ❖ Use the arrow keys on your keyboard to simultaneous.
... video signal. NOTE Use of the audio signal, use the internal speakers, click on the Speakers tab and click Set Default. ❖ Use the arrow keys on your keyboard to simultaneous.


