User Manual
Page 50
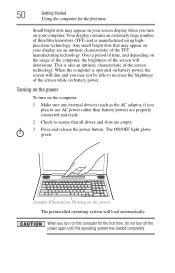
...technology. Over a period of time, and depending on your display are properly connected and ready. 2 Check to increase the brightness of the screen while on battery power. When you turn on the power The preinstalled operating system will deteriorate. When the computer is operated on your computer.... Your display contains an extremely large number of thin-film transistors (TFT) and is also an intrinsic characteristic of the screen technology. The ON/OFF light glows green. (Sample Illustration) Turning on the computer for the first time Small bright dots may appear ...
...technology. Over a period of time, and depending on your display are properly connected and ready. 2 Check to increase the brightness of the screen while on battery power. When you turn on the power The preinstalled operating system will deteriorate. When the computer is operated on your computer.... Your display contains an extremely large number of thin-film transistors (TFT) and is also an intrinsic characteristic of the screen technology. The ON/OFF light glows green. (Sample Illustration) Turning on the computer for the first time Small bright dots may appear ...

User Manual
Page 51
... time you may vary according to your software setup choices. Adding optional external devices NOTE Before adding external devices or memory, Toshiba recommends setting up your software. Follow the on-screen instructions. The first time you turn off the power again until the operating system has loaded completely. Product registration can be...
... time you may vary according to your software setup choices. Adding optional external devices NOTE Before adding external devices or memory, Toshiba recommends setting up your software. Follow the on-screen instructions. The first time you turn off the power again until the operating system has loaded completely. Product registration can be...
User Manual
Page 58
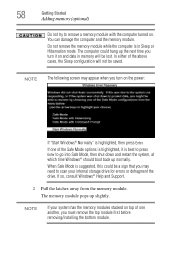
The computer could be saved. In either of the Safe Mode options is highlighted, it on . NOTE The following screen may appear when you may need to go into Safe Mode, then shut down and restart the system, at which time Windows® should boot ...
The computer could be saved. In either of the Safe Mode options is highlighted, it on . NOTE The following screen may appear when you may need to go into Safe Mode, then shut down and restart the system, at which time Windows® should boot ...
User Manual
Page 62
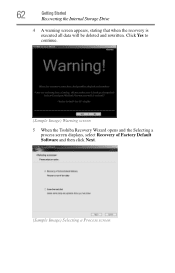
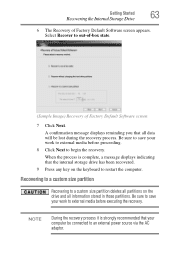
Click Yes to continue. (Sample Image) Warning screen 5 When the Toshiba Recovery Wizard opens and the Selecting a process screen displays, select Recovery of Factory Default Software and then click Next. (Sample Image) Selecting a Process screen 62 Getting Started Recovering the Internal Storage Drive 4 A warning screen appears, stating that when the recovery is executed all data will be deleted and rewritten.
Click Yes to continue. (Sample Image) Warning screen 5 When the Toshiba Recovery Wizard opens and the Selecting a process screen displays, select Recovery of Factory Default Software and then click Next. (Sample Image) Selecting a Process screen 62 Getting Started Recovering the Internal Storage Drive 4 A warning screen appears, stating that when the recovery is executed all data will be deleted and rewritten.
User Manual
Page 63
... that all information stored in those partitions. Be sure to save your work to out-of-box state. (Sample Image) Recovery of Factory Default Software screen appears. A confirmation message displays reminding you that your computer be lost during the recovery process. Getting Started 63 Recovering the Internal Storage Drive 6 The Recovery...
... that all information stored in those partitions. Be sure to save your work to out-of-box state. (Sample Image) Recovery of Factory Default Software screen appears. A confirmation message displays reminding you that your computer be lost during the recovery process. Getting Started 63 Recovering the Internal Storage Drive 6 The Recovery...

User Manual
Page 64
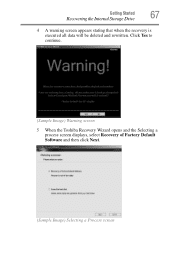
To recover using the first method, follow the procedure below. Click Yes to step 4. 4 A warning screen appears, stating that when the recovery is turned off. 2 Press and hold the 0 (zero) key on your keyboard while powering on the computer. 3 If your ... DVDs/media" on your system offers a choice of -box state, and allows you have created such media. If not, skip to continue. (Sample Image) Warning screen You can resize and recover the C: drive using recovery DVDs/media, if you to specify the size for the C: partition. To resize and recover the...
To recover using the first method, follow the procedure below. Click Yes to step 4. 4 A warning screen appears, stating that when the recovery is turned off. 2 Press and hold the 0 (zero) key on your keyboard while powering on the computer. 3 If your ... DVDs/media" on your system offers a choice of -box state, and allows you have created such media. If not, skip to continue. (Sample Image) Warning screen You can resize and recover the C: drive using recovery DVDs/media, if you to specify the size for the C: partition. To resize and recover the...

User Manual
Page 65
Getting Started 65 Recovering the Internal Storage Drive 5 When the Toshiba Recovery Wizard opens and the Selecting a process screen displays, select Recovery of Factory Default Software and then click Next. (Sample Image) Selecting a Process screen 6 The Recovery of drive C: field to set the partition size. Select Recover to a custom size portion. (Sample Image) Recovery of Factory Default Software screen 7 Use the on-screen arrow buttons in The size of Factory Default Software screen appears.
Getting Started 65 Recovering the Internal Storage Drive 5 When the Toshiba Recovery Wizard opens and the Selecting a process screen displays, select Recovery of Factory Default Software and then click Next. (Sample Image) Selecting a Process screen 6 The Recovery of drive C: field to set the partition size. Select Recover to a custom size portion. (Sample Image) Recovery of Factory Default Software screen 7 Use the on-screen arrow buttons in The size of Factory Default Software screen appears.
User Manual
Page 67
Getting Started 67 Recovering the Internal Storage Drive 4 A warning screen appears stating that when the recovery is executed all data will be deleted and rewritten. Click Yes to continue. (Sample Image) Warning screen 5 When the Toshiba Recovery Wizard opens and the Selecting a process screen displays, select Recovery of Factory Default Software and then click Next. (Sample Image) Selecting a Process screen
Getting Started 67 Recovering the Internal Storage Drive 4 A warning screen appears stating that when the recovery is executed all data will be deleted and rewritten. Click Yes to continue. (Sample Image) Warning screen 5 When the Toshiba Recovery Wizard opens and the Selecting a process screen displays, select Recovery of Factory Default Software and then click Next. (Sample Image) Selecting a Process screen

User Manual
Page 68
... has been recovered. 9 Press any key on your computer's internal storage drive. When the process is not a writable drive, contact Toshiba Customer Support to restart the computer. Creating recovery DVDs/media Depending on the keyboard to obtain the Recovery media for your internal storage drive... have been deleted from your system. 68 Getting Started Recovering the Internal Storage Drive 6 The Recovery of Factory Default Software screen 7 Click Next. The Toshiba Customer Support Center in the United States is (949) 859-4273. NOTE The system will be able to copy the ...
... has been recovered. 9 Press any key on your computer's internal storage drive. When the process is not a writable drive, contact Toshiba Customer Support to restart the computer. Creating recovery DVDs/media Depending on the keyboard to obtain the Recovery media for your internal storage drive... have been deleted from your system. 68 Getting Started Recovering the Internal Storage Drive 6 The Recovery of Factory Default Software screen 7 Click Next. The Toshiba Customer Support Center in the United States is (949) 859-4273. NOTE The system will be able to copy the ...

User Manual
Page 69
...drive recovery process it is strongly recommended that you will know in which order to insert the discs during recovery. 6 Follow the on-screen prompts to complete the copy process. NOTE As you create your computer be sure to label each item's Name-recovery files, applications (original... "Restoring from your internal storage drive. Getting Started 69 Recovering the Internal Storage Drive To create recovery DVDs/media: 1 Click Start, All Programs, TOSHIBA, and then Recovery Media Creator. 2 Select DVD (to create Recovery media on DVD). 3 Select the items you want to copy to DVD by...
...drive recovery process it is strongly recommended that you will know in which order to insert the discs during recovery. 6 Follow the on-screen prompts to complete the copy process. NOTE As you create your computer be sure to label each item's Name-recovery files, applications (original... "Restoring from your internal storage drive. Getting Started 69 Recovering the Internal Storage Drive To create recovery DVDs/media: 1 Click Start, All Programs, TOSHIBA, and then Recovery Media Creator. 2 Select DVD (to create Recovery media on DVD). 3 Select the items you want to copy to DVD by...

User Manual
Page 70
... its out-of-box state and specify a custom size for the C: drive. Click Yes to continue. 7 When the Toshiba Recovery Wizard opens and the Selecting a Process screen displays, select Recovery of Factory Default Software and then click Next. 8 Select one at this time. To recover your internal...options, see "Recovering the Internal Storage Drive" on the computer. 2 When the initial screen displays, press F12. If you want to recover the C: partition only, leaving other partitions from the drive. Select Toshiba Recovery Wizard and then click Next. 5 If your optical drive and power on page ...
... its out-of-box state and specify a custom size for the C: drive. Click Yes to continue. 7 When the Toshiba Recovery Wizard opens and the Selecting a Process screen displays, select Recovery of Factory Default Software and then click Next. 8 Select one at this time. To recover your internal...options, see "Recovering the Internal Storage Drive" on the computer. 2 When the initial screen displays, press F12. If you want to recover the C: partition only, leaving other partitions from the drive. Select Toshiba Recovery Wizard and then click Next. 5 If your optical drive and power on page ...
User Manual
Page 71
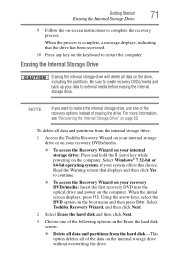
...174; 7 32-bit or 64-bit operating system, if your data to create recovery DVDs/media and back up your system offers this choice. Select Toshiba Recovery Wizard, and then click Next. 2 Select Erase the hard disk and then click Next. 3 Choose one of the recovery options instead of ...the following options on the Erase the hard disk screen: ❖ Delete all data and partitions from the internal storage drive: 1 Access the Toshiba Recovery Wizard on your internal storage drive or on your recovery DVDs/media. ❖ To access the ...
...174; 7 32-bit or 64-bit operating system, if your data to create recovery DVDs/media and back up your system offers this choice. Select Toshiba Recovery Wizard, and then click Next. 2 Select Erase the hard disk and then click Next. 3 Choose one of the recovery options instead of ...the following options on the Erase the hard disk screen: ❖ Delete all data and partitions from the internal storage drive: 1 Access the Toshiba Recovery Wizard on your internal storage drive or on your recovery DVDs/media. ❖ To access the ...
User Manual
Page 72
...have saved your internal storage drive, you that the internal storage drive has been erased. 6 Press any key on the size of the screen. 72 Getting Started Checking the internal storage drive operating status ❖ Delete all partitions and overwrite all sectors on the hard disk-This ... drive in the Volume list to display its status in the lower portion of your internal storage drive. (Sample Image) Erase the hard disk screen 4 Click Next. Checking the internal storage drive operating status After restoring your work to external media before proceeding. 5 Click Next to restart the...
...have saved your internal storage drive, you that the internal storage drive has been erased. 6 Press any key on the size of the screen. 72 Getting Started Checking the internal storage drive operating status ❖ Delete all partitions and overwrite all sectors on the hard disk-This ... drive in the Volume list to display its status in the lower portion of your internal storage drive. (Sample Image) Erase the hard disk screen 4 Click Next. Checking the internal storage drive operating status After restoring your work to external media before proceeding. 5 Click Next to restart the...
User Manual
Page 73
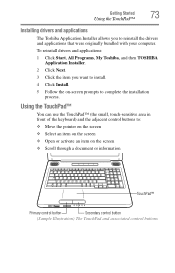
... that were originally bundled with your computer. Getting Started 73 Using the TouchPad™ Installing drivers and applications The Toshiba Application Installer allows you want to install. 4 Click Install. 5 Follow the on the screen ❖ Scroll through a document or information TouchPad™ Primary control button Secondary control button (Sample Illustration) The TouchPad...
... that were originally bundled with your computer. Getting Started 73 Using the TouchPad™ Installing drivers and applications The Toshiba Application Installer allows you want to install. 4 Click Install. 5 Follow the on the screen ❖ Scroll through a document or information TouchPad™ Primary control button Secondary control button (Sample Illustration) The TouchPad...

User Manual
Page 74
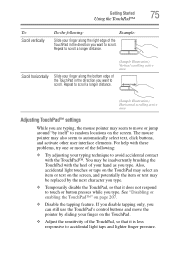
NOTE The pointer is the icon (usually an arrow) that moves on the screen when you want to move the pointer. To move a mouse connected to your computer. Check your finger across the TouchPad in the pointer direction you ...want to right-click. 2 Press and release the secondary control button. This feature varies by program. To: Do the following: Example: Move the on-screen Slide your finger across the TouchPad or move the pointer a longer distance, slide your finger several times across the TouchPad in the preferred direction. (Sample...
NOTE The pointer is the icon (usually an arrow) that moves on the screen when you want to move the pointer. To move a mouse connected to your computer. Check your finger across the TouchPad in the pointer direction you ...want to right-click. 2 Press and release the secondary control button. This feature varies by program. To: Do the following: Example: Move the on-screen Slide your finger across the TouchPad or move the pointer a longer distance, slide your finger several times across the TouchPad in the preferred direction. (Sample...
User Manual
Page 75
...light taps and lighter finger pressure. You may also seem to scroll. Repeat to scroll. See "Disabling or enabling the TouchPad™" on the screen. If you disable tapping only, you can still use the TouchPad's control buttons and move or jump around "by sliding your finger along the .... The mouse pointer may be replaced by the next character you want to scroll a longer distance. Scroll horizontally Slide your finger on the screen, and potentially the item or text may seem to move the pointer by itself" to avoid accidental contact with the heel of the TouchPad ...
...light taps and lighter finger pressure. You may also seem to scroll. Repeat to scroll. See "Disabling or enabling the TouchPad™" on the screen. If you disable tapping only, you can still use the TouchPad's control buttons and move or jump around "by sliding your finger along the .... The mouse pointer may be replaced by the next character you want to scroll a longer distance. Scroll horizontally Slide your finger on the screen, and potentially the item or text may seem to move the pointer by itself" to avoid accidental contact with the heel of the TouchPad ...

User Manual
Page 77
... will automatically detect the external display device. To do this: 1 Read the directions that came with the monitor to see if you first need a larger screen. Connecting an HDMI™-compatible television or VCR/DVD player To connect an HDMI™-compatible television or VCR/DVD player to the computer: ❖...
... will automatically detect the external display device. To do this: 1 Read the directions that came with the monitor to see if you first need a larger screen. Connecting an HDMI™-compatible television or VCR/DVD player To connect an HDMI™-compatible television or VCR/DVD player to the computer: ❖...

User Manual
Page 80
... the power button before completing the following procedure. If you turn off . The Add Printer Wizard appears. (Sample Image) Add Printer Wizard 2 Follow the on-screen instructions to lose your printer. Setting up your work.
... the power button before completing the following procedure. If you turn off . The Add Printer Wizard appears. (Sample Image) Add Printer Wizard 2 Follow the on-screen instructions to lose your printer. Setting up your work.
User Manual
Page 84
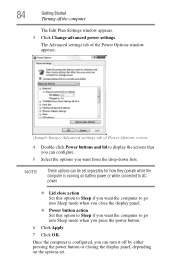
The Advanced settings tab of the Power Options window appears. (Sample Image) Advanced settings tab of Power Options screen 4 Double-click Power buttons and lid to go into Sleep mode when you close the display panel. ❖ Power button action Set this option to ...
The Advanced settings tab of the Power Options window appears. (Sample Image) Advanced settings tab of Power Options screen 4 Double-click Power buttons and lid to go into Sleep mode when you close the display panel. ❖ Power button action Set this option to ...
User Manual
Page 86
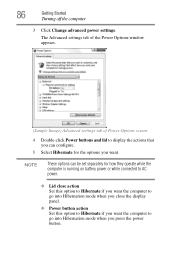
... the computer 3 Click Change advanced power settings. The Advanced settings tab of the Power Options window appears. (Sample Image) Advanced settings tab of Power Options screen 4 Double-click Power buttons and lid to go into Hibernation mode when you want.
... the computer 3 Click Change advanced power settings. The Advanced settings tab of the Power Options window appears. (Sample Image) Advanced settings tab of Power Options screen 4 Double-click Power buttons and lid to go into Hibernation mode when you want.


