Toshiba Satellite L505D-S5987 Research
View Results Below
Free Toshiba Satellite L505D-S5987 manuals!
Problems with Toshiba Satellite L505D-S5987?
Ask a Question
Free Toshiba Satellite L505D-S5987 manuals!
Problems with Toshiba Satellite L505D-S5987?
Ask a Question
Related Manual Pages

Similar Questions

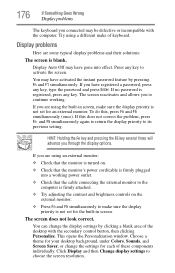
Blank Screen -'lighted Keyboard And Sound...how Do I Get The Display To Come Bac
My Toshiba Satellite Radius P55W B5220 had a keyboard that lights up and there is sound but the scre...
My Toshiba Satellite Radius P55W B5220 had a keyboard that lights up and there is sound but the scre...
(Posted by SOARBUTTERFLY7400 7 years ago)

Black Screen Power Button Lights
power button lights up and the cde drive lights flash and it spins but the screen iscompletely black...
power button lights up and the cde drive lights flash and it spins but the screen iscompletely black...
(Posted by sherriehornewilliams 10 years ago)

How Do I Set Up The Wifi On The Satellite C675
Set up my wifi on the satellite c675-s7104
Set up my wifi on the satellite c675-s7104
(Posted by vvstevensonvs 11 years ago)