User Guide
Page 2
...may not function properly and you purchased may lose data or suffer other damage. Model: Satellite®/Satellite Pro® L40/L50/L70/ S40/ S50/S70 - TOSHIBA AMERICA INFORMATION SYSTEMS, INC. ("TOSHIBA"), ITS AFFILIATES AND SUPPLIERS DO NOT WARRANT THAT OPERATION OF THE PRODUCT WILL BE UNINTERRUPTED ...OR ERROR FREE. TOSHIBA DISCLAIMS ANY LIABILITY FOR THE FAILURE TO COPY OR TRANSFER THE DATA CORRECTLY. Protection of Stored Data For your important data, please make periodic back-up and usage instructions in the applicable user guides and/or manuals enclosed or provided ...
...may not function properly and you purchased may lose data or suffer other damage. Model: Satellite®/Satellite Pro® L40/L50/L70/ S40/ S50/S70 - TOSHIBA AMERICA INFORMATION SYSTEMS, INC. ("TOSHIBA"), ITS AFFILIATES AND SUPPLIERS DO NOT WARRANT THAT OPERATION OF THE PRODUCT WILL BE UNINTERRUPTED ...OR ERROR FREE. TOSHIBA DISCLAIMS ANY LIABILITY FOR THE FAILURE TO COPY OR TRANSFER THE DATA CORRECTLY. Protection of Stored Data For your important data, please make periodic back-up and usage instructions in the applicable user guides and/or manuals enclosed or provided ...
User Guide
Page 15
... to change without notice. Department of the U.S. Notice The information contained in contravention of Commerce prior to export. TOSHIBA CORPORATION AND TOSHIBA AMERICA INFORMATION SYSTEMS, INC. (TOSHIBA) PROVIDES NO WARRANTY WITH REGARD TO THIS MANUAL OR ANY OTHER INFORMATION CONTAINED HEREIN AND HEREBY EXPRESSLY DISCLAIMS ANY IMPLIED WARRANTIES OF MERCHANTABILITY OR FITNESS FOR ANY...
... to change without notice. Department of the U.S. Notice The information contained in contravention of Commerce prior to export. TOSHIBA CORPORATION AND TOSHIBA AMERICA INFORMATION SYSTEMS, INC. (TOSHIBA) PROVIDES NO WARRANTY WITH REGARD TO THIS MANUAL OR ANY OTHER INFORMATION CONTAINED HEREIN AND HEREBY EXPRESSLY DISCLAIMS ANY IMPLIED WARRANTIES OF MERCHANTABILITY OR FITNESS FOR ANY...
User Guide
Page 25
Visit http://www.energystar.gov or http://www.energystar.gov/powermanagement for copy protection. Toshiba requires its computer component suppliers to meet RoHS requirements and verifies its retail version (if available), and may not include user manuals or all your equipment needs, which restricts use of lead, cadmium, mercury, hexavalent chromium, PBB, and...
Visit http://www.energystar.gov or http://www.energystar.gov/powermanagement for copy protection. Toshiba requires its computer component suppliers to meet RoHS requirements and verifies its retail version (if available), and may not include user manuals or all your equipment needs, which restricts use of lead, cadmium, mercury, hexavalent chromium, PBB, and...

User Guide
Page 27
... Provides important information. Indicates a potentially hazardous situation which , if not avoided, will result in death or serious injury. Introduction Safety icons 27 Safety icons This manual contains safety instructions that must be observed to avoid potential hazards that could result in death or serious injury.
... Provides important information. Indicates a potentially hazardous situation which , if not avoided, will result in death or serious injury. Introduction Safety icons 27 Safety icons This manual contains safety instructions that must be observed to avoid potential hazards that could result in death or serious injury.
User Guide
Page 67
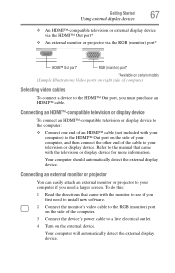
..., and then connect the other end of an HDMI™ cable (not included with the television or display device for more information. Refer to the manual that came with your computer) to see if you first need a larger screen. To do this: 1 Read the directions that came with the monitor to...
..., and then connect the other end of an HDMI™ cable (not included with the television or display device for more information. Refer to the manual that came with your computer) to see if you first need a larger screen. To do this: 1 Read the directions that came with the monitor to...
User Guide
Page 80
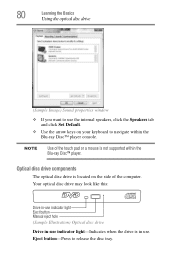
... is located on your keyboard to release the disc tray. Your optical disc drive may look like this: Drive in-use indicator light Eject button Manual eject hole (Sample Illustration) Optical disc drive Drive in-use indicator light-Indicates when the drive is in use the internal speakers, click the Speakers...
... is located on your keyboard to release the disc tray. Your optical disc drive may look like this: Drive in-use indicator light Eject button Manual eject hole (Sample Illustration) Optical disc drive Drive in-use indicator light-Indicates when the drive is in use the internal speakers, click the Speakers...
User Guide
Page 81
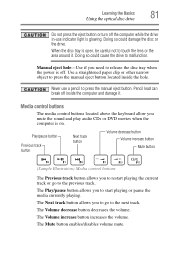
...the optical disc drive Do not press the eject button or turn off the computer while the drive in-use a pencil to press the manual eject button. Play/pause button Previous track button Next track button Volume decrease button Volume increase button Mute button (Sample Illustration) Media control ...buttons The Previous track button allows you to release the disc tray when the power is on. Manual eject hole-Use if you need to start playing or pause the media currently playing. The Volume decrease button decreases the volume. Doing so...
...the optical disc drive Do not press the eject button or turn off the computer while the drive in-use a pencil to press the manual eject button. Play/pause button Previous track button Next track button Volume decrease button Volume increase button Mute button (Sample Illustration) Media control ...buttons The Previous track button allows you to release the disc tray when the power is on. Manual eject hole-Use if you need to start playing or pause the media currently playing. The Volume decrease button decreases the volume. Doing so...
User Guide
Page 82
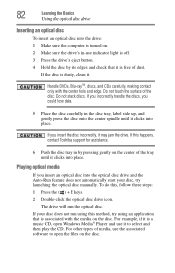
... lose data. 5 Place the disc carefully in by its edges and check that is associated with the center hole and edge. If this happens, contact Toshiba support for assistance. 6 Push the disc tray in the disc tray, label side up, and gently press the disc onto the center spindle until it... insert an optical disc into the drive: 1 Make sure the computer is turned on the disc. To do this method, try launching the optical disc manually. Do not touch the surface of the tray until it is free of media, use indicator light is off. 3 Press the drive's eject button. 4 Hold...
... lose data. 5 Place the disc carefully in by its edges and check that is associated with the center hole and edge. If this happens, contact Toshiba support for assistance. 6 Push the disc tray in the disc tray, label side up, and gently press the disc onto the center spindle until it... insert an optical disc into the drive: 1 Make sure the computer is turned on the disc. To do this method, try launching the optical disc manually. Do not touch the surface of the tray until it is free of media, use indicator light is off. 3 Press the drive's eject button. 4 Hold...

User Guide
Page 84
...disc tray slides partially out of online sites to which you up to date with future upgrades. Toshiba's online resources Toshiba maintains a number of the drive. These sites provide information about Toshiba products, give help with technical questions and keep you can break off : 1 Insert a slender... object, such as a straightened paper clip, into the manual eject hole. Never use a pencil to press the manual eject button. Pencil lead can connect. 84 Learning the Basics Toshiba's online resources Removing a disc with the computer off To remove a disc with ...
...disc tray slides partially out of online sites to which you up to date with future upgrades. Toshiba's online resources Toshiba maintains a number of the drive. These sites provide information about Toshiba products, give help with technical questions and keep you can break off : 1 Insert a slender... object, such as a straightened paper clip, into the manual eject hole. Never use a pencil to press the manual eject button. Pencil lead can connect. 84 Learning the Basics Toshiba's online resources Removing a disc with the computer off To remove a disc with ...
User Guide
Page 100
... accessible battery read the following disposal information. The life of used batteries For models with your computer Disposing of used battery packs in the User's Manual. Toshiba is dedicated to preserving the environment by throwing it into a fire, and never allow exposure to explode and/or release caustic liquid, both which may...
... accessible battery read the following disposal information. The life of used batteries For models with your computer Disposing of used battery packs in the User's Manual. Toshiba is dedicated to preserving the environment by throwing it into a fire, and never allow exposure to explode and/or release caustic liquid, both which may...

User Guide
Page 101
... wireless communication, use the F12 key. Contact your computer through airport security equipment. For more information or visit Toshiba's Web site at accessories.toshiba.com. Mobile Computing Traveling tips 101 Traveling tips The environmental precautions listed in a carrying case. They all provide... plenty of carrying cases for manuals, power cords, and compact discs. The X-ray equipment will not harm your computer has wireless LAN capability. Toshiba offers a choice of extra space for the computer. NOTE Before using ...
... wireless communication, use the F12 key. Contact your computer through airport security equipment. For more information or visit Toshiba's Web site at accessories.toshiba.com. Mobile Computing Traveling tips 101 Traveling tips The environmental precautions listed in a carrying case. They all provide... plenty of carrying cases for manuals, power cords, and compact discs. The X-ray equipment will not harm your computer has wireless LAN capability. Toshiba offers a choice of extra space for the computer. NOTE Before using ...
User Guide
Page 133
... responds differently from depending on the severity of the problem and your level of the computer. 3 If the specifications do match, contact Toshiba. Using Startup options to fix problems If the operating system fails to start properly twice, the Windows® Boot menu will launch. If... Operating System and/or its settings. If Windows® fails to your computer. To enter the Boot menu manually: 1 Press Ctrl, Alt, and Del simultaneously (once). See "Contacting Toshiba" on the bottom of these problems, use the AC adaptor that shipped with computers. Unless a hardware device has...
... responds differently from depending on the severity of the problem and your level of the computer. 3 If the specifications do match, contact Toshiba. Using Startup options to fix problems If the operating system fails to start properly twice, the Windows® Boot menu will launch. If... Operating System and/or its settings. If Windows® fails to your computer. To enter the Boot menu manually: 1 Press Ctrl, Alt, and Del simultaneously (once). See "Contacting Toshiba" on the bottom of these problems, use the AC adaptor that shipped with computers. Unless a hardware device has...
User Guide
Page 134
... the Restart option from the menu. 4 Click or touch Troubleshoot from discs or Web sites are removed ❖ A list of removed apps is installed ❖ Manually by the user System Image Recovery Windows® will "Recover" the Operating system using a specific image provided by the user.
... the Restart option from the menu. 4 Click or touch Troubleshoot from discs or Web sites are removed ❖ A list of removed apps is installed ❖ Manually by the user System Image Recovery Windows® will "Recover" the Operating system using a specific image provided by the user.
User Guide
Page 145
...in the Control Panel. Make sure the computer is with your system may not support this function. If the problem is connected to press the manual eject button. If Something Goes Wrong Optical disc drive problems 145 You press the disc eject button, but others do not. Make sure a ...the audio signal in Sound properties in the small hole next to remove a disc and cannot turn on the computer (for your computer at support.toshiba.com. High Definition content via the Blu-ray Disc™ (available on an external monitor, your optical disc drive. If viewing High Definition content...
...in the Control Panel. Make sure the computer is with your system may not support this function. If the problem is connected to press the manual eject button. If Something Goes Wrong Optical disc drive problems 145 You press the disc eject button, but others do not. Make sure a ...the audio signal in Sound properties in the small hole next to remove a disc and cannot turn on the computer (for your computer at support.toshiba.com. High Definition content via the Blu-ray Disc™ (available on an external monitor, your optical disc drive. If viewing High Definition content...
User Guide
Page 151
... features to reformat your internal storage drive and start again, reloading all of self-help books you purchase. Data and system configuration backup in the manuals. Here are some easy-to-use features for backing up your Windows® settings and your programs and data files from much more difficult and...
... features to reformat your internal storage drive and start again, reloading all of self-help books you purchase. Data and system configuration backup in the manuals. Here are some easy-to-use features for backing up your Windows® settings and your programs and data files from much more difficult and...
User Guide
Page 183
...76 moving the computer 70 N network accessing 107 connecting your computer 107 networking wireless 107 notification area 105 notifications 106 O online resources Toshiba 84 optical disc Auto-Run feature 82 handling 82 inserting 82 playing optical media 82 positioning 82 recording optical media 83 removing with computer...optical disc drive components 80 drive in-use indicator light 80 eject button 80 handling an optical disc 82 inserting an optical disc 82 manual eject hole 81 playing optical media 82 recording optical media 83 removing a disc 83, 84 troubleshooting 144 using 78, 80 optical ...
...76 moving the computer 70 N network accessing 107 connecting your computer 107 networking wireless 107 notification area 105 notifications 106 O online resources Toshiba 84 optical disc Auto-Run feature 82 handling 82 inserting 82 playing optical media 82 positioning 82 recording optical media 83 removing with computer...optical disc drive components 80 drive in-use indicator light 80 eject button 80 handling an optical disc 82 inserting an optical disc 82 manual eject hole 81 playing optical media 82 recording optical media 83 removing a disc 83, 84 troubleshooting 144 using 78, 80 optical ...


