Resource Guide
Page 3
..., DATA, NETWORK SYSTEMS OR REMOVABLE STORAGE MEDIA ARISING OUT OF OR RESULTING FROM THE USE OF THE PRODUCT, EVEN IF ADVISED OF THE POSSIBILITY THEREOF. Wash hands after handling. Protection of Stored Data For your important data, please make periodic back-up and usage instructions in the applicable user guides and/or manuals enclosed or provided electronically. Model: Satellite Pro® L350 Series Recordable...
..., DATA, NETWORK SYSTEMS OR REMOVABLE STORAGE MEDIA ARISING OUT OF OR RESULTING FROM THE USE OF THE PRODUCT, EVEN IF ADVISED OF THE POSSIBILITY THEREOF. Wash hands after handling. Protection of Stored Data For your important data, please make periodic back-up and usage instructions in the applicable user guides and/or manuals enclosed or provided electronically. Model: Satellite Pro® L350 Series Recordable...
Resource Guide
Page 9
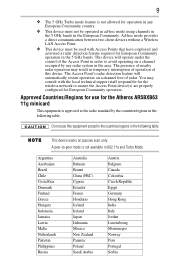
... Mode. This device works on a channel free of this equipment except in the countries/regions in the following table. A peer-to ensure the Access Point device(s) are properly configured for European Community operation. Ad-hoc mode provides a direct communication between two client devices without a Wireless LAN Access Point. ❖ This device must not be used with the local technical support staff responsible for the wireless network to -peer mode...
... Mode. This device works on a channel free of this equipment except in the countries/regions in the following table. A peer-to ensure the Access Point device(s) are properly configured for European Community operation. Ad-hoc mode provides a direct communication between two client devices without a Wireless LAN Access Point. ❖ This device must not be used with the local technical support staff responsible for the wireless network to -peer mode...

Resource Guide
Page 20
... computer ships with new ENERGY STAR® qualified models, we would save more information regarding the ENERGY STAR® Program. household and businesses replaced old computers with the power management options preset to a configuration that your computer is a partner in energy costs over the lifetime of ENERGY STAR®, saved about $14 billion dollars on using power management settings to conserve...
... computer ships with new ENERGY STAR® qualified models, we would save more information regarding the ENERGY STAR® Program. household and businesses replaced old computers with the power management options preset to a configuration that your computer is a partner in energy costs over the lifetime of ENERGY STAR®, saved about $14 billion dollars on using power management settings to conserve...

Resource Guide
Page 27
... to step 3. 1 Click Start, and then Turn off the computer using the Start menu. Before you install or remove a memory module while the computer is on may damage the computer, the module, or both. If only one or two memory modules. Avoid touching the cover, the module, and the surrounding area before replacing it must be hot. otherwise, skip to be installed, it . The operating system turns off computer or...
... to step 3. 1 Click Start, and then Turn off the computer using the Start menu. Before you install or remove a memory module while the computer is on may damage the computer, the module, or both. If only one or two memory modules. Avoid touching the cover, the module, and the surrounding area before replacing it must be hot. otherwise, skip to be installed, it . The operating system turns off computer or...
Resource Guide
Page 28
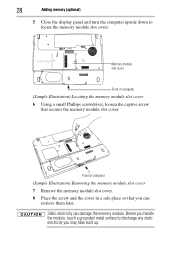
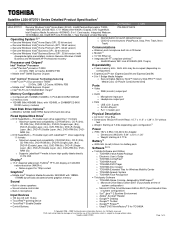
... retrieve them later. Front of computer (Sample Illustration) Locating the memory module slot cover 6 Using a small Phillips screwdriver, loosen the captive screw that you handle the module, touch a grounded metal surface to locate the memory module slot cover. Before you can damage the memory module. PLACE HOLDER Memory module slot cover Front of computer (Sample Illustration) Removing the memory module slot cover 7 Remove the memory module slot cover. 8 Place the screw and the cover in a safe place so that secures the memory module slot cover.
... retrieve them later. Front of computer (Sample Illustration) Locating the memory module slot cover 6 Using a small Phillips screwdriver, loosen the captive screw that you handle the module, touch a grounded metal surface to locate the memory module slot cover. Before you can damage the memory module. PLACE HOLDER Memory module slot cover Front of computer (Sample Illustration) Removing the memory module slot cover 7 Remove the memory module slot cover. 8 Place the screw and the cover in a safe place so that secures the memory module slot cover.
Resource Guide
Page 29
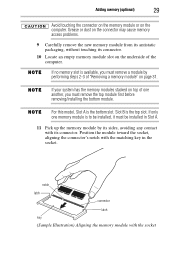
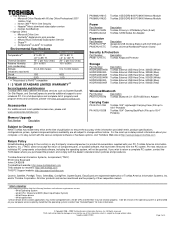
... one memory module is available, you must remove the top module first before removing/installing the bottom module. Adding memory (optional) 29 Avoid touching the connector on the memory module or on the connector may cause memory access problems. 9 Carefully remove the new memory module from its antistatic packaging, without touching its connector. Slot B is the bottom slot. notch latch connector latch key (Sample Illustration) Aligning the memory module with its connector. 10 Locate an empty memory module slot...
... one memory module is available, you must remove the top module first before removing/installing the bottom module. Adding memory (optional) 29 Avoid touching the connector on the memory module or on the connector may cause memory access problems. 9 Carefully remove the new memory module from its antistatic packaging, without touching its connector. Slot B is the bottom slot. notch latch connector latch key (Sample Illustration) Aligning the memory module with its connector. 10 Locate an empty memory module slot...
Resource Guide
Page 31
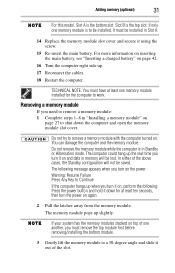
... using the screw. 15 Re-insert the main battery. In either of the slot. If your system has the memory modules stacked on page 27 to shut down for at least one another, you turn it down the computer and open the memory module slot cover. Do not try to remove a memory module: 1 Complete steps 1-8 in memory will not be installed in Standby or Hibernation mode. The memory module...
... using the screw. 15 Re-insert the main battery. In either of the slot. If your system has the memory modules stacked on page 27 to shut down for at least one another, you turn it down the computer and open the memory module slot cover. Do not try to remove a memory module: 1 Complete steps 1-8 in memory will not be installed in Standby or Hibernation mode. The memory module...

Resource Guide
Page 32
... card is operated on battery power, the screen will deteriorate. This is manufactured using the screw. 5 Re-insert the main battery. Any small bright dots that comes with the card to see "Inserting a charged battery" on your computer. TECHNICAL NOTE: You must have at least one memory module installed for the computer to the documentation that may appear on your screen display when you insert it using...
... card is operated on battery power, the screen will deteriorate. This is manufactured using the screw. 5 Re-insert the main battery. Any small bright dots that comes with the card to see "Inserting a charged battery" on your computer. TECHNICAL NOTE: You must have at least one memory module installed for the computer to the documentation that may appear on your screen display when you insert it using...
Resource Guide
Page 33
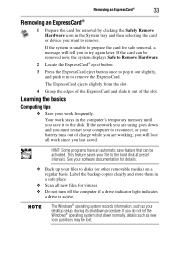
... the card or device you want to reconnect, or your battery runs out of charge while you are using goes down normally, details such as your desktop setup, during its shutdown procedure. If the system is unable to prepare the card for safe removal, a message will lose all new files for viruses. ❖ Do not turn off the computer if a drive indicator light indicates a drive is active.
... the card or device you want to reconnect, or your battery runs out of charge while you are using goes down normally, details such as your desktop setup, during its shutdown procedure. If the system is unable to prepare the card for safe removal, a message will lose all new files for viruses. ❖ Do not turn off the computer if a drive indicator light indicates a drive is active.
Resource Guide
Page 35
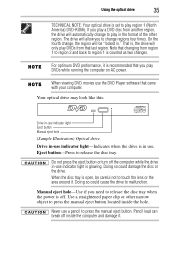
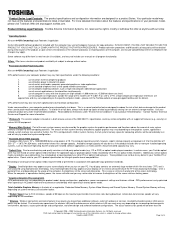
... viewing DVD movies use indicator light is counted as two changes. Your optical drive may look like this: Drive in-use indicator light Eject button Manual eject hole (Sample Illustration) Optical drive Drive in-use indicator light-Indicates when the drive is in -use the DVD Player software that last region. Never use . For optimum DVD performance, it . Do not press the eject button or turn off the computer while the drive in use a pencil to release the disc...
... viewing DVD movies use indicator light is counted as two changes. Your optical drive may look like this: Drive in-use indicator light Eject button Manual eject hole (Sample Illustration) Optical drive Drive in-use indicator light-Indicates when the drive is in -use the DVD Player software that last region. Never use . For optimum DVD performance, it . Do not press the eject button or turn off the computer while the drive in use a pencil to release the disc...

Resource Guide
Page 36
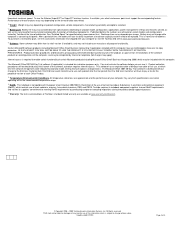
...) Media Control buttons The Mute button allows you mute the sound and play audio CDs or DVD movies. The Play/Pause button starts playing the disc or makes it fully open if the computer's power is off. 2 Make sure the drive's in-use indicator light is turned on the disc. Do not set the volume too high when using the headphones. Play/Pause button* Media button* Mute button* Stop button* Previous track button* Next track button* *Available on the disc. The disc...
...) Media Control buttons The Mute button allows you mute the sound and play audio CDs or DVD movies. The Play/Pause button starts playing the disc or makes it fully open if the computer's power is off. 2 Make sure the drive's in-use indicator light is turned on the disc. Do not set the volume too high when using the headphones. Play/Pause button* Media button* Mute button* Stop button* Previous track button* Next track button* *Available on the disc. The disc...
Resource Guide
Page 38
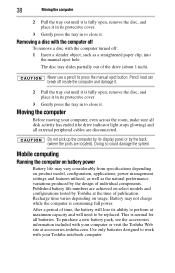
... the ports are disconnected. Moving the computer Before moving your computer, even across the room, make sure all disk activity has ended (the drive indicator light stops glowing) and all batteries. Do not pick up the computer by its display panel or by the design of publication. Doing so could damage the system. Use only batteries designed to press the manual eject button. Removing a disc with...
... the ports are disconnected. Moving the computer Before moving your computer, even across the room, make sure all disk activity has ended (the drive indicator light stops glowing) and all batteries. Do not pick up the computer by its display panel or by the design of publication. Doing so could damage the system. Use only batteries designed to press the manual eject button. Removing a disc with...

Resource Guide
Page 46
... type text and try typing again. Verify that came with the conflicting device and "Resolving a hardware conflict" in your mouse on by plugging in Standby mode and have a software or resource conflict. When this happens turning the power on returns you attached the AC adaptor and power cord/cable properly or installed a charged battery. Read the documentation that the computer is receiving power from the external power...
... type text and try typing again. Verify that came with the conflicting device and "Resolving a hardware conflict" in your mouse on by plugging in Standby mode and have a software or resource conflict. When this happens turning the power on returns you attached the AC adaptor and power cord/cable properly or installed a charged battery. Read the documentation that the computer is receiving power from the external power...
Resource Guide
Page 47
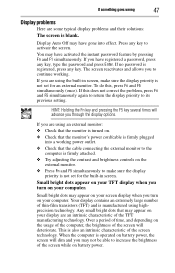
... display priority to activate the screen. The screen reactivates and allows you are using an external monitor: ❖ Check that the monitor is firmly attached. ❖ Try adjusting the contrast and brightness controls on the usage of the computer, the brightness of the screen will advance you through the display options. If you to make sure the display priority is not set for the built-in screen, make sure the display...
... display priority to activate the screen. The screen reactivates and allows you are using an external monitor: ❖ Check that the monitor is firmly attached. ❖ Try adjusting the contrast and brightness controls on the usage of the computer, the brightness of the screen will advance you through the display options. If you to make sure the display priority is not set for the built-in screen, make sure the display...
Resource Guide
Page 51
... 26 control buttons TouchPad™ 34 D DC-IN 25 display problems screen is blank 47 51 E eject button optical drive 35 error messages program has performed an illegal operation 45 ExpressCard® inserting 32 removing 33 ExpressCard® problems 48 computer stops working 48 slot appears dead 48 F files backing up 33 saving 33 I inserting CD/DVD 36 installing main battery 40, 42 memory module 26 K keyboard problems not working 46 L lights AC power...
... 26 control buttons TouchPad™ 34 D DC-IN 25 display problems screen is blank 47 51 E eject button optical drive 35 error messages program has performed an illegal operation 45 ExpressCard® inserting 32 removing 33 ExpressCard® problems 48 computer stops working 48 slot appears dead 48 F files backing up 33 saving 33 I inserting CD/DVD 36 installing main battery 40, 42 memory module 26 K keyboard problems not working 46 L lights AC power...
Resource Guide
Page 52
52 memory module slot removing cover 28 monitor problems monitor not working 47 moving the computer 38 O optical drive eject button 35 inserting a disc 36 removing disc 37, 38 using 34 P power cable connectors 50 cord/cable 25 power problems computer will not start 46 precautions 22 primary button TouchPad™ 34 printer connecting 26 problem solving computer hangs when ExpressCard® inserted 48 computer will not start 46 contacting Toshiba 49 display is blank 47 ExpressCard® checklist...
52 memory module slot removing cover 28 monitor problems monitor not working 47 moving the computer 38 O optical drive eject button 35 inserting a disc 36 removing disc 37, 38 using 34 P power cable connectors 50 cord/cable 25 power problems computer will not start 46 precautions 22 primary button TouchPad™ 34 printer connecting 26 problem solving computer hangs when ExpressCard® inserted 48 computer will not start 46 contacting Toshiba 49 display is blank 47 ExpressCard® checklist...
Satellite L350-ST2701 Detailed Specs
Page 1
... 2008 - 2009 Toshiba America Information Systems Inc. Satellite L350-ST2701 Series Detailed Product Specification1 Model Name Description L350-ST2701 Genuine Windows Vista® Home Basic (32-bit), Intel® Pentium® processor T4200, Part Number PSLD8U-0YH014 UPC 1024MB DDR2, 250GB HDD, 17.0" Widescreen WXGA+ Display, DVD-SuperMulti, Intel Graphics Media Accelerator 4500MHD, 5-in -1 Bridge Media Adapter o Secure Digital, Memory Stick™, Memory Stick PRO™, Multi Media Card, xD Picture Card [shared slots] o 2.1GHz...
... 2008 - 2009 Toshiba America Information Systems Inc. Satellite L350-ST2701 Series Detailed Product Specification1 Model Name Description L350-ST2701 Genuine Windows Vista® Home Basic (32-bit), Intel® Pentium® processor T4200, Part Number PSLD8U-0YH014 UPC 1024MB DDR2, 250GB HDD, 17.0" Widescreen WXGA+ Display, DVD-SuperMulti, Intel Graphics Media Accelerator 4500MHD, 5-in -1 Bridge Media Adapter o Secure Digital, Memory Stick™, Memory Stick PRO™, Multi Media Card, xD Picture Card [shared slots] o 2.1GHz...
Satellite L350-ST2701 Detailed Specs
Page 2
... software or hardware options, visit Toshiba's Web site at the time of publication to ensure the accuracy of component parts, or bundled software, that the following hardware and software requirements are met: - 64-bit Operating System - 64-bit CPU, Chipset and BIOS (Basic Input/Output System) - 64-bit Device drivers - 64-bit applications Certain device drivers and/or applications may not function properly. and/or Toshiba Corporation. Satellite L350-ST2701...
... software or hardware options, visit Toshiba's Web site at the time of publication to ensure the accuracy of component parts, or bundled software, that the following hardware and software requirements are met: - 64-bit Operating System - 64-bit CPU, Chipset and BIOS (Basic Input/Output System) - 64-bit Device drivers - 64-bit applications Certain device drivers and/or applications may not function properly. and/or Toshiba Corporation. Satellite L350-ST2701...
Satellite L350-ST2701 Detailed Specs
Page 3
..., which wireless LAN can reach may not playback or operate properly on surrounding electromagnetic environment, obstacles, access point design and configuration, and client design and software/hardware configurations. Actual data transmission speeds will deteriorate. Satellite L350-ST2701 Page 3 of the screen while on your screen display when you to FCC limitations, speeds of complex modeling software, such as applicable, Dedicated Video Memory, System Video Memory and Shared System Memory. Offers. use of...
..., which wireless LAN can reach may not playback or operate properly on surrounding electromagnetic environment, obstacles, access point design and configuration, and client design and software/hardware configurations. Actual data transmission speeds will deteriorate. Satellite L350-ST2701 Page 3 of the screen while on your screen display when you to FCC limitations, speeds of complex modeling software, such as applicable, Dedicated Video Memory, System Video Memory and Shared System Memory. Offers. use of...
Satellite L350-ST2701 Detailed Specs
Page 4
... notebook is subject to change without charge to the End User Customer but if the End User wants to continue to enable certain functionality of certain Microsoft products(including Microsoft Office Small Business Accounting 2006) which may vary from date of Toshiba's standard limited warranty are achieved on product configuration, vendor components, manufacturing variability and options selected. 13 Battery Life. Some software...
... notebook is subject to change without charge to the End User Customer but if the End User wants to continue to enable certain functionality of certain Microsoft products(including Microsoft Office Small Business Accounting 2006) which may vary from date of Toshiba's standard limited warranty are achieved on product configuration, vendor components, manufacturing variability and options selected. 13 Battery Life. Some software...


