
User Guide
Page 2
... SURE TO CONFIRM WHETHER THE DATA HAS BEEN SUCCESSFULLY COPIED OR TRANSFERRED. Model: Satellite®/Satellite Pro® C800/L800/S800 Series Recordable and/or ReWritable Drive(s) and Associated...please make periodic back-up and usage instructions in the applicable user guides and/or manuals enclosed or provided electronically. 2 Handling the cord on the hard disk or other storage...as a precaution against possible failures, alteration, or loss of the data. TOSHIBA AMERICA INFORMATION SYSTEMS, INC. ("TOSHIBA"), ITS AFFILIATES AND SUPPLIERS DO NOT WARRANT THAT OPERATION OF THE PRODUCT WILL...
... SURE TO CONFIRM WHETHER THE DATA HAS BEEN SUCCESSFULLY COPIED OR TRANSFERRED. Model: Satellite®/Satellite Pro® C800/L800/S800 Series Recordable and/or ReWritable Drive(s) and Associated...please make periodic back-up and usage instructions in the applicable user guides and/or manuals enclosed or provided electronically. 2 Handling the cord on the hard disk or other storage...as a precaution against possible failures, alteration, or loss of the data. TOSHIBA AMERICA INFORMATION SYSTEMS, INC. ("TOSHIBA"), ITS AFFILIATES AND SUPPLIERS DO NOT WARRANT THAT OPERATION OF THE PRODUCT WILL...
User Guide
Page 16
... of the information contained herein. ©2012 by Toshiba America Information Systems, Inc. Export Administration Regulations is prohibited. TOSHIBA CORPORATION AND TOSHIBA AMERICA INFORMATION SYSTEMS, INC. (TOSHIBA) PROVIDES NO WARRANTY WITH REGARD TO THIS MANUAL OR ANY OTHER INFORMATION CONTAINED HEREIN AND HEREBY EXPRESSLY... under the U.S. IN NO EVENT SHALL TOSHIBA BE LIABLE FOR ANY INCIDENTAL, CONSEQUENTIAL, SPECIAL, OR EXEMPLARY DAMAGES, WHETHER BASED ON TORT, CONTRACT OR OTHERWISE, ARISING OUT OF OR IN CONNECTION WITH THIS MANUAL OR ANY OTHER INFORMATION CONTAINED HEREIN OR THE...
... of the information contained herein. ©2012 by Toshiba America Information Systems, Inc. Export Administration Regulations is prohibited. TOSHIBA CORPORATION AND TOSHIBA AMERICA INFORMATION SYSTEMS, INC. (TOSHIBA) PROVIDES NO WARRANTY WITH REGARD TO THIS MANUAL OR ANY OTHER INFORMATION CONTAINED HEREIN AND HEREBY EXPRESSLY... under the U.S. IN NO EVENT SHALL TOSHIBA BE LIABLE FOR ANY INCIDENTAL, CONSEQUENTIAL, SPECIAL, OR EXEMPLARY DAMAGES, WHETHER BASED ON TORT, CONTRACT OR OTHERWISE, ARISING OUT OF OR IN CONNECTION WITH THIS MANUAL OR ANY OTHER INFORMATION CONTAINED HEREIN OR THE...
User Guide
Page 26
Toshiba requires its computer component suppliers to meet RoHS requirements and verifies its retail version (if available), and may use technological measures for more information regarding ... http://www.energystar.gov or http://www.energystar.gov/powermanagement for copy protection. NOTE This computer is compatible with this computer may not include user manuals or all your equipment needs, which restricts use of the computer, and may be completed by Internet or telephone (toll charges may differ from its...
Toshiba requires its computer component suppliers to meet RoHS requirements and verifies its retail version (if available), and may use technological measures for more information regarding ... http://www.energystar.gov or http://www.energystar.gov/powermanagement for copy protection. NOTE This computer is compatible with this computer may not include user manuals or all your equipment needs, which restricts use of the computer, and may be completed by Internet or telephone (toll charges may differ from its...
User Guide
Page 28
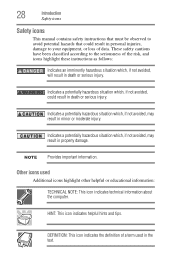
HINT: This icon indicates helpful hints and tips. 28 Introduction Safety icons Safety icons This manual contains safety instructions that could result in the text. DEFINITION: This icon indicates the definition of data. Indicates a potentially hazardous situation which , if not avoided, ...
HINT: This icon indicates helpful hints and tips. 28 Introduction Safety icons Safety icons This manual contains safety instructions that could result in the text. DEFINITION: This icon indicates the definition of data. Indicates a potentially hazardous situation which , if not avoided, ...
User Guide
Page 68
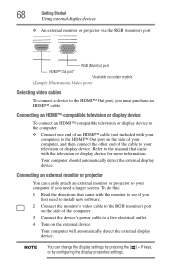
Refer to the manual that came with your computer) to the HDMI™ Out port on the side of your computer, and then connect the other end of the ...
Refer to the manual that came with your computer) to the HDMI™ Out port on the side of your computer, and then connect the other end of the ...
User Guide
Page 79
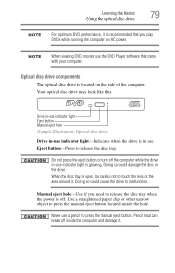
...indicator light-Indicates when the drive is in -use . Eject button-Press to release the disc tray when the power is located on AC power. Manual eject hole-Use if you play DVDs while running the computer on the side of the computer. Optical disc drive components The optical disc drive... off. When the disc tray is glowing. Use a straightened paper clip or other narrow object to press the manual eject button. NOTE When viewing DVD movies use a pencil to press the manual eject button located inside the computer and damage it. Doing so could damage the disc or the drive. Learning...
...indicator light-Indicates when the drive is in -use . Eject button-Press to release the disc tray when the power is located on AC power. Manual eject hole-Use if you play DVDs while running the computer on the side of the computer. Optical disc drive components The optical disc drive... off. When the disc tray is glowing. Use a straightened paper clip or other narrow object to press the manual eject button. NOTE When viewing DVD movies use a pencil to press the manual eject button located inside the computer and damage it. Doing so could damage the disc or the drive. Learning...
User Guide
Page 81
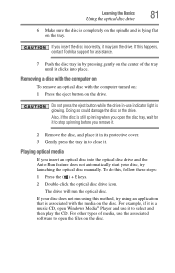
... press the eject button while the drive in by pressing gently on the disc. To do this method, try launching the optical disc manually. If this happens, contact Toshiba support for it to open Windows Media® Player and use indicator light is lying flat on the tray. Removing a disc with the...
... press the eject button while the drive in by pressing gently on the disc. To do this method, try launching the optical disc manually. If this happens, contact Toshiba support for it to open Windows Media® Player and use indicator light is lying flat on the tray. Removing a disc with the...

User Guide
Page 82
... computer turned off: 1 Insert a slender object, such as a straightened paper clip, into the manual eject hole. Please refer to your computer's detailed specifications at support.toshiba.com. Copy protection technology may not play back optical media recorded by other computers or optical media ...optical media. ❖ Read/write data and multi-media files to recordable optical media. For details on the configuration, your Toshiba computer or optical disc drive. For more information regarding supported optical media formats please refer to your computer's product specification for...
... computer turned off: 1 Insert a slender object, such as a straightened paper clip, into the manual eject hole. Please refer to your computer's detailed specifications at support.toshiba.com. Copy protection technology may not play back optical media recorded by other computers or optical media ...optical media. ❖ Read/write data and multi-media files to recordable optical media. For details on the configuration, your Toshiba computer or optical disc drive. For more information regarding supported optical media formats please refer to your computer's product specification for...
User Guide
Page 83
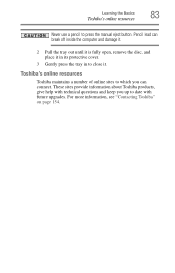
... a number of online sites to which you up to date with future upgrades. These sites provide information about Toshiba products, give help with technical questions and keep you can break off inside the computer and damage it. 2 Pull the tray out until it is ...fully open, remove the disc, and place it . Learning the Basics 83 Toshiba's online resources Never use a pencil to close it in its protective cover. 3 Gently press the tray in to press the...
... a number of online sites to which you up to date with future upgrades. These sites provide information about Toshiba products, give help with technical questions and keep you can break off inside the computer and damage it. 2 Pull the tray out until it is ...fully open, remove the disc, and place it . Learning the Basics 83 Toshiba's online resources Never use a pencil to close it in its protective cover. 3 Gently press the tray in to press the...
User Guide
Page 98
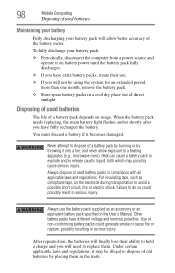
... discharge your battery pack will allow exposure to dispose of used batteries The life of non-conforming battery packs could possibly result in the User's Manual. Never attempt to a heating apparatus (e.g., microwave oven). Failure to dispose of old batteries by throwing it on battery power until the battery pack fully discharges...
... discharge your battery pack will allow exposure to dispose of used batteries The life of non-conforming battery packs could possibly result in the User's Manual. Never attempt to a heating apparatus (e.g., microwave oven). Failure to dispose of old batteries by throwing it on battery power until the battery pack fully discharges...

User Guide
Page 99
... it could get wet or covered in dust. ❖ Always travel with your local government authority for more information and for manuals, power cords, and compact discs. Mobile Computing 99 Traveling tips Please be required to pass your computer through airport security equipment.... Check with the computer in "Selecting a place to work" on page 156. In addition, Toshiba's recycling initiatives include recycling programs, events and consumer promotions. Toshiba offers a choice of extra space for drop-off locations, visit www.rbrc.org or call 1-800-822...
... it could get wet or covered in dust. ❖ Always travel with your local government authority for more information and for manuals, power cords, and compact discs. Mobile Computing 99 Traveling tips Please be required to pass your computer through airport security equipment.... Check with the computer in "Selecting a place to work" on page 156. In addition, Toshiba's recycling initiatives include recycling programs, events and consumer promotions. Toshiba offers a choice of extra space for drop-off locations, visit www.rbrc.org or call 1-800-822...
User Guide
Page 132
... ❖ Your computer settings are changed back to their defaults For more information, see "Reset your PC" on page 58. To enter the Boot menu manually: 1 Press Ctrl, Alt, and Del simultaneously (once). 2 Press the Power button in the Startup menu to choose from the menu. 132 If Something Goes Wrong...
... ❖ Your computer settings are changed back to their defaults For more information, see "Reset your PC" on page 58. To enter the Boot menu manually: 1 Press Ctrl, Alt, and Del simultaneously (once). 2 Press the Power button in the Startup menu to choose from the menu. 132 If Something Goes Wrong...
User Guide
Page 133
... point to return the computer to reset your current video driver at which it was performing properly. Command Prompt The command prompt is installed ❖ Manually by the user. Restore points are installed during the Windows® boot process: ❖ Enable low resolution video mode Restarts Windows® using a specific image...
... point to return the computer to reset your current video driver at which it was performing properly. Command Prompt The command prompt is installed ❖ Manually by the user. Restore points are installed during the Windows® boot process: ❖ Enable low resolution video mode Restarts Windows® using a specific image...
User Guide
Page 143
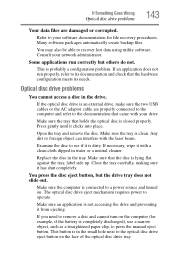
... out. Make sure the tray that the disc is not accessing the drive and preventing it clicks into place. Examine the disc to press the manual eject button. Replace the disc in the drive. Close the tray carefully, making sure it is completely discharged), use a narrow object, such as a straightened paper...
... out. Make sure the tray that the disc is not accessing the drive and preventing it clicks into place. Examine the disc to press the manual eject button. Replace the disc in the drive. Close the tray carefully, making sure it is completely discharged), use a narrow object, such as a straightened paper...

User Guide
Page 144
... turned up. Pencil lead can break off inside the computer and damage it. For more information regarding supported optical media formats, refer to press the manual eject button. Try pressing the F11 key to the software's documentation and check that the hardware configuration meets the application's needs. This is compatible with... ready (on the screen. 144 If Something Goes Wrong Sound system problems Never use a pencil to the complete detail specifications for your computer at support.toshiba.com. The disc will not come out of paper. If you click the eject button on line).
... turned up. Pencil lead can break off inside the computer and damage it. For more information regarding supported optical media formats, refer to press the manual eject button. Try pressing the F11 key to the software's documentation and check that the hardware configuration meets the application's needs. This is compatible with... ready (on the screen. 144 If Something Goes Wrong Sound system problems Never use a pencil to the complete detail specifications for your computer at support.toshiba.com. The disc will not come out of paper. If you click the eject button on line).
User Guide
Page 149
... previously established Control Point to 'turn back the clock,' restoring the Windows® operating system to the state it was in the manuals. If you purchase. This is also easy to protect yourself from much easier and more difficult and time-consuming restoration procedures, and ...to solve problems will improve as the manuals that appears. 2 Click System and Security, and then System. 3 In the left pane, click System Protection. Follow these features to undo...
... previously established Control Point to 'turn back the clock,' restoring the Windows® operating system to the state it was in the manuals. If you purchase. This is also easy to protect yourself from much easier and more difficult and time-consuming restoration procedures, and ...to solve problems will improve as the manuals that appears. 2 Click System and Security, and then System. 3 In the left pane, click System Protection. Follow these features to undo...
User Guide
Page 180
...N network accessing 105 connecting your computer 105 networking wireless 105 notification area 103 notifications 104 O ON/OFF indicator light 89 online resources Toshiba 83 optical disc Auto-Run feature 81 handling 80 inserting 80 playing optical media 81 positioning 80 recording optical media 82 removing with computer...optical disc drive components 79 drive in-use indicator light 79 eject button 79 handling an optical disc 80 inserting an optical disc 80 manual eject hole 79 playing optical media 81 recording optical media 82 removing a disc 81, 82 troubleshooting 143 using 78, 79 optical ...
...N network accessing 105 connecting your computer 105 networking wireless 105 notification area 103 notifications 104 O ON/OFF indicator light 89 online resources Toshiba 83 optical disc Auto-Run feature 81 handling 80 inserting 80 playing optical media 81 positioning 80 recording optical media 82 removing with computer...optical disc drive components 79 drive in-use indicator light 79 eject button 79 handling an optical disc 80 inserting an optical disc 80 manual eject hole 79 playing optical media 81 recording optical media 82 removing a disc 81, 82 troubleshooting 143 using 78, 79 optical ...


