User Manual
Page 20
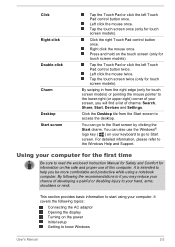
... the enclosed Instruction Manual for Safety and Comfort for information on the safe and proper use the Windows® logo key ( ) on the power Initial setup Getting to start using your screen, you be more comfortable and productive while using a notebook computer. This section provides basic information to know Windows User's Manual 2-2 Tap the Touch Pad or click the left Touch Pad control button once. Tap the touch screen twice (only for touch screen models) or pointing...
... the enclosed Instruction Manual for Safety and Comfort for information on the safe and proper use the Windows® logo key ( ) on the power Initial setup Getting to start using your screen, you be more comfortable and productive while using a notebook computer. This section provides basic information to know Windows User's Manual 2-2 Tap the Touch Pad or click the left Touch Pad control button once. Tap the touch screen twice (only for touch screen models) or pointing...
User Manual
Page 27
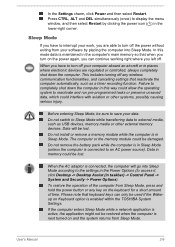
... from Sleep Mode. Do not switch to Sleep Mode while transferring data to turn off your software by clicking the power icon ( ) in taskbar) -> Control Panel -> System and Security -> Power Options). The computer or the memory module could interfere with aviation or other external memory devices. To restore the operation of time. When you have to interrupt your work, you have to external media, such as a timer recording function. User's Manual 2-9 In the Settings charm, click Power...
... from Sleep Mode. Do not switch to Sleep Mode while transferring data to turn off your software by clicking the power icon ( ) in taskbar) -> Control Panel -> System and Security -> Power Options). The computer or the memory module could interfere with aviation or other external memory devices. To restore the operation of time. When you have to interrupt your work, you have to external media, such as a timer recording function. User's Manual 2-9 In the Settings charm, click Power...
User Manual
Page 29
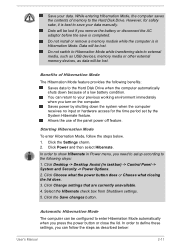
... return to external media, such as USB devices, memory media or other external memory devices, as described below . 1. Do not install or remove a memory module while the computer is completed. Do not switch to Hibernation Mode while transferring data to your previous working environment immediately when you remove the battery or disconnect the AC adaptor before the save your data. Click Change settings that are currently unavailable. 4. In order to save...
... return to external media, such as USB devices, memory media or other external memory devices, as described below . 1. Do not install or remove a memory module while the computer is completed. Do not switch to Hibernation Mode while transferring data to your previous working environment immediately when you remove the battery or disconnect the AC adaptor before the save your data. Click Change settings that are currently unavailable. 4. In order to save...
User Manual
Page 48
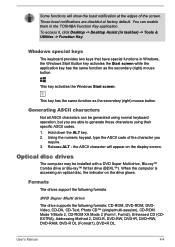
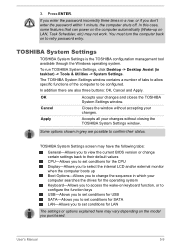
... accessing an optical disc, the indicator on the display screen. Formats The drives support the following formats: CD-ROM, DVD-ROM, DVDVideo, CD-DA, CD-Text, Photo CD™ (single/multi-session), CD-ROM Mode 1/Mode 2, CD-ROM XA Mode 2 (Form1, Form2), Enhanced CD (CDEXTRA), Addressing Method 2, DVD-R, DVD-RW, DVD+R, DVD+RW, DVD-RAM, DVD-R DL (Format1), DVD+R DL. User's Manual 4-4 To access it, click Desktop -> Desktop Assist (in Windows, the Windows Start Button key activates the Start screen while the application key has the same function...
... accessing an optical disc, the indicator on the display screen. Formats The drives support the following formats: CD-ROM, DVD-ROM, DVDVideo, CD-DA, CD-Text, Photo CD™ (single/multi-session), CD-ROM Mode 1/Mode 2, CD-ROM XA Mode 2 (Form1, Form2), Enhanced CD (CDEXTRA), Addressing Method 2, DVD-R, DVD-RW, DVD+R, DVD+RW, DVD-RAM, DVD-R DL (Format1), DVD+R DL. User's Manual 4-4 To access it, click Desktop -> Desktop Assist (in Windows, the Windows Start Button key activates the Start screen while the application key has the same function...
User Manual
Page 59
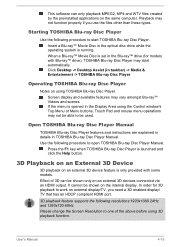
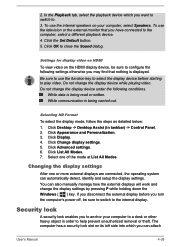
... start automatically. Open TOSHIBA Blu-ray Disc Player Manual TOSHIBA Blu-ray Disc Player features and instructions are explained in details in the Display Area using the Control window's Top Menu or Menu buttons, Touch Pad and mouse menu operations may start TOSHIBA Blu-ray Disc Player. Starting TOSHIBA Blu-ray Disc Player Use the following procedure to one of 3D can only playback MPEG2, MP4 and WTV files created by the preinstalled applications on the internal display. Please change the Screen...
... start automatically. Open TOSHIBA Blu-ray Disc Player Manual TOSHIBA Blu-ray Disc Player features and instructions are explained in details in the Display Area using the Control window's Top Menu or Menu buttons, Touch Pad and mouse menu operations may start TOSHIBA Blu-ray Disc Player. Starting TOSHIBA Blu-ray Disc Player Use the following procedure to one of 3D can only playback MPEG2, MP4 and WTV files created by the preinstalled applications on the internal display. Please change the Screen...
User Manual
Page 63
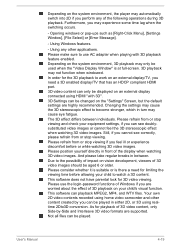
... only be used when the "Video Display Window" is there a need a 3D enabled display/TV that has an HDCP compliant HDMI port. 3D video content can be played in between individuals. Please refrain from or stop viewing and check your equipment settings, if you can be changed on an external display/TV, you need for the 3D playback to work on the "Settings" Screen, but the default settings are highly...
... only be used when the "Video Display Window" is there a need a 3D enabled display/TV that has an HDCP compliant HDMI port. 3D video content can be played in between individuals. Please refrain from or stop viewing and check your equipment settings, if you can be changed on an external display/TV, you need for the 3D playback to work on the "Settings" Screen, but the default settings are highly...
User Manual
Page 64
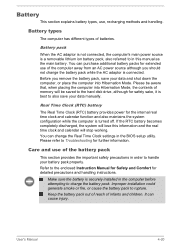
... in the BIOS setup utility. It can purchase additional battery packs for further information. Before you should not change the Real Time Clock settings in order to also save your data manually. Refer to charge the battery pack. Improper installation could generate smoke or fire, or cause the battery pack to Troubleshooting for extended use , recharging methods and handling. Battery This section explains battery types, use of batteries. Please...
... in the BIOS setup utility. It can purchase additional battery packs for further information. Before you should not change the Real Time Clock settings in order to also save your data manually. Refer to charge the battery pack. Improper installation could generate smoke or fire, or cause the battery pack to Troubleshooting for extended use , recharging methods and handling. Battery This section explains battery types, use of batteries. Please...

User Manual
Page 71
... is available. Plug the other cable to prevent the computer's lid from becoming scratched or damaged when you must remain connected during LAN use. When installing or removing a memory module, you are made of system memory that are installing/replacing the memory module. Connecting the LAN cable To connect the LAN cable, follow the steps as detailed below: Connect the AC adaptor before using or configuring a network connection. LAN jack 2. Turn off the power to all external devices connected to install and remove optional memory modules.
... is available. Plug the other cable to prevent the computer's lid from becoming scratched or damaged when you must remain connected during LAN use. When installing or removing a memory module, you are made of system memory that are installing/replacing the memory module. Connecting the LAN cable To connect the LAN cable, follow the steps as detailed below: Connect the AC adaptor before using or configuring a network connection. LAN jack 2. Turn off the power to all external devices connected to install and remove optional memory modules.

User Manual
Page 72
... memory module is a precision electronic component that the Power indicator is on . Close the display panel. 4. User's Manual 4-28 a. The computer was shut down and remove the battery pack (refer to prevent it from being lost. Click Power in place - Installing a memory module To install a memory module, follow the steps as detailed below: 1. d. b. ensure that may be fatally damaged by TOSHIBA. Use only memory modules approved by static electricity. The wireless communication function...
... memory module is a precision electronic component that the Power indicator is on . Close the display panel. 4. User's Manual 4-28 a. The computer was shut down and remove the battery pack (refer to prevent it from being lost. Click Power in place - Installing a memory module To install a memory module, follow the steps as detailed below: 1. d. b. ensure that may be fatally damaged by TOSHIBA. Use only memory modules approved by static electricity. The wireless communication function...

User Manual
Page 75
... the cover in place - Memory module cover 2. Screw Product appearance depends on and make sure the added memory is off . 7. ensure that the screw is firmly closed. Turn the computer upside down the SHIFT key - User's Manual 4-31 to release it , click Desktop -> Desktop Assist (in taskbar) -> Control Panel -> System and Security -> System. Remove the AC adaptor and all cables and peripherals connected to Replacing the battery...
... the cover in place - Memory module cover 2. Screw Product appearance depends on and make sure the added memory is off . 7. ensure that the screw is firmly closed. Turn the computer upside down the SHIFT key - User's Manual 4-31 to release it , click Desktop -> Desktop Assist (in taskbar) -> Control Panel -> System and Security -> System. Remove the AC adaptor and all cables and peripherals connected to Replacing the battery...
User Manual
Page 82
... order to . 3. Click List All Modes. 7. If you disconnect the external display before starting to configure the following conditions. To use the function key to select the display device before you turn the computer's power off, be sure to play video. Do not change the display device under the following settings otherwise you may find that you want to switch to help prevent unauthorized removal or theft. The computer has a security lock slot...
... order to . 3. Click List All Modes. 7. If you disconnect the external display before starting to configure the following conditions. To use the function key to select the display device before you turn the computer's power off, be sure to play video. Do not change the display device under the following settings otherwise you may find that you want to switch to help prevent unauthorized removal or theft. The computer has a security lock slot...
User Manual
Page 94
... for LAN The settings or options explained here may not work. OK Accepts your computer searches the drives for the operating system Keyboard-Allows you to access the wake-on keyboard function, or to configure the function keys USB-Allows you to set conditions for USB SATA-Allows you to set conditions for SATA LAN-Allows you to set conditions for the CPU Display-Allows you to select the internal LCD and/or external monitor...
... for LAN The settings or options explained here may not work. OK Accepts your computer searches the drives for the operating system Keyboard-Allows you to access the wake-on keyboard function, or to configure the function keys USB-Allows you to set conditions for USB SATA-Allows you to set conditions for SATA LAN-Allows you to set conditions for the CPU Display-Allows you to select the internal LCD and/or external monitor...
User Manual
Page 103
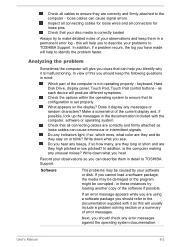
... computer is set properly. keyboard, Hard Disk Drive, display panel, Touch Pad, Touch Pad control buttons - Check all cables to ensure they are using a software package you should refer to the documentation supplied with the computer, software or operating system. Write down what color are correctly and firmly attached as this you to describe your observations and keep the following questions in a permanent error log - In addition, if a problem recurs...
... computer is set properly. keyboard, Hard Disk Drive, display panel, Touch Pad, Touch Pad control buttons - Check all cables to ensure they are using a software package you should refer to the documentation supplied with the computer, software or operating system. Write down what color are correctly and firmly attached as this you to describe your observations and keep the following questions in a permanent error log - In addition, if a problem recurs...
User Manual
Page 105
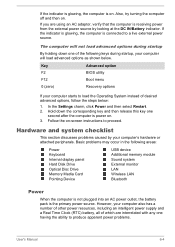
... release this key one of the following areas: Power Keyboard Internal display panel Hard Disk Drive Optical Disc Drive Memory Media Card Pointing Device USB device Additional memory module Sound system External monitor LAN Wireless LAN Bluetooth Power When the computer is not plugged into an AC power outlet, the battery pack is connected to proceed. Follow the on . 3. If the indicator is glowing, the computer is the primary power source. However, your computer starts to produce apparent power problems. User's Manual 6-4 In the Settings charm, click Power and...
... release this key one of the following areas: Power Keyboard Internal display panel Hard Disk Drive Optical Disc Drive Memory Media Card Pointing Device USB device Additional memory module Sound system External monitor LAN Wireless LAN Bluetooth Power When the computer is not plugged into an AC power outlet, the battery pack is connected to proceed. Follow the on . 3. If the indicator is glowing, the computer is the primary power source. However, your computer starts to produce apparent power problems. User's Manual 6-4 In the Settings charm, click Power and...
User Manual
Page 109
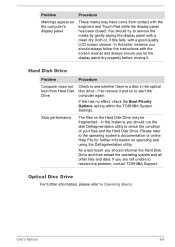
... keyboard and Touch Pad while the display panel has been closed. Hard Disk Drive Problem Procedure Computer does not boot from contact with a good quality LCD screen cleaner. Please refer to start the computer again. You should always follow the instructions with the screen cleaner and always ensure you let the display panel dry properly before closing it and try to remove the marks by gently wiping the display panel...
... keyboard and Touch Pad while the display panel has been closed. Hard Disk Drive Problem Procedure Computer does not boot from contact with a good quality LCD screen cleaner. Please refer to start the computer again. You should always follow the instructions with the screen cleaner and always ensure you let the display panel dry properly before closing it and try to remove the marks by gently wiping the display panel...

User Manual
Page 110
... actually on the memory media card that it in the drive Open the disc tray and make sure the disc is no obstruction. Click Desktop -> Desktop Assist -> Control Panel -> Hardware and Sound -> Mouse. User's Manual 6-9 You cannot read a file Check to resolve the problem, contact TOSHIBA Support. not work. Check whether the disc is securely closed. Touch Pad Problem Procedure The Touch Pad does Check the Device Select settings. You cannot write to a memory media card Remove the memory media card from the computer...
... actually on the memory media card that it in the drive Open the disc tray and make sure the disc is no obstruction. Click Desktop -> Desktop Assist -> Control Panel -> Hardware and Sound -> Mouse. User's Manual 6-9 You cannot read a file Check to resolve the problem, contact TOSHIBA Support. not work. Check whether the disc is securely closed. Touch Pad Problem Procedure The Touch Pad does Check the Device Select settings. You cannot write to a memory media card Remove the memory media card from the computer...
User Manual
Page 111
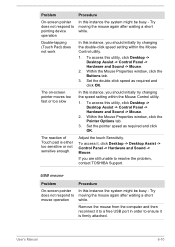
... the problem, contact TOSHIBA Support. Set the double-click speed as required and click OK. The reaction of Touch pad is firmly attached. Try moving the mouse again after waiting a short while. To access this utility, click Desktop -> Desktop Assist -> Control Panel -> Hardware and Sound -> Mouse. 2. User's Manual 6-10 Problem Procedure On-screen pointer does not respond to pointing device operation In this instance the system might be busy - Adjust the touch...
... the problem, contact TOSHIBA Support. Set the double-click speed as required and click OK. The reaction of Touch pad is firmly attached. Try moving the mouse again after waiting a short while. To access this utility, click Desktop -> Desktop Assist -> Control Panel -> Hardware and Sound -> Mouse. 2. User's Manual 6-10 Problem Procedure On-screen pointer does not respond to pointing device operation In this instance the system might be busy - Adjust the touch...
User Manual
Page 112
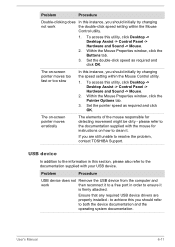
... it . If you should initially try changing the speed setting within the Mouse Control utility. 1. Ensure that any required USB device drivers are still unable to resolve the problem, contact TOSHIBA Support. Set the double-click speed as required and click OK. Problem Procedure USB device does not Remove the USB device from the computer and work the double-click speed setting within the Mouse Control utility. 1. Set the pointer speed as required and...
... it . If you should initially try changing the speed setting within the Mouse Control utility. 1. Ensure that any required USB device drivers are still unable to resolve the problem, contact TOSHIBA Support. Set the double-click speed as required and click OK. Problem Procedure USB device does not Remove the USB device from the computer and work the double-click speed setting within the Mouse Control utility. 1. Set the pointer speed as required and...
User Manual
Page 113
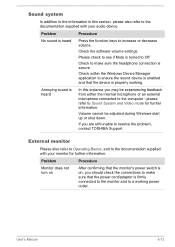
... to the documentation supplied with your audio device. Problem Procedure Monitor does not turn on After confirming that the monitor's power switch is on, you should check the connections to make sure the headphone connection is heard Press the function keys to the documentation supplied with your monitor for further information. User's Manual 6-12 Problem Procedure No sound is secure. Check the software volume settings. please refer to resolve the problem, contact TOSHIBA Support.
... to the documentation supplied with your audio device. Problem Procedure Monitor does not turn on After confirming that the monitor's power switch is on, you should check the connections to make sure the headphone connection is heard Press the function keys to the documentation supplied with your monitor for further information. User's Manual 6-12 Problem Procedure No sound is secure. Check the software volume settings. please refer to resolve the problem, contact TOSHIBA Support.
User Manual
Page 114
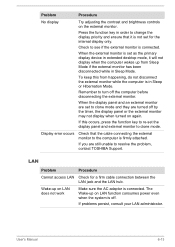
... Sleep or Hibernation Mode. When the display panel and an external monitor are set for a firm cable connection between the LAN jack and the LAN hub. To keep this occurs, press the function key to clone mode. Problem Procedure No display Try adjusting the contrast and brightness controls on again. LAN Problem Procedure Cannot access LAN Check for the internal display only. The Wake-up from happening, do not disconnect the external monitor while the computer is off. User's Manual...
... Sleep or Hibernation Mode. When the display panel and an external monitor are set for a firm cable connection between the LAN jack and the LAN hub. To keep this occurs, press the function key to clone mode. Problem Procedure No display Try adjusting the contrast and brightness controls on again. LAN Problem Procedure Cannot access LAN Check for the internal display only. The Wake-up from happening, do not disconnect the external monitor while the computer is off. User's Manual...


