
Online User's Guide for Satellite A300/A305
Page 56
... memory module slot cover. Do not remove the memory module while the computer is in "Checking total memory" on page 51 to remove a memory module: 1 Complete steps 1-8 in memory will not be lost. In either of the above cases, the Sleep configuration will be saved. You can now continue setting up . 17 Reconnect the cables. 18 Restart the computer. Do not try to work. 56 Getting Started Adding memory (optional...
... memory module slot cover. Do not remove the memory module while the computer is in "Checking total memory" on page 51 to remove a memory module: 1 Complete steps 1-8 in memory will not be lost. In either of the above cases, the Sleep configuration will be saved. You can now continue setting up . 17 Reconnect the cables. 18 Restart the computer. Do not try to work. 56 Getting Started Adding memory (optional...
Online User's Guide for Satellite A300/A305
Page 58
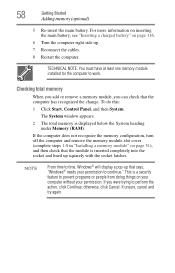
To do this: 1 Click Start, Control Panel, and then System. For more information on inserting the main battery, see "Inserting a charged battery" on your computer without your permission. If you can check that the computer has recognized the change. If the computer does not recognize the memory configuration, turn off the computer and remove the memory module slot cover (complete steps 1-8 in "Installing a memory module" on page 51), and...
To do this: 1 Click Start, Control Panel, and then System. For more information on inserting the main battery, see "Inserting a charged battery" on your computer without your permission. If you can check that the computer has recognized the change. If the computer does not recognize the memory configuration, turn off the computer and remove the memory module slot cover (complete steps 1-8 in "Installing a memory module" on page 51), and...
Online User's Guide for Satellite A300/A305
Page 68
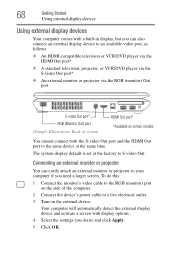
... Getting Started Using external display devices Using external display devices Your computer comes with display options. 4 Select the settings you can easily attach an external monitor or projector to your computer if you need a larger screen. The system display default is set at the factory to an available video port, as follows: ❖ An HDMI-compatible television or VCR/DVD player via the HDMI Out port* ❖ A standard television, projector, or VCR/DVD player via the S-video Out port...
... Getting Started Using external display devices Using external display devices Your computer comes with display options. 4 Select the settings you can easily attach an external monitor or projector to your computer if you need a larger screen. The system display default is set at the factory to an available video port, as follows: ❖ An HDMI-compatible television or VCR/DVD player via the HDMI Out port* ❖ A standard television, projector, or VCR/DVD player via the S-video Out port...
Online User's Guide for Satellite A300/A305
Page 152
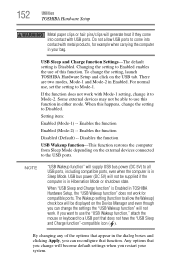
... power (DC 5V) to Mode-2. To change the setting, launch TOSHIBA Hardware Setup and click on the external devices connected to Enabled enables the use this function. If the function does not work for example when carrying the computer in the dialog boxes and clicking Apply, you restart your bag. Enables the function Disabled (Default) -- Disables the function USB Wakeup function-This function restores the computer from Sleep Mode depending on the USB tab. When "USB Sleep and Charge function" is Enabled in TOSHIBA Hardware Setup, the "USB...
... power (DC 5V) to Mode-2. To change the setting, launch TOSHIBA Hardware Setup and click on the external devices connected to Enabled enables the use this function. If the function does not work for example when carrying the computer in the dialog boxes and clicking Apply, you restart your bag. Enables the function Disabled (Default) -- Disables the function USB Wakeup function-This function restores the computer from Sleep Mode depending on the USB tab. When "USB Sleep and Charge function" is Enabled in TOSHIBA Hardware Setup, the "USB...
Online User's Guide for Satellite A300/A305
Page 168
... plug fits correctly in the Startup menu to change the system in the Startup menu. The Windows® Advanced Boot Options menu displays these problems, use the options in some way such as installing a new program or adding a device. 168 If Something Goes Wrong The Windows® operating system is not working 5 Verify that required by the computer. The computer may have to fix the problem. The amperage rating of the...
... plug fits correctly in the Startup menu to change the system in the Startup menu. The Windows® Advanced Boot Options menu displays these problems, use the options in some way such as installing a new program or adding a device. 168 If Something Goes Wrong The Windows® operating system is not working 5 Verify that required by the computer. The computer may have to fix the problem. The amperage rating of the...
Online User's Guide for Satellite A300/A305
Page 172
... error again. 6 If the error recurs, remove the memory module entirely and check for these first: 1 Click Start, and then click the arrow next to the monitor, optional external optical drive, optional external diskette drive, and other power-using resources. ❖ The Driver tab, which lists resources assigned to the Lock button in "Installing a memory module" on page 51, and making sure the module is not caused by the device. If only one memory module is not using functions...
... error again. 6 If the error recurs, remove the memory module entirely and check for these first: 1 Click Start, and then click the arrow next to the monitor, optional external optical drive, optional external diskette drive, and other power-using resources. ❖ The Driver tab, which lists resources assigned to the Lock button in "Installing a memory module" on page 51, and making sure the module is not caused by the device. If only one memory module is not using functions...
Online User's Guide for Satellite A300/A305
Page 175
... not set for the screen. Display Auto Off may have gone into a working . You may have activated the instant password feature by clicking a blank area of the desktop with the secondary control button, then clicking Personalize. This opens the Personalization window. If you have registered a password, press any key. If no password is firmly attached. ❖ Try adjusting the contrast and brightness controls on the external monitor. ❖...
... not set for the screen. Display Auto Off may have gone into a working . You may have activated the instant password feature by clicking a blank area of the desktop with the secondary control button, then clicking Personalize. This opens the Personalization window. If you have registered a password, press any key. If no password is firmly attached. ❖ Try adjusting the contrast and brightness controls on the external monitor. ❖...
Online User's Guide for Satellite A300/A305
Page 183
... the Wireless antenna ON/OFF switch is ON (the wireless indicator light will not receive or transmit properly. The other system may be for networking problems, specifically wireless (Wi-Fi®) networking. Try making a test transmission to change these settings. It should be set up to check this. Connect a telephone handset to the line to transmit at pcsupport.toshiba.com. Wireless networking problems NOTE This section provides general troubleshooting tips...
... the Wireless antenna ON/OFF switch is ON (the wireless indicator light will not receive or transmit properly. The other system may be for networking problems, specifically wireless (Wi-Fi®) networking. Try making a test transmission to change these settings. It should be set up to check this. Connect a telephone handset to the line to transmit at pcsupport.toshiba.com. Wireless networking problems NOTE This section provides general troubleshooting tips...
Online User's Guide for Satellite A300/A305
Page 226
... battery changing 114 charge indicator light 47, 108 charge not lasting 173 charging 45, 47 conserving power 111 disposal 119 low charge 110 monitoring power 47, 108 not charging 173 226 notifications 111 power plan 202 power plan hot key 113 real-time clock (RTC) 105 removing 114 BIOS Setup see TOSHIBA Hardware Setup Bridge Media Adapter inserting memory media 133 removing memory media 134 button power 50, 60 start 123 C CD playing an audio 99 CD, using 95 character keys 87 charging the battery 47 checking device...
... battery changing 114 charge indicator light 47, 108 charge not lasting 173 charging 45, 47 conserving power 111 disposal 119 low charge 110 monitoring power 47, 108 not charging 173 226 notifications 111 power plan 202 power plan hot key 113 real-time clock (RTC) 105 removing 114 BIOS Setup see TOSHIBA Hardware Setup Bridge Media Adapter inserting memory media 133 removing memory media 134 button power 50, 60 start 123 C CD playing an audio 99 CD, using 95 character keys 87 charging the battery 47 checking device...
Online User's Guide for Satellite A300/A305
Page 227
... DVD, using 95 E error messages device driver conflict 170 general hardware problem 170 non-system disk or disk error 167 problem with display settings/ current settings not working with hardware 176 warning resume failure 166 Error-checking 177 expansion memory slot 53 exploring the desktop 121 ExpressCard® checklist 180 computer stops working 181 errors 182 hot swapping fails 181 inserting 131 not recognized 181 problem solving 180 removing 132 external 71 monitor not working 176 external diskette drive connecting...
... DVD, using 95 E error messages device driver conflict 170 general hardware problem 170 non-system disk or disk error 167 problem with display settings/ current settings not working with hardware 176 warning resume failure 166 Error-checking 177 expansion memory slot 53 exploring the desktop 121 ExpressCard® checklist 180 computer stops working 181 errors 182 hot swapping fails 181 inserting 131 not recognized 181 problem solving 180 removing 132 external 71 monitor not working 176 external diskette drive connecting...
Online User's Guide for Satellite A300/A305
Page 229
... L lock computer, using 84 M main battery removing 114 memory adding 50 problem solving 172 removing expansion slot cover 53 memory module inserting 54 installation 51 removing 57 microphone 129 modem connecting to telephone line 125 problem solving 183 monitor 68 connecting 68 not working 175 mouse installing 71 mouse utility 148 N network accessing 125 Connect to the Internet Wizard 125 networking wireless 124 Notification Area 123 O opening the display panel 48 optical disc positioning 98 optical discs handling 98 inserting 97 removing 101 optical drive problems 178 troubleshooting...
... L lock computer, using 84 M main battery removing 114 memory adding 50 problem solving 172 removing expansion slot cover 53 memory module inserting 54 installation 51 removing 57 microphone 129 modem connecting to telephone line 125 problem solving 183 monitor 68 connecting 68 not working 175 mouse installing 71 mouse utility 148 N network accessing 125 Connect to the Internet Wizard 125 networking wireless 124 Notification Area 123 O opening the display panel 48 optical disc positioning 98 optical discs handling 98 inserting 97 removing 101 optical drive problems 178 troubleshooting...
Online User's Guide for Satellite A300/A305
Page 230
... 180 error occurs 182 hot swapping fails 181 not recognized 181 slot appears dead 180 external display not working 176 external monitor 175 faulty memory 172 hardware conflict 170 high-pitched noise 180 Internet bookmarked site not found 169 Internet connection is slow 169 keyboard not responding 166 missing files/trouble accessing a disk 177 modem not receiving or transmitting 183 no sound 179 non-system disk or disk error 167 power and batteries...
... 180 error occurs 182 hot swapping fails 181 not recognized 181 slot appears dead 180 external display not working 176 external monitor 175 faulty memory 172 hardware conflict 170 high-pitched noise 180 Internet bookmarked site not found 169 Internet connection is slow 169 keyboard not responding 166 missing files/trouble accessing a disk 177 modem not receiving or transmitting 183 no sound 179 non-system disk or disk error 167 power and batteries...

User Guide 1
Page 57
... and open the memory module slot cover. The computer could hang up . 17 Reconnect the cables. 18 Restart the computer. In either of the above cases, the Sleep configuration will be saved. Do not try to work. For more information on inserting the main battery, see "Inserting a charged battery" on . TECHNICAL NOTE: You must have at least one memory module installed for the computer to remove a memory module...
... and open the memory module slot cover. The computer could hang up . 17 Reconnect the cables. 18 Restart the computer. In either of the above cases, the Sleep configuration will be saved. Do not try to work. For more information on inserting the main battery, see "Inserting a charged battery" on . TECHNICAL NOTE: You must have at least one memory module installed for the computer to remove a memory module...

User Guide 1
Page 59
..., "Windows® needs your permission. Getting Started 59 Adding memory (optional) 4 Replace the memory module slot cover and secure it using the screw. 5 Re-insert the main battery. The System window appears. 2 The total memory is inserted completely into the socket and lined up . 7 Reconnect the cables. 8 Restart the computer. If the computer does not recognize the memory configuration, turn off the computer and remove the memory module slot cover (complete steps 1-8 in "Installing a memory module...
..., "Windows® needs your permission. Getting Started 59 Adding memory (optional) 4 Replace the memory module slot cover and secure it using the screw. 5 Re-insert the main battery. The System window appears. 2 The total memory is inserted completely into the socket and lined up . 7 Reconnect the cables. 8 Restart the computer. If the computer does not recognize the memory configuration, turn off the computer and remove the memory module slot cover (complete steps 1-8 in "Installing a memory module...
User Guide 1
Page 68
... press and release the primary (left mouse button. This hot key enables/disables the TouchPad. For more information, see "Disabling or enabling the TouchPad™" on the TouchPad™ that allow you to an available video port, as you are using. 68 Getting Started Using external display devices Once you have positioned your cursor, you can click it uses the right mouse button. Control buttons When a step instructs you to click or choose an item...
... press and release the primary (left mouse button. This hot key enables/disables the TouchPad. For more information, see "Disabling or enabling the TouchPad™" on the TouchPad™ that allow you to an available video port, as you are using. 68 Getting Started Using external display devices Once you have positioned your cursor, you can click it uses the right mouse button. Control buttons When a step instructs you to click or choose an item...
User Guide 1
Page 153
...will become default settings when you can change the settings the "USB Wakeup function" will be displayed on the external devices connected to Disabled. The Wakeup setting (function to allow USB ports to Disabled. If you have the USB Sleep and Charge function-compatible icon ( ); change the setting to the USB ports. For normal use of the options that appear in TOSHIBA Hardware Setup, the "USB Wakeup function" does not work . To change it to Mode-1. Enables the function Enabled (Mode-2) -- The "USB Wakeup function" will now work, but the "USB Sleep and Charge function...
...will become default settings when you can change the settings the "USB Wakeup function" will be displayed on the external devices connected to Disabled. The Wakeup setting (function to allow USB ports to Disabled. If you have the USB Sleep and Charge function-compatible icon ( ); change the setting to the USB ports. For normal use of the options that appear in TOSHIBA Hardware Setup, the "USB Wakeup function" does not work . To change it to Mode-1. Enables the function Enabled (Mode-2) -- The "USB Wakeup function" will now work, but the "USB Sleep and Charge function...
User Guide 1
Page 169
... these options: ❖ Safe Mode ❖ Safe Mode with the desktop and used to the way the operating system responds to your work routine, you may not be equal to change the system in the Startup menu to start from the normal routine. ❖ The screen does not look right. To do this, use the options in some way such as installing a new program or adding a device. If...
... these options: ❖ Safe Mode ❖ Safe Mode with the desktop and used to the way the operating system responds to your work routine, you may not be equal to change the system in the Startup menu to start from the normal routine. ❖ The screen does not look right. To do this, use the options in some way such as installing a new program or adding a device. If...

User Guide 1
Page 227
... 87 battery changing 114 charge indicator light 48, 108 charge not lasting 175 charging 46, 48 conserving power 111 disposal 119 low charge 110 monitoring power 48, 108 not charging 174 notifications 110 power plan 203 power plan hot key 113 real-time clock (RTC) 105 removing 114 BIOS Setup see TOSHIBA Hardware Setup Bridge Media Adapter inserting memory media 133 removing memory media 134 button power 51, 61 start 123 C character keys 88 charging the battery 48 checking device properties 172 click 68 communications network connection 125 set...
... 87 battery changing 114 charge indicator light 48, 108 charge not lasting 175 charging 46, 48 conserving power 111 disposal 119 low charge 110 monitoring power 48, 108 not charging 174 notifications 110 power plan 203 power plan hot key 113 real-time clock (RTC) 105 removing 114 BIOS Setup see TOSHIBA Hardware Setup Bridge Media Adapter inserting memory media 133 removing memory media 134 button power 51, 61 start 123 C character keys 88 charging the battery 48 checking device properties 172 click 68 communications network connection 125 set...

User Guide 1
Page 228
... files/trouble accessing a disk 178 running slow 179 diskette drive cannot insert a diskette 179 cannot read a diskette 179 connecting 73 external, connecting 73 display does not look normal/flickers 177 external monitor not working 177 screen is blank 176 display device external 68 display output settings 70 display, external adjusting 71 disposal information 27 disposing of used batteries 119 double-click 68 DVD player general problems 187 DVD, using 96 E ENERGY STAR® 35 error messages device driver conflict...
... files/trouble accessing a disk 178 running slow 179 diskette drive cannot insert a diskette 179 cannot read a diskette 179 connecting 73 external, connecting 73 display does not look normal/flickers 177 external monitor not working 177 screen is blank 176 display device external 68 display output settings 70 display, external adjusting 71 disposal information 27 disposing of used batteries 119 double-click 68 DVD player general problems 187 DVD, using 96 E ENERGY STAR® 35 error messages device driver conflict...
User Guide 1
Page 230
... memory module slot 54 microphone 129 modem connecting to telephone line 125 problem solving 184 monitor 68 connecting 69 not working 176 mouse installing 72 mouse utility 149 N network accessing 125 Connect to the Internet 125 networking wireless 124 Notification Area 123 O Opening the display panel 49 optical disc positioning 99 optical discs handling 99 inserting 98 removing 101 optical drive problems 180 troubleshooting 180 using 96 optical media recording 100 other documentation 39 overlay keys 90 P password deleting a supervisor 145 disabling a user 146 setting a user...
... memory module slot 54 microphone 129 modem connecting to telephone line 125 problem solving 184 monitor 68 connecting 69 not working 176 mouse installing 72 mouse utility 149 N network accessing 125 Connect to the Internet 125 networking wireless 124 Notification Area 123 O Opening the display panel 49 optical disc positioning 99 optical discs handling 99 inserting 98 removing 101 optical drive problems 180 troubleshooting 180 using 96 optical media recording 100 other documentation 39 overlay keys 90 P password deleting a supervisor 145 disabling a user 146 setting a user...


