

Users Manual Canada; English
Page 2
... trademark, and IBM PC and PS/2 are registered trademarks and Windows Vista is a trademark of International Business Machines Corporation. Windows and Microsoft are trademarks of Eastman Kodak. Copyright © 2007 by copyright laws belongs to the author or to the copyright owner. TOSHIBA Satellite A210/Satellite Pro A210 Portable Personal Computer User's Manual First edition August 2007 Copyright authority for damages incurred directly...
... trademark, and IBM PC and PS/2 are registered trademarks and Windows Vista is a trademark of International Business Machines Corporation. Windows and Microsoft are trademarks of Eastman Kodak. Copyright © 2007 by copyright laws belongs to the author or to the copyright owner. TOSHIBA Satellite A210/Satellite Pro A210 Portable Personal Computer User's Manual First edition August 2007 Copyright authority for damages incurred directly...

Users Manual Canada; English
Page 9
... possible. User's Manual ix Telephone company procedures The goal of the telephone company is not operating properly, you with the FCC. In order to party lines service is not feasible, you will give you notice in their equipment, operations, or procedures. Connection to program this information upon request. If the telephone company notes a problem, they should immediately remove it...
... possible. User's Manual ix Telephone company procedures The goal of the telephone company is not operating properly, you with the FCC. In order to party lines service is not feasible, you will give you notice in their equipment, operations, or procedures. Connection to program this information upon request. If the telephone company notes a problem, they should immediately remove it...
Users Manual Canada; English
Page 30
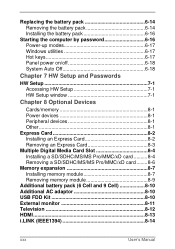
Replacing the battery pack 6-14 Removing the battery pack 6-14 Installing the battery pack 6-16 Starting the computer by password 6-16 Power-up modes 6-17 Windows utilities 6-17 Hot keys 6-17 Panel power on/off 6-18 System Auto Off 6-18 Chapter 7 HW Setup and Passwords HW Setup 7-1 Accessing HW Setup 7-1 HW Setup window 7-1 Chapter 8 Optional Devices Cards/memory 8-1 Power devices 8-1 Peripheral devices 8-1 Other 8-1 Express Card 8-2 Installing an Express Card 8-2 Removing an Express Card 8-3 Multiple Digital Media Card Slot 8-4 Installing a SD/SDHC/MS/MS Pro/MMC/xD card ...
Replacing the battery pack 6-14 Removing the battery pack 6-14 Installing the battery pack 6-16 Starting the computer by password 6-16 Power-up modes 6-17 Windows utilities 6-17 Hot keys 6-17 Panel power on/off 6-18 System Auto Off 6-18 Chapter 7 HW Setup and Passwords HW Setup 7-1 Accessing HW Setup 7-1 HW Setup window 7-1 Chapter 8 Optional Devices Cards/memory 8-1 Power devices 8-1 Peripheral devices 8-1 Other 8-1 Express Card 8-2 Installing an Express Card 8-2 Removing an Express Card 8-3 Multiple Digital Media Card Slot 8-4 Installing a SD/SDHC/MS/MS Pro/MMC/xD card ...

Users Manual Canada; English
Page 33
... preface to begin using the Touch Pad/Dual Mode Pad, optical disc drive, external diskette drive, Wireless LAN, LANs, Audio/Video controls, and internal modem. If you are going to install Express Cards or connect external devices such as a printer, be sure to read over the Special Features section of the Introduction, to learn how this manual by -step instructions on setting up and begin operating your computer, basic operations and care, using optional devices and troubleshooting. Chapter 2, The Grand...
... preface to begin using the Touch Pad/Dual Mode Pad, optical disc drive, external diskette drive, Wireless LAN, LANs, Audio/Video controls, and internal modem. If you are going to install Express Cards or connect external devices such as a printer, be sure to read over the Special Features section of the Introduction, to learn how this manual by -step instructions on setting up and begin operating your computer, basic operations and care, using optional devices and troubleshooting. Chapter 2, The Grand...
Users Manual Canada; English
Page 48
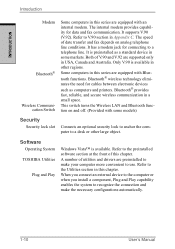
... series are supported only in Appendix C. cation Switch Some computers in this chapter. The speed of V.90 and V.92 are equipped with Bluetooth functions. It is available. Refer to the Utilities section in some models) Security Security lock slot Connects an optional security lock to anchor the computer to make the necessary configurations automatically. 1-10 User's Manual When you connect an external device to the computer or when you install...
... series are supported only in Appendix C. cation Switch Some computers in this chapter. The speed of V.90 and V.92 are equipped with Bluetooth functions. It is available. Refer to the Utilities section in some models) Security Security lock slot Connects an optional security lock to anchor the computer to make the necessary configurations automatically. 1-10 User's Manual When you connect an external device to the computer or when you install...

Users Manual Canada; English
Page 99
... on your creating Recovery Media GETTING STARTED For HDD Recovery model If preinstalled files are damaged, use System Recovery Options if restoring the pre-installed software without System Recovery Options. 1. Hold down 0 (zero) key on the keyboard, turn off your creating Recovery Media or using HDD Recovery to display the Boot menu. When In Touch with Tomorrow TOSHIBA" prompt appears, press the F12 key to restore them. a. c. Restoring the preinstalled software from your computer. 3. Load the Recovery Media in the optional optical disc drive and turn on -screen instructions...
... on your creating Recovery Media GETTING STARTED For HDD Recovery model If preinstalled files are damaged, use System Recovery Options if restoring the pre-installed software without System Recovery Options. 1. Hold down 0 (zero) key on the keyboard, turn off your creating Recovery Media or using HDD Recovery to display the Boot menu. When In Touch with Tomorrow TOSHIBA" prompt appears, press the F12 key to restore them. a. c. Restoring the preinstalled software from your computer. 3. Load the Recovery Media in the optional optical disc drive and turn on -screen instructions...

Users Manual Canada; English
Page 119
... be displayed on an external display or television, use an HDMI cable to connect the external device to the HDMI out port and change the screen resolution while running the "TOSHIBA HD DVD PLAYER". ❑ Audio output through the S/PDIF cannot be recorded when playing an HD DVD in the "Display Settings". Operating Basics ❑ Do not configure the Display automatic power off function to run when "Colors" is set to "Highest (32 bit)". HD DVD Video...
... be displayed on an external display or television, use an HDMI cable to connect the external device to the HDMI out port and change the screen resolution while running the "TOSHIBA HD DVD PLAYER". ❑ Audio output through the S/PDIF cannot be recorded when playing an HD DVD in the "Display Settings". Operating Basics ❑ Do not configure the Display automatic power off function to run when "Colors" is set to "Highest (32 bit)". HD DVD Video...

Users Manual Canada; English
Page 121
... click OK to launch the TOSHIBA HD DVD PLAYER. Operating TOSHIBA HD DVD PLAYER Notes on the Front operation panel. Touch the CD/DVD panel on Using "TOSHIBA HD DVD PLAYER". ❑ The HD DVD standard defines A, B, C and D buttons, and some software may vary amongst HD DVD-Videos and scenes. ❑ Only operation buttons (including remote controller and Front operation panels) which correspond to start "TOSHIBA HD DVD PLAYER". Operating Basics If this type appears, use the following corresponding keyboard keys.
... click OK to launch the TOSHIBA HD DVD PLAYER. Operating TOSHIBA HD DVD PLAYER Notes on the Front operation panel. Touch the CD/DVD panel on Using "TOSHIBA HD DVD PLAYER". ❑ The HD DVD standard defines A, B, C and D buttons, and some software may vary amongst HD DVD-Videos and scenes. ❑ Only operation buttons (including remote controller and Front operation panels) which correspond to start "TOSHIBA HD DVD PLAYER". Operating Basics If this type appears, use the following corresponding keyboard keys.

Users Manual Canada; English
Page 130
... the Windows Vista™ operating system. ◆ Operate the computer for it to finish, then disable virus detection programs including any other software cannot be lost if there is a write error. ◆ Do not perform any of a mouse or Touch Pad, closing/opening the LCD panel. ◆ Start a communication application such as airplanes, trains, or cars. Do not use shut down/log off and sleep/hibernation...
... the Windows Vista™ operating system. ◆ Operate the computer for it to finish, then disable virus detection programs including any other software cannot be lost if there is a write error. ◆ Do not perform any of a mouse or Touch Pad, closing/opening the LCD panel. ◆ Start a communication application such as airplanes, trains, or cars. Do not use shut down/log off and sleep/hibernation...
Users Manual Canada; English
Page 162
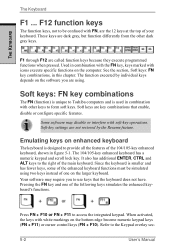
THE KEYBOARD The Keyboard F1 ... F12 function keys The function keys, not to use keys that enable, disable or configure specific features. The function executed by the Resume feature. Some software may require you are key combinations that the keyboard does not have. Soft-key settings are the 12 keys at the top of the main keyboard. It also has additional ENTER, CTRL and ALT keys to provide all the features of the...
THE KEYBOARD The Keyboard F1 ... F12 function keys The function keys, not to use keys that enable, disable or configure specific features. The function executed by the Resume feature. Some software may require you are key combinations that the keyboard does not have. Soft-key settings are the 12 keys at the top of the main keyboard. It also has additional ENTER, CTRL and ALT keys to provide all the features of the...
Users Manual Canada; English
Page 164
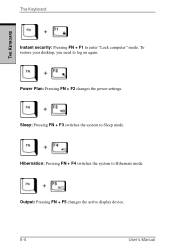
Sleep: Pressing FN + F3 switches the system to Hibernate mode. Hibernation: Pressing FN + F4 switches the system to Sleep mode. To restore your desktop, you need to enter "Lock computer" mode. Output: Pressing FN + F5 changes the active display device. 5-4 User's Manual The Keyboard THE KEYBOARD Instant security: Pressing FN + F1 to log on again. Power Plan: Pressing FN + F2 changes the power settings.
Sleep: Pressing FN + F3 switches the system to Hibernate mode. Hibernation: Pressing FN + F4 switches the system to Sleep mode. To restore your desktop, you need to enter "Lock computer" mode. Output: Pressing FN + F5 changes the active display device. 5-4 User's Manual The Keyboard THE KEYBOARD Instant security: Pressing FN + F1 to log on again. Power Plan: Pressing FN + F2 changes the power settings.
Users Manual Canada; English
Page 188
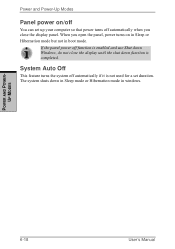
... a set up your computer so that power turns off function is enabled and use Shut down Windows, do not close the display panel. Power and Power-Up Modes Panel power on in Sleep or Hibernation mode but not in windows. When you close the display until the shut down in Sleep mode or Hibernation mode in boot mode. If the panel power off automatically when you open the panel, power turns on /off You can set duration. POWER AND POWERUP MODES 6-18 User's Manual
... a set up your computer so that power turns off function is enabled and use Shut down Windows, do not close the display panel. Power and Power-Up Modes Panel power on in Sleep or Hibernation mode but not in windows. When you close the display until the shut down in Sleep mode or Hibernation mode in boot mode. If the panel power off automatically when you open the panel, power turns on /off You can set duration. POWER AND POWERUP MODES 6-18 User's Manual
Users Manual Canada; English
Page 201
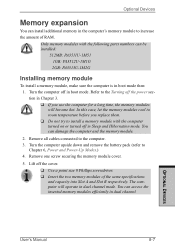
... memory modules will operate in dual channel mode. You can access the inserted memory modules efficiently in dual channel. Lift off in boot mode. You can damage the computer and the memory module. 2. OPTIONAL DEVICES User's Manual 8-7 Refer to increase the amount of the same specifications and capacity into Slot A and Slot B respectively. Turn the computer off the cover. ❑ Use a point size 0 Phillips screwdriver. ❑ Insert the two memory modules of RAM. Remove all cables connected...
... memory modules will operate in dual channel mode. You can access the inserted memory modules efficiently in dual channel. Lift off in boot mode. You can damage the computer and the memory module. 2. OPTIONAL DEVICES User's Manual 8-7 Refer to increase the amount of the same specifications and capacity into Slot A and Slot B respectively. Turn the computer off the cover. ❑ Use a point size 0 Phillips screwdriver. ❑ Insert the two memory modules of RAM. Remove all cables connected...
Users Manual Canada; English
Page 203
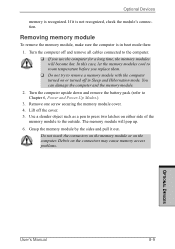
... cause memory access problems. OPTIONAL DEVICES User's Manual 8-9 Removing memory module To remove the memory module, make sure the computer is recognized. In this case, let the memory modules cool to room temperature before you replace them. ❑ Do not try to the computer. ❑ If you use the computer for a long time, the memory modules will pop up. 6. Optional Devices memory is in Sleep and Hibernation mode. If it out. The memory module will become hot. Debris...
... cause memory access problems. OPTIONAL DEVICES User's Manual 8-9 Removing memory module To remove the memory module, make sure the computer is recognized. In this case, let the memory modules cool to room temperature before you replace them. ❑ Do not try to the computer. ❑ If you use the computer for a long time, the memory modules will pop up. 6. Optional Devices memory is in Sleep and Hibernation mode. If it out. The memory module will become hot. Debris...

Users Manual Canada; English
Page 240
... of main system memory allocated to support graphics may not charge while computer is 64-bit. This is 10-2 User's Manual See "www.pcsupport.toshiba.com" for more information. Battery may vary depending on your computer unless explicitly stated that the following hardware and software requirements are met: • 64-bit Operating System • 64-bit CPU, Chipset and BIOS (Basic Input...
... of main system memory allocated to support graphics may not charge while computer is 64-bit. This is 10-2 User's Manual See "www.pcsupport.toshiba.com" for more information. Battery may vary depending on your computer unless explicitly stated that the following hardware and software requirements are met: • 64-bit Operating System • 64-bit CPU, Chipset and BIOS (Basic Input...
Users Manual Canada; English
Page 266
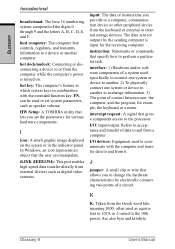
... access to set the parameters for example, the keyboard or a menu. See also byte and kilobyte. Glossary-8 User's Manual input: The data or instructions you to change the hardware characteristics by the sending computer is turned on the screen or in combination with the computer and transfer data to and from it. interface: 1) Hardware and/or software components of a system used as digital video cameras. Refers...
... access to set the parameters for example, the keyboard or a menu. See also byte and kilobyte. Glossary-8 User's Manual input: The data or instructions you to change the hardware characteristics by the sending computer is turned on the screen or in combination with the computer and transfer data to and from it. interface: 1) Hardware and/or software components of a system used as digital video cameras. Refers...

Users Manual Canada; English
Page 267
... to digital format where received. mode: A method of operation, for transmission over telephone lines and then converts modulated data (demodulates) to lighted portions of multimedia applications. GLOSSARY KB: See kilobyte. Each keystroke activates a switch that uses the large scale integration. menu: A software interface that converts (modulates) digital data for example, the boot mode or the resume mode. modem: Derived from modulator/ demodulator, a device that displays a list of options on...
... to digital format where received. mode: A method of operation, for transmission over telephone lines and then converts modulated data (demodulates) to lighted portions of multimedia applications. GLOSSARY KB: See kilobyte. Each keystroke activates a switch that uses the large scale integration. menu: A software interface that converts (modulates) digital data for example, the boot mode or the resume mode. modem: Derived from modulator/ demodulator, a device that displays a list of options on...

Users Manual Canada; English
Page 271
... each pixel enabling fine display control and excellent screen legibility. volatile memory: Random access memory (RAM) that stores information as long as the computer is an industry standard video adapter that lets you might connect a USB-HUB to the computer, then connect a keyboard to the USB-HUB and a mouse to the keyboard. Wireless LAN: A short-range radio technology designed to that produced by a composite connection. See also RCA jack. W Warm dock...
... each pixel enabling fine display control and excellent screen legibility. volatile memory: Random access memory (RAM) that stores information as long as the computer is an industry standard video adapter that lets you might connect a USB-HUB to the computer, then connect a keyboard to the USB-HUB and a mouse to the keyboard. Wireless LAN: A short-range radio technology designed to that produced by a composite connection. See also RCA jack. W Warm dock...
Users Manual Canada; English
Page 274
...M Main battery, See Battery pack Memory 1-3 expansion 1-17, 8-7 installing 8-7 removing 8-9 slots 1-3 Microphone, See Sound system microphone Microprocessor, See Processor Modem 1-10, 4-50 connecting 4-52 disconnecting 4-52 jack location 2-6 problems 9-22 region selection 4-50 using 4-35 Hibernation 1-12, 5-4 problems 9-24 Hot keys 1-11, 5-3 brightness down 5-5 brightness up 5-5 hibernation 5-4 instant security 5-4 lock computer mode 5-4 output 5-4 power plan 5-4 sleep 5-4 touch pad 5-5 wireless 5-5 HW Setup 1-14 accessing 7-1 Boot Priority 7-4 CPU 7-4 Display 7-3 General 7-2 Keyboard 7-6 LAN...
...M Main battery, See Battery pack Memory 1-3 expansion 1-17, 8-7 installing 8-7 removing 8-9 slots 1-3 Microphone, See Sound system microphone Microprocessor, See Processor Modem 1-10, 4-50 connecting 4-52 disconnecting 4-52 jack location 2-6 problems 9-22 region selection 4-50 using 4-35 Hibernation 1-12, 5-4 problems 9-24 Hot keys 1-11, 5-3 brightness down 5-5 brightness up 5-5 hibernation 5-4 instant security 5-4 lock computer mode 5-4 output 5-4 power plan 5-4 sleep 5-4 touch pad 5-5 wireless 5-5 HW Setup 1-14 accessing 7-1 Boot Priority 7-4 CPU 7-4 Display 7-3 General 7-2 Keyboard 7-6 LAN...

Detailed Specs for Satellite A210 PSAFGC-ST008C English
Page 1
... up to 12,192m. Zero free slots. Non Operating 20° C per hr. Non-Operating: -9.14 to 831MB available graphics memory using Hypermemory Sound System Realtek ALC268 Software Sound, High Definition Audio, Built-in -1 Bridge Media Adaptor (SDHC Card, xD picture card, Memory Stick, Memory Stick Pro, Multi Media Card), 4 USB 2.0, RJ11, RJ45, IEEE 1394, external microphone port, headphone port, RGB, TV-Out (S-Video) Keyboard CANADIAN BILINGUAL KEYBOARD Full sized 87 keys with low air pressure (high...
... up to 12,192m. Zero free slots. Non Operating 20° C per hr. Non-Operating: -9.14 to 831MB available graphics memory using Hypermemory Sound System Realtek ALC268 Software Sound, High Definition Audio, Built-in -1 Bridge Media Adaptor (SDHC Card, xD picture card, Memory Stick, Memory Stick Pro, Multi Media Card), 4 USB 2.0, RJ11, RJ45, IEEE 1394, external microphone port, headphone port, RGB, TV-Out (S-Video) Keyboard CANADIAN BILINGUAL KEYBOARD Full sized 87 keys with low air pressure (high...


