
User Guide
Page 9
... GmbH, Hammfelddamm 8, 41460 Neuss, Germany. Responsible for harmful interference to co-channel Mobile Satellite systems. High power radars are allocated as primary users of Conformity TOSHIBA declares that this device is restricted to indoor use due to its transmit antenna) that the Industry Canada technical specifications were met. Si le matriel (... conforms to 5.25 GHz frequency range. Equipment (or its operation in accordance with and/or damage this product to be operated indoors and away from windows to licensing.
... GmbH, Hammfelddamm 8, 41460 Neuss, Germany. Responsible for harmful interference to co-channel Mobile Satellite systems. High power radars are allocated as primary users of Conformity TOSHIBA declares that this device is restricted to indoor use due to its transmit antenna) that the Industry Canada technical specifications were met. Si le matriel (... conforms to 5.25 GHz frequency range. Equipment (or its operation in accordance with and/or damage this product to be operated indoors and away from windows to licensing.
User Guide
Page 25
...mark and logos are trademarks or registered trademarks of their respective companies. 25 Trademarks Satellite is a registered trademark of the Wi-Fi Alliance. ConfigFree is a trademark of Toshiba Corporation. MultiMediaCard is a trademark of Infineon Technologies AG. Disposal of Fuji Photo Film...and trade names are registered trademarks of Microsoft Corporation in the United States and/or other countries. Microsoft Windows and Windows Vista are either registered trademarks or trademarks of Microsoft Corporation. Ltd. Adobe and Photoshop are either registered ...
...mark and logos are trademarks or registered trademarks of their respective companies. 25 Trademarks Satellite is a registered trademark of the Wi-Fi Alliance. ConfigFree is a trademark of Toshiba Corporation. MultiMediaCard is a trademark of Infineon Technologies AG. Disposal of Fuji Photo Film...and trade names are registered trademarks of Microsoft Corporation in the United States and/or other countries. Microsoft Windows and Windows Vista are either registered trademarks or trademarks of Microsoft Corporation. Ltd. Adobe and Photoshop are either registered ...
User Guide
Page 28
...86 Making your keyboard emulate a full-size keyboard 86 Ctrl, Fn, and Alt keys 87 Function keys 87 Special Windows® keys 87 Overlay keys 88 Using the overlay to type numeric data 88 Starting a program 89 Starting a ...program from the Start menu...........89 Starting a program from Windows® Explorer....90 Starting a program using the Start Search field 91 Saving your work 91 Printing your work 93 Backing... Removing a disc with the computer off ..........101 Caring for CD or DVD discs 101 Toshiba's online resources 101
...86 Making your keyboard emulate a full-size keyboard 86 Ctrl, Fn, and Alt keys 87 Function keys 87 Special Windows® keys 87 Overlay keys 88 Using the overlay to type numeric data 88 Starting a program 89 Starting a ...program from the Start menu...........89 Starting a program from Windows® Explorer....90 Starting a program using the Start Search field 91 Saving your work 91 Printing your work 93 Backing... Removing a disc with the computer off ..........101 Caring for CD or DVD discs 101 Toshiba's online resources 101

User Guide
Page 31
... Problems that are easy to fix 168 Problems when you turn on the computer............169 The Windows® operating system is not working 172 Using Startup options to fix problems 172 Internet problems 173 The Windows® operating system can help you 174 Resolving a hardware conflict 174 A plan of action 174 Fixing...
... Problems that are easy to fix 168 Problems when you turn on the computer............169 The Windows® operating system is not working 172 Using Startup options to fix problems 172 Internet problems 173 The Windows® operating system can help you 174 Resolving a hardware conflict 174 A plan of action 174 Fixing...
User Guide
Page 32
32 Contents Data and system configuration backup in the Windows® operating system 191 If you need further assistance 195 Before you contact Toshiba 195 Contacting Toshiba 196 Other Toshiba Internet Web sites 197 Toshiba's worldwide offices 197 Appendix A: Hot Keys/TOSHIBA Cards 199 Hot Key Cards 199 Using the Hot Key Cards 200 Application Cards 201...
32 Contents Data and system configuration backup in the Windows® operating system 191 If you need further assistance 195 Before you contact Toshiba 195 Contacting Toshiba 196 Other Toshiba Internet Web sites 197 Toshiba's worldwide offices 197 Appendix A: Hot Keys/TOSHIBA Cards 199 Hot Key Cards 199 Using the Hot Key Cards 200 Application Cards 201...
User Guide
Page 40
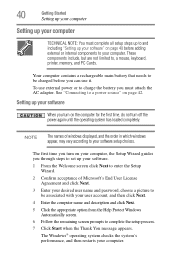
...From the Welcome screen click Next to enter the Setup Wizard. 2 Confirm acceptance of windows displayed, and the order in which windows appear, may vary according to your software setup choices. The Windows® operating system checks the system's performance, and then restarts your user account, and... then click Next. 4 Enter the computer name and description and click Next. 5 Click the appropriate option from the Help Protect Windows Automatically screen. 6 Follow the remaining screen prompts to complete the setup process. 7 Click Start when the Thank You message appears. These ...
...From the Welcome screen click Next to enter the Setup Wizard. 2 Confirm acceptance of windows displayed, and the order in which windows appear, may vary according to your software setup choices. The Windows® operating system checks the system's performance, and then restarts your user account, and... then click Next. 4 Enter the computer name and description and click Next. 5 Click the appropriate option from the Help Protect Windows Automatically screen. 6 Follow the remaining screen prompts to complete the setup process. 7 Click Start when the Thank You message appears. These ...

User Guide
Page 54
...memory module pops up normally. NOTE If your hard drive for errors or defragment the drive. If so, consult Windows® Help and Support. 2 Pull the latches away from the memory module. If one of one another, you...may need to scan your system has the memory modules stacked on the power: If "Start Windows® Normally" is best to press Enter to go into Safe Mode, then shut down and restart the... system, at which time Windows® should boot back up slightly. When Safe Mode is suggested, this could be a sign that...
...memory module pops up normally. NOTE If your hard drive for errors or defragment the drive. If so, consult Windows® Help and Support. 2 Pull the latches away from the memory module. If one of one another, you...may need to scan your system has the memory modules stacked on the power: If "Start Windows® Normally" is best to press Enter to go into Safe Mode, then shut down and restart the... system, at which time Windows® should boot back up slightly. When Safe Mode is suggested, this could be a sign that...
User Guide
Page 56
...is inserted completely into the socket and lined up squarely with a hard disk partition (available on page 48), and then check that says, "Windows® needs your system. If the computer does not recognize the memory configuration, turn off the computer and remove the memory module slot cover ...(complete steps 1-8 in "Installing a memory module" on certain models) to allow you were trying to continue." NOTE From time to time, Windows® will display a pop-up that the module is a security feature to prevent programs or people from doing things on page 57. Using the...
...is inserted completely into the socket and lined up squarely with a hard disk partition (available on page 48), and then check that says, "Windows® needs your system. If the computer does not recognize the memory configuration, turn off the computer and remove the memory module slot cover ...(complete steps 1-8 in "Installing a memory module" on certain models) to allow you were trying to continue." NOTE From time to time, Windows® will display a pop-up that the module is a security feature to prevent programs or people from doing things on page 57. Using the...

User Guide
Page 57
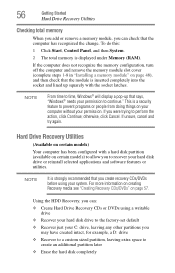
... Support Centre in the United States is (800) 457-7777, outside the United States it is not writable, contact Toshiba Customer Support to create Recovery media on CDs or DVDs). (Sample Image) Recovery Disc Creator screen You can also launch the application by clicking Start, ... hard disk drive and recover your system if the hard drive recovery partition has been deleted or the hard disk has been replaced on the Windows® desktop. NOTE The system will prompt you the ability to copy the Hard Drive Recovery Utilities.
... Support Centre in the United States is (800) 457-7777, outside the United States it is not writable, contact Toshiba Customer Support to create Recovery media on CDs or DVDs). (Sample Image) Recovery Disc Creator screen You can also launch the application by clicking Start, ... hard disk drive and recover your system if the hard drive recovery partition has been deleted or the hard disk has been replaced on the Windows® desktop. NOTE The system will prompt you the ability to copy the Hard Drive Recovery Utilities.

User Guide
Page 64
Installing drivers and applications (Available on certain models) The Toshiba Application Installer (available on certain models) allows you to reinstall the drivers ... to the left side, slide your finger from right to left. To reinstall drivers and applications: 1 Double-click the Toshiba Application Installer icon on -screen prompts to move the cursor with your computer. Using the TouchPad™ The TouchPad™... and enables you want to install. 4 Click Install. 5 Follow the on the Windows® desktop. 2 Click Next. 3 Click the item(s) you to complete the installation process.
Installing drivers and applications (Available on certain models) The Toshiba Application Installer (available on certain models) allows you to reinstall the drivers ... to the left side, slide your finger from right to left. To reinstall drivers and applications: 1 Double-click the Toshiba Application Installer icon on -screen prompts to move the cursor with your computer. Using the TouchPad™ The TouchPad™... and enables you want to install. 4 Click Install. 5 Follow the on the Windows® desktop. 2 Click Next. 3 Click the item(s) you to complete the installation process.

User Guide
Page 66
... following default settings: ❖ Left button: Opens the assigned email application ❖ Middle button: Opens the ConfigFree utility (see the Toshiba online Help for more information) ❖ Right button: Sends the item in the Mouse Properties dialog box before they can be configured... the Dual Mode Pad will deactivate an external mouse. You must configure these buttons in the active window to adjust the system volume level. Virtual buttons Mode switch button TOSHIBA 1 2 3 Volume control bar Virtual buttons (Sample Illustration) Virtual buttons on the Dual Mode Pad...
... following default settings: ❖ Left button: Opens the assigned email application ❖ Middle button: Opens the ConfigFree utility (see the Toshiba online Help for more information) ❖ Right button: Sends the item in the Mouse Properties dialog box before they can be configured... the Dual Mode Pad will deactivate an external mouse. You must configure these buttons in the active window to adjust the system volume level. Virtual buttons Mode switch button TOSHIBA 1 2 3 Volume control bar Virtual buttons (Sample Illustration) Virtual buttons on the Dual Mode Pad...

User Guide
Page 67
...when an external device is plugged in. Enabling Dual Mode To enable Dual Mode: 1 Click Start, and then Control Panel. The Mouse Properties window appears. 3 Click the Device Settings tab, and then Settings. The virtual buttons cannot be enabled or changed in the upper-right corner. ...Switch to Button Mode by tapping in the Mouse Properties dialog box. The Properties for the Email, ConfigFree, and Print functions. The Control Panel window appears. 2 Click Mouse. The virtual buttons and Dual Mode can assign different functions to these buttons if you wish to the application you ...
...when an external device is plugged in. Enabling Dual Mode To enable Dual Mode: 1 Click Start, and then Control Panel. The Mouse Properties window appears. 3 Click the Device Settings tab, and then Settings. The virtual buttons cannot be enabled or changed in the upper-right corner. ...Switch to Button Mode by tapping in the Mouse Properties dialog box. The Properties for the Email, ConfigFree, and Print functions. The Control Panel window appears. 2 Click Mouse. The virtual buttons and Dual Mode can assign different functions to these buttons if you wish to the application you ...
User Guide
Page 68
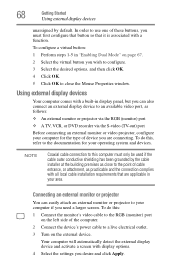
..., you need a larger screen. 68 Getting Started Using external display devices unassigned by the cable installer at the building premises as close the Mouse Properties window. To do this : 1 Connect the monitor's video cable to your computer if you must only be used if the cable outer conductive shielding has been...
..., you need a larger screen. 68 Getting Started Using external display devices unassigned by the cable installer at the building premises as close the Mouse Properties window. To do this : 1 Connect the monitor's video cable to your computer if you must only be used if the cable outer conductive shielding has been...
User Guide
Page 69
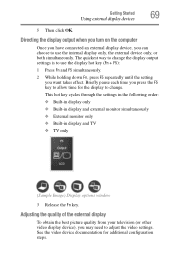
... ❖ Built-in display and external monitor simultaneously ❖ External monitor only ❖ Built-in display and TV ❖ TV only (Sample Image) Display options window 3 Release the Fn key. Getting Started 69 Using external display devices 5 Then click OK. Directing the display output when you turn on the computer Once...
... ❖ Built-in display and external monitor simultaneously ❖ External monitor only ❖ Built-in display and TV ❖ TV only (Sample Image) Display options window 3 Release the Fn key. Getting Started 69 Using external display devices 5 Then click OK. Directing the display output when you turn on the computer Once...
User Guide
Page 72
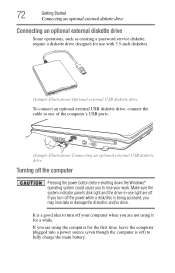
... the computer's USB ports. (Sample Illustration) Connecting an optional external USB diskette drive Turning off the computer Pressing the power button before shutting down the Windows® operating system could cause you may lose data or damage the disk/disc and/or drive. 72 Getting Started Connecting an optional external diskette...
... the computer's USB ports. (Sample Illustration) Connecting an optional external USB diskette drive Turning off the computer Pressing the power button before shutting down the Windows® operating system could cause you may lose data or damage the disk/disc and/or drive. 72 Getting Started Connecting an optional external diskette...

User Guide
Page 74
NOTE After your computer sleeps for an extended period of time, the Windows® operating system may save your work first. For information on using the Sleep command and the main battery discharges fully, your hard disk, and ...
NOTE After your computer sleeps for an extended period of time, the Windows® operating system may save your work first. For information on using the Sleep command and the main battery discharges fully, your hard disk, and ...
User Guide
Page 75
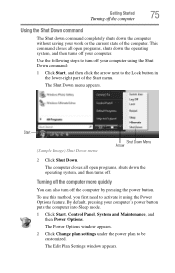
The Power Options window appears. 2 Click Change plan settings under the power plan to the Lock button in the lower-right part of the computer. Use the following steps ... your computer's power button puts the computer into Sleep mode. 1 Click Start, Control Panel, System and Maintenance, and then Power Options. The Edit Plan Settings window appears. Getting Started 75 Turning off the computer Using the Shut Down command The Shut down command completely shuts down the operating system, and then...
The Power Options window appears. 2 Click Change plan settings under the power plan to the Lock button in the lower-right part of the computer. Use the following steps ... your computer's power button puts the computer into Sleep mode. 1 Click Start, Control Panel, System and Maintenance, and then Power Options. The Edit Plan Settings window appears. Getting Started 75 Turning off the computer Using the Shut Down command The Shut down command completely shuts down the operating system, and then...
User Guide
Page 76
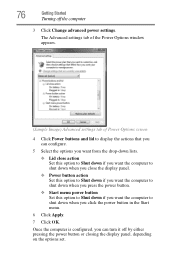
The Advanced settings tab of the Power Options window appears. (Sample Image) Advanced settings tab of Power Options screen 4 Click Power buttons and lid to display the actions that you can configure. 5 Select the ...
The Advanced settings tab of the Power Options window appears. (Sample Image) Advanced settings tab of Power Options screen 4 Click Power buttons and lid to display the actions that you can configure. 5 Select the ...
User Guide
Page 77
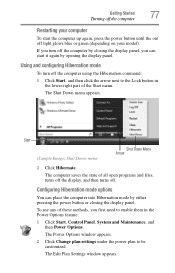
... computer To start it again by closing the display panel. Start (Sample Image) Shut Down menu Shut Down Menu Arrow 2 Click Hibernate. The Power Options window appears. 2 Click Change plan settings under the power plan to enable them in the lower-right part of the Start menu. The Shut Down menu...
... computer To start it again by closing the display panel. Start (Sample Image) Shut Down menu Shut Down Menu Arrow 2 Click Hibernate. The Power Options window appears. 2 Click Change plan settings under the power plan to enable them in the lower-right part of the Start menu. The Shut Down menu...
User Guide
Page 78
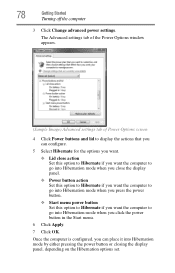
The Advanced settings tab of the Power Options window appears. (Sample Image) Advanced settings tab of Power Options screen 4 Click Power buttons and lid to display the actions that you click the power button ...
The Advanced settings tab of the Power Options window appears. (Sample Image) Advanced settings tab of Power Options screen 4 Click Power buttons and lid to display the actions that you click the power button ...


