

User Manual
Page 26
Contents Introduction 33 This guide 34 Safety icons 35 Other icons used 35 Other documentation 36 Service options 36 Chapter 1: Getting Started 37 Selecting a place to work 37 Creating a computer-friendly environment........37 Keeping yourself comfortable 38 Precautions 38 Important information on your computer's cooling fan 39 Setting up your computer 40 Setting up your software 40 Registering your computer with Toshiba 41 Adding optional external devices 41 Connecting to a power source 42 Charging the main battery 44 26
Contents Introduction 33 This guide 34 Safety icons 35 Other icons used 35 Other documentation 36 Service options 36 Chapter 1: Getting Started 37 Selecting a place to work 37 Creating a computer-friendly environment........37 Keeping yourself comfortable 38 Precautions 38 Important information on your computer's cooling fan 39 Setting up your computer 40 Setting up your software 40 Registering your computer with Toshiba 41 Adding optional external devices 41 Connecting to a power source 42 Charging the main battery 44 26
User Manual
Page 28
... 78 Special Windows® keys 78 Overlay keys 79 Using the overlay to type numeric data 79 Starting a program 80 Starting a program from the Start menu...........80 Starting a program from Windows® Explorer....81 Starting a program using the Start Search field 82 Saving your work 82 Printing your work 84 Backing up your work 85 Restoring... Creating a CD/DVD 91 Removing a disc with the computer on 91 Removing a disc with the computer off 92 Caring for CD or DVD discs 92 Toshiba's online resources 92
... 78 Special Windows® keys 78 Overlay keys 79 Using the overlay to type numeric data 79 Starting a program 80 Starting a program from the Start menu...........80 Starting a program from Windows® Explorer....81 Starting a program using the Start Search field 82 Saving your work 82 Printing your work 84 Backing up your work 85 Restoring... Creating a CD/DVD 91 Removing a disc with the computer on 91 Removing a disc with the computer off 92 Caring for CD or DVD discs 92 Toshiba's online resources 92
User Manual
Page 31
... Power-on Security 146 Control Center 147 Password Bank 148 Care and maintenance of your fingerprint reader 152 Fingerprint reader limitations 154 ConfigFree 154 Getting Started 155 ConfigFree Utilities 155 Chapter 6: If Something Goes Wrong 158 Problems that are easy to fix 158 Problems when you turn on the computer............159...
... Power-on Security 146 Control Center 147 Password Bank 148 Care and maintenance of your fingerprint reader 152 Fingerprint reader limitations 154 ConfigFree 154 Getting Started 155 ConfigFree Utilities 155 Chapter 6: If Something Goes Wrong 158 Problems that are easy to fix 158 Problems when you turn on the computer............159...

User Manual
Page 37
Chapter 1 Getting Started This chapter provides tips for the computer and any other items you use your notebook computer. Creating a computer-friendly environment Place the computer on a flat ...
Chapter 1 Getting Started This chapter provides tips for the computer and any other items you use your notebook computer. Creating a computer-friendly environment Place the computer on a flat ...
User Manual
Page 38
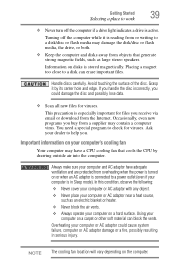
... Manual for Safety and Comfort, that shipped with the underside or surface of these instructions could damage the computer or cause system failure. 38 Getting Started Selecting a place to skin. Avoid prolonged contact to prevent heat injury to work environment and tips for working comfortably throughout the day. Disconnect the ... work ❖ Extreme heat, cold, or humidity. ❖ Liquids and corrosive chemicals. It could result in damage or serious injury. Keeping yourself comfortable The Toshiba Instruction Manual for Safety and Comfort. Remove the battery pack.
... Manual for Safety and Comfort, that shipped with the underside or surface of these instructions could damage the computer or cause system failure. 38 Getting Started Selecting a place to skin. Avoid prolonged contact to prevent heat injury to work environment and tips for working comfortably throughout the day. Disconnect the ... work ❖ Extreme heat, cold, or humidity. ❖ Liquids and corrosive chemicals. It could result in damage or serious injury. Keeping yourself comfortable The Toshiba Instruction Manual for Safety and Comfort. Remove the battery pack.
User Manual
Page 39
... power is turned on a hard surface. Occasionally, even new programs you . Ask your computer is active. Information on disks is especially important for viruses. Getting Started Selecting a place to work 39 ❖ Never turn off the computer while it by drawing outside air into the computer. Always make sure your computer...
... power is turned on a hard surface. Occasionally, even new programs you . Ask your computer is active. Information on disks is especially important for viruses. Getting Started Selecting a place to work 39 ❖ Never turn off the computer while it by drawing outside air into the computer. Always make sure your computer...
User Manual
Page 40
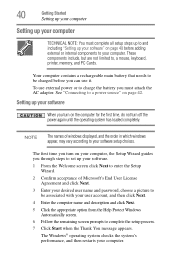
...windows appear, may vary according to a power source" on the computer for the first time, do not turn on page 42. 40 Getting Started Setting up your computer Setting up your computer TECHNICAL NOTE: You must attach the AC adaptor. These components include, but are not limited to ...complete the setup process. 7 Click Start when the Thank You message appears. Your computer contains a rechargeable main battery that needs to be associated with your user account, and then click...
...windows appear, may vary according to a power source" on the computer for the first time, do not turn on page 42. 40 Getting Started Setting up your computer Setting up your computer TECHNICAL NOTE: You must attach the AC adaptor. These components include, but are not limited to ...complete the setup process. 7 Click Start when the Thank You message appears. Your computer contains a rechargeable main battery that needs to be associated with your user account, and then click...
User Manual
Page 41
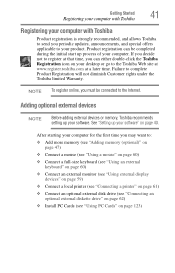
... time, you must be completed during the initial start up process of your computer. Failure to the Toshiba Web site at www.register.toshiba.com at a later time. Product registration can either double-click the Toshiba Registration icon on page 40. See "Setting up... time you periodic updates, announcements, and special offers applicable to your product. Getting Started Registering your computer with Toshiba 41 Registering your computer with Toshiba Product registration is strongly recommended, and allows Toshiba to send you may want to: ❖ Add more memory (see "Adding...
... time, you must be completed during the initial start up process of your computer. Failure to the Toshiba Web site at www.register.toshiba.com at a later time. Product registration can either double-click the Toshiba Registration icon on page 40. See "Setting up... time you periodic updates, announcements, and special offers applicable to your product. Getting Started Registering your computer with Toshiba 41 Registering your computer with Toshiba Product registration is strongly recommended, and allows Toshiba to send you may want to: ❖ Add more memory (see "Adding...
User Manual
Page 42
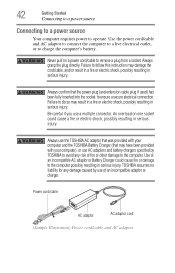
... a power cord/cable to do so may result in a fire or electric shock, possibly resulting in serious injury. TOSHIBA assumes no liability for any damage caused by TOSHIBA to avoid any risk of fire or other damage to the computer. Use the power cord/cable and AC adaptor to... adaptor that was provided with your computer and the TOSHIBA Battery Charger (that the power plug (and extension cable plug if used) has been fully inserted into the socket, to the computer possibly resulting in serious injury. 42 Getting Started Connecting to a power source Connecting to a power source ...
... a power cord/cable to do so may result in a fire or electric shock, possibly resulting in serious injury. TOSHIBA assumes no liability for any damage caused by TOSHIBA to avoid any risk of fire or other damage to the computer. Use the power cord/cable and AC adaptor to... adaptor that was provided with your computer and the TOSHIBA Battery Charger (that the power plug (and extension cable plug if used) has been fully inserted into the socket, to the computer possibly resulting in serious injury. 42 Getting Started Connecting to a power source Connecting to a power source ...
User Manual
Page 43
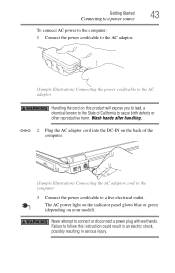
... on the back of California to cause birth defects or other reproductive harm. Never attempt to connect or disconnect a power plug with wet hands. Getting Started Connecting to a power source 43 To connect AC power to the computer: 1 Connect the power cord/cable to the AC adaptor. (Sample Illustration) Connecting the...
... on the back of California to cause birth defects or other reproductive harm. Never attempt to connect or disconnect a power plug with wet hands. Getting Started Connecting to a power source 43 To connect AC power to the computer: 1 Connect the power cord/cable to the AC adaptor. (Sample Illustration) Connecting the...
User Manual
Page 44
... If the AC power light flashes amber during charging, either the main battery is malfunctioning, or it is using the battery to recharge. 44 Getting Started Charging the main battery The computer's main battery light gives you must charge the battery. See "Changing the main battery" on page 104 for system...
... If the AC power light flashes amber during charging, either the main battery is malfunctioning, or it is using the battery to recharge. 44 Getting Started Charging the main battery The computer's main battery light gives you must charge the battery. See "Changing the main battery" on page 104 for system...
User Manual
Page 45
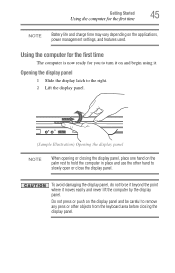
... hand on the palm rest to hold the computer in place and use the other hand to slowly open or close the display panel. Getting Started Using the computer for you to the right. 2 Lift the display panel. (Sample Illustration) Opening the display panel NOTE When opening or closing the display...
... hand on the palm rest to hold the computer in place and use the other hand to slowly open or close the display panel. Getting Started Using the computer for you to the right. 2 Lift the display panel. (Sample Illustration) Opening the display panel NOTE When opening or closing the display...
User Manual
Page 46
... extremely large number of the screen will dim and you may not have selected all the features and icons described in this guide. 46 Getting Started Using the computer for an entire product Series.
... extremely large number of the screen will dim and you may not have selected all the features and icons described in this guide. 46 Getting Started Using the computer for an entire product Series.
User Manual
Page 47
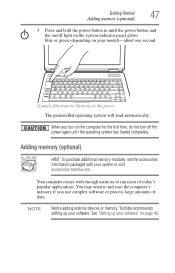
.... (Sample Illustration) Turning on the power The preinstalled operating system will load automatically. See "Setting up your system or visit accessories.toshiba.com. Adding memory (optional) HINT: To purchase additional memory modules, see the accessories information packaged with enough memory to increase the ...computer's memory if you turn on page 40. Getting Started Adding memory (optional) 47 3 Press and hold the power button in until the power button and the on/off light on ...
.... (Sample Illustration) Turning on the power The preinstalled operating system will load automatically. See "Setting up your system or visit accessories.toshiba.com. Adding memory (optional) HINT: To purchase additional memory modules, see the accessories information packaged with enough memory to increase the ...computer's memory if you turn on page 40. Getting Started Adding memory (optional) 47 3 Press and hold the power button in until the power button and the on/off light on ...
User Manual
Page 48
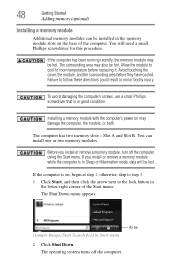
...injury. The computer has two memory slots-Slot A and Slot B. If the computer is on the base of the Start menu. The operating system turns off the computer using the Start menu. Avoid touching the cover, the module, and the surrounding area before replacing it. You will be lost. ...the computer's screws, use a small Phillips screwdriver that is in the memory module slots on , begin at step 1; otherwise, skip to step 3. 1 Click Start, and then click the arrow next to room temperature before they have cooled. Allow the module to cool to the lock button in good condition...
...injury. The computer has two memory slots-Slot A and Slot B. If the computer is on the base of the Start menu. The operating system turns off the computer using the Start menu. Avoid touching the cover, the module, and the surrounding area before replacing it. You will be lost. ...the computer's screws, use a small Phillips screwdriver that is in the memory module slots on , begin at step 1; otherwise, skip to step 3. 1 Click Start, and then click the arrow next to room temperature before they have cooled. Allow the module to cool to the lock button in good condition...
User Manual
Page 49
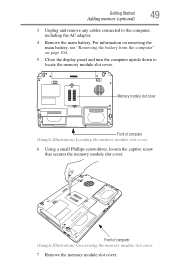
... the main battery. Memory module slot cover Front of computer (Sample Illustration) Unscrewing the memory module slot cover 7 Remove the memory module slot cover. Getting Started Adding memory (optional) 49 3 Unplug and remove any cables connected to locate the memory module slot cover.
... the main battery. Memory module slot cover Front of computer (Sample Illustration) Unscrewing the memory module slot cover 7 Remove the memory module slot cover. Getting Started Adding memory (optional) 49 3 Unplug and remove any cables connected to locate the memory module slot cover.
User Manual
Page 50
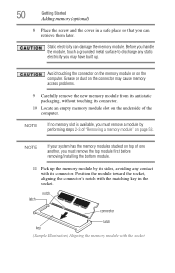
... any static electricity you may cause memory access problems. 9 Carefully remove the new memory module from its antistatic packaging, without touching its connector. 50 Getting Started Adding memory (optional) 8 Place the screw and the cover in the socket. NOTE If your system has the memory modules stacked on page 53. Position...
... any static electricity you may cause memory access problems. 9 Carefully remove the new memory module from its antistatic packaging, without touching its connector. 50 Getting Started Adding memory (optional) 8 Place the screw and the cover in the socket. NOTE If your system has the memory modules stacked on page 53. Position...
User Manual
Page 51
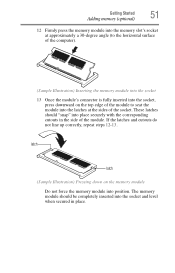
Getting Started Adding memory (optional) 51 12 Firmly press the memory module into the memory slot's socket at approximately a 30-degree angle (to seat the module into ...
Getting Started Adding memory (optional) 51 12 Firmly press the memory module into the memory slot's socket at approximately a 30-degree angle (to seat the module into ...
User Manual
Page 52
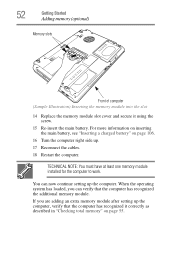
... Reconnect the cables. 18 Restart the computer. TECHNICAL NOTE: You must have at least one memory module installed for the computer to work. 52 Getting Started Adding memory (optional) Memory slots Front of computer (Sample Illustration) Inserting the memory module into the slot 14 Replace the memory module slot cover and...
... Reconnect the cables. 18 Restart the computer. TECHNICAL NOTE: You must have at least one memory module installed for the computer to work. 52 Getting Started Adding memory (optional) Memory slots Front of computer (Sample Illustration) Inserting the memory module into the slot 14 Replace the memory module slot cover and...
User Manual
Page 53
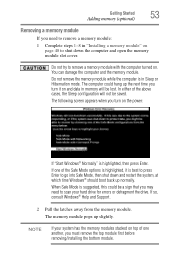
... slot cover. The memory module pops up the next time you turn on the power: If "Start Windows® Normally" is best to press Enter to remove a memory module with the computer turned on. Getting Started Adding memory (optional) 53 Removing a memory module If you need to remove a memory module: 1 Complete steps...
... slot cover. The memory module pops up the next time you turn on the power: If "Start Windows® Normally" is best to press Enter to remove a memory module with the computer turned on. Getting Started Adding memory (optional) 53 Removing a memory module If you need to remove a memory module: 1 Complete steps...


