User Manual
Page 22
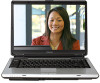
Never attempt to disassemble, adjust or repair a HD DVD, CD/DVD drive, CD-RW drive, Multi-drive or any repair or adjustment is required. You would also be exposed to the device class of radio equipment of this product, please read this ... Number: 01NYDA1305 The following restrictions apply: ❖ Do not disassemble or modify the device. ❖ Do not install the embedded wireless module into other optical drive. Always contact an authorized Toshiba service provider, if any other device...
Never attempt to disassemble, adjust or repair a HD DVD, CD/DVD drive, CD-RW drive, Multi-drive or any repair or adjustment is required. You would also be exposed to the device class of radio equipment of this product, please read this ... Number: 01NYDA1305 The following restrictions apply: ❖ Do not disassemble or modify the device. ❖ Do not install the embedded wireless module into other optical drive. Always contact an authorized Toshiba service provider, if any other device...

User Manual
Page 23
... Information Systems, Inc. Always contact an authorized Toshiba service provider, if any repair or adjustment is assumed, however, with all rights reserved. with respect to the use this guide cannot be exposed to disassemble, adjust or repair a HD DVD, CD/DVD drive, CD-RW drive, Multi-drive or any form without the prior written permission of...
... Information Systems, Inc. Always contact an authorized Toshiba service provider, if any repair or adjustment is assumed, however, with all rights reserved. with respect to the use this guide cannot be exposed to disassemble, adjust or repair a HD DVD, CD/DVD drive, CD-RW drive, Multi-drive or any form without the prior written permission of...
User Manual
Page 28
... your work 84 Backing up your work 85 Restoring your work 85 Using the optical drive 86 Optical drive components 86 Media control buttons 87 Inserting a compact disc 88 Playing an audio CD 89 Playing optical media 90 Creating a CD/DVD 91 Removing a disc with the computer on 91 Removing a disc with the computer...
... your work 84 Backing up your work 85 Restoring your work 85 Using the optical drive 86 Optical drive components 86 Media control buttons 87 Inserting a compact disc 88 Playing an audio CD 89 Playing optical media 90 Creating a CD/DVD 91 Removing a disc with the computer on 91 Removing a disc with the computer...
User Manual
Page 30
... Slot 125 Inserting memory media 125 Removing memory media 126 Using the i.LINK® port 126 Chapter 5: Toshiba Utilities 127 TOSHIBA Assist 128 Connect 129 Secure 130 Protect & Fix 131 Optimize 132 Setting passwords 133 Using an instant password 133... 133 Using a user password 135 Deleting a user password 136 TOSHIBA PC Diagnostic Tool Utility 137 Mouse Utility 138 Toshiba Hardware Setup 139 TOSHIBA Zooming Utility 141 CD/DVD Drive Acoustic Silencer 142 TOSHIBA Accessibility 143 Fingerprint Authentication Utility 144 Fingerprint utility limitations 144 Fingerprint...
... Slot 125 Inserting memory media 125 Removing memory media 126 Using the i.LINK® port 126 Chapter 5: Toshiba Utilities 127 TOSHIBA Assist 128 Connect 129 Secure 130 Protect & Fix 131 Optimize 132 Setting passwords 133 Using an instant password 133... 133 Using a user password 135 Deleting a user password 136 TOSHIBA PC Diagnostic Tool Utility 137 Mouse Utility 138 Toshiba Hardware Setup 139 TOSHIBA Zooming Utility 141 CD/DVD Drive Acoustic Silencer 142 TOSHIBA Accessibility 143 Fingerprint Authentication Utility 144 Fingerprint utility limitations 144 Fingerprint...
User Manual
Page 82
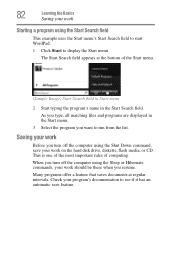
... Start menu. Saving your work Before you turn off the computer using the Sleep or Hibernate commands, your work on the hard disk drive, diskette, flash media, or CD. This is one of the most important rules of the Start menu. (Sample Image) Start Search field in Start menu 2 Start typing the...
... Start menu. Saving your work Before you turn off the computer using the Sleep or Hibernate commands, your work on the hard disk drive, diskette, flash media, or CD. This is one of the most important rules of the Start menu. (Sample Image) Start Search field in Start menu 2 Start typing the...
User Manual
Page 85
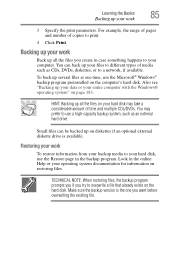
... 3 Specify the print parameters. You may take a considerable amount of copies to your hard disk, use a high-capacity backup system, such as CDs, DVDs, diskettes, or to overwrite a file that already exists on page 183. Make sure the backup version is available. Small files can back ...up all the files you create in case something happens to different types of media such as an external hard drive. Also see "Backing up on your work To restore information from your operating system documentation for information on the computer's hard disk. ...
... 3 Specify the print parameters. You may take a considerable amount of copies to your hard disk, use a high-capacity backup system, such as CDs, DVDs, diskettes, or to overwrite a file that already exists on page 183. Make sure the backup version is available. Small files can back ...up all the files you create in case something happens to different types of media such as an external hard drive. Also see "Backing up on your work To restore information from your operating system documentation for information on the computer's hard disk. ...
User Manual
Page 87
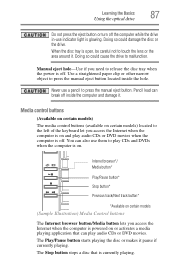
Pencil lead can play audio CDs or DVD movies. The Play/Pause button starts playing the disc or makes it . Doing so could cause the drive to press the manual eject button located inside the computer and damage it. Use a straightened paper clip or other narrow object to malfunction. Doing ...also use indicator light is glowing. The Stop button stops a disc that can break off inside the hole. Learning the Basics Using the optical drive 87 Do not press the eject button or turn off the computer while the drive in-use them to play CDs and DVDs when the computer is on.
Pencil lead can play audio CDs or DVD movies. The Play/Pause button starts playing the disc or makes it . Doing so could cause the drive to press the manual eject button located inside the computer and damage it. Use a straightened paper clip or other narrow object to malfunction. Doing ...also use indicator light is glowing. The Stop button stops a disc that can break off inside the hole. Learning the Basics Using the optical drive 87 Do not press the eject button or turn off the computer while the drive in-use them to play CDs and DVDs when the computer is on.
User Manual
Page 88
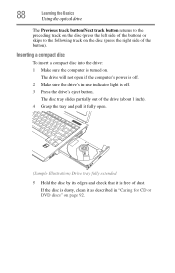
... disc (press the right side of the button). The drive will not open . (Sample Illustration) Drive tray fully extended 5 Hold the disc by its edges and check that it fully open if the computer's power is off . 2 Make sure the drive's in "Caring for CD or DVD discs" on page 92. 88 Learning the... Basics Using the optical drive The Previous track button/Next track button returns to the preceding track on the disc (press the...
... disc (press the right side of the button). The drive will not open . (Sample Illustration) Drive tray fully extended 5 Hold the disc by its edges and check that it fully open if the computer's power is off . 2 Make sure the drive's in "Caring for CD or DVD discs" on page 92. 88 Learning the... Basics Using the optical drive The Previous track button/Next track button returns to the preceding track on the disc (press the...
User Manual
Page 89
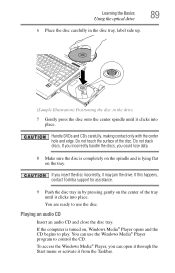
... insert the disc incorrectly, it from the Taskbar. You can open it through the Start menu or activate it may jam the drive. Playing an audio CD Insert an audio CD and close the disc tray. If you incorrectly handle the discs, you could lose data. 8 Make sure the disc is completely ...on the spindle and is turned on the tray. If this happens, contact Toshiba support for assistance. 9 Push the disc tray in the drive 7 Gently press...
... insert the disc incorrectly, it from the Taskbar. You can open it through the Start menu or activate it may jam the drive. Playing an audio CD Insert an audio CD and close the disc tray. If you incorrectly handle the discs, you could lose data. 8 Make sure the disc is completely ...on the spindle and is turned on the tray. If this happens, contact Toshiba support for assistance. 9 Push the disc tray in the drive 7 Gently press...
User Manual
Page 90
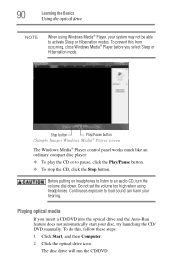
...Hibernation modes. To do this from occurring, close Windows Media® Player before you insert a CD/DVD into the optical drive and the Auto-Run feature does not automatically start your disc, try launching the CD/ DVD manually. Do not set the volume too high when using Windows Media® Player,...system may not be able to pause, click the Play/Pause button. ❖ To stop the CD, click the Stop button. Playing optical media If you select Sleep or Hibernation mode. The disc drive will run the CD/DVD. To prevent this , follow these steps: 1 Click Start, and then Computer. 2 ...
...Hibernation modes. To do this from occurring, close Windows Media® Player before you insert a CD/DVD into the optical drive and the Auto-Run feature does not automatically start your disc, try launching the CD/ DVD manually. Do not set the volume too high when using Windows Media® Player,...system may not be able to pause, click the Play/Pause button. ❖ To stop the CD, click the Stop button. Playing optical media If you select Sleep or Hibernation mode. The disc drive will run the CD/DVD. To prevent this , follow these steps: 1 Click Start, and then Computer. 2 ...

User Manual
Page 91
... details on the disc. For example, if it is glowing. These problems are not due to any defect in certain cases, your Toshiba optical drive may also prevent or limit recording or viewing of certain optical media. Also, if the disc is associated with the media on the... disc. NOTE Due to manufacturing and quality variations in third party optical media (e.g., CD or DVD) or optical media players/recorders, in your Toshiba computer or optical drive. For other computers or optical media recorders. Additionally, certain optical media recorded on your optical...
... details on the disc. For example, if it is glowing. These problems are not due to any defect in certain cases, your Toshiba optical drive may also prevent or limit recording or viewing of certain optical media. Also, if the disc is associated with the media on the... disc. NOTE Due to manufacturing and quality variations in third party optical media (e.g., CD or DVD) or optical media players/recorders, in your Toshiba computer or optical drive. For other computers or optical media recorders. Additionally, certain optical media recorded on your optical...

User Manual
Page 92
Fingerprints on the surface can prevent the optical drive from reading the data properly. ❖ Do not expose discs to close it. Pencil lead can connect. Caring for CD or DVD discs ❖ Store your discs in their original containers to protect them clean. ❖ Do...a slender object, such as a straightened paper clip, into the manual eject hole. Let the disc dry completely before inserting it in the drive. Toshiba's online resources Toshiba maintains a number of the disc and wipe toward the outward edge (not in a circle). Removing a disc with the computer off To ...
Fingerprints on the surface can prevent the optical drive from reading the data properly. ❖ Do not expose discs to close it. Pencil lead can connect. Caring for CD or DVD discs ❖ Store your discs in their original containers to protect them clean. ❖ Do...a slender object, such as a straightened paper clip, into the manual eject hole. Let the disc dry completely before inserting it in the drive. Toshiba's online resources Toshiba maintains a number of the disc and wipe toward the outward edge (not in a circle). Removing a disc with the computer off To ...
User Manual
Page 127
... meet your individual needs. These utilities are described in this chapter. ❖ TOSHIBA Assist ❖ Supervisor password ❖ User password ❖ TOSHIBA PC Diagnostic Tool Utility ❖ Mouse Utility ❖ Toshiba Hardware Setup ❖ TOSHIBA Zooming Utility ❖ CD/DVD Drive Acoustic Silencer ❖ TOSHIBA Accessibility ❖ Fingerprint Authentication Utility 127 Together, these allow you to reconfigure...
... meet your individual needs. These utilities are described in this chapter. ❖ TOSHIBA Assist ❖ Supervisor password ❖ User password ❖ TOSHIBA PC Diagnostic Tool Utility ❖ Mouse Utility ❖ Toshiba Hardware Setup ❖ TOSHIBA Zooming Utility ❖ CD/DVD Drive Acoustic Silencer ❖ TOSHIBA Accessibility ❖ Fingerprint Authentication Utility 127 Together, these allow you to reconfigure...

User Manual
Page 132
Optimize tab 132 Toshiba Utilities TOSHIBA Assist Optimize The features available in this category are: ❖ Mouse Utility ❖ Toshiba Hardware Setup ❖ CD/DVD Drive Acoustic Silencer (Sample Image) TOSHIBA Assist window -
Optimize tab 132 Toshiba Utilities TOSHIBA Assist Optimize The features available in this category are: ❖ Mouse Utility ❖ Toshiba Hardware Setup ❖ CD/DVD Drive Acoustic Silencer (Sample Image) TOSHIBA Assist window -
User Manual
Page 142
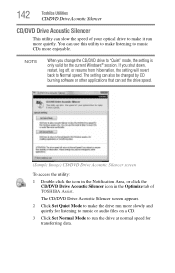
..." mode, the setting is only valid for listening to music or audio files on a CD. 3 Click Set Normal Mode to Normal speed. 142 Toshiba Utilities CD/DVD Drive Acoustic Silencer CD/DVD Drive Acoustic Silencer This utility can slow the speed of TOSHIBA Assist. NOTE When you shut down, restart, log off, or resume from hibernation, the...
..." mode, the setting is only valid for listening to music or audio files on a CD. 3 Click Set Normal Mode to Normal speed. 142 Toshiba Utilities CD/DVD Drive Acoustic Silencer CD/DVD Drive Acoustic Silencer This utility can slow the speed of TOSHIBA Assist. NOTE When you shut down, restart, log off, or resume from hibernation, the...
User Manual
Page 172
...be able to its documentation and check that the drive's cable is dirty. Hold the diskette with a clean cloth dipped in the drive. The drive cannot read a diskette. Run Errorchecking on page 171). Make sure the tray that holds the CD or DVD is probably a configuration problem. Replace... the disc in the drive. Close the tray carefully, making sure it is properly...
...be able to its documentation and check that the drive's cable is dirty. Hold the diskette with a clean cloth dipped in the drive. The drive cannot read a diskette. Run Errorchecking on page 171). Make sure the tray that holds the CD or DVD is probably a configuration problem. Replace... the disc in the drive. Close the tray carefully, making sure it is properly...
User Manual
Page 173
...power source and turned on. If the problem is with a data CD or DVD, refer to remove a disc and cannot turn on the front of the computer is turned up. The disc will not come out of the drive when you need to the software's documentation and check that the ...Make sure the computer is not accessing the drive and preventing it . Check the type of the optical drive tray. The optical drive supports the Digital Versatile Disc (DVD) formats DVD±R, DVD±RW, and DVD RAM, plus the CD formats CD-Recordable (CD-R) and CDRewritable (CD-RW). For additional information see if volume ...
...power source and turned on. If the problem is with a data CD or DVD, refer to remove a disc and cannot turn on the front of the computer is turned up. The disc will not come out of the drive when you need to the software's documentation and check that the ...Make sure the computer is not accessing the drive and preventing it . Check the type of the optical drive tray. The optical drive supports the Digital Versatile Disc (DVD) formats DVD±R, DVD±RW, and DVD RAM, plus the CD formats CD-Recordable (CD-R) and CDRewritable (CD-RW). For additional information see if volume ...
User Manual
Page 181
... external hard disk. ❖ Copy files to diskette. ❖ Copy files to a rewritable external storage device. ❖ Connect a writable CD/DVD or hard drive to reformat your hard disk and start again, reloading all the user's guides provided with the computer. If you have installed your valuable data ...these features to protect yourself from loss. Here are some easy-to-use specialized software to copy everything on the hard disk to a CD/DVD or hard drive. ❖ Connect your computer to the office network and copy files to diskette on your computer, as well as you can do ...
... external hard disk. ❖ Copy files to diskette. ❖ Copy files to a rewritable external storage device. ❖ Connect a writable CD/DVD or hard drive to reformat your hard disk and start again, reloading all the user's guides provided with the computer. If you have installed your valuable data ...these features to protect yourself from loss. Here are some easy-to-use specialized software to copy everything on the hard disk to a CD/DVD or hard drive. ❖ Connect your computer to the office network and copy files to diskette on your computer, as well as you can do ...
User Manual
Page 183
...Points that the Restore Point you selected is the correct one. The utility displays the timestamp and description of the CD and DVD drives built into recent Toshiba portable computer models can not back up your computer system is required. No additional software is the data you ...want to begin the system restore. External CD and DVD writers are also widely available. Restore Points labeled System Checkpoint were ...
...Points that the Restore Point you selected is the correct one. The utility displays the timestamp and description of the CD and DVD drives built into recent Toshiba portable computer models can not back up your computer system is required. No additional software is the data you ...want to begin the system restore. External CD and DVD writers are also widely available. Restore Points labeled System Checkpoint were ...
User Manual
Page 184
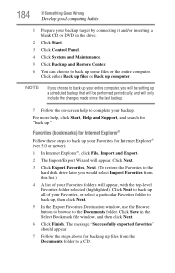
... Wrong Develop good computing habits 1 Prepare your backup target by connecting it and/or inserting a blank CD or DVD in the Select Bookmark file window, and then click Next. 6 Click Finish. Click Save in the drive. 2 Click Start. 3 Click Control Panel. 4 Click System and Maintenance. 5 Click Backup and ...Favorites from the Documents folder to the Documents folder. Click Next. 3 Click Export Favorites, Next. (To restore the Favorites to the hard disk drive later you will only include the changes made since the last backup. 7 Follow the on-screen help , click Start, Help and Support, ...
... Wrong Develop good computing habits 1 Prepare your backup target by connecting it and/or inserting a blank CD or DVD in the Select Bookmark file window, and then click Next. 6 Click Finish. Click Save in the drive. 2 Click Start. 3 Click Control Panel. 4 Click System and Maintenance. 5 Click Backup and ...Favorites from the Documents folder to the Documents folder. Click Next. 3 Click Export Favorites, Next. (To restore the Favorites to the hard disk drive later you will only include the changes made since the last backup. 7 Follow the on-screen help , click Start, Help and Support, ...


