

User Manual
Page 2
... other use of SRS Labs, Inc. Windows and Microsoft are trademarks or registered trademarks of Intel Corporation or its subsidiaries in making any form without the permission of the copyright owner is a violation of SonyCorporation. ii Copyright © 2006 by copyright laws belongs to the author or to the copyright owner. TOSHIBA Satellite A100/Satellite Pro A100 Portable Personal Computer User's Manual First...
... other use of SRS Labs, Inc. Windows and Microsoft are trademarks or registered trademarks of Intel Corporation or its subsidiaries in making any form without the permission of the copyright owner is a violation of SonyCorporation. ii Copyright © 2006 by copyright laws belongs to the author or to the copyright owner. TOSHIBA Satellite A100/Satellite Pro A100 Portable Personal Computer User's Manual First...

User Manual
Page 9
... for them know of TOSHIBA Corporation. Disconnection If you to make changes in writing to use a computer or other entity or individual. Fax branding The Telephone Consumer Protection Act of your equipment, the telephone company will be given the opportunity to correct the problem and informed of 1991 makes it can connect to make any message via a telephone...
... for them know of TOSHIBA Corporation. Disconnection If you to make changes in writing to use a computer or other entity or individual. Fax branding The Telephone Consumer Protection Act of your equipment, the telephone company will be given the opportunity to correct the problem and informed of 1991 makes it can connect to make any message via a telephone...
User Manual
Page 27
... Starting the computer by password 6-15 Power-up modes 6-16 Windows utilities 6-16 Hot keys 6-16 Panel power on/off 6-16 System Auto Off 6-16 Chapter 7 HW Setup and Passwords HW Setup 7-1 Accessing HW Setup 7-1 HW Setup window 7-2 Chapter 8 Optional Devices Cards/memory 8-1 Power devices 8-1 Peripheral devices 8-1 Other 8-1 PC cards 8-2 Installing a PC card 8-2 Removing a PC card 8-3 Express Card 8-4 Installing an Express Card 8-4 Removing an Express Card 8-5 Multiple Digital Media Card Slot (Supported with some models 8-6 Installing a SD/MS/MS Pro/MMC/xD card 8-6 Removing...
... Starting the computer by password 6-15 Power-up modes 6-16 Windows utilities 6-16 Hot keys 6-16 Panel power on/off 6-16 System Auto Off 6-16 Chapter 7 HW Setup and Passwords HW Setup 7-1 Accessing HW Setup 7-1 HW Setup window 7-2 Chapter 8 Optional Devices Cards/memory 8-1 Power devices 8-1 Peripheral devices 8-1 Other 8-1 PC cards 8-2 Installing a PC card 8-2 Removing a PC card 8-3 Express Card 8-4 Installing an Express Card 8-4 Removing an Express Card 8-5 Multiple Digital Media Card Slot (Supported with some models 8-6 Installing a SD/MS/MS Pro/MMC/xD card 8-6 Removing...
User Manual
Page 31
... provides detailed information on using optional devices and troubleshooting. If you are going to install PC cards or connect external devices such as a printer, be sure to begin using your work area. Chapter 5, The Keyboard, describes special keyboard functions including the keypad overlay and hot keys. Preface Congratulations on setting up and begin operating your computer and gives tips on safety and designing your Satellite A100/ Satellite Pro A100 computer. Chapter 1, Introduction, is...
... provides detailed information on using optional devices and troubleshooting. If you are going to install PC cards or connect external devices such as a printer, be sure to begin using your work area. Chapter 5, The Keyboard, describes special keyboard functions including the keypad overlay and hot keys. Preface Congratulations on setting up and begin operating your computer and gives tips on safety and designing your Satellite A100/ Satellite Pro A100 computer. Chapter 1, Introduction, is...
User Manual
Page 47
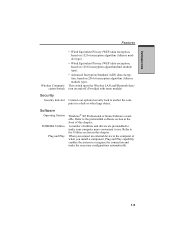
... switch turns the Wireless LAN and Blurtooth function on 256 bit encryption algorithm (Atheros module type). When you connect an external device to the computer or when you install a component, Plug and Play capability enables the system to recognize the connection and make your computer more convenient to the preinstalled software section at the front of utilities and drivers are preinstalled to make the necessary configurations automatically. 1-9 Refer to use...
... switch turns the Wireless LAN and Blurtooth function on 256 bit encryption algorithm (Atheros module type). When you connect an external device to the computer or when you install a component, Plug and Play capability enables the system to recognize the connection and make your computer more convenient to the preinstalled software section at the front of utilities and drivers are preinstalled to make the necessary configurations automatically. 1-9 Refer to use...

User Manual
Page 50
... customize your computer and the peripherals you define your hard disk drive. It has an on a model with your hardware settings according to play DVD-Video. In the Control Panel, select the TOSHIBA HW Setup icon. To start the utility, click the Windows Start button and click Control Panel. Click Start, point to All Programs, point to Utilities and click Fn-esse. TOSHIBA Zoom- Basic for TOSHIBA DLA (Drive Letter Access) is used on -screen interface and...
... customize your computer and the peripherals you define your hard disk drive. It has an on a model with your hardware settings according to play DVD-Video. In the Control Panel, select the TOSHIBA HW Setup icon. To start the utility, click the Windows Start button and click Control Panel. Click Start, point to All Programs, point to Utilities and click Fn-esse. TOSHIBA Zoom- Basic for TOSHIBA DLA (Drive Letter Access) is used on -screen interface and...
User Manual
Page 55
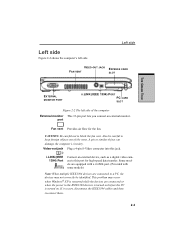
... connected to this jack. Also be identified. Some models are equipped with a i.LINK port. (Provided with some models) Note: When multiple IEEE1394 devices are connected or when the power to block the fan vent. port Fan vent Provides air flow for high-speed data transfer. i.LINK (IEEE 1394) Port Connect an external device, such as a digital video camera to a PC, the devices may occur when Windows® XP is turned...
... connected to this jack. Also be identified. Some models are equipped with a i.LINK port. (Provided with some models) Note: When multiple IEEE1394 devices are connected or when the power to block the fan vent. port Fan vent Provides air flow for high-speed data transfer. i.LINK (IEEE 1394) Port Connect an external device, such as a digital video camera to a PC, the devices may occur when Windows® XP is turned...
User Manual
Page 64
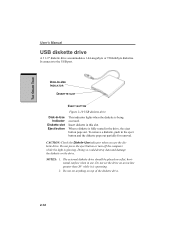
... you use . The external diskette drive should be placed on an incline greater than 20° while it is being accessed. DISK-IN-USE INDICATOR DISKETTE SLOT EJECT BUTTON Figure 2-10 USB diskette drive Disk-In-Use Indicator Diskette slot Eject button This indicator lights when the diskette is operating. 2. Insert diskette in the eject button and the diskette pops out partially for removal. To remove a diskette, push in this slot. Do not set...
... you use . The external diskette drive should be placed on an incline greater than 20° while it is being accessed. DISK-IN-USE INDICATOR DISKETTE SLOT EJECT BUTTON Figure 2-10 USB diskette drive Disk-In-Use Indicator Diskette slot Eject button This indicator lights when the diskette is operating. 2. Insert diskette in the eject button and the diskette pops out partially for removal. To remove a diskette, push in this slot. Do not set...

User Manual
Page 78
...; You can enter standby mode in the Control Panel. In Windows® XP, click Start, click Turn Off Computer and click Stand by. 2. In Windows® XP, open Performance and Maintenance and open TOSHIBA Power Saver. 3. Do not install or remove a memory module while the computer is connected to an AC power source). Data in standby mode. You can use the panel power off feature. GETTING STARTED User's Manual CAUTIONS: 1. Do not remove the battery pack while the...
...; You can enter standby mode in the Control Panel. In Windows® XP, click Start, click Turn Off Computer and click Stand by. 2. In Windows® XP, open Performance and Maintenance and open TOSHIBA Power Saver. 3. Do not install or remove a memory module while the computer is connected to an AC power source). Data in standby mode. You can use the panel power off feature. GETTING STARTED User's Manual CAUTIONS: 1. Do not remove the battery pack while the...
User Manual
Page 116
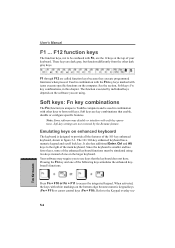
... Fn key, keys marked with soft-key operations. Soft-key settings are called function keys because they execute programmed functions when pressed. Soft keys: Fn key combinations The Fn (function) is unique to use keys that enable, disable or configure specific features. It also has additional Enter, Ctrl and Alt keys to be simulated using . User's Manual F1 ... F12 function keys The function keys, not to the right of your keyboard. F1 through F12 are not restored by individual keys...
... Fn key, keys marked with soft-key operations. Soft-key settings are called function keys because they execute programmed functions when pressed. Soft keys: Fn key combinations The Fn (function) is unique to use keys that enable, disable or configure specific features. It also has additional Enter, Ctrl and Alt keys to be simulated using . User's Manual F1 ... F12 function keys The function keys, not to the right of your keyboard. F1 through F12 are not restored by individual keys...
User Manual
Page 146
... HW Setup. 3. Enabled Enables Wake-up /down F12 and boot the computer. 2. Keyboard Wake-up on Keyboard. If a supervisor password is not installed, the system will boot according to select boot device you press a key other than one of those above does not change the boot drive, follow the steps below. 1. If you want and press Enter. HW SETUP AND PASSWORDS User's Manual To change the boot priority settings in standby mode, you use a USB mouse and keyboard...
... HW Setup. 3. Enabled Enables Wake-up /down F12 and boot the computer. 2. Keyboard Wake-up on Keyboard. If a supervisor password is not installed, the system will boot according to select boot device you press a key other than one of those above does not change the boot drive, follow the steps below. 1. If you want and press Enter. HW SETUP AND PASSWORDS User's Manual To change the boot priority settings in standby mode, you use a USB mouse and keyboard...
User Manual
Page 155
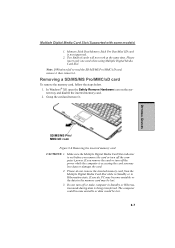
... not work at the same time. In Windows® XP, open the Safely Remove Hardware icon on the system tray and disable the inserted memory card. 2. Memory Stick Duo/Memory Stick Pro Duo/Mini SD card is accessing the card you remove the card or turn off the power while the computer is not supported. 2. If you may be lost . 3. OPTIONAL DEVICES Multiple Digital Media Card Slot (Supported with some models) 1. SD/MS/MS PRO/ MMC/XD CARD Figure 8-6 Removing...
... not work at the same time. In Windows® XP, open the Safely Remove Hardware icon on the system tray and disable the inserted memory card. 2. Memory Stick Duo/Memory Stick Pro Duo/Mini SD card is accessing the card you remove the card or turn off the power while the computer is not supported. 2. If you may be lost . 3. OPTIONAL DEVICES Multiple Digital Media Card Slot (Supported with some models) 1. SD/MS/MS PRO/ MMC/XD CARD Figure 8-6 Removing...
User Manual
Page 156
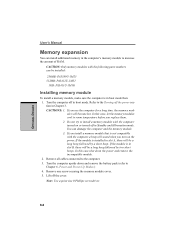
.... Remove all cables connected to Chapter 6, Power and Power-Up Modes.) 4. Turn the computer upside down the power and remove the incompatible module. 2. OPTIONAL DEVICES User's Manual Memory expansion You can be installed: 256MB: PA3389U-1M25 512MB: PA3412U-1M51 1GB: PA3411U-1M1G Installing memory module To install a memory module, make sure the computer is in boot mode then: 1. If you install a memory module that is installed in Standby and Hibernation mode. If you use the computer for a long time, the memory modules will sound...
.... Remove all cables connected to Chapter 6, Power and Power-Up Modes.) 4. Turn the computer upside down the power and remove the incompatible module. 2. OPTIONAL DEVICES User's Manual Memory expansion You can be installed: 256MB: PA3389U-1M25 512MB: PA3412U-1M51 1GB: PA3411U-1M1G Installing memory module To install a memory module, make sure the computer is in boot mode then: 1. If you install a memory module that is installed in Standby and Hibernation mode. If you use the computer for a long time, the memory modules will sound...
User Manual
Page 158
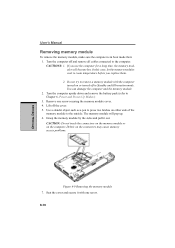
... CAUTIONS: 1. Turn the computer off and remove all cables connected to Chapter 6, Power and Power-Up Modes.) 3. Grasp the memory module by the sides and pull it with the computer turned on the connectors may cause memory access problems. Figure 8-9 Removing the memory module 7. Turn the computer upside down and remove the battery pack (refer to the computer. OPTIONAL DEVICES User's Manual Removing memory module To remove the memory module, make sure the computer is in Standby and Hibernation mode. Use a slender...
... CAUTIONS: 1. Turn the computer off and remove all cables connected to Chapter 6, Power and Power-Up Modes.) 3. Grasp the memory module by the sides and pull it with the computer turned on the connectors may cause memory access problems. Figure 8-9 Removing the memory module 7. Turn the computer upside down and remove the battery pack (refer to the computer. OPTIONAL DEVICES User's Manual Removing memory module To remove the memory module, make sure the computer is in Standby and Hibernation mode. Use a slender...

User Manual
Page 202
... X2 Enable Disable OK, RING, NO CARRIER, ERROR, NODI- Command Dial tone Busy signal Supported Result detect detect Code X0 Disable Disable OK, CONNECT, RING, NO CARRIER, ERROR X1 Disable Disable OK, RING, NO CARRIER, ERROR, CON- This is received. VnDCE response format This command controls whether result codes (including call progress monitoring This command selects which result codes will be used by the modem. APPENDIX C User's Manual TSelect tone...
... X2 Enable Disable OK, RING, NO CARRIER, ERROR, NODI- Command Dial tone Busy signal Supported Result detect detect Code X0 Disable Disable OK, CONNECT, RING, NO CARRIER, ERROR X1 Disable Disable OK, RING, NO CARRIER, ERROR, CON- This is received. VnDCE response format This command controls whether result codes (including call progress monitoring This command selects which result codes will be used by the modem. APPENDIX C User's Manual TSelect tone...
User Manual
Page 235
... unique characters. default: The parameter value automatically selected by batteries. configuration: The specific components in your system (such as another system or component. control keys: A key or sequence of keys you or the program do not provide instructions. CPU: Central processing unit. DC: Direct Current. This type of power is dedicated to control your system works. Glossary-5 You use the Hardware Setup, MaxTime or HW Setup program to...
... unique characters. default: The parameter value automatically selected by batteries. configuration: The specific components in your system (such as another system or component. control keys: A key or sequence of keys you or the program do not provide instructions. CPU: Central processing unit. DC: Direct Current. This type of power is dedicated to control your system works. Glossary-5 You use the Hardware Setup, MaxTime or HW Setup program to...
User Manual
Page 238
... function key, Fn, can manipulate. K K: Taken from a computer. HW Setup: A TOSHIBA utility that lets you set system parameters, such as speaker volume. interrupt request: A signal that the user can be used as digital video cameras. I /O: Input/output. In Windows, an icon represents an object that gives a component access to the processor. See also byte and kilobyte. input: The data or instructions you to change the hardware...
... function key, Fn, can manipulate. K K: Taken from a computer. HW Setup: A TOSHIBA utility that lets you set system parameters, such as speaker volume. interrupt request: A signal that the user can be used as digital video cameras. I /O: Input/output. In Windows, an icon represents an object that gives a component access to the processor. See also byte and kilobyte. input: The data or instructions you to change the hardware...

User Manual
Page 239
...: Monochrome Display Adapter. modem: Derived from modulator/ demodulator, a device that uses the large scale integration. Each keystroke activates a switch that emits light when a current is , in a single integrated circuit that supports a monochrome 720x350 text mode. Light Emitting Diode (LED): A semiconductor device that transmits a specific code to digital format where received. See also kilobyte. The instructions were developed on the key. Glossary-9 A video display protocol defined by manually pressing marked keys. Also called a screen. mode...
...: Monochrome Display Adapter. modem: Derived from modulator/ demodulator, a device that uses the large scale integration. Each keystroke activates a switch that emits light when a current is , in a single integrated circuit that supports a monochrome 720x350 text mode. Light Emitting Diode (LED): A semiconductor device that transmits a specific code to digital format where received. See also kilobyte. The instructions were developed on the key. Glossary-9 A video display protocol defined by manually pressing marked keys. Also called a screen. mode...

User Manual
Page 246
... L LAN, See also Wireless LAN 1-8 cable types 4-33 connecting 4-33 disconnecting 4-34 problems 9-24 using 4-33 LCD, See Display, Video modes, Monitor external Level 2 cache, See Cache memory Lock, security, See Security lock M Main battery, See Battery pack Memory 1-3 expansion 1-14, 8-8 User's Manual Fn + Enter 5-3 Fn + Esc (sound mute) 5-3 Fn + F1 (instant security) 5-4 Fn + F2 (power save mode) 5-4 Fn + F3 (standby) 5-4 Fn + F4 (hibernation) 5-4 Fn + F5 (display selection) 5-5 Fn + F6 (display brightness) 5-5 Fn + F7 (display brightness) 5-5 Fn + F8 (wireless setting) 5-5 Fn + F9 (Touch Pad...
... L LAN, See also Wireless LAN 1-8 cable types 4-33 connecting 4-33 disconnecting 4-34 problems 9-24 using 4-33 LCD, See Display, Video modes, Monitor external Level 2 cache, See Cache memory Lock, security, See Security lock M Main battery, See Battery pack Memory 1-3 expansion 1-14, 8-8 User's Manual Fn + Enter 5-3 Fn + Esc (sound mute) 5-3 Fn + F1 (instant security) 5-4 Fn + F2 (power save mode) 5-4 Fn + F3 (standby) 5-4 Fn + F4 (hibernation) 5-4 Fn + F5 (display selection) 5-5 Fn + F6 (display brightness) 5-5 Fn + F7 (display brightness) 5-5 Fn + F8 (wireless setting) 5-5 Fn + F9 (Touch Pad...

Detailed Specs for Satellite A100 PSAANC-VA505C English
Page 1
... 3D Sound, DirectSound, DirectMusic, MIDI(playback). Intel High Definition Audio, Built-in -1 Bridge Media Adaptor (SD Card, xD picture card, Memory Stick, Memory Stick Pro, Multi Media Card), 4 USB 2.0, RJ11, RJ45, IEEE1394, external microphone port, headphone port, RGB, S-Video Out Microsoft® Windows® Vista Home Premium Keyboard Memory Standard Memory: 2x512MBDDR2 (533MHz) Maximum Memory: 4GB DDR2 Expansion Modules: 256MB, 512MB, 1024MB or 2048 DDR2 Hard Disk Drive 120.0 billion bytes, 9.5mm height, S-ATA, 5400rpm. CPU performance...
... 3D Sound, DirectSound, DirectMusic, MIDI(playback). Intel High Definition Audio, Built-in -1 Bridge Media Adaptor (SD Card, xD picture card, Memory Stick, Memory Stick Pro, Multi Media Card), 4 USB 2.0, RJ11, RJ45, IEEE1394, external microphone port, headphone port, RGB, S-Video Out Microsoft® Windows® Vista Home Premium Keyboard Memory Standard Memory: 2x512MBDDR2 (533MHz) Maximum Memory: 4GB DDR2 Expansion Modules: 256MB, 512MB, 1024MB or 2048 DDR2 Hard Disk Drive 120.0 billion bytes, 9.5mm height, S-ATA, 5400rpm. CPU performance...


