

User Manual
Page 5
... network. Connection to make any of your telephone equipment is not feasible, you with the FCC. If you in their equipment, operations or procedures. 5 ❖ The ringer equivalence number (REN) of the modem, which is prohibited. Type of Service Your modem is designed to be necessary for them know of this change. In order to the telephone line by Toshiba...
... network. Connection to make any of your telephone equipment is not feasible, you with the FCC. If you in their equipment, operations or procedures. 5 ❖ The ringer equivalence number (REN) of the modem, which is prohibited. Type of Service Your modem is designed to be necessary for them know of this change. In order to the telephone line by Toshiba...
User Manual
Page 27
... 55 Adding external devices 55 Connecting to a power source 56 Charging the main battery 58 Using the computer for the first time 59 Opening the display panel 59 Turning on the power 60 Using the TouchPad 61 Control buttons 62 Disabling or enabling the TouchPad 62 Setting up a printer 63 Installing additional memory (optional 66 Removing a memory module 70 Connecting a mouse 71 Connecting a printer 71 Connecting a USB printer 71 Connecting a parallel printer 71 Using external display devices 72 Connecting an external monitor 72 Directing the display output when you turn on...
... 55 Adding external devices 55 Connecting to a power source 56 Charging the main battery 58 Using the computer for the first time 59 Opening the display panel 59 Turning on the power 60 Using the TouchPad 61 Control buttons 62 Disabling or enabling the TouchPad 62 Setting up a printer 63 Installing additional memory (optional 66 Removing a memory module 70 Connecting a mouse 71 Connecting a printer 71 Connecting a USB printer 71 Connecting a parallel printer 71 Using external display devices 72 Connecting an external monitor 72 Directing the display output when you turn on...

User Manual
Page 33
... you need further assistance 223 Before you call 223 Contacting Toshiba 224 Other Toshiba Internet Web sites 225 Toshiba's worldwide offices 225 Appendix A: Hot Keys 228 Volume Mute 228 Instant password security 228 Without a password 229 With a password 229 Maintaining security when the battery is not fully charged ...... 230 Power usage mode 231 Standby mode 232 Hibernation mode 233 Display modes 234 Display brightness 235 Enabling a wireless device 235 Disabling or enabling the TouchPad 235 Keyboard hot keys 236 Appendix B: Power Cable...
... you need further assistance 223 Before you call 223 Contacting Toshiba 224 Other Toshiba Internet Web sites 225 Toshiba's worldwide offices 225 Appendix A: Hot Keys 228 Volume Mute 228 Instant password security 228 Without a password 229 With a password 229 Maintaining security when the battery is not fully charged ...... 230 Power usage mode 231 Standby mode 232 Hibernation mode 233 Display modes 234 Display brightness 235 Enabling a wireless device 235 Disabling or enabling the TouchPad 235 Keyboard hot keys 236 Appendix B: Power Cable...
User Manual
Page 40
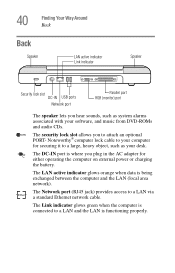
... an optional PORT- 40 Finding Your Way Around Back Back Speaker LAN active indicator Link indicator Speaker Security lock slot DC-IN USB ports Network port Parallel port RGB (monitor) port The speaker lets you hear sounds, such as your software, and music from DVD-ROMs and audio CDs. The Link indicator glows green when the computer is connected to a LAN via Ether Ether a standard Ethernet network cable. The LAN active indicator glows orange when data is functioning properly...
... an optional PORT- 40 Finding Your Way Around Back Back Speaker LAN active indicator Link indicator Speaker Security lock slot DC-IN USB ports Network port Parallel port RGB (monitor) port The speaker lets you hear sounds, such as your software, and music from DVD-ROMs and audio CDs. The Link indicator glows green when the computer is connected to a LAN via Ether Ether a standard Ethernet network cable. The LAN active indicator glows orange when data is functioning properly...
User Manual
Page 63
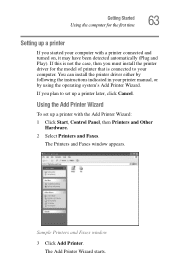
... Wizard: 1 Click Start, Control Panel, then Printers and Other Hardware. 2 Select Printers and Faxes. The Add Printer Wizard starts. The Printers and Faxes window appears. Using the Add Printer Wizard To set up a printer with a printer connected and turned on, it may have been detected automatically (Plug and Play). You can install the printer driver either by following the instructions indicated in your computer...
... Wizard: 1 Click Start, Control Panel, then Printers and Other Hardware. 2 Select Printers and Faxes. The Add Printer Wizard starts. The Printers and Faxes window appears. Using the Add Printer Wizard To set up a printer with a printer connected and turned on, it may have been detected automatically (Plug and Play). You can install the printer driver either by following the instructions indicated in your computer...

User Manual
Page 66
... the modules cool to operate the computer with a memory module in various capacities (visit Toshiba's Web site at toshiba.com for a long time, the memory modules will sound when you turn on the computer. Your computer comes with the computer, a beep will become hot. If you use complex software or process large amounts of today's popular applications. If you install a memory module that is installed in slot A, there...
... the modules cool to operate the computer with a memory module in various capacities (visit Toshiba's Web site at toshiba.com for a long time, the memory modules will sound when you turn on the computer. Your computer comes with the computer, a beep will become hot. If you use complex software or process large amounts of today's popular applications. If you install a memory module that is installed in slot A, there...
User Manual
Page 70
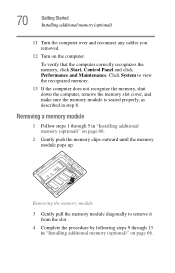
... memory module pops up. Removing the memory module 3 Gently pull the memory module diagonally to view the recognized memory. 13 If the computer does not recognize the memory, shut down the computer, remove the memory slot cover, and make sure the memory module is seated properly, as described in "Installing additional memory (optional)" on page 66. To verify that the computer correctly recognizes the memory, click Start, Control Panel and click Performance and Maintenance...
... memory module pops up. Removing the memory module 3 Gently pull the memory module diagonally to view the recognized memory. 13 If the computer does not recognize the memory, shut down the computer, remove the memory slot cover, and make sure the memory module is seated properly, as described in "Installing additional memory (optional)" on page 66. To verify that the computer correctly recognizes the memory, click Start, Control Panel and click Performance and Maintenance...
User Manual
Page 74
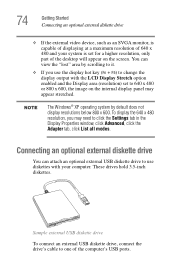
... the LCD Display Stretch option enabled and the Display area (resolution) set for a higher resolution, only part of the computer's USB ports. You can attach an optional external USB diskette drive to use the display hot key (Fn + F5) to change the display output with your system is set to one of the desktop will appear on the internal display panel may need to click the Settings tab in the Display Properties window, click Advanced, click the Adapter...
... the LCD Display Stretch option enabled and the Display area (resolution) set for a higher resolution, only part of the computer's USB ports. You can attach an optional external USB diskette drive to use the display hot key (Fn + F5) to change the display output with your system is set to one of the desktop will appear on the internal display panel may need to click the Settings tab in the Display Properties window, click Advanced, click the Adapter...

User Manual
Page 81
... called function keys because they run specific functions on the keyboard indicator panel illuminates when you press the Caps Lock key. Ctrl, Fn and Alt keys The Ctrl, Fn, and Alt keys do different things depending on a typewriter, except that: ❖ The spacebar creates a space character instead of just passing over an area of the page. ❖ The lowercase l (el) and the number...
... called function keys because they run specific functions on the keyboard indicator panel illuminates when you press the Caps Lock key. Ctrl, Fn and Alt keys The Ctrl, Fn, and Alt keys do different things depending on a typewriter, except that: ❖ The spacebar creates a space character instead of just passing over an area of the page. ❖ The lowercase l (el) and the number...

User Manual
Page 180
... makes hot swapping (switching cards while the computer is on page 182). 2 Align the card connectors with the PC Card slot and carefully slide the card into the slot until it locks into place. Other cards may also hot swap a PC Card (see "Hot swapping" on ) possible. a set of Card and Socket Services, you should use . To insert a PC Card: 1 Turn off the computer. PC Card supporting software PC Cards require Card and Socket Services software - The operating...
... makes hot swapping (switching cards while the computer is on page 182). 2 Align the card connectors with the PC Card slot and carefully slide the card into the slot until it locks into place. Other cards may also hot swap a PC Card (see "Hot swapping" on ) possible. a set of Card and Socket Services, you should use . To insert a PC Card: 1 Turn off the computer. PC Card supporting software PC Cards require Card and Socket Services software - The operating...

User Manual
Page 184
184 Toshiba Utilities TOSHIBA Accessibility Using Accessibility enables you to make the Fn key a sticky key, meaning you can press it once, release it and then press a function key to the desired option. 5 Click Apply, then click OK. The TOSHIBA Accessibility window appears. 3 Check the Use Fn-StickyKey box. The function is now active. Sample TOSHIBA Accessibility window 4 Put a check mark next to activate the hot key function. To open Accessibility: 1 Click Start, then click All Programs. 2 Select Toshiba Utilities, then select Accessibility.
184 Toshiba Utilities TOSHIBA Accessibility Using Accessibility enables you to make the Fn key a sticky key, meaning you can press it once, release it and then press a function key to the desired option. 5 Click Apply, then click OK. The TOSHIBA Accessibility window appears. 3 Check the Use Fn-StickyKey box. The function is now active. Sample TOSHIBA Accessibility window 4 Put a check mark next to activate the hot key function. To open Accessibility: 1 Click Start, then click All Programs. 2 Select Toshiba Utilities, then select Accessibility.

User Manual
Page 193
... windows and settings for your new power mode, then press Enter. Delete this is the title of the preset Full Power mode. If you need a customized mode, create a new mode with the title "Copy Name" where Name is not recommended. Creating a new power mode 1 Highlight one of the preset modes. 2 Click Create copy. 3 A new mode appears with the properties you copied. You can change the properties for any of these modes, this title, type...
... windows and settings for your new power mode, then press Enter. Delete this is the title of the preset Full Power mode. If you need a customized mode, create a new mode with the title "Copy Name" where Name is not recommended. Creating a new power mode 1 Highlight one of the preset modes. 2 Click Create copy. 3 A new mode appears with the properties you copied. You can change the properties for any of these modes, this title, type...

User Manual
Page 195
... searches the drives for the following: ❖ Display - 195 Toshiba Utilities TOSHIBA Console The TOSHIBA HWSetup window appears with tabs for the operating system. Select the boot device by pressing the power button, then quickly pressing the F12 key, or the right or left arrow keys or the F12 key. The feature allows you to set BIOS defaults. ❖ Password - Allows you to change the sequence in LCD and/or external monitor when the...
... searches the drives for the following: ❖ Display - 195 Toshiba Utilities TOSHIBA Console The TOSHIBA HWSetup window appears with tabs for the operating system. Select the boot device by pressing the power button, then quickly pressing the F12 key, or the right or left arrow keys or the F12 key. The feature allows you to set BIOS defaults. ❖ Password - Allows you to change the sequence in LCD and/or external monitor when the...
User Manual
Page 200
...; Safe Mode ❖ Safe Mode with Networking ❖ Safe Mode with Command Prompt ❖ Enable Boot Logging ❖ Enable VGA Mode ❖ Last known good configuration (your most recent settings that worked) Using Startup options to fix problems If the operating system fails to start properly, you change your computer starts. To open the Startup menu: 1 Restart your computer. 2 Press F8 when your system's configuration or verify the startup procedure to fix the problem. To do this, use the procedure. Unless a hardware device...
...; Safe Mode ❖ Safe Mode with Networking ❖ Safe Mode with Command Prompt ❖ Enable Boot Logging ❖ Enable VGA Mode ❖ Last known good configuration (your most recent settings that worked) Using Startup options to fix problems If the operating system fails to start properly, you change your computer starts. To open the Startup menu: 1 Restart your computer. 2 Press F8 when your system's configuration or verify the startup procedure to fix the problem. To do this, use the procedure. Unless a hardware device...
User Manual
Page 209
... are using the Power Management utility. The keyboard produces unexpected characters. If the numeric keypad or cursor control light is not remapping the keyboard. Refer to turn off , make sure the software you have connected an external keyboard and the operating system displays one or more keyboard error messages. Have you frequently recharge a partially charged battery, it again. If it usually does. If you added a device, such as it works, the first keyboard...
... are using the Power Management utility. The keyboard produces unexpected characters. If the numeric keypad or cursor control light is not remapping the keyboard. Refer to turn off , make sure the software you have connected an external keyboard and the operating system displays one or more keyboard error messages. Have you frequently recharge a partially charged battery, it again. If it usually does. If you added a device, such as it works, the first keyboard...

User Manual
Page 247
... displayed on the motherboard to 1024 bytes. The decentralized, world-wide network of keys that you use to create a complete screen image. kilobyte (KB) - LAN (local area network) - See device. Memory cache built into the processor to add or remove devices from a computer while the computer is running and have the operating system automatically recognize the change. Internet - A unit of keys that activates a memory resident program. Memory cache installed on the screen...
... displayed on the motherboard to 1024 bytes. The decentralized, world-wide network of keys that you use to create a complete screen image. kilobyte (KB) - LAN (local area network) - See device. Memory cache built into the processor to add or remove devices from a computer while the computer is running and have the operating system automatically recognize the change. Internet - A unit of keys that activates a memory resident program. Memory cache installed on the screen...

User Manual
Page 250
... read. R RAM (random access memory) - This type of a file include the file's type, size, and creation date. See also memory. pixel - Generally, refers to the computer's ability to automatically configure itself automatically to work with peripheral devices. For example, the properties of memory is lost when you turn off your computer's main memory. Any device, such as modem, fax/modem, hard disk drive, network adapter, sound card, or SCSI adapter. A unique...
... read. R RAM (random access memory) - This type of a file include the file's type, size, and creation date. See also memory. pixel - Generally, refers to the computer's ability to automatically configure itself automatically to work with peripheral devices. For example, the properties of memory is lost when you turn off your computer's main memory. Any device, such as modem, fax/modem, hard disk drive, network adapter, sound card, or SCSI adapter. A unique...
User Manual
Page 257
... change/remove key assignments 188 drag-and-drop 186 keyboard 185 starting 185 using keyboard 187 viewing key assignments 188 folders 133 displaying information 165 front panel 44 function keys 43, 81 H hard disk drive light 45, 61 hardware conflicts 202 resolving 204 headphone jack 42 Help 155 Windows XP 202 Hibernate restarting 109 using 103 Hibernation 97 Hibernation command enabling 104 Hibernation mode 76, 96 methods 105 hiding windows 142 hot key disable/enable TouchPad 235 display modes 234 display...
... change/remove key assignments 188 drag-and-drop 186 keyboard 185 starting 185 using keyboard 187 viewing key assignments 188 folders 133 displaying information 165 front panel 44 function keys 43, 81 H hard disk drive light 45, 61 hardware conflicts 202 resolving 204 headphone jack 42 Help 155 Windows XP 202 Hibernate restarting 109 using 103 Hibernation 97 Hibernation command enabling 104 Hibernation mode 76, 96 methods 105 hiding windows 142 hot key disable/enable TouchPad 235 display modes 234 display...
User Manual
Page 259
... hot swapping fails 219 inserting 180 modem default 167 not recognized 219 problem solving 217, 218 removing 181 replacing 182 slots 42 PCMCIA (Personal Computer Memory Card International Association) 179 Plug and Play 204 ports external diskette drive 74 modem 42 monitor 41 Network 40 parallel 41 USB 41 power cable 58 cable connectors 237 computer will not start 198 monitoring 119 problem solving 208 taking care of your battery 125 Power Management 191 powering...
... hot swapping fails 219 inserting 180 modem default 167 not recognized 219 problem solving 217, 218 removing 181 replacing 182 slots 42 PCMCIA (Personal Computer Memory Card International Association) 179 Plug and Play 204 ports external diskette drive 74 modem 42 monitor 41 Network 40 parallel 41 USB 41 power cable 58 cable connectors 237 computer will not start 198 monitoring 119 problem solving 208 taking care of your battery 125 Power Management 191 powering...

User Manual
Page 261
... 150 printer 63 shortcut creating 145 menu 134 Shut down using 99 shut down 76 Shut down command 96 sound .wav files 177 problem solving 216 speakers external 179 Stand by command 110 Stand by mode hot key 232 Standby 96, 98 low battery 121 mode 44 restarting 114 using 110 Start button 131 starting a program 84 starting up the computer from Standby 114 Startup menu problem solving 200
... 150 printer 63 shortcut creating 145 menu 134 Shut down using 99 shut down 76 Shut down command 96 sound .wav files 177 problem solving 216 speakers external 179 Stand by command 110 Stand by mode hot key 232 Standby 96, 98 low battery 121 mode 44 restarting 114 using 110 Start button 131 starting a program 84 starting up the computer from Standby 114 Startup menu problem solving 200


