
User Guide
Page 14
14 Contents Creating a computer-friendly environment....... 40 Keeping yourself comfortable 41 Precautions 44 Setting up your computer 45 Installing additional memory (optional 46 Connecting a mouse 50 Connecting a printer 50 Using external display devices 51 Directing the display output when you turn on the computer 51 Adjusting ...
14 Contents Creating a computer-friendly environment....... 40 Keeping yourself comfortable 41 Precautions 44 Setting up your computer 45 Installing additional memory (optional 46 Connecting a mouse 50 Connecting a printer 50 Using external display devices 51 Directing the display output when you turn on the computer 51 Adjusting ...
User Guide
Page 21
21 Contents Memory card problems 232 Power and the batteries 233 Keyboard problems 234 Display problems 235 Disk drive problems 237 DVD-ROM or DVD-ROM/CD-RW ... problems 247 Printer problems 250 Modem problems 251 Develop good computing habits 252 If you need further assistance 253 Before you call 253 Contacting Toshiba 253 Other Toshiba Internet Web sites 255 Appendix A: Hot Keys 259 Volume Mute 259 Instant password security 260 Without a password 260 With a password 260 Power usage mode...
21 Contents Memory card problems 232 Power and the batteries 233 Keyboard problems 234 Display problems 235 Disk drive problems 237 DVD-ROM or DVD-ROM/CD-RW ... problems 247 Printer problems 250 Modem problems 251 Develop good computing habits 252 If you need further assistance 253 Before you call 253 Contacting Toshiba 253 Other Toshiba Internet Web sites 255 Appendix A: Hot Keys 259 Volume Mute 259 Instant password security 260 Without a password 260 With a password 260 Power usage mode...

User Guide
Page 32
...external monitor. The SmartMedia card slot supports 8 MB (3.3V), 16 MB (3.3V), 32 MB (3.3V), 64 MB (3.3V) and 128 MB (3.3V) SmartMedia Random Access Memory (RAM) cards. They are only 0.76mm in thickness. If the operating system does not recognize an inserted SmartMedia card, remove and insert it again. The.... The PC Card eject buttons release PC Cards from the corresponding slots. The SD (Secure Digital) card slot holds a highly secure, stamp-size flash memory card with a variety of 16 MB, 32 MB, 64 MB and 128 MB. 32 Finding Your Way Around Left side The cooling vent helps keep...
...external monitor. The SmartMedia card slot supports 8 MB (3.3V), 16 MB (3.3V), 32 MB (3.3V), 64 MB (3.3V) and 128 MB (3.3V) SmartMedia Random Access Memory (RAM) cards. They are only 0.76mm in thickness. If the operating system does not recognize an inserted SmartMedia card, remove and insert it again. The.... The PC Card eject buttons release PC Cards from the corresponding slots. The SD (Secure Digital) card slot holds a highly secure, stamp-size flash memory card with a variety of 16 MB, 32 MB, 64 MB and 128 MB. 32 Finding Your Way Around Left side The cooling vent helps keep...
User Guide
Page 38
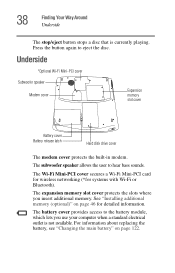
...again to hear bass sounds. The battery cover provides access to the battery module, which lets you insert additional memory. See "Installing additional memory (optional)" on page 122. The expansion memory slot cover protects the slots where you use your computer when a standard electrical outlet is currently playing. The ...on page 46 for systems with Wi-Fi or Bluetooth). Underside *Optional Wi-Fi Mini-PCI cover Subwoofer speaker Modem cover Expansion memory slot cover Battery cover Battery release latch Hard disk drive cover The modem cover protects the built-in modem.
...again to hear bass sounds. The battery cover provides access to the battery module, which lets you insert additional memory. See "Installing additional memory (optional)" on page 122. The expansion memory slot cover protects the slots where you use your computer when a standard electrical outlet is currently playing. The ...on page 46 for systems with Wi-Fi or Bluetooth). Underside *Optional Wi-Fi Mini-PCI cover Subwoofer speaker Modem cover Expansion memory slot cover Battery cover Battery release latch Hard disk drive cover The modem cover protects the built-in modem.
User Guide
Page 46
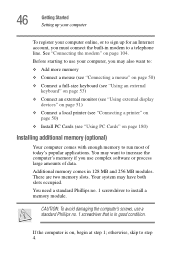
...or to sign up for an Internet account, you must connect the built-in modem to step 4. Your system may want to: ❖ Add more memory ❖ Connect a mouse (see "Connecting a mouse" on page 50) ❖ Connect a full-size keyboard (see "Using an external keyboard" on... "Connecting a printer" on page 50) ❖ Install PC Cards (see "Using PC Cards" on page 180) Installing additional memory (optional) Your computer comes with enough memory to install a memory module. You need a standard Phillips no . 1 screwdriver that is on page 104. otherwise, skip to a telephone line. 46...
...or to sign up for an Internet account, you must connect the built-in modem to step 4. Your system may want to: ❖ Add more memory ❖ Connect a mouse (see "Connecting a mouse" on page 50) ❖ Connect a full-size keyboard (see "Using an external keyboard" on... "Connecting a printer" on page 50) ❖ Install PC Cards (see "Using PC Cards" on page 180) Installing additional memory (optional) Your computer comes with enough memory to install a memory module. You need a standard Phillips no . 1 screwdriver that is on page 104. otherwise, skip to a telephone line. 46...
User Guide
Page 47
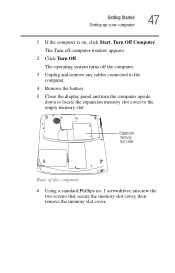
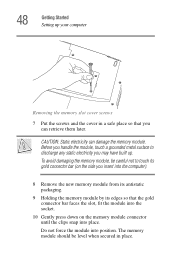
... cover Base of the computer 6 Using a standard Phillips no. 1 screwdriver, unscrew the two screws that secure the memory slot cover, then remove the memory slot cover. The Turn off the computer. 3 Unplug and remove any cables connected to the computer. 4 Remove the battery. 5 Close the display... panel and turn the computer upside down to locate the expansion memory slot cover to the empty memory slot. Getting Started Setting up your computer 47 1 If the computer is on, click Start, Turn Off Computer. The operating system...
... cover Base of the computer 6 Using a standard Phillips no. 1 screwdriver, unscrew the two screws that secure the memory slot cover, then remove the memory slot cover. The Turn off the computer. 3 Unplug and remove any cables connected to the computer. 4 Remove the battery. 5 Close the display... panel and turn the computer upside down to locate the expansion memory slot cover to the empty memory slot. Getting Started Setting up your computer 47 1 If the computer is on, click Start, Turn Off Computer. The operating system...
User Guide
Page 48
...slot, fit the module into the computer). 8 Remove the new memory module from its antistatic packaging. 9 Holding the memory module by its gold connector bar (on the memory module connector until the clips snap into position. The memory module should be careful not to discharge any static electricity you ...insert into the socket. 10 Gently press down on the side you may have built up your computer Removing the memory slot cover screws 7 Put the screws and the cover in place. CAUTION: Static electricity can retrieve them later. Before you handle the ...
...slot, fit the module into the computer). 8 Remove the new memory module from its antistatic packaging. 9 Holding the memory module by its gold connector bar (on the memory module connector until the clips snap into position. The memory module should be careful not to discharge any static electricity you ...insert into the socket. 10 Gently press down on the side you may have built up your computer Removing the memory slot cover screws 7 Put the screws and the cover in place. CAUTION: Static electricity can retrieve them later. Before you handle the ...
User Guide
Page 49
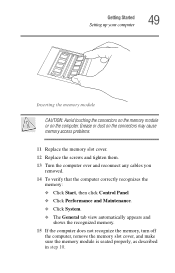
...dust on the computer. Getting Started Setting up your computer 49 Inserting the memory module CAUTION: Avoid touching the connectors on the memory module or on the connectors may cause memory access problems. 11 Replace the memory slot cover. 12 Replace the screws and tighten them. 13 Turn the... computer over and reconnect any cables you removed. 14 To verify that the computer correctly recognizes the memory: ❖ Click Start, then click Control Panel ❖ Click Performance and Maintenance. ❖ Click System. ❖ The General tab view...
...dust on the computer. Getting Started Setting up your computer 49 Inserting the memory module CAUTION: Avoid touching the connectors on the memory module or on the connectors may cause memory access problems. 11 Replace the memory slot cover. 12 Replace the screws and tighten them. 13 Turn the... computer over and reconnect any cables you removed. 14 To verify that the computer correctly recognizes the memory: ❖ Click Start, then click Control Panel ❖ Click Performance and Maintenance. ❖ Click System. ❖ The General tab view...
User Guide
Page 50
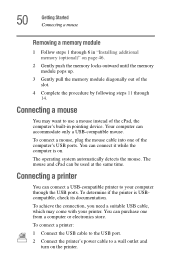
... use a mouse instead of the cPad, the computer's built-in "Installing additional memory (optional)" on page 46. 2 Gently push the memory locks outward until the memory module pops up. 3 Gently pull the memory module diagonally out of the computer's USB ports. To connect a mouse, plug the...automatically detects the mouse. Connecting a mouse You may come with your computer through the USB ports. 50 Getting Started Connecting a mouse Removing a memory module 1 Follow steps 1 through 6 in pointing device. Your computer can be used at the same time. To achieve the connection, you ...
... use a mouse instead of the cPad, the computer's built-in "Installing additional memory (optional)" on page 46. 2 Gently push the memory locks outward until the memory module pops up. 3 Gently pull the memory module diagonally out of the computer's USB ports. To connect a mouse, plug the...automatically detects the mouse. Connecting a mouse You may come with your computer through the USB ports. 50 Getting Started Connecting a mouse Removing a memory module 1 Follow steps 1 through 6 in pointing device. Your computer can be used at the same time. To achieve the connection, you ...
User Guide
Page 78
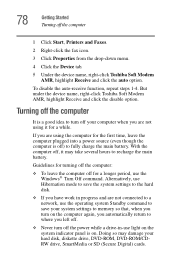
... and Faxes. 2 Right-click the fax icon. 3 Click Properties from the drop-down menu. 4 Click the Device tab. 5 Under the device name, right-click Toshiba Soft Modem AMR, highlight Receive and click the auto option. If you are not connected to a network, use the operating system Standby command to save...when you are not using the computer for a while. Alternatively, use the Windows® Turn Off command. Doing so may take several hours to memory so that, when you turn off the power while a drive-in progress and are using it may damage your system settings to recharge the main...
... and Faxes. 2 Right-click the fax icon. 3 Click Properties from the drop-down menu. 4 Click the Device tab. 5 Under the device name, right-click Toshiba Soft Modem AMR, highlight Receive and click the auto option. If you are not connected to a network, use the operating system Standby command to save...when you are not using the computer for a while. Alternatively, use the Windows® Turn Off command. Doing so may take several hours to memory so that, when you turn off the power while a drive-in progress and are using it may damage your system settings to recharge the main...
User Guide
Page 81
Your work stays in the computer's temporary memory until you are working. This feature saves your software documentation for example, a system error occurs and you must restart your computer, or your battery runs ...
Your work stays in the computer's temporary memory until you are working. This feature saves your software documentation for example, a system error occurs and you must restart your computer, or your battery runs ...
User Guide
Page 96
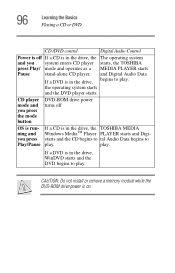
...or DVD CD /DVD control Digital Audio Control Power is off OS is in the drive, the TOSHIBA MEDIA ning and Windows MediaTM Player PLAYER starts and Digi- the operating system starts and the DVD player... If a DVD is in the drive, the The operating system and you system enters CD player starts, the TOSHIBA press Play/ mode and operates as a MEDIA PLAYER starts Pause stand-alone CD player. and Digital Audio Data...starts and the DVD begins to play. CAUTION: Do not install or remove a memory module while the DVD-ROM drive power is in the drive, begins to Play/Pause play . If a ...
...or DVD CD /DVD control Digital Audio Control Power is off OS is in the drive, the TOSHIBA MEDIA ning and Windows MediaTM Player PLAYER starts and Digi- the operating system starts and the DVD player... If a DVD is in the drive, the The operating system and you system enters CD player starts, the TOSHIBA press Play/ mode and operates as a MEDIA PLAYER starts Pause stand-alone CD player. and Digital Audio Data...starts and the DVD begins to play. CAUTION: Do not install or remove a memory module while the DVD-ROM drive power is in the drive, begins to Play/Pause play . If a ...
User Guide
Page 106
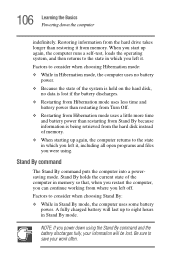
... holds the current state of the computer in Stand By mode. Factors to eight hours in memory so that, when you restart the computer, you can continue working from where you left it from memory. Stand By command The Stand By command puts the computer into a powersaving mode. A fully...programs and files you left it. Factors to the state in Hibernation mode, the computer uses no battery power. ❖ Because the state of memory. ❖ When starting up again, the computer runs a self-test, loads the operating system, and then returns to save your information will last...
... holds the current state of the computer in Stand By mode. Factors to eight hours in memory so that, when you restart the computer, you can continue working from where you left it from memory. Stand By command The Stand By command puts the computer into a powersaving mode. A fully...programs and files you left it. Factors to the state in Hibernation mode, the computer uses no battery power. ❖ Because the state of memory. ❖ When starting up again, the computer runs a self-test, loads the operating system, and then returns to save your information will last...
User Guide
Page 112
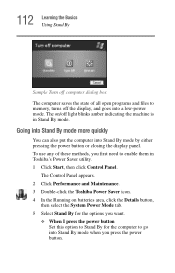
...box The computer saves the state of these methods, you press the power button. The Control Panel appears. 2 Click Performance and Maintenance. 3 Double-click the Toshiba Power Saver icon. 4 In the Running on /off the display, and goes into Stand By mode by either pressing the power button or closing the... Set this option to Stand By for the computer to go into Stand By mode when you first need to memory, turns off light blinks amber indicating the machine is in Toshiba's Power Saver utility. 1 Click Start, then click Control Panel. Going into Stand By mode more quickly You can also ...
...box The computer saves the state of these methods, you press the power button. The Control Panel appears. 2 Click Performance and Maintenance. 3 Double-click the Toshiba Power Saver icon. 4 In the Running on /off the display, and goes into Stand By mode by either pressing the power button or closing the... Set this option to Stand By for the computer to go into Stand By mode when you first need to memory, turns off light blinks amber indicating the machine is in Toshiba's Power Saver utility. 1 Click Start, then click Control Panel. Going into Stand By mode more quickly You can also ...
User Guide
Page 115
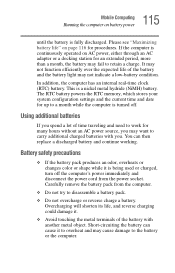
..., overheats or changes color or shape while it to overheat and may fail to the battery or the computer. The RTC battery powers the RTC memory, which stores your system configuration settings and the current time and date for up to work for procedures. You can cause it is fully discharged...
..., overheats or changes color or shape while it to overheat and may fail to the battery or the computer. The RTC battery powers the RTC memory, which stores your system configuration settings and the current time and date for up to work for procedures. You can cause it is fully discharged...
User Guide
Page 180
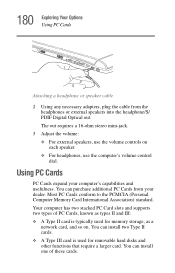
...stereo mini-jack. 3 Adjust the volume: ❖ For external speakers, use the computer's volume control dial. Most PC Cards conform to the PCMCIA (Personal Computer Memory Card International Association) standard. You can install two Type II cards. ❖ A Type III card is typically used for... memory storage, as a network card, and so on each speaker. ❖ For headphones, use the volume controls on . Your computer has two stacked PC Card slots...
...stereo mini-jack. 3 Adjust the volume: ❖ For external speakers, use the computer's volume control dial. Most PC Cards conform to the PCMCIA (Personal Computer Memory Card International Association) standard. You can install two Type II cards. ❖ A Type III card is typically used for... memory storage, as a network card, and so on each speaker. ❖ For headphones, use the volume controls on . Your computer has two stacked PC Card slots...
User Guide
Page 183
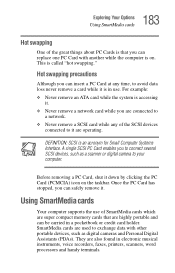
... while you are connected to a network. ❖ Never remove a SCSI card while any of the great things about PC Cards is that are super compact memory cards that you can insert a PC Card at any time, to avoid data loss never remove a card while it down by clicking the PC Card...
... while you are connected to a network. ❖ Never remove a SCSI card while any of the great things about PC Cards is that are super compact memory cards that you can insert a PC Card at any time, to avoid data loss never remove a card while it down by clicking the PC Card...
User Guide
Page 185
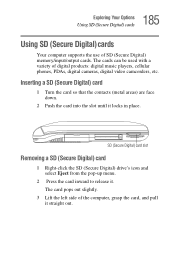
...-up menu. 2 Press the card inward to release it locks in place. The card pops out slightly. 3 Lift the left side of SD (Secure Digital) memory/input/output cards. The cards can be used with a variety of digital products: digital music players, cellular phones, PDAs, digital cameras, digital video camcorders, etc...
...-up menu. 2 Press the card inward to release it locks in place. The card pops out slightly. 3 Lift the left side of SD (Secure Digital) memory/input/output cards. The cards can be used with a variety of digital products: digital music players, cellular phones, PDAs, digital cameras, digital video camcorders, etc...
User Guide
Page 226
... the computer. The Windows® operating system is not working Once you can easily detect if the operating system is no diskette in the computer's memory has been lost. If you change the system in some way such as installing a new program or adding a device. For more information, see "Power and...
... the computer. The Windows® operating system is not working Once you can easily detect if the operating system is no diskette in the computer's memory has been lost. If you change the system in some way such as installing a new program or adding a device. For more information, see "Power and...
User Guide
Page 230
...it from the computer. ❖ Disable another system component and use its requirements do to the CPU is called the Direct Memory Access (DMA). This causes a hardware conflict. Refer to as it interrupts what the processor is asking for adapter cards to store ...information as system resources. 230 If Something Goes Wrong Resolving a hardware conflict the computer's Central Processing Unit (CPU). Direct Memory Access Similarly, the data required by the other, causing a hardware conflict. These channels of the processor's time. Interrupt Request Channel The...
...it from the computer. ❖ Disable another system component and use its requirements do to the CPU is called the Direct Memory Access (DMA). This causes a hardware conflict. Refer to as it interrupts what the processor is asking for adapter cards to store ...information as system resources. 230 If Something Goes Wrong Resolving a hardware conflict the computer's Central Processing Unit (CPU). Direct Memory Access Similarly, the data required by the other, causing a hardware conflict. These channels of the processor's time. Interrupt Request Channel The...


