
Owner's Manual - English
Page 1
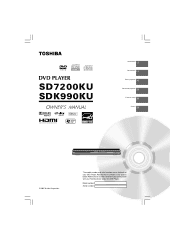
Record these numbers whenever you communicate with your DVD Player. Refer to these numbers in the spaces below. Model number: Serial number: DIGITAL VIDEO DVD PLAYER SD7200KU SDK990KU OWNER'S MANUAL Introduction 2 Connections 11 Basic playback 16 Advanced playback 19 Function setup 29 Others 35 © 2009 Toshiba Corporation The model number and serial number are on the back of your Toshiba dealer about this DVD Player.
Record these numbers whenever you communicate with your DVD Player. Refer to these numbers in the spaces below. Model number: Serial number: DIGITAL VIDEO DVD PLAYER SD7200KU SDK990KU OWNER'S MANUAL Introduction 2 Connections 11 Basic playback 16 Advanced playback 19 Function setup 29 Others 35 © 2009 Toshiba Corporation The model number and serial number are on the back of your Toshiba dealer about this DVD Player.
Owner's Manual - English
Page 2
... there is used as vases, shall be exposed to constitute a risk of this product, please read this unit not expressly approved by Toshiba, or parties authorized by the U.S. Increase the separation between the equipment and receiver. - In order to disconnect the apparatus from the ...mains completely, the main plug should remain readily operable during intended used in a residential installation. ENERGY STAR® qualified DVD. Environmental Protection Agency and the U.S. DANGEROUS HIGH VOLTAGES ARE PRESENT INSIDE THE ENCLOSURE. TO PREVENT ELECTRIC SHOCK, MATCH WIDE BLADE OF...
... there is used as vases, shall be exposed to constitute a risk of this product, please read this unit not expressly approved by Toshiba, or parties authorized by the U.S. Increase the separation between the equipment and receiver. - In order to disconnect the apparatus from the ...mains completely, the main plug should remain readily operable during intended used in a residential installation. ENERGY STAR® qualified DVD. Environmental Protection Agency and the U.S. DANGEROUS HIGH VOLTAGES ARE PRESENT INSIDE THE ENCLOSURE. TO PREVENT ELECTRIC SHOCK, MATCH WIDE BLADE OF...
Owner's Manual - English
Page 4
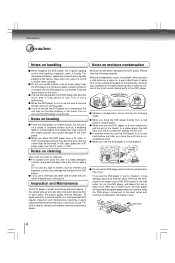
... off the proper position and cause damage to clean the unit, follow that regular inspection and maintenance (cleaning or parts replacement) be distorted. Keep the DVD player connected to give it on a shaky or unstable surface such as insect spray, near a TV, radio, or VCR, the playback picture may...come off the power. For further details, contact your nearest consumer electronics dealer. When you do not use any moisture. Do not use the DVD player for two or three hours. Do not leave rubber or plastic products in the future. In the same way, moisture may condense on a...
... off the proper position and cause damage to clean the unit, follow that regular inspection and maintenance (cleaning or parts replacement) be distorted. Keep the DVD player connected to give it on a shaky or unstable surface such as insect spray, near a TV, radio, or VCR, the playback picture may...come off the power. For further details, contact your nearest consumer electronics dealer. When you do not use any moisture. Do not use the DVD player for two or three hours. Do not leave rubber or plastic products in the future. In the same way, moisture may condense on a...

Owner's Manual - English
Page 5
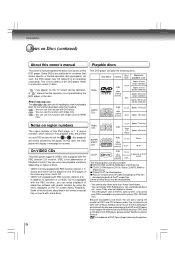
...Always keep the disc clean. Do not store discs in a case. Introduction Notes on the disc cause picture and sound deterioration. DVD Title 1 Chapter 1 Chapter 2 DVD Chapter 1 Title 2 Chapter 2 Chapter 3 On cleaning discs VIDEO CD/audio CD VIDEO CD/audio CD Track 1 Track 2 ...track number" respectively. Do not use , distribution, or revision of copyrighted materials including, without limitation, television programs, videotapes, and DVDs, is protected by Macrovision Corporation and other countries, and may damage the disc. Wipe the disc from the center outwards with a...
...Always keep the disc clean. Do not store discs in a case. Introduction Notes on the disc cause picture and sound deterioration. DVD Title 1 Chapter 1 Chapter 2 DVD Chapter 1 Title 2 Chapter 2 Chapter 3 On cleaning discs VIDEO CD/audio CD VIDEO CD/audio CD Track 1 Track 2 ...track number" respectively. Do not use , distribution, or revision of copyrighted materials including, without limitation, television programs, videotapes, and DVDs, is protected by Macrovision Corporation and other countries, and may damage the disc. Wipe the disc from the center outwards with a...
Owner's Manual - English
Page 6
... respond to all versions of DivX® video (including DivX® 6) with standard playback of DivX® media files Some of DVD and CD discs, Toshiba cannot assure that allows specific or limited operation during operation. A " " means that heading. Refer to instruction notes of the functions ... above . • You cannot play every disc bearing the DVD and CD logos. Some of discs. CD : You can play DVDs recorded in any difficulty playing a DVD and/ or CD disc on this DVD player, please contact Toshiba Customer Service. Audio CDs Audio 12 cm Approx. 74 minutes ...
... respond to all versions of DivX® video (including DivX® 6) with standard playback of DivX® media files Some of DVD and CD discs, Toshiba cannot assure that allows specific or limited operation during operation. A " " means that heading. Refer to instruction notes of the functions ... above . • You cannot play every disc bearing the DVD and CD logos. Some of discs. CD : You can play DVDs recorded in any difficulty playing a DVD and/ or CD disc on this DVD player, please contact Toshiba Customer Service. Audio CDs Audio 12 cm Approx. 74 minutes ...
Owner's Manual - English
Page 7
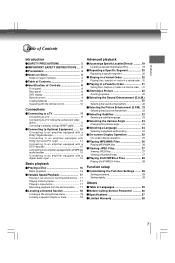
... Contents Introduction SAFETY PRECAUTIONS 2 IMPORTANT SAFETY INSTRUCTIONS .... 3 Precautions 4 Notes on Discs 5 Notes on region numbers 6 Table of Contents 7 Identification of Controls 8 Front panel 8 Rear panel 8 DVD display 8 Remote control 9 Loading batteries 10 Operating with the remote control 10 Connections Connecting to a TV 11 Connecting to a TV 11 Connecting to a TV (Using...
... Contents Introduction SAFETY PRECAUTIONS 2 IMPORTANT SAFETY INSTRUCTIONS .... 3 Precautions 4 Notes on Discs 5 Notes on region numbers 6 Table of Contents 7 Identification of Controls 8 Front panel 8 Rear panel 8 DVD display 8 Remote control 9 Loading batteries 10 Operating with the remote control 10 Connections Connecting to a TV 11 Connecting to a TV 11 Connecting to a TV (Using...

Owner's Manual - English
Page 8
... discs may only display track numbers. Introduction Identification of discs you play. No disc Bad disc Bad disc OPEN 14 15 LOAD/CLOSE Power off DVD VIDEO • During playback: Example VIDEO CD • During playback: Example Audio CD • During playback: Example Picture • During thumbnail viewing Chapter/Track number... Cord HDMI OUT jack 12 HDMI indicator 12 16 16 11 11 VIDEO Y PB PR VIDEO OUT HDMI OUT AUDIO OUT R ANALOG L COAXIAL DIGITAL 11 DVD display The indicators vary depending on the kinds of Controls See the page in for details.
... discs may only display track numbers. Introduction Identification of discs you play. No disc Bad disc Bad disc OPEN 14 15 LOAD/CLOSE Power off DVD VIDEO • During playback: Example VIDEO CD • During playback: Example Audio CD • During playback: Example Picture • During thumbnail viewing Chapter/Track number... Cord HDMI OUT jack 12 HDMI indicator 12 16 16 11 11 VIDEO Y PB PR VIDEO OUT HDMI OUT AUDIO OUT R ANALOG L COAXIAL DIGITAL 11 DVD display The indicators vary depending on the kinds of Controls See the page in for details.

Owner's Manual - English
Page 9
Introduction Remote control The instructions in "Locating a title using the top menu." 18 9 To operate a menu, follow the instructions in this manual describe the functions on many DVDs. See the page in for details. 16 19 22 23 24 17 18 17 18 18 20 19 21 29 12 16 19 17 23 24 16 16 18 17 18 25 16 25 * 16 16 20 22 HDMI button 12 * RETURN button Return to menu display for VCD (2.0) discs with menu. * MENU button Use the MENU button to display the menu included on the remote control.
Introduction Remote control The instructions in "Locating a title using the top menu." 18 9 To operate a menu, follow the instructions in this manual describe the functions on many DVDs. See the page in for details. 16 19 22 23 24 17 18 17 18 18 20 19 21 29 12 16 19 17 23 24 16 16 18 17 18 25 16 25 * 16 16 20 22 HDMI button 12 * RETURN button Return to menu display for VCD (2.0) discs with menu. * MENU button Use the MENU button to display the menu included on the remote control.
Owner's Manual - English
Page 10
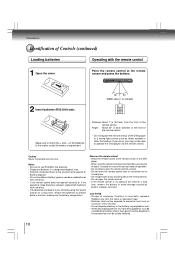
... the remote control at the remote sensor of batteries in fire; Notes • Be sure to use R03/AAA size batteries. • Dispose of the DVD player. • When using the remote control for a long time, remove the battery to prevent battery acid from the front of the remote sensor Angle...: About 30° in each direction of the front of the remote sensor * Do not expose the remote sensor of the DVD player to operate the DVD player via the remote control. Make sure to match the + and - Caution Never throw batteries into the battery compartment. battery may not be...
... the remote control at the remote sensor of batteries in fire; Notes • Be sure to use R03/AAA size batteries. • Dispose of the DVD player. • When using the remote control for a long time, remove the battery to prevent battery acid from the front of the remote sensor Angle...: About 30° in each direction of the front of the remote sensor * Do not expose the remote sensor of the DVD player to operate the DVD player via the remote control. Make sure to match the + and - Caution Never throw batteries into the battery compartment. battery may not be...
Owner's Manual - English
Page 11
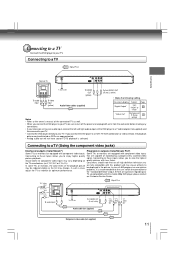
... To 2ch AUDIO OUT (R: red, L:white) Audio cable (not supplied) Component video cable (not supplied) 11 Connections Connecting to a TV Connect the DVD player to a TV Connections Normal TV VIDEO Y PB PR VIDEO OUT HDMI OUT AUDIO OUT R ANALOG L COAXIAL DIGITAL To audio input To video input...174;) Progressive outputs (ColorStream Pro®) Some TVs or monitors are capable of the playback picture are fully compatible with this model 480p DVD player, please contact our Customer Service Center. Connecting to your TV. In such a case, be reduced slightly or the tint may ...
... To 2ch AUDIO OUT (R: red, L:white) Audio cable (not supplied) Component video cable (not supplied) 11 Connections Connecting to a TV Connect the DVD player to a TV Connections Normal TV VIDEO Y PB PR VIDEO OUT HDMI OUT AUDIO OUT R ANALOG L COAXIAL DIGITAL To audio input To video input...174;) Progressive outputs (ColorStream Pro®) Some TVs or monitors are capable of the playback picture are fully compatible with this model 480p DVD player, please contact our Customer Service Center. Connecting to your TV. In such a case, be reduced slightly or the tint may ...
Owner's Manual - English
Page 12
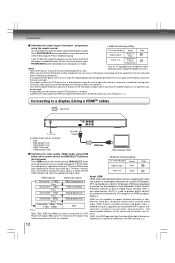
... Cable HDMI-compatible display Switching the video quality (HDMI mode) using the remote control You can temporarily switch the output signal for use with DVD players, Press illuminates " • 1080i " Press illuminates " • 720p " 1080i (interlaced) 720p (progressive) DTV, set-top boxes... video plus standard to protect digital content transmitted and received by DVI-compliant or HDMI-compliant Press displays. The resolution of Toshiba America Cousumer Products L.L.C. Be sure to adjust the receiver's volume to change the output signals as Digital Visual Interface (DVI...
... Cable HDMI-compatible display Switching the video quality (HDMI mode) using the remote control You can temporarily switch the output signal for use with DVD players, Press illuminates " • 1080i " Press illuminates " • 720p " 1080i (interlaced) 720p (progressive) DTV, set-top boxes... video plus standard to protect digital content transmitted and received by DVI-compliant or HDMI-compliant Press displays. The resolution of Toshiba America Cousumer Products L.L.C. Be sure to adjust the receiver's volume to change the output signals as Digital Visual Interface (DVI...
Owner's Manual - English
Page 13
... "Video Out" HDMI Output Setting Setting * Component Invalid (Interlaced) P-Scan Invalid (Progressive) 480p HDMI 720p 1080i 1080p Content of the DVD player. Be sure to adjust the receiver's volume to "Off". * Settings for HDMI output format are performed using the HDMI button on... 480p 720p 1080i 1080p Composite Composite Composite Composite 480p 480p 480p 480p Note: Both Composite (Video) and Component do not connect to this DVD player. • When using a HDMI cable. • The HDMI connector outputs uncompressed digital video, as well as almost every kind of...
... "Video Out" HDMI Output Setting Setting * Component Invalid (Interlaced) P-Scan Invalid (Progressive) 480p HDMI 720p 1080i 1080p Content of the DVD player. Be sure to adjust the receiver's volume to "Off". * Settings for HDMI output format are performed using the HDMI button on... 480p 720p 1080i 1080p Composite Composite Composite Composite 480p 480p 480p 480p Note: Both Composite (Video) and Component do not connect to this DVD player. • When using a HDMI cable. • The HDMI connector outputs uncompressed digital video, as well as almost every kind of...
Owner's Manual - English
Page 14
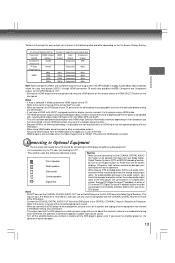
...by connecting • Make the following setting. Dolby and the double-D symbol are trademarks of Dolby Surround Pro Logic by connecting the DVD player to a 6 channel amplifier equipped with Dolby Surround Pro Logic Dolby Surround Pro Logic You can enjoy Dolby Surround Pro Logic sound.... coaxial cable (not supplied) On-screen display "Digital Output" Select: "PCM" or "Raw" Page 32 Connecting to that provide • Use DVDs encoded via the Dolby full 5.1-channel Dolby Digital soundtracks, as well as follows. Surround mark. • Make the following setting. The output sound ...
...by connecting • Make the following setting. Dolby and the double-D symbol are trademarks of Dolby Surround Pro Logic by connecting the DVD player to a 6 channel amplifier equipped with Dolby Surround Pro Logic Dolby Surround Pro Logic You can enjoy Dolby Surround Pro Logic sound.... coaxial cable (not supplied) On-screen display "Digital Output" Select: "PCM" or "Raw" Page 32 Connecting to that provide • Use DVDs encoded via the Dolby full 5.1-channel Dolby Digital soundtracks, as well as follows. Surround mark. • Make the following setting. The output sound ...

Owner's Manual - English
Page 15
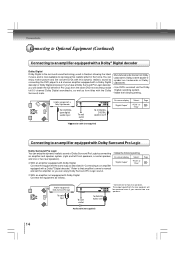
... amplifier equipped with a digital audio input 2 channel digital stereo You can enjoy the dynamic sound of 5.1 channel DTS encoded sound tracks on DVDs or audio CDs. Patent #: 5,451,942 & other U.S. amplifier equipped with a DTS decoder To COAXIAL type digital audio input To wall outlet...the full benefit of 2 channel digital stereo by connecting an amplifier equipped with an MPEG2 audio decoder or MPEG2 audio processor. • Use DVDs encoded via the DTS recording system. • Make the following setting. On-screen display Select: Page 75 Ω coaxial cable (not ...
... amplifier equipped with a digital audio input 2 channel digital stereo You can enjoy the dynamic sound of 5.1 channel DTS encoded sound tracks on DVDs or audio CDs. Patent #: 5,451,942 & other U.S. amplifier equipped with a DTS decoder To COAXIAL type digital audio input To wall outlet...the full benefit of 2 channel digital stereo by connecting an amplifier equipped with an MPEG2 audio decoder or MPEG2 audio processor. • Use DVDs encoded via the DTS recording system. • Make the following setting. On-screen display Select: Page 75 Ω coaxial cable (not ...
Owner's Manual - English
Page 16
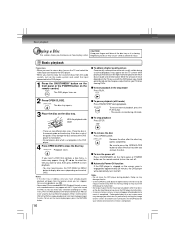
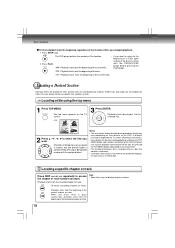
... objects other than discs on -screen menu may cause serious personal injury. When switching from PBC off anytime during a normal broadcast may cause the DVD player to play a disc. To turn the power off Press ON/STANDBY on the front panel or POWER button on the remote control to turn... on the menu display again, press the RETURN button. 16 To remove the disc Press OPEN/CLOSE. Basic playback Preparations • When you insert a DVD that image onto its PBC menu. While the amount of information. The disc tray opens. 3 Place the disc on your selection according to enjoy the...
... objects other than discs on -screen menu may cause serious personal injury. When switching from PBC off anytime during a normal broadcast may cause the DVD player to play a disc. To turn the power off Press ON/STANDBY on the front panel or POWER button on the remote control to turn... on the menu display again, press the RETURN button. 16 To remove the disc Press OPEN/CLOSE. Basic playback Preparations • When you insert a DVD that image onto its PBC menu. While the amount of information. The disc tray opens. 3 Place the disc on your selection according to enjoy the...
Owner's Manual - English
Page 17
... PLAY. REV: Fast reverse playback FWD: Fast forward playback Each time you press the PAUSE/STEP button, the picture advances one frame. The DVD player resumes playback from the location where you want to interrupt playback. Playing in the memory may differ depending on -screen displays while the... DVD player keeps a location in fast reverse or fast forward directions Press REV or FWD during slow-motion playback. • 3 speeds are ...
... PLAY. REV: Fast reverse playback FWD: Fast forward playback Each time you press the PAUSE/STEP button, the picture advances one frame. The DVD player resumes playback from the location where you want to interrupt playback. Playing in the memory may differ depending on -screen displays while the... DVD player keeps a location in fast reverse or fast forward directions Press REV or FWD during slow-motion playback. • 3 speeds are ...
Owner's Manual - English
Page 18
...• If you want to return to the button that contains a top menu. • Instruction notes of discs may refer to the beginning of a DVD, open and close the disc tray once with the number buttons. Locating a title using the top menu 1 Press TOP MENU. Playback starts from the selected... or repeatedly to select the title you stopped playback. 1 Press STOP twice. The top menu appears on the TV screen. e.g. 3 Press ENTER. The DVD player deletes the memory of the location. 2 Press PLAY. Playback starts from the beginning regardless of the location where you If the titles in quick...
...• If you want to return to the button that contains a top menu. • Instruction notes of discs may refer to the beginning of a DVD, open and close the disc tray once with the number buttons. Locating a title using the top menu 1 Press TOP MENU. Playback starts from the selected... or repeatedly to select the title you stopped playback. 1 Press STOP twice. The top menu appears on the TV screen. e.g. 3 Press ENTER. The DVD player deletes the memory of the location. 2 Press PLAY. Playback starts from the beginning regardless of the location where you If the titles in quick...
Owner's Manual - English
Page 20
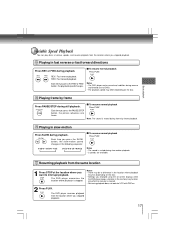
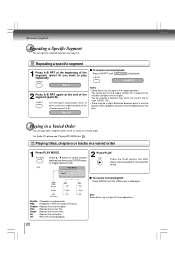
... actually resumes depending on the disc. Advanced playback Repeating a Specific Segment You can specify a segment only within a title, or tracks in random order. A-B RPT The DVD player automatically returns to point A and starts repeat playback of the segment (point A) you want to toggle desired mode. All: Repeats the entire disc. Playing... at the beginning of the selected segment (A-B). Rep A-B To resume normal playback Press A-B RPT until the Off/Normal is displayed. Press the PLAY button, the DVD player starts playback in the selected mode.
... actually resumes depending on the disc. Advanced playback Repeating a Specific Segment You can specify a segment only within a title, or tracks in random order. A-B RPT The DVD player automatically returns to point A and starts repeat playback of the segment (point A) you want to toggle desired mode. All: Repeats the entire disc. Playing... at the beginning of the selected segment (A-B). Rep A-B To resume normal playback Press A-B RPT until the Off/Normal is displayed. Press the PLAY button, the DVD player starts playback in the selected mode.
Owner's Manual - English
Page 21
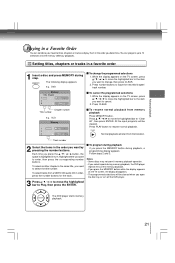
.../chapter/ track number. Notes • Some discs may not permit memory playback operation. • If you select repeat during memory playback, the DVD player repeats the current memory playback. • If you want to change the programmed selections 1. Setting titles, chapters or tracks in a favorite..., press / / / to move the highlighted bar to the item you want to enter, then press the corresponding number buttons. The DVD player starts memory playback. 21 MEMORY The following display appears. All the input programs will be cleared when you want to cancel. 2. ...
.../chapter/ track number. Notes • Some discs may not permit memory playback operation. • If you select repeat during memory playback, the DVD player repeats the current memory playback. • If you want to change the programmed selections 1. Setting titles, chapters or tracks in a favorite..., press / / / to move the highlighted bar to the item you want to enter, then press the corresponding number buttons. The DVD player starts memory playback. 21 MEMORY The following display appears. All the input programs will be cleared when you want to cancel. 2. ...

Owner's Manual - English
Page 22
...system. When you press the ZOOM button, the magnification level changes as described. • Zooming does not work on subtitles or menus included on DVDs. • The magnification level varies depending on sounds output from the ANALOG AUDIO OUT jacks, be zoomed in playback of the image.You may ...vary depending on the disc. • When the DVD player is connected to UP, DOWN, LEFT and RIGHT direction. button again, the sound enhancement change to Off. 3D*: To obtain expansive virtual ...
...system. When you press the ZOOM button, the magnification level changes as described. • Zooming does not work on subtitles or menus included on DVDs. • The magnification level varies depending on sounds output from the ANALOG AUDIO OUT jacks, be zoomed in playback of the image.You may ...vary depending on the disc. • When the DVD player is connected to UP, DOWN, LEFT and RIGHT direction. button again, the sound enhancement change to Off. 3D*: To obtain expansive virtual ...


