

User Manual
Page 3
... the Battery 10 Inserting and Removing an SD Card (Optional 10 Turning the Camcorder On and Getting Started 11 Turning the Camcorder Off 11 Section 3 Record Mode 12 Button Function 12 LCD Monitor Information 13 Movie Recording 15 Using the Pre-Record Function 15 Picture Recording 16 Taking Close up Pictures/Movies 16 Using Digital Light or Light Function 16 Using Digital Zoom 16 Options for Record Menu 17 Operations for Record Mode 17 Movie Resolution 18 Picture Resolution 18 White Balance 19 Scene 19 Movie Effect 20 Picture Effect...
... the Battery 10 Inserting and Removing an SD Card (Optional 10 Turning the Camcorder On and Getting Started 11 Turning the Camcorder Off 11 Section 3 Record Mode 12 Button Function 12 LCD Monitor Information 13 Movie Recording 15 Using the Pre-Record Function 15 Picture Recording 16 Taking Close up Pictures/Movies 16 Using Digital Light or Light Function 16 Using Digital Zoom 16 Options for Record Menu 17 Operations for Record Mode 17 Movie Resolution 18 Picture Resolution 18 White Balance 19 Scene 19 Movie Effect 20 Picture Effect...
User Manual
Page 4
Contents Section 4 Playback Mode 23 Button Function 23 LCD Monitor Information 24 Operations for Playback Mode 25 Movie Playback 26 Picture Playback 27 Section 5 Setting Your Camcorder 28 Setting Menu 28 Section 6 Viewing Pictures and Movies on TV 32 Connecting to a High-Definition 16:9(Wide) TV 32 Connecting to a non-high-definition 4:3 TV 32 Section 7 Viewing Movie & Picture on PC 33 Installing Bundled Software 33 Transferring Pictures or Movies to a Computer 33 Section 8 Burning the Recorded Clip into a DVD 34 Section 9 Uploading Video Files to...
Contents Section 4 Playback Mode 23 Button Function 23 LCD Monitor Information 24 Operations for Playback Mode 25 Movie Playback 26 Picture Playback 27 Section 5 Setting Your Camcorder 28 Setting Menu 28 Section 6 Viewing Pictures and Movies on TV 32 Connecting to a High-Definition 16:9(Wide) TV 32 Connecting to a non-high-definition 4:3 TV 32 Section 7 Viewing Movie & Picture on PC 33 Installing Bundled Software 33 Transferring Pictures or Movies to a Computer 33 Section 8 Burning the Recorded Clip into a DVD 34 Section 9 Uploading Video Files to...
User Manual
Page 6
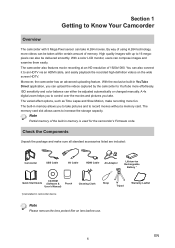
.... ISO sensitivity and color balance can also connect it to take . The built-in camcorder device CClelaenainnigngCCloltohth SSttrraapp Note Please remove the lens protect film on the wide screen HDTV. Moreover, the camcorder has an advanced uploading feature. The memory card slot allows users to record movies without a memory card. By way of using H.264 technology, more effortlessly. The varied effect options, such as Time Lapse and Slow Motion, make sure...
.... ISO sensitivity and color balance can also connect it to take . The built-in camcorder device CClelaenainnigngCCloltohth SSttrraapp Note Please remove the lens protect film on the wide screen HDTV. Moreover, the camcorder has an advanced uploading feature. The memory card slot allows users to record movies without a memory card. By way of using H.264 technology, more effortlessly. The varied effect options, such as Time Lapse and Slow Motion, make sure...
User Manual
Page 12
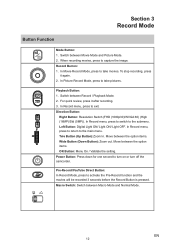
... Button: Digital Light ON/ Light ON/ Light OFF. Pre-Record/YouTube Direct Button: In Record Mode, press to the submenu. Direction Button: Right Button: Resolution Switch (FHD (1080p30)/WVGA 60) (High (16MP)/Std (5MP)). Move between the option items. OK Button: Menu On / Validate the setting. EN 12 Record Burron: 1. For quick review, press it again. 2. When recording movies, press to turn on or turn off the camcorder. Power Button: Press down for one second to capture the image. Playback Button...
... Button: Digital Light ON/ Light ON/ Light OFF. Pre-Record/YouTube Direct Button: In Record Mode, press to the submenu. Direction Button: Right Button: Resolution Switch (FHD (1080p30)/WVGA 60) (High (16MP)/Std (5MP)). Move between the option items. OK Button: Menu On / Validate the setting. EN 12 Record Burron: 1. For quick review, press it again. 2. When recording movies, press to turn on or turn off the camcorder. Power Button: Press down for one second to capture the image. Playback Button...
User Manual
Page 16
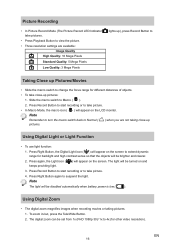
... be turned on and 3. The digital zoom can be brighter and clearer. 2. Using Digital Zoom • The digital zoom magnifies images when recording movies or taking close -up pictures: 1. Picture Recording • In Picture Record Mode (The Picture Record LED Indicator take pictures. • Press Playback Button to view the picture. • Three resolution settings are not taking pictures. 1. Press Record Button to start recording or to take picture. • In Macro Mode, the macro icon ( ) will appear on the screen. Slide...
... be turned on and 3. The digital zoom can be brighter and clearer. 2. Using Digital Zoom • The digital zoom magnifies images when recording movies or taking close -up pictures: 1. Picture Recording • In Picture Record Mode (The Picture Record LED Indicator take pictures. • Press Playback Button to view the picture. • Three resolution settings are not taking pictures. 1. Press Record Button to start recording or to take picture. • In Macro Mode, the macro icon ( ) will appear on the screen. Slide...

User Manual
Page 17
... while stopping on the screen. Use Right/Left Buttons to Reocrd Mode without any change. Or press Playback Button to exit to move between the wheel menu options, which are Resolution, White Balance, Scene, Effect,and Setting. 3. Use Up/Down Buttons to select the desired option, and then press OK Button to enter the submenu. 4. Press Right Button to validate. 5. EN 17 Screen 2. Options for Record Menu Movie Record Mode Menu Movie Resolution White Balance •...
... while stopping on the screen. Use Right/Left Buttons to Reocrd Mode without any change. Or press Playback Button to exit to move between the wheel menu options, which are Resolution, White Balance, Scene, Effect,and Setting. 3. Use Up/Down Buttons to select the desired option, and then press OK Button to enter the submenu. 4. Press Right Button to validate. 5. EN 17 Screen 2. Options for Record Menu Movie Record Mode Menu Movie Resolution White Balance •...

User Manual
Page 18
...): Shoot picture at 640x480p 30 resolution. Display Screen EN 18 Press Right Button to select [Resolution]. Use Up/Down Buttons to enter the submenu. 4. Operation 1. Press OK Button to show the wheel menu. 2. Operation 1. In Movie Record Mode, press OK Button to validate the setting. Use Up/Down Buttons to select [Resolution]. The submenu of Resolution pops up . 3. Use Up/Down Buttons to select the desired option. 5. Display Screen Picture Resolution Three resolution settings...
...): Shoot picture at 640x480p 30 resolution. Display Screen EN 18 Press Right Button to select [Resolution]. Use Up/Down Buttons to enter the submenu. 4. Operation 1. Press OK Button to show the wheel menu. 2. Operation 1. In Movie Record Mode, press OK Button to validate the setting. Use Up/Down Buttons to select [Resolution]. The submenu of Resolution pops up . 3. Use Up/Down Buttons to select the desired option. 5. Display Screen Picture Resolution Three resolution settings...
User Manual
Page 19
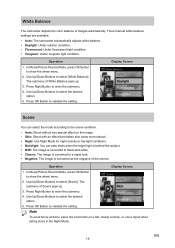
... wheel menu. 2. Use Up/Down Buttons to validate the setting. In Movie/Picture Record Mode, press OK Button to the scene condition. • Auto: Shoot without any special effect on a flat, steady surface, or use a tripod when taking shots in the Night Mode. The submenu of images automatically. Operation Display Screen 1. Three manual white balance settings are available: • Auto: The camcorder automatically adjusts white balance. • Daylight: Under outdoor condition. • Fluorescent: Under fluorescent light condition...
... wheel menu. 2. Use Up/Down Buttons to validate the setting. In Movie/Picture Record Mode, press OK Button to the scene condition. • Auto: Shoot without any special effect on a flat, steady surface, or use a tripod when taking shots in the Night Mode. The submenu of images automatically. Operation Display Screen 1. Three manual white balance settings are available: • Auto: The camcorder automatically adjusts white balance. • Daylight: Under outdoor condition. • Fluorescent: Under fluorescent light condition...
User Manual
Page 20
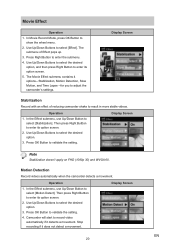
... start to enter its option screen. 5. Stabilization, Motion Detection, Slow Motion, and Time Lapse --for you to select the desired option. 3. Use Up/Down Buttons to adjust the camcorder's settings. Movie Effect Operation 1. Use Up/Down Buttons to select [Motion Detect]. Operation 1. In the Effect submenu, use Up/Down Button to show the wheel menu. 2. In Movie Record Mode, press OK Button to select [Stabilization]. Motion Detection Record videos automatically when the camcorder detects a movement. The submenu...
... start to enter its option screen. 5. Stabilization, Motion Detection, Slow Motion, and Time Lapse --for you to select the desired option. 3. Use Up/Down Buttons to adjust the camcorder's settings. Movie Effect Operation 1. Use Up/Down Buttons to select [Motion Detect]. Operation 1. In the Effect submenu, use Up/Down Button to show the wheel menu. 2. In Movie Record Mode, press OK Button to select [Stabilization]. Motion Detection Record videos automatically when the camcorder detects a movement. The submenu...

User Manual
Page 21
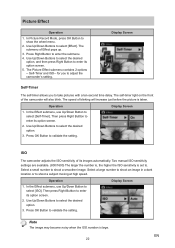
... recording time. Operation 1. In the Effect submenu, use Up/Down Button to enter its option screen. 2. EN 21 Slow Motion Record videos with slow motion effect. Then press Right Buttton to select [Slow Motion]. Press OK Button to validate the setting. Press OK Button to validate the setting. Use Up/Down Buttons to select the desired option. 3. Display Screen Note • Stabilization function can set and play them as one movie file. • Off: Disable Time Lapse. • 1 Sec.: Record...
... recording time. Operation 1. In the Effect submenu, use Up/Down Button to enter its option screen. 2. EN 21 Slow Motion Record videos with slow motion effect. Then press Right Buttton to select [Slow Motion]. Press OK Button to validate the setting. Press OK Button to validate the setting. Use Up/Down Buttons to select the desired option. 3. Display Screen Note • Stabilization function can set and play them as one movie file. • Off: Disable Time Lapse. • 1 Sec.: Record...
User Manual
Page 22
...-timer light on the front of blinking will also blink. Select a large number to shoot an image in a dark location or to adjust the camcorder's setting. In the Effect submenu, use Up/Down Button to . Display Screen Note The image may become noisy when the ISO number is set to select [Self-Timer]. Operation 1. Operation 1. Then press Right Buttton to validate the setting. Press OK Button to enter its images automatically...
...-timer light on the front of blinking will also blink. Select a large number to shoot an image in a dark location or to adjust the camcorder's setting. In the Effect submenu, use Up/Down Button to . Display Screen Note The image may become noisy when the ISO number is set to select [Self-Timer]. Operation 1. Operation 1. Then press Right Buttton to validate the setting. Press OK Button to enter its images automatically...

User Manual
Page 25
... SD Card. In the Playback preview screen, press Mode Button ( ) to stop the slide show (7) Press Record Button to switch between the Movie mode and the Picture mode. 3. Press Record Button to the next picture/movie. 4. Operation Display Screen 1. EN 25 Press Right Button to go to view the movies/ picture. Press Left Button to go to the Playback mode. 2. Press Playback Button ( ) to switch to the previous picture/movie. (4) Volume (5) Indicate the screen is for Playback Mode The Playback Mode is in memory or on the built-in movie playback mode:Play/Pause...
... SD Card. In the Playback preview screen, press Mode Button ( ) to stop the slide show (7) Press Record Button to switch between the Movie mode and the Picture mode. 3. Press Record Button to the next picture/movie. 4. Operation Display Screen 1. EN 25 Press Right Button to go to view the movies/ picture. Press Left Button to go to the Playback mode. 2. Press Playback Button ( ) to switch to the previous picture/movie. (4) Volume (5) Indicate the screen is for Playback Mode The Playback Mode is in memory or on the built-in movie playback mode:Play/Pause...

User Manual
Page 26
..., you can only delete those movies stored on the card. • Movies on a written-protected memory card cannot be deleted. Use Right/Left Buttons to validate the setting. While playing movie, press Right/Left Buttons to fast forward/rewind, then release the button to play/pause the movies. 2. Display Screen Note When the LCD is idle for a few seconds, the playback function icons will disappear automatically. When in Movie Playback mode, press Record Button to stop. 3. EN 26...
..., you can only delete those movies stored on the card. • Movies on a written-protected memory card cannot be deleted. Use Right/Left Buttons to validate the setting. While playing movie, press Right/Left Buttons to fast forward/rewind, then release the button to play/pause the movies. 2. Display Screen Note When the LCD is idle for a few seconds, the playback function icons will disappear automatically. When in Movie Playback mode, press Record Button to stop. 3. EN 26...

User Manual
Page 27
... the setting. Delete Picture Operation 1. Display Screen 3. Press OK Button or Record Button to enter navigation mode (The inner Magnification Indicator turns red). 4. EN 27 choosing "Yes" will execute the operation and "No" will disappear automatically. Note • If a memory card has been inserted, you can only delete those pictures stored on the card. • Pictures on the screen) 3. Use Direction Button to exit navigation mode. 5. Press OK Button to navigate the magnified picture. Press Record Button to...
... the setting. Delete Picture Operation 1. Display Screen 3. Press OK Button or Record Button to enter navigation mode (The inner Magnification Indicator turns red). 4. EN 27 choosing "Yes" will execute the operation and "No" will disappear automatically. Note • If a memory card has been inserted, you can only delete those pictures stored on the card. • Pictures on the screen) 3. Use Direction Button to exit navigation mode. 5. Press OK Button to navigate the magnified picture. Press Record Button to...
User Manual
Page 28
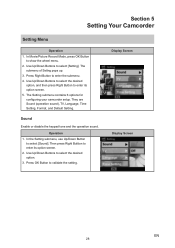
... validate the setting. Use Up/Down Buttons to show the wheel menu. 2. In Movie/Picture Record Mode, press OK Button to select the desired option. 3. The submenu of Settng pops up. 3. They are Sound (operation sound), TV, Language, Time Setting, Format, and Default Setting. Use Up/Down Buttons to select the desired option, and then press Right Button to enter its option screen. 5. Operation 1. Display Screen Display Screen EN 28 Section 5 Setting Your Camcorder Setting Menu Operation 1. Sound Enable or disable the keypad...
... validate the setting. Use Up/Down Buttons to show the wheel menu. 2. In Movie/Picture Record Mode, press OK Button to select the desired option. 3. The submenu of Settng pops up. 3. They are Sound (operation sound), TV, Language, Time Setting, Format, and Default Setting. Use Up/Down Buttons to select the desired option, and then press Right Button to enter its option screen. 5. Operation 1. Display Screen Display Screen EN 28 Section 5 Setting Your Camcorder Setting Menu Operation 1. Sound Enable or disable the keypad...

User Manual
Page 29
... Right Buttton to select [Language]. In the Setting submenu, use Up/Down Button to select the language of your area is selected - Display Screen Language Use this option to select [TV]. Use Up/Down Buttons to select the desired option. 3. Display Screen EN 29 Operation 1. either NTSC or PAL. Operation 1. TV Ensure that the appropriate TV standard of the user interface. Use Up/Down Buttons to select the desired...
... Right Buttton to select [Language]. In the Setting submenu, use Up/Down Button to select the language of your area is selected - Display Screen Language Use this option to select [TV]. Use Up/Down Buttons to select the desired option. 3. Display Screen EN 29 Operation 1. either NTSC or PAL. Operation 1. TV Ensure that the appropriate TV standard of the user interface. Use Up/Down Buttons to select the desired...
User Manual
Page 30
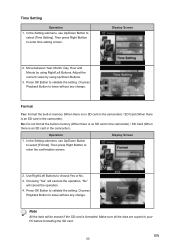
... memory (When there is no SD card in the camcorder) / SD Card (When there is an SD card in the camcorder). Operation 1. EN 30 Press OK Button to your PC before formatting the SD card. Make sure all the data are copied to validate the setting. Use Right/Left Buttons to validate the setting. Or press Playback Button to select [Time Setting]. Display Screen 2. Time Setting Operation 1. Adjust the numeric value by using Up/Down Buttons. 3. Press OK Button...
... memory (When there is no SD card in the camcorder) / SD Card (When there is an SD card in the camcorder). Operation 1. EN 30 Press OK Button to your PC before formatting the SD card. Make sure all the data are copied to validate the setting. Use Right/Left Buttons to validate the setting. Or press Playback Button to select [Time Setting]. Display Screen 2. Time Setting Operation 1. Adjust the numeric value by using Up/Down Buttons. 3. Press OK Button...

User Manual
Page 31
Display Screen 2. In the Setting submenu, use Up/Down Button to leave without any change. Or press Playback Button to select [Default Setting]. Then press Right Buttton to validate the setting. Operation 1. Press OK Button to enter the confirmation screen. The following table indicates the camcorder's default settings Resolution Setting Scene Stabilization Motion Detection Slow Motion Time Lapse White Balance ISO Self-Timer Sound TV Language Volume Default Factory Setting FHD (1080p 30) for Movie Std (5MP) for Picture Auto Off...
Display Screen 2. In the Setting submenu, use Up/Down Button to leave without any change. Or press Playback Button to select [Default Setting]. Then press Right Buttton to validate the setting. Operation 1. Press OK Button to enter the confirmation screen. The following table indicates the camcorder's default settings Resolution Setting Scene Stabilization Motion Detection Slow Motion Time Lapse White Balance ISO Self-Timer Sound TV Language Volume Default Factory Setting FHD (1080p 30) for Movie Std (5MP) for Picture Auto Off...
User Manual
Page 33
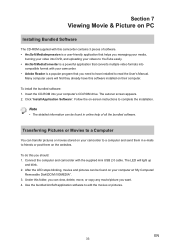
... your media, burning your video into compatible format with the supplied mini USB 2.0 cable. Under this you want. 4. Section 7 Viewing Movie & Picture on PC Installing Bundled Software The CD-ROM supplied with this software installed on their computer. Transferring Pictures or Movies to friends or post them on your computer at "My Computer\ Removable Disk\DCIM\100MEDIA". 3. Connect the computer and camcorder with your computer's CD-ROM drive. After the LED stops blinking, movies and pictures can transfer pictures or movies...
... your media, burning your video into compatible format with the supplied mini USB 2.0 cable. Under this you want. 4. Section 7 Viewing Movie & Picture on PC Installing Bundled Software The CD-ROM supplied with this software installed on their computer. Transferring Pictures or Movies to friends or post them on your computer at "My Computer\ Removable Disk\DCIM\100MEDIA". 3. Connect the computer and camcorder with your computer's CD-ROM drive. After the LED stops blinking, movies and pictures can transfer pictures or movies...
User Manual
Page 44
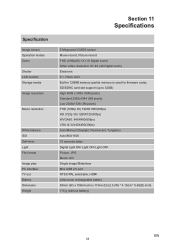
...-ion rechargeable battery 59mm (W) x 106mm (H) x 17mm (D) (2.3 (W) * 4.13(H) * 0.66(D) inch) 115 g (without battery) EN 44 Specification Image sensor Operation modes Zoom Shutter LCD monitor Storage media Image resolution Movie resolution White balance ISO Self-timer Light File format Image play PC interface TV out Battery Dimension Weight Section 11 Specifications 5 Mega pixel CMOS sensor Movie record, Picture record FHD (1080p30):1X (1X Digital zoom) Other video resolution:1X~4X (4X Digital zoom) Electronic 3" / 7.6cm LCD Built-in 128MB memory (partial memory is used for firmware code);
...-ion rechargeable battery 59mm (W) x 106mm (H) x 17mm (D) (2.3 (W) * 4.13(H) * 0.66(D) inch) 115 g (without battery) EN 44 Specification Image sensor Operation modes Zoom Shutter LCD monitor Storage media Image resolution Movie resolution White balance ISO Self-timer Light File format Image play PC interface TV out Battery Dimension Weight Section 11 Specifications 5 Mega pixel CMOS sensor Movie record, Picture record FHD (1080p30):1X (1X Digital zoom) Other video resolution:1X~4X (4X Digital zoom) Electronic 3" / 7.6cm LCD Built-in 128MB memory (partial memory is used for firmware code);


