

Users Manual Canada; English
Page 6
... Video modes Display controller B-1 Video modes B-1 PowerMizer B-10 Appendix C Wireless LAN Card Specifications C-1 Radio Characteristics C-2 Supported Frequency Sub-bands C-3 Appendix D TOSHIBA RAID Setting up Windows Manually D-2 Starting, Modifying and Ending the BIOS Setup Program D-4 Appendix E Bluetooth wireless technology Interoperability Bluetooth wireless technology and your Health E-3 Regulatory statements E-3 Using Bluetooth® Card from...
... Video modes Display controller B-1 Video modes B-1 PowerMizer B-10 Appendix C Wireless LAN Card Specifications C-1 Radio Characteristics C-2 Supported Frequency Sub-bands C-3 Appendix D TOSHIBA RAID Setting up Windows Manually D-2 Starting, Modifying and Ending the BIOS Setup Program D-4 Appendix E Bluetooth wireless technology Interoperability Bluetooth wireless technology and your Health E-3 Regulatory statements E-3 Using Bluetooth® Card from...

Users Manual Canada; English
Page 136
... Utilities\SVPWTool\TOSPU.EXE If you , and your HDD, or for general users. 6-16 User's Manual TOSHIBA will NOT be able to Starting and Ending the BIOS Setup Program section in Chapter 3. When you or any loss of access to associate text with the user password. If you enter the text, click... the computer on the power in Chapter 7 for example, to prompt the user to enter the password. ■ If you forget your HDD User Password, TOSHIBA will NOT be held responsible for any loss of any data, any other person or organization that result from the loss of use this box...
... Utilities\SVPWTool\TOSPU.EXE If you , and your HDD, or for general users. 6-16 User's Manual TOSHIBA will NOT be able to Starting and Ending the BIOS Setup Program section in Chapter 3. When you or any loss of access to associate text with the user password. If you enter the text, click... the computer on the power in Chapter 7 for example, to prompt the user to enter the password. ■ If you forget your HDD User Password, TOSHIBA will NOT be held responsible for any loss of any data, any other person or organization that result from the loss of use this box...

Users Manual Canada; English
Page 140
... the computer will use the internal (attached) LCD display regardless of the Windows Desktop properties. HW Setup General This window displays the BIOS version and contains two buttons: Default and About. Power On Display This tab allows you customize your computer's display settings for either... the internal LCD screen or for simultaneous display. Setup This field displays the installed BIOS version and date. Auto-Selected LCD + Analog RGB Selects an external monitor if one is only available on that this setting is ...
... the computer will use the internal (attached) LCD display regardless of the Windows Desktop properties. HW Setup General This window displays the BIOS version and contains two buttons: Default and About. Power On Display This tab allows you customize your computer's display settings for either... the internal LCD screen or for simultaneous display. Setup This field displays the installed BIOS version and date. Auto-Selected LCD + Analog RGB Selects an external monitor if one is only available on that this setting is ...

Users Manual Canada; English
Page 145
... functions. Disabled Disables Built-in LAN. Device Config Device Configuration This option allows you to the section in LAN is enabled. All Devices The computer's BIOS will be changed when the Built-in chapter 6, Retaining data with power off . The battery retention time will setup and configure all devices. Enabled Enables...
... functions. Disabled Disables Built-in LAN. Device Config Device Configuration This option allows you to the section in LAN is enabled. All Devices The computer's BIOS will be changed when the Built-in chapter 6, Retaining data with power off . The battery retention time will setup and configure all devices. Enabled Enables...
Users Manual Canada; English
Page 147
... Windows applications will take priority. ■ Changes to reboot. Please refer to be made and end the BIOS setup application, follow the steps as TOSHIBA HW Setup, TOSHIBA Password Utility, TOSHIBA Power Saver, Windows Device Manager and so forth. Then press [F1] key. User's Manual 7-9 Switch... as detailed below : 1. Press the End key - If you made by using the HW Setup program. prompt to Chapter 6, the TOSHIBA Password Utility for further details about the User Password. 2. if the Password = prompt is displayed, enter either the Supervisor Password, if ...
... Windows applications will take priority. ■ Changes to reboot. Please refer to be made and end the BIOS setup application, follow the steps as TOSHIBA HW Setup, TOSHIBA Password Utility, TOSHIBA Power Saver, Windows Device Manager and so forth. Then press [F1] key. User's Manual 7-9 Switch... as detailed below : 1. Press the End key - If you made by using the HW Setup program. prompt to Chapter 6, the TOSHIBA Password Utility for further details about the User Password. 2. if the Password = prompt is displayed, enter either the Supervisor Password, if ...

Users Manual Canada; English
Page 148
...System configuration changes, other than changes to this setting, should be made within Windows by using applications such as TOSHIBA HW Setup, TOSHIBA Password Utility, TOSHIBA Power Saver, Windows Device Manager and so forth. 7-10 User's Manual The configuration for the Enhanced C-States ...is carried out in the BIOS setup program. Disabled is Dual Core mode. Processing The Core Multi-Processing sets the CPU ...
...System configuration changes, other than changes to this setting, should be made within Windows by using applications such as TOSHIBA HW Setup, TOSHIBA Password Utility, TOSHIBA Power Saver, Windows Device Manager and so forth. 7-10 User's Manual The configuration for the Enhanced C-States ...is carried out in the BIOS setup program. Disabled is Dual Core mode. Processing The Core Multi-Processing sets the CPU ...
Users Manual Canada; English
Page 219
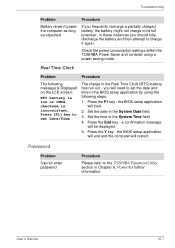
... - Password Problem Cannot enter password Procedure Please refer to set Date/Time. The charge in the System Date field. 3. in the BIOS setup application by using a power saving mode. Troubleshooting Problem Procedure Battery doesn't power the computer as long as expected If you frequently ...recharge a partially charged battery, the battery might not charge to charge it again. Check the power consumption settings within the TOSHIBA Power Saver and consider using the following message is Displayed on the LCD screen: RTC battery is low or CMOS checksum is inconsistent...
... - Password Problem Cannot enter password Procedure Please refer to set Date/Time. The charge in the System Date field. 3. in the BIOS setup application by using a power saving mode. Troubleshooting Problem Procedure Battery doesn't power the computer as long as expected If you frequently ...recharge a partially charged battery, the battery might not charge to charge it again. Check the power consumption settings within the TOSHIBA Power Saver and consider using the following message is Displayed on the LCD screen: RTC battery is low or CMOS checksum is inconsistent...
Users Manual Canada; English
Page 235
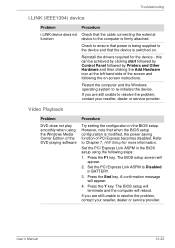
... Hardware and then clicking the Add Hardware icon at the left-hand side of the DVD playing software Procedure Try setting the configuration in the BIOS setup. Refer to Chapter 7, HW Setup for the device - Press the End key. Press the Y key. User's Manual 10-23 If ...the problem, contact your reseller, dealer or service provider. Video Playback Problem DVD does not play smoothly when using the following the on . The BIOS setup will terminate and the computer will appear. 2. Reinstall the drivers required for more information. Press the F1 key. Restart the computer and ...
... Hardware and then clicking the Add Hardware icon at the left-hand side of the DVD playing software Procedure Try setting the configuration in the BIOS setup. Refer to Chapter 7, HW Setup for the device - Press the End key. Press the Y key. User's Manual 10-23 If ...the problem, contact your reseller, dealer or service provider. Video Playback Problem DVD does not play smoothly when using the following the on . The BIOS setup will terminate and the computer will appear. 2. Reinstall the drivers required for more information. Press the F1 key. Restart the computer and ...

Users Manual Canada; English
Page 264
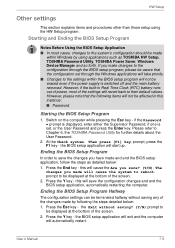
...click the Next button. 3. Insert the Windows Setup CD-ROM into the optical disc drive and boot the computer up Windows, create a TOSHIBA RAID Driver Disk and configure the BIOS setup program. When the message "Press F6 if you created. 4. When the message "Setup will start. D-2 User's Manual Before ... for the following types of the BIOS setup program, make sure the built-in hard disk drive is not necessary to install a third party SCSI or RAID driver" appears on the screen, press the S key and install the TOSHIBA RAID Driver using the TOSHIBA RAID Driver Disk that read /write...
...click the Next button. 3. Insert the Windows Setup CD-ROM into the optical disc drive and boot the computer up Windows, create a TOSHIBA RAID Driver Disk and configure the BIOS setup program. When the message "Press F6 if you created. 4. When the message "Setup will start. D-2 User's Manual Before ... for the following types of the BIOS setup program, make sure the built-in hard disk drive is not necessary to install a third party SCSI or RAID driver" appears on the screen, press the S key and install the TOSHIBA RAID Driver using the TOSHIBA RAID Driver Disk that read /write...

Users Manual Canada; English
Page 266
..., Modifying and Ending the BIOS Setup Program Starting the BIOS Setup Program 1. The settings are made with this setting). Set to Chapter 6, the TOSHIBA Password Utility for further details about the User Password. 2. if the Password = prompt is displayed, enter either the Supervisor ...the Esc key - Please refer to RAID ready. Then press [F1] key. prompt, press the F1 key - the BIOS setup application will start up. Modifying the BIOS 1. Select the RAID ARRAY setting in the settings screen. 2. Please refer to RAID-0 for using recovery CD/DVD. ...
..., Modifying and Ending the BIOS Setup Program Starting the BIOS Setup Program 1. The settings are made with this setting). Set to Chapter 6, the TOSHIBA Password Utility for further details about the User Password. 2. if the Password = prompt is displayed, enter either the Supervisor ...the Esc key - Please refer to RAID ready. Then press [F1] key. prompt, press the F1 key - the BIOS setup application will start up. Modifying the BIOS 1. Select the RAID ARRAY setting in the settings screen. 2. Please refer to RAID-0 for using recovery CD/DVD. ...

Users Manual Canada; English
Page 267
... you change the RAID array, you made and end the BIOS setup application, follow the steps as detailed below: 1. this ? The changes you will revert the modified Create State settings back to continue. TOSHIBA RAID 3. The Execute Creation message is displayed once the configuration... is written in the following message will cause the Are you have made will save the configuration changes and end the BIOS setup application, automatically restarting the...
... you change the RAID array, you made and end the BIOS setup application, follow the steps as detailed below: 1. this ? The changes you will revert the modified Create State settings back to continue. TOSHIBA RAID 3. The Execute Creation message is displayed once the configuration... is written in the following message will cause the Are you have made will save the configuration changes and end the BIOS setup application, automatically restarting the...

Users Manual Canada; English
Page 283
... ASCII: American Standard Code for reference. Glossary The terms in this glossary cover topics related to this manual. Alternate naming is included for Information Interchange BIOS: basic input output system CD-ROM: Compact Disc Read Only Memory CD-RW: Compact Disc ReWritable CMOS: complementary metal-oxide semiconductor CPU: central processing unit...
... ASCII: American Standard Code for reference. Glossary The terms in this glossary cover topics related to this manual. Alternate naming is included for Information Interchange BIOS: basic input output system CD-ROM: Compact Disc Read Only Memory CD-RW: Compact Disc ReWritable CMOS: complementary metal-oxide semiconductor CPU: central processing unit...

Users Manual Canada; English
Page 285
... for a variety of signals, data or electric power. An organization established to the method of transmitting data that can be transmitted at regular time intervals. BIOS: Basic Input Output System. See also firmware. It is temporarily stored. bit: Derived from a storage device into the computer's memory. Typically used by most digital...
... for a variety of signals, data or electric power. An organization established to the method of transmitting data that can be transmitted at regular time intervals. BIOS: Basic Input Output System. See also firmware. It is temporarily stored. bit: Derived from a storage device into the computer's memory. Typically used by most digital...

Users Manual Canada; English
Page 297
... time clock, 1-4, 6-5 safety precautions, 6-6 save mode, 1-13 types, 6-3 Battery Charger, 1-18, 9-17 Battery pack, 1-4, 2-9 additional, 9-17 replacing, 6-13 BIOS Setup, 7-9 Bluetooth, 1-10, 4-27 Bluetooth 2.0+EDR Module Kit, 1-18 Bluetooth Stack for Windows by Toshiba, 1-16 Bluetooth USB Adaptor, 1-18 Bluetooth Wireless Mouse, 1-18 Bluetooth Wireless Stereo, 1-18 problems, 10-22 Boot Priority...
... time clock, 1-4, 6-5 safety precautions, 6-6 save mode, 1-13 types, 6-3 Battery Charger, 1-18, 9-17 Battery pack, 1-4, 2-9 additional, 9-17 replacing, 6-13 BIOS Setup, 7-9 Bluetooth, 1-10, 4-27 Bluetooth 2.0+EDR Module Kit, 1-18 Bluetooth Stack for Windows by Toshiba, 1-16 Bluetooth USB Adaptor, 1-18 Bluetooth Wireless Mouse, 1-18 Bluetooth Wireless Stereo, 1-18 problems, 10-22 Boot Priority...
Detailed Specs for Qosmio G30 PQG32C-AV605EF English
Page 1
...(Li-ion) 7050mAh capacity Dimensions: (WxHxD) 141 x 98 x 20.4 mm Weight: 320g BIOS APM Support, ACPI support, PnP support, VESA support, DPMS support, DDC Support, SM BIOS support, PCI BIOS Support, Security Cable lock slot, power on this warranty program and other Warranty Programs such as ...Model: i Qosmio G30-AV6 ƒ Intel® Centrino® Duo Mobile Technology featuring Intel® Core™ 2 Duo processor T7200 - 2.0 GHz,17.0" WUXGA TFT w/ Ultimate Trubrite™, 2GB DDR2, 240GB HDD*, HD DVD-R Super-Multi Double Layer, Modem, LAN, Wireless LAN, TV-Tuner, Toshiba Remote, NVIDIA...
...(Li-ion) 7050mAh capacity Dimensions: (WxHxD) 141 x 98 x 20.4 mm Weight: 320g BIOS APM Support, ACPI support, PnP support, VESA support, DPMS support, DDC Support, SM BIOS support, PCI BIOS Support, Security Cable lock slot, power on this warranty program and other Warranty Programs such as ...Model: i Qosmio G30-AV6 ƒ Intel® Centrino® Duo Mobile Technology featuring Intel® Core™ 2 Duo processor T7200 - 2.0 GHz,17.0" WUXGA TFT w/ Ultimate Trubrite™, 2GB DDR2, 240GB HDD*, HD DVD-R Super-Multi Double Layer, Modem, LAN, Wireless LAN, TV-Tuner, Toshiba Remote, NVIDIA...


