
User Guide
Page 30
...time 55 Opening the display panel 56 Your computer's features and specifications.... 56 Turning on the power 57 Adding memory (optional 58 Installing a memory module 59 Removing a memory module 64 Hard Disk Drive (HDD) Recovery Utilities 66 Creating Recovery CDs/DVDs 67 Hard disk drive recovery using... 76 Connecting the modem 78 Connecting other external devices 79 Using the TouchPad 80 Disabling or enabling the TouchPad 81 Using the Toshiba Assist button 82 Customizing your computer's settings 83 Powering off the computer 83 Closing the display panel 84 Different ways to turn...
...time 55 Opening the display panel 56 Your computer's features and specifications.... 56 Turning on the power 57 Adding memory (optional 58 Installing a memory module 59 Removing a memory module 64 Hard Disk Drive (HDD) Recovery Utilities 66 Creating Recovery CDs/DVDs 67 Hard disk drive recovery using... 76 Connecting the modem 78 Connecting other external devices 79 Using the TouchPad 80 Disabling or enabling the TouchPad 81 Using the Toshiba Assist button 82 Customizing your computer's settings 83 Powering off the computer 83 Closing the display panel 84 Different ways to turn...

User Guide
Page 34
... 165 Optimize 166 Connect 167 Secure 167 Protect and Fix 167 TOSHIBA Button Controls 167 HDD Protection 168 TOSHIBA Power Saver 169 TOSHIBA Hardware Setup 171 TOSHIBA Password Utility 173 TOSHIBA Touch and Launch 174 TOSHIBA Zooming Utility 178 TOSHIBA SD™ Memory Boot Utility 179 SD™ Memory Card Format 180 Trusted Platform Module (TPM 180 Hard disk...
... 165 Optimize 166 Connect 167 Secure 167 Protect and Fix 167 TOSHIBA Button Controls 167 HDD Protection 168 TOSHIBA Power Saver 169 TOSHIBA Hardware Setup 171 TOSHIBA Password Utility 173 TOSHIBA Touch and Launch 174 TOSHIBA Zooming Utility 178 TOSHIBA SD™ Memory Boot Utility 179 SD™ Memory Card Format 180 Trusted Platform Module (TPM 180 Hard disk...

User Guide
Page 35
... can help you 212 Resolving a hardware conflict 213 A plan of action 213 Resolving hardware conflicts on your own .... 214 Fixing a problem with Device Manager .......... 215 Memory problems 217 Power and the batteries 218 Keyboard problems 220 Display problems 221 Disk drive problems 223 DVD-ROM or multi-function drive problems.. 226...
... can help you 212 Resolving a hardware conflict 213 A plan of action 213 Resolving hardware conflicts on your own .... 214 Fixing a problem with Device Manager .......... 215 Memory problems 217 Power and the batteries 218 Keyboard problems 220 Display problems 221 Disk drive problems 223 DVD-ROM or multi-function drive problems.. 226...

User Guide
Page 47
... on your computer. See "Connecting the AC adapter" on the computer. The cooling fan may have a CPU cooling fan that needs to , a mouse, keyboard, printer, memory, and PC cards. Loose items such as notebook and tissue paper, plastic wrappers, or other similar materials can be charged before adding external or internal...
... on your computer. See "Connecting the AC adapter" on the computer. The cooling fan may have a CPU cooling fan that needs to , a mouse, keyboard, printer, memory, and PC cards. Loose items such as notebook and tissue paper, plastic wrappers, or other similar materials can be charged before adding external or internal...

User Guide
Page 50
... devices Adding external devices NOTE Before adding external devices or memory, Toshiba recommends setting up your software" on page 138) After starting your software. See "Setting up your computer for the first time you may want to: ❖ Add more memory (see "Adding memory (optional)" on page 58) ❖ Connect a mouse (see "Connecting a mouse...
... devices Adding external devices NOTE Before adding external devices or memory, Toshiba recommends setting up your software" on page 138) After starting your software. See "Setting up your computer for the first time you may want to: ❖ Add more memory (see "Adding memory (optional)" on page 58) ❖ Connect a mouse (see "Connecting a mouse...

User Guide
Page 58
...or the AC adapter is in use . NOTE Before adding external devices or memory, Toshiba recommends setting up your system or visit accessories.toshiba.com. You may want to increase the computer's memory if you use complex software or process large amounts of today's popular applications.... to run most of data. Adding memory (optional) HINT: To purchase additional memory modules, see the accessories information packaged with enough memory to indicate that came with your software. See "Setting up your computer, or visit accessories.toshiba.com. Never turn off the computer ...
...or the AC adapter is in use . NOTE Before adding external devices or memory, Toshiba recommends setting up your system or visit accessories.toshiba.com. You may want to increase the computer's memory if you use complex software or process large amounts of today's popular applications.... to run most of data. Adding memory (optional) HINT: To purchase additional memory modules, see the accessories information packaged with enough memory to indicate that came with your software. See "Setting up your computer, or visit accessories.toshiba.com. Never turn off the computer ...
User Guide
Page 59
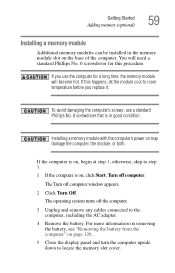
...see "Removing the battery from the computer" on may damage the computer, the module, or both. Getting Started Adding memory (optional) 59 Installing a memory module Additional memory modules can be installed in good condition. To avoid damaging the computer's screws, use the computer for this happens,... let the module cool to locate the memory slot cover. If you replace it. otherwise, skip to the computer, including the AC adapter. 4 Remove the battery. The Turn off...
...see "Removing the battery from the computer" on may damage the computer, the module, or both. Getting Started Adding memory (optional) 59 Installing a memory module Additional memory modules can be installed in good condition. To avoid damaging the computer's screws, use the computer for this happens,... let the module cool to locate the memory slot cover. If you replace it. otherwise, skip to the computer, including the AC adapter. 4 Remove the battery. The Turn off...

User Guide
Page 60
Sample loosening the memory slot cover screw 7 Remove the memory slot cover. 8 Place the screw and the cover in a safe place so that secures the memory slot cover. 60 Getting Started Adding memory (optional) Memory slot cover Sample base of the computer 6 Using a standard Phillips No. 0 screwdriver, loosen the screw that you can retrieve them later.
Sample loosening the memory slot cover screw 7 Remove the memory slot cover. 8 Place the screw and the cover in a safe place so that secures the memory slot cover. 60 Getting Started Adding memory (optional) Memory slot cover Sample base of the computer 6 Using a standard Phillips No. 0 screwdriver, loosen the screw that you can retrieve them later.

User Guide
Page 61
.... Before you handle the module, touch a grounded metal surface to touch its antistatic packaging. Sample inserting the memory module Getting Started Adding memory (optional) 61 Static electricity can damage the memory module. To avoid damaging the memory module, be careful not to discharge any static electricity you insert into the computer. 9 Remove the new...
.... Before you handle the module, touch a grounded metal surface to touch its antistatic packaging. Sample inserting the memory module Getting Started Adding memory (optional) 61 Static electricity can damage the memory module. To avoid damaging the memory module, be careful not to discharge any static electricity you insert into the computer. 9 Remove the new...

User Guide
Page 62
clip clip Sample inserting the memory module into the socket 12 Check that the gold connector bar faces the slot, at a slight angle to the socket. 62 Getting Started Adding memory (optional) 11 Hold the memory module by its edges so that the module is inserted completely into the socket and lined up squarely with the socket clips. Sample aligning the module into the socket 13 Gently press down on the memory module connector until the clips snap into place.
clip clip Sample inserting the memory module into the socket 12 Check that the gold connector bar faces the slot, at a slight angle to the socket. 62 Getting Started Adding memory (optional) 11 Hold the memory module by its edges so that the module is inserted completely into the socket and lined up squarely with the socket clips. Sample aligning the module into the socket 13 Gently press down on the memory module connector until the clips snap into place.
User Guide
Page 63
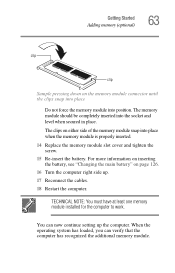
... the computer. For more information on inserting the battery, see "Changing the main battery" on either side of the memory module snap into place when the memory module is properly inserted. 14 Replace the memory module slot cover and tighten the screw. 15 Re-insert the battery. Getting Started Adding... memory (optional) 63 clip clip Sample pressing down on the memory module connector until the clips snap into place Do not force the memory module into the socket and level when secured in place. The clips on...
... the computer. For more information on inserting the battery, see "Changing the main battery" on either side of the memory module snap into place when the memory module is properly inserted. 14 Replace the memory module slot cover and tighten the screw. 15 Re-insert the battery. Getting Started Adding... memory (optional) 63 clip clip Sample pressing down on the memory module connector until the clips snap into place Do not force the memory module into the socket and level when secured in place. The clips on...
User Guide
Page 64
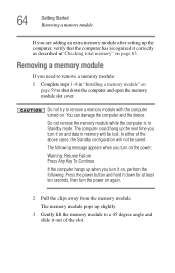
... the computer hangs up the computer, verify that the computer has recognized it correctly as described in"Checking total memory" on page 65. The computer could hang up slightly. 3 Gently lift the memory module to a 45 degree angle and slide it on and data in Standby mode. Removing... a memory module If you turn the power on . The memory module pops up the next time you need to remove a memory module: 1 Complete steps 1-8 in "Installing a memory module" on page 59 to remove a memory module with the computer turned on again. 2 Pull ...
... the computer hangs up the computer, verify that the computer has recognized it correctly as described in"Checking total memory" on page 65. The computer could hang up slightly. 3 Gently lift the memory module to a 45 degree angle and slide it on and data in Standby mode. Removing... a memory module If you turn the power on . The memory module pops up the next time you need to remove a memory module: 1 Complete steps 1-8 in "Installing a memory module" on page 59 to remove a memory module with the computer turned on again. 2 Pull ...

User Guide
Page 65
... the computer does not recognize the memory configuration, turn off the computer, remove the memory slot cover, and make sure the memory module is seated properly, as described in step 13 of "Installing a memory module" on page 59 Getting Started Removing a memory module 65 Removing the memory module 4 Replace the memory module slot cover and tighten the...
... the computer does not recognize the memory configuration, turn off the computer, remove the memory slot cover, and make sure the memory module is seated properly, as described in step 13 of "Installing a memory module" on page 59 Getting Started Removing a memory module 65 Removing the memory module 4 Replace the memory module slot cover and tighten the...

User Guide
Page 87
... your file to reconnect, or your battery runs out of charge while you are working, you will lose all work stays in the computer's temporary memory until you save feature which you last saved. See your work frequently. Computing tips ❖ Save your computer to the hard disk at preset intervals...
... your file to reconnect, or your battery runs out of charge while you are working, you will lose all work stays in the computer's temporary memory until you save feature which you last saved. See your work frequently. Computing tips ❖ Save your computer to the hard disk at preset intervals...
User Guide
Page 101
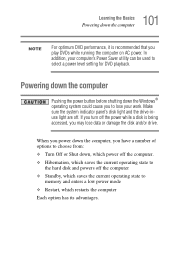
.... 101 Learning the Basics Powering down the Windows® operating system could cause you to lose your computer's Power Saver utility can be used to memory and enters a low power mode ❖ Restart, which saves the current operating state to select a power level setting for DVD playback. Make sure the system...
.... 101 Learning the Basics Powering down the Windows® operating system could cause you to lose your computer's Power Saver utility can be used to memory and enters a low power mode ❖ Restart, which saves the current operating state to select a power level setting for DVD playback. Make sure the system...
User Guide
Page 103
... which you left off the computer, but it first saves the current state of the computer in memory so that, when you restart the computer, you can continue working from memory. 103 Learning the Basics Powering down option. Factors to consider when choosing Hibernation: ❖ While in... Hibernation mode, the computer uses no battery power. ❖ Because the state of from memory. ❖ On restarting, the computer returns to the state in Standby mode for an extended period, your computer could lose data. Standby stores...
... which you left off the computer, but it first saves the current state of the computer in memory so that, when you restart the computer, you can continue working from memory. 103 Learning the Basics Powering down option. Factors to consider when choosing Hibernation: ❖ While in... Hibernation mode, the computer uses no battery power. ❖ Because the state of from memory. ❖ On restarting, the computer returns to the state in Standby mode for an extended period, your computer could lose data. Standby stores...
User Guide
Page 110
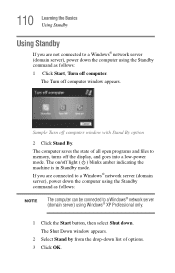
... connected to a Windows® network server (domain server), power down the computer using the Standby command as follows: NOTE The computer can be connected to memory, turns off light ( ) blinks amber indicating the machine is in Standby mode. The Turn off computer window with Stand By option 2 Click Stand By. If...
... connected to a Windows® network server (domain server), power down the computer using the Standby command as follows: NOTE The computer can be connected to memory, turns off light ( ) blinks amber indicating the machine is in Standby mode. The Turn off computer window with Stand By option 2 Click Stand By. If...
User Guide
Page 111
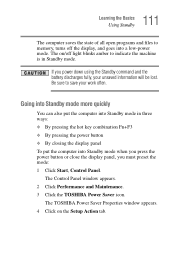
... press the power button or close the display panel, you power down using the Standby command and the battery discharges fully, your work often. The TOSHIBA Power Saver Properties window appears. 4 Click on /off the display, and goes into Standby mode in Standby mode. If you must preset the mode: 1... Click Start, Control Panel. 111 Learning the Basics Using Standby The computer saves the state of all open programs and files to memory, turns off light blinks amber to save your unsaved information will be lost. Be sure to indicate the machine is in three ways: ❖ ...
... press the power button or close the display panel, you power down using the Standby command and the battery discharges fully, your work often. The TOSHIBA Power Saver Properties window appears. 4 Click on /off the display, and goes into Standby mode in Standby mode. If you must preset the mode: 1... Click Start, Control Panel. 111 Learning the Basics Using Standby The computer saves the state of all open programs and files to memory, turns off light blinks amber to save your unsaved information will be lost. Be sure to indicate the machine is in three ways: ❖ ...

User Guide
Page 116
...Changes to the main battery, you . 116 Mobile Computing Running the computer on battery power The RTC battery powers the RTC memory that will provide the most stable operating environment and optimum system performance for use the preset configuration. Users who are not ...completely familiar with setup changes, contact Toshiba's Global Support Centre. You can then replace a discharged battery and continue working. The RTC battery charges when the computer is ...
...Changes to the main battery, you . 116 Mobile Computing Running the computer on battery power The RTC battery powers the RTC memory that will provide the most stable operating environment and optimum system performance for use the preset configuration. Users who are not ...completely familiar with setup changes, contact Toshiba's Global Support Centre. You can then replace a discharged battery and continue working. The RTC battery charges when the computer is ...
User Guide
Page 118
... your computer was shipped, resulting in the following conditions: ❖ The battery is powered off. The RTC battery powers the System Time Clock and BIOS memory used to its full capacity, wait until the battery discharges completely. When fully charged, it reaches room temperature (50 to 80 degrees Fahrenheit, 10 to...
... your computer was shipped, resulting in the following conditions: ❖ The battery is powered off. The RTC battery powers the System Time Clock and BIOS memory used to its full capacity, wait until the battery discharges completely. When fully charged, it reaches room temperature (50 to 80 degrees Fahrenheit, 10 to...


