
User Guide
Page 30
...time 55 Opening the display panel 56 Your computer's features and specifications.... 56 Turning on the power 57 Adding memory (optional 58 Installing a memory module 59 Removing a memory module 64 Hard Disk Drive (HDD) Recovery Utilities 66 Creating Recovery CDs/DVDs 67 Hard disk drive recovery using... 76 Connecting the modem 78 Connecting other external devices 79 Using the TouchPad 80 Disabling or enabling the TouchPad 81 Using the Toshiba Assist button 82 Customizing your computer's settings 83 Powering off the computer 83 Closing the display panel 84 Different ways to turn...
...time 55 Opening the display panel 56 Your computer's features and specifications.... 56 Turning on the power 57 Adding memory (optional 58 Installing a memory module 59 Removing a memory module 64 Hard Disk Drive (HDD) Recovery Utilities 66 Creating Recovery CDs/DVDs 67 Hard disk drive recovery using... 76 Connecting the modem 78 Connecting other external devices 79 Using the TouchPad 80 Disabling or enabling the TouchPad 81 Using the Toshiba Assist button 82 Customizing your computer's settings 83 Powering off the computer 83 Closing the display panel 84 Different ways to turn...

User Guide
Page 34
... 165 Optimize 166 Connect 167 Secure 167 Protect and Fix 167 TOSHIBA Button Controls 167 HDD Protection 168 TOSHIBA Power Saver 169 TOSHIBA Hardware Setup 171 TOSHIBA Password Utility 173 TOSHIBA Touch and Launch 174 TOSHIBA Zooming Utility 178 TOSHIBA SD™ Memory Boot Utility 179 SD™ Memory Card Format 180 Trusted Platform Module (TPM 180 Hard disk...
... 165 Optimize 166 Connect 167 Secure 167 Protect and Fix 167 TOSHIBA Button Controls 167 HDD Protection 168 TOSHIBA Power Saver 169 TOSHIBA Hardware Setup 171 TOSHIBA Password Utility 173 TOSHIBA Touch and Launch 174 TOSHIBA Zooming Utility 178 TOSHIBA SD™ Memory Boot Utility 179 SD™ Memory Card Format 180 Trusted Platform Module (TPM 180 Hard disk...

User Guide
Page 35
... can help you 212 Resolving a hardware conflict 213 A plan of action 213 Resolving hardware conflicts on your own .... 214 Fixing a problem with Device Manager .......... 215 Memory problems 217 Power and the batteries 218 Keyboard problems 220 Display problems 221 Disk drive problems 223 DVD-ROM or multi-function drive problems.. 226...
... can help you 212 Resolving a hardware conflict 213 A plan of action 213 Resolving hardware conflicts on your own .... 214 Fixing a problem with Device Manager .......... 215 Memory problems 217 Power and the batteries 218 Keyboard problems 220 Display problems 221 Disk drive problems 223 DVD-ROM or multi-function drive problems.. 226...

User Guide
Page 47
... CPU by drawing outside air into the computer. To prevent possible overheating of the computer. Do not use external power or to , a mouse, keyboard, printer, memory, and PC cards. To use the computer on the cooling fan is blocked, it .
... CPU by drawing outside air into the computer. To prevent possible overheating of the computer. Do not use external power or to , a mouse, keyboard, printer, memory, and PC cards. To use the computer on the cooling fan is blocked, it .

User Guide
Page 50
See "Setting up your software. After starting your computer for the first time you may want to: ❖ Add more memory (see "Adding memory (optional)" on page 58) ❖ Connect a mouse (see "Connecting a mouse" on page 76) ❖ Connect a full-size keyboard (see "Connecting a keyboard" on page 137) ❖ ...; Install PC Cards (see "Using PC Cards" on page 48. 50 Getting Started Adding external devices Adding external devices NOTE Before adding external devices or memory, Toshiba recommends setting up your software" on page 138)
See "Setting up your software. After starting your computer for the first time you may want to: ❖ Add more memory (see "Adding memory (optional)" on page 58) ❖ Connect a mouse (see "Connecting a mouse" on page 76) ❖ Connect a full-size keyboard (see "Connecting a keyboard" on page 137) ❖ ...; Install PC Cards (see "Using PC Cards" on page 48. 50 Getting Started Adding external devices Adding external devices NOTE Before adding external devices or memory, Toshiba recommends setting up your software" on page 138)

User Guide
Page 58
... run most of data. NOTE Before adding external devices or memory, Toshiba recommends setting up your computer, or visit accessories.toshiba.com. Adding memory (optional) HINT: To purchase additional memory modules, see the accessories information packaged with your software" on page 48. 58 Getting Started Adding memory (optional) ❖ Is unlit when the battery has discharged...
... run most of data. NOTE Before adding external devices or memory, Toshiba recommends setting up your computer, or visit accessories.toshiba.com. Adding memory (optional) HINT: To purchase additional memory modules, see the accessories information packaged with your software" on page 48. 58 Getting Started Adding memory (optional) ❖ Is unlit when the battery has discharged...
User Guide
Page 59
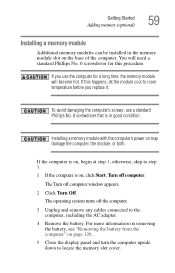
...the computer. 3 Unplug and remove any cables connected to room temperature before you use a standard Phillips No. 0 screwdriver that is in the memory module slot on , begin at step 1; The operating system turns off computer window appears. 2 Click Turn Off. To avoid damaging the computer...'s screws, use the computer for a long time, the memory module will need a standard Phillips No. 0 screwdriver for this procedure. You will become hot. If you replace it. For more information on...
...the computer. 3 Unplug and remove any cables connected to room temperature before you use a standard Phillips No. 0 screwdriver that is in the memory module slot on , begin at step 1; The operating system turns off computer window appears. 2 Click Turn Off. To avoid damaging the computer...'s screws, use the computer for a long time, the memory module will need a standard Phillips No. 0 screwdriver for this procedure. You will become hot. If you replace it. For more information on...

User Guide
Page 60
Sample loosening the memory slot cover screw 7 Remove the memory slot cover. 8 Place the screw and the cover in a safe place so that secures the memory slot cover. 60 Getting Started Adding memory (optional) Memory slot cover Sample base of the computer 6 Using a standard Phillips No. 0 screwdriver, loosen the screw that you can retrieve them later.
Sample loosening the memory slot cover screw 7 Remove the memory slot cover. 8 Place the screw and the cover in a safe place so that secures the memory slot cover. 60 Getting Started Adding memory (optional) Memory slot cover Sample base of the computer 6 Using a standard Phillips No. 0 screwdriver, loosen the screw that you can retrieve them later.

User Guide
Page 61
... you insert into the computer. 9 Remove the new memory module from its pin connector on the side you may cause memory access problems. 10 Insert the memory module in the slot on the computer. Avoid touching the connectors on the memory module or on the underside of the computer. Sample ...inserting the memory module Grease or dust on the connectors may have...
... you insert into the computer. 9 Remove the new memory module from its pin connector on the side you may cause memory access problems. 10 Insert the memory module in the slot on the computer. Avoid touching the connectors on the memory module or on the underside of the computer. Sample ...inserting the memory module Grease or dust on the connectors may have...

User Guide
Page 62
62 Getting Started Adding memory (optional) 11 Hold the memory module by its edges so that the module is inserted completely into the socket and lined up squarely with the socket clips. Sample aligning the module into the socket 13 Gently press down on the memory module connector until the clips snap into the socket 12 Check that the gold connector bar faces the slot, at a slight angle to the socket. clip clip Sample inserting the memory module into place.
62 Getting Started Adding memory (optional) 11 Hold the memory module by its edges so that the module is inserted completely into the socket and lined up squarely with the socket clips. Sample aligning the module into the socket 13 Gently press down on the memory module connector until the clips snap into the socket 12 Check that the gold connector bar faces the slot, at a slight angle to the socket. clip clip Sample inserting the memory module into place.
User Guide
Page 63
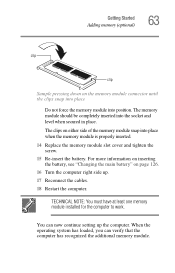
... the computer right side up the computer. Getting Started Adding memory (optional) 63 clip clip Sample pressing down on either side of the memory module snap into place when the memory module is properly inserted. 14 Replace the memory module slot cover and tighten the screw. 15 Re-insert... You can verify that the computer has recognized the additional memory module. The memory module should be completely inserted into position. The clips on the memory module connector until the clips snap into place Do not force the memory module into the socket and level when secured in place...
... the computer right side up the computer. Getting Started Adding memory (optional) 63 clip clip Sample pressing down on either side of the memory module snap into place when the memory module is properly inserted. 14 Replace the memory module slot cover and tighten the screw. 15 Re-insert... You can verify that the computer has recognized the additional memory module. The memory module should be completely inserted into position. The clips on the memory module connector until the clips snap into place Do not force the memory module into the socket and level when secured in place...
User Guide
Page 64
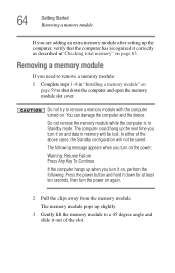
... turn the power on again. 2 Pull the clips away from the memory module. 64 Getting Started Removing a memory module If you are adding an extra memory module after setting up slightly. 3 Gently lift the memory module to remove a memory module with the computer turned on. You can damage the computer and... the device. In either of the slot. Removing a memory module If you need to remove a memory module: 1 Complete steps 1-8 in "Installing a memory module" on page 59 to shut down for at least ten seconds, then turn it on, perform the...
... turn the power on again. 2 Pull the clips away from the memory module. 64 Getting Started Removing a memory module If you are adding an extra memory module after setting up slightly. 3 Gently lift the memory module to remove a memory module with the computer turned on. You can damage the computer and... the device. In either of the slot. Removing a memory module If you need to remove a memory module: 1 Complete steps 1-8 in "Installing a memory module" on page 59 to shut down for at least ten seconds, then turn it on, perform the...

User Guide
Page 65
...tab view automatically appears and shows total memory. Getting Started Removing a memory module 65 Removing the memory module 4 Replace the memory module slot cover and tighten the screw. 5 Turn the computer over and restart it. Checking total memory When you add or remove a memory module, you can check that the ... TECHNICAL NOTE: You must have at least one memory module installed for the computer to work. If the computer does not recognize the memory configuration, turn off the computer, remove the memory slot cover, and make sure the memory module is seated properly, as described in step ...
...tab view automatically appears and shows total memory. Getting Started Removing a memory module 65 Removing the memory module 4 Replace the memory module slot cover and tighten the screw. 5 Turn the computer over and restart it. Checking total memory When you add or remove a memory module, you can check that the ... TECHNICAL NOTE: You must have at least one memory module installed for the computer to work. If the computer does not recognize the memory configuration, turn off the computer, remove the memory slot cover, and make sure the memory module is seated properly, as described in step ...

User Guide
Page 87
... system's basic features. See "Saving your battery runs out of charge while you are working, you will lose all work stays in the computer's temporary memory until you save feature which you last saved. If the network you are using goes down and you must restart your computer to reconnect, or...
... system's basic features. See "Saving your battery runs out of charge while you are working, you will lose all work stays in the computer's temporary memory until you save feature which you last saved. If the network you are using goes down and you must restart your computer to reconnect, or...
User Guide
Page 101
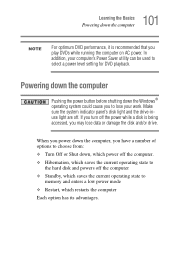
... sure the system indicator panel's disk light and the drive-inuse light are off the computer ❖ Standby, which saves the current operating state to memory and enters a low power mode ❖ Restart, which saves the current operating state to select a power level setting for DVD playback. Powering down the computer...
... sure the system indicator panel's disk light and the drive-inuse light are off the computer ❖ Standby, which saves the current operating state to memory and enters a low power mode ❖ Restart, which saves the current operating state to select a power level setting for DVD playback. Powering down the computer...
User Guide
Page 103
... the state in which you were using. Standby stores the current state of from memory. Restoring information from the hard disk takes longer than the Standby option, because information is in memory so that, when you restart the computer, you can continue working from where you... command The Hibernation command powers off . But it uses a little more time and battery power to start up than restoring it from memory. ❖ On restarting, the computer returns to maintain the saved information, the system settings are retained indefinitely. Standby command The Standby ...
... the state in which you were using. Standby stores the current state of from memory. Restoring information from the hard disk takes longer than the Standby option, because information is in memory so that, when you restart the computer, you can continue working from where you... command The Hibernation command powers off . But it uses a little more time and battery power to start up than restoring it from memory. ❖ On restarting, the computer returns to maintain the saved information, the system settings are retained indefinitely. Standby command The Standby ...
User Guide
Page 110
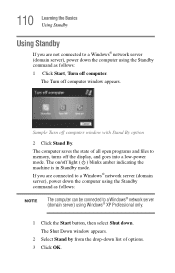
The Shut Down window appears. 2 Select Stand by from the drop-down list of all open programs and files to memory, turns off light ( ) blinks amber indicating the machine is in Standby mode. 110 Learning the Basics Using Standby Using Standby If you are not connected ...
The Shut Down window appears. 2 Select Stand by from the drop-down list of all open programs and files to memory, turns off light ( ) blinks amber indicating the machine is in Standby mode. 110 Learning the Basics Using Standby Using Standby If you are not connected ...
User Guide
Page 111
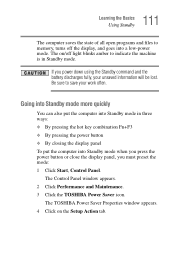
... Standby mode in Standby mode. The Control Panel window appears. 2 Click Performance and Maintenance. 3 Click the TOSHIBA Power Saver icon. Going into Standby mode more quickly You can also put the computer into a low-power mode.... If you must preset the mode: 1 Click Start, Control Panel. The TOSHIBA Power Saver Properties window appears. 4 Click on /off the display, and goes into Standby mode when you press...computer saves the state of all open programs and files to memory, turns off light blinks amber to save your unsaved information will be lost.
... Standby mode in Standby mode. The Control Panel window appears. 2 Click Performance and Maintenance. 3 Click the TOSHIBA Power Saver icon. Going into Standby mode more quickly You can also put the computer into a low-power mode.... If you must preset the mode: 1 Click Start, Control Panel. The TOSHIBA Power Saver Properties window appears. 4 Click on /off the display, and goes into Standby mode when you press...computer saves the state of all open programs and files to memory, turns off light blinks amber to save your unsaved information will be lost.

User Guide
Page 116
... the current time and date information. 116 Mobile Computing Running the computer on battery power The RTC battery powers the RTC memory that will provide the most stable operating environment and optimum system performance for both AC power and battery modes. For assistance...configuration. The RTC battery charges when the computer is powered on batteries and accessories, see accessories.toshiba.com. Users who are not completely familiar with setup changes, contact Toshiba's Global Support Centre. Using additional batteries In addition to these settings may purchase a battery module...
... the current time and date information. 116 Mobile Computing Running the computer on battery power The RTC battery powers the RTC memory that will provide the most stable operating environment and optimum system performance for both AC power and battery modes. For assistance...configuration. The RTC battery charges when the computer is powered on batteries and accessories, see accessories.toshiba.com. Users who are not completely familiar with setup changes, contact Toshiba's Global Support Centre. Using additional batteries In addition to these settings may purchase a battery module...
User Guide
Page 118
... RTC BATTERY BAD CHECKSUM (CMOS) CHECK SYSTEM HINT: Once the battery is almost completely discharged. The RTC battery powers the System Time Clock and BIOS memory used to a month when the computer is extremely hot or cold. When fully charged, it reaches room temperature (50 to 80 degrees Fahrenheit, 10 to...
... RTC BATTERY BAD CHECKSUM (CMOS) CHECK SYSTEM HINT: Once the battery is almost completely discharged. The RTC battery powers the System Time Clock and BIOS memory used to a month when the computer is extremely hot or cold. When fully charged, it reaches room temperature (50 to 80 degrees Fahrenheit, 10 to...


