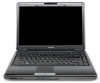
User Manual
Page 29
Chapter 7 HW Setup Accessing HW Setup 7-1 HW Setup Window 7-1 Chapter 8 Optional Devices ExpressCard Slot 8-2 Inserting an ExpressCard 8-2 Removing an ExpressCard 8-3 SD/SDHC/MMC/MEMORY STICK / MEMORY STICK PRO/xD Memory cards 8-4 Installing a memory card 8-5 Removing a memory card 8-5 Memory card care 8-6 Memory expansion 8-7 Installing a memory module 8-7 Removing a memory module 8-9 Additional battery pack 8-10 Additional AC adaptor 8-10 External monitor 8-11 HDMI 8-11...
Chapter 7 HW Setup Accessing HW Setup 7-1 HW Setup Window 7-1 Chapter 8 Optional Devices ExpressCard Slot 8-2 Inserting an ExpressCard 8-2 Removing an ExpressCard 8-3 SD/SDHC/MMC/MEMORY STICK / MEMORY STICK PRO/xD Memory cards 8-4 Installing a memory card 8-5 Removing a memory card 8-5 Memory card care 8-6 Memory expansion 8-7 Installing a memory module 8-7 Removing a memory module 8-9 Additional battery pack 8-10 Additional AC adaptor 8-10 External monitor 8-11 HDMI 8-11...
User Manual
Page 37
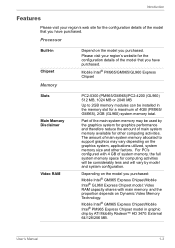
.... Mobile Intel® GM965 Express Chipset/Mobile Intel® PM965 Express Chipset model in graphic chip by model and system configuration. Processor Built-in the memory slot for the configuration details of the model that you have purchased. Part of the main system.... Please visit your region's web site for the configuration details of the model that you have purchased. Mobile Intel® PM965/GM965/GL960 Express Chipset Slots Main Memory Disclaimer Video RAM PC2-5300 (PM965/GM965)/PC2-4200 (GL960) 512 MB, 1024 MB or 2048 MB Up to support graphics may be used...
.... Mobile Intel® GM965 Express Chipset/Mobile Intel® PM965 Express Chipset model in graphic chip by model and system configuration. Processor Built-in the memory slot for the configuration details of the model that you have purchased. Part of the main system.... Please visit your region's web site for the configuration details of the model that you have purchased. Mobile Intel® PM965/GM965/GL960 Express Chipset Slots Main Memory Disclaimer Video RAM PC2-5300 (PM965/GM965)/PC2-4200 (GL960) 512 MB, 1024 MB or 2048 MB Up to support graphics may be used...
User Manual
Page 43
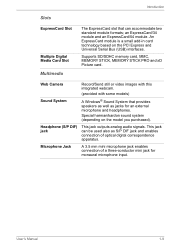
...digital correspondence apparatus. This jack can accommodate two standard module formats; User's Manual 1-9 Introduction Slots ExpressCard Slot Multiple Digital Media Card Slot Multimedia The ExpressCard slot that provides speakers as well as S/P DIF jack and enables connection of a three-conductor... mini jack for an external microphone and headphones. Supports SD/SDHC memory card, MMC, MEMORY STICK, MEMORY STICK...
...digital correspondence apparatus. This jack can accommodate two standard module formats; User's Manual 1-9 Introduction Slots ExpressCard Slot Multiple Digital Media Card Slot Multimedia The ExpressCard slot that provides speakers as well as S/P DIF jack and enables connection of a three-conductor... mini jack for an external microphone and headphones. Supports SD/SDHC memory card, MMC, MEMORY STICK, MEMORY STICK...
User Manual
Page 53
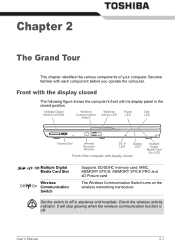
Become familiar with its display panel in the closed position. Set the switch to off . Multiple Digital Media Card Slot Wireless Communication Switch Wireless Activity LED Power LED Disk LED Volume Dial Infrared Receiver Window DC in airplanes and hospitals...Battery LED Front of your computer. Front with the display closed Multiple Digital Media Card Slot LED Multiple Digital Media Card Slot Wireless Communication Switch Supports SD/SDHC memory card, MMC, MEMORY STICK, MEMORY STICK PRO and xD Picture card The Wireless Communication Switch turns on the wireless networking ...
Become familiar with its display panel in the closed position. Set the switch to off . Multiple Digital Media Card Slot Wireless Communication Switch Wireless Activity LED Power LED Disk LED Volume Dial Infrared Receiver Window DC in airplanes and hospitals...Battery LED Front of your computer. Front with the display closed Multiple Digital Media Card Slot LED Multiple Digital Media Card Slot Wireless Communication Switch Supports SD/SDHC memory card, MMC, MEMORY STICK, MEMORY STICK PRO and xD Picture card The Wireless Communication Switch turns on the wireless networking ...
User Manual
Page 156
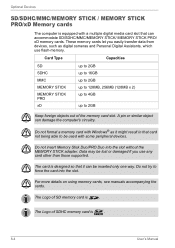
... the card into the slot without the MEMORY STICK adapter. Card Type Capacities SD SDHC MMC MEMORY STICK MEMORY STICK PRO xD up to 2GB up to 16GB up to 2GB up to 128MB, 256MB (128MB x 2) up to 4GB up to 2GB Keep foreign objects out of SDHC memory card is . The ...Logo of SD memory card is . 8-4 User's Manual The Logo of the memory card slot. Optional Devices SD/SDHC/MMC/MEMORY STICK / MEMORY STICK PRO/xD Memory cards The computer is equipped with a multiple digital media card slot that card not being able to be...
... the card into the slot without the MEMORY STICK adapter. Card Type Capacities SD SDHC MMC MEMORY STICK MEMORY STICK PRO xD up to 2GB up to 16GB up to 2GB up to 128MB, 256MB (128MB x 2) up to 4GB up to 2GB Keep foreign objects out of SDHC memory card is . The ...Logo of SD memory card is . 8-4 User's Manual The Logo of the memory card slot. Optional Devices SD/SDHC/MMC/MEMORY STICK / MEMORY STICK PRO/xD Memory cards The computer is equipped with a multiple digital media card slot that card not being able to be...
User Manual
Page 157
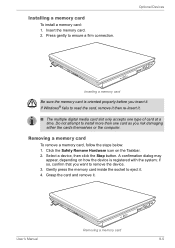
... fails to install more than one type of card at a time. Removing a memory card To remove a memory card, follow the steps below: 1. Press gently to eject it . ■ The multiple digital media card slot only accepts one card as you risk damaging either the cards themselves or the computer.... Optional Devices Inserting a memory card Be sure the memory card is registered with the system; Gently press the memory card inside the socket to ensure a firm ...
... fails to install more than one type of card at a time. Removing a memory card To remove a memory card, follow the steps below: 1. Press gently to eject it . ■ The multiple digital media card slot only accepts one card as you risk damaging either the cards themselves or the computer.... Optional Devices Inserting a memory card Be sure the memory card is registered with the system; Gently press the memory card inside the socket to ensure a firm ...
User Manual
Page 158
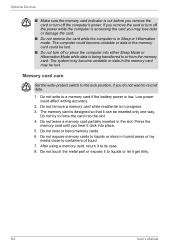
... while the computer is accessing the card you do not want to force the card into the slot. 4. Press the memory card until you hear it can be inserted only one way. Do not expose memory cards to liquids or store in Sleep or Hibernation mode. Do not touch the metal part or... lay media close to liquids or let it to containers of liquid. 7. The memory card is designed so that it click into either Sleep Mode or Hibernation Mode while data is in the slot. Do not twist or bend memory cards. 6. If you remove the card or turn off the computer's power. The...
... while the computer is accessing the card you do not want to force the card into the slot. 4. Press the memory card until you hear it can be inserted only one way. Do not expose memory cards to liquids or store in Sleep or Hibernation mode. Do not touch the metal part or... lay media close to liquids or let it to containers of liquid. 7. The memory card is designed so that it click into either Sleep Mode or Hibernation Mode while data is in the slot. Do not twist or bend memory cards. 6. If you remove the card or turn off the computer's power. The...
User Manual
Page 160
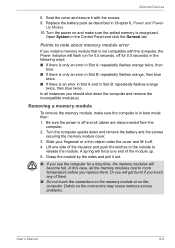
... sheet and fit the module's connectors into place to ensure a firm connection. Slot B Slot A Installing the memory module 8-8 User's Manual Use slot B for main memory. Lift one card is reserved for expanded memory. Latches on the connectors may cause memory access problems. Slot A is installed use slot A. 7. Debris on either side will click into the computer's connectors at about...
... sheet and fit the module's connectors into place to ensure a firm connection. Slot B Slot A Installing the memory module 8-8 User's Manual Use slot B for main memory. Lift one card is reserved for expanded memory. Latches on the connectors may cause memory access problems. Slot A is installed use slot A. 7. Debris on either side will click into the computer's connectors at about...
User Manual
Page 161
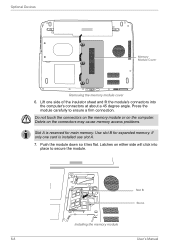
... temperature before you should shut down and remove the battery and the screws securing the memory module cover. 3. Lift one end of the module up. 5. Or you install a memory module that is an error in Slot A and in boot mode then: 1. In all cables are disconnected from the computer... upside down the computer and remove the incompatible module(s) Removing a memory module To remove the memory module, make sure the added memory is in Slot B: repeatedly flashes orange twice, then blue twice. In this case, let the memory modules cool to release the module. Seat the cover and secure ...
... temperature before you should shut down and remove the battery and the screws securing the memory module cover. 3. Lift one end of the module up. 5. Or you install a memory module that is an error in Slot A and in boot mode then: 1. In all cables are disconnected from the computer... upside down the computer and remove the incompatible module(s) Removing a memory module To remove the memory module, make sure the added memory is in Slot B: repeatedly flashes orange twice, then blue twice. In this case, let the memory modules cool to release the module. Seat the cover and secure ...
User Manual
Page 184
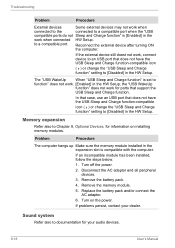
... When "USB Sleep and Charge function" is compatible with the computer. Problem Procedure The computer hangs up Make sure the memory module installed in the expansion slot is set to function" does not work. [Enabled] in the HW Setup. Disconnect the AC adaptor and all peripheral ... to documentation for information on the power. Reconnect the external device after turning ON the computer. Remove the battery pack. 4. Remove the memory module. 5. Sound system Refer also to a compatible port. If problems persist, contact your audio devices. 9-18 User's Manual If an...
... When "USB Sleep and Charge function" is compatible with the computer. Problem Procedure The computer hangs up Make sure the memory module installed in the expansion slot is set to function" does not work. [Enabled] in the HW Setup. Disconnect the AC adaptor and all peripheral ... to documentation for information on the power. Reconnect the external device after turning ON the computer. Remove the battery pack. 4. Remove the memory module. 5. Sound system Refer also to a compatible port. If problems persist, contact your audio devices. 9-18 User's Manual If an...


