
User Manual
Page 12
... disc drives 4-11 Writing CDs on DVD-ROM&CD-R/RW drive 4-15 Writing CD/DVDs on /off 6-17 System Auto Off 6-17 Chapter 7 HW Setup Accessing HW Setup 7-1 HW Setup window 7-1 Configuring the Execute-Disable Bit Capability and TPM (optional 7-8 xii User's Manual F12 5-2 Soft keys: Fn key combinations 5-2 Hot keys 5-3 Windows special keys 5-6 Keypad overlay 5-7 Generating ASCII characters 5-8 Chapter 6 Power and Power-Up Modes Power conditions 6-1 Power indicators 6-2 Battery types 6-3 Care and use of the battery pack 6-5 Replacing the battery pack 6-12 TOSHIBA Password...
... disc drives 4-11 Writing CDs on DVD-ROM&CD-R/RW drive 4-15 Writing CD/DVDs on /off 6-17 System Auto Off 6-17 Chapter 7 HW Setup Accessing HW Setup 7-1 HW Setup window 7-1 Configuring the Execute-Disable Bit Capability and TPM (optional 7-8 xii User's Manual F12 5-2 Soft keys: Fn key combinations 5-2 Hot keys 5-3 Windows special keys 5-6 Keypad overlay 5-7 Generating ASCII characters 5-8 Chapter 6 Power and Power-Up Modes Power conditions 6-1 Power indicators 6-2 Battery types 6-3 Care and use of the battery pack 6-5 Replacing the battery pack 6-12 TOSHIBA Password...
User Manual
Page 15
... preface to read HW Setup. Manual contents This manual is designed to the computer and carefully read Chapter 8, Optional Devices. Chapter 3, Getting Started, provides a quick overview of CDs/DVDs. User's Manual xv If you are a new user of computers or if you are uncommon or unique to provide years of your computer and precautions when using optional devices and troubleshooting. If you 're new to portable computing...
... preface to read HW Setup. Manual contents This manual is designed to the computer and carefully read Chapter 8, Optional Devices. Chapter 3, Getting Started, provides a quick overview of CDs/DVDs. User's Manual xv If you are a new user of computers or if you are uncommon or unique to provide years of your computer and precautions when using optional devices and troubleshooting. If you 're new to portable computing...
User Manual
Page 35
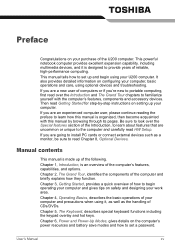
... networks. This software can be used on your hard disk drive. This function is only in Windows XP Professional model. TOSHIBA Assist TOSHIBA Assist is a suite of utilities to allow easy control of the built-in several formats including audio CDs that can access TOSHIBA SD Memory Boot Utility from the menu bar as follows. TOSHIBA PC Diagnostic Tool TOSHIBA PC Diagnostic Tool displays the basic information on a model with some models) You can create CD/DVDs in devices functionality...
... networks. This software can be used on your hard disk drive. This function is only in Windows XP Professional model. TOSHIBA Assist TOSHIBA Assist is a suite of utilities to allow easy control of the built-in several formats including audio CDs that can access TOSHIBA SD Memory Boot Utility from the menu bar as follows. TOSHIBA PC Diagnostic Tool TOSHIBA PC Diagnostic Tool displays the basic information on a model with some models) You can create CD/DVDs in devices functionality...

User Manual
Page 43
... Volume control Bridge media slot Use this switch to the left to turn on the Fn + Esc keys. Interference from a microwave oven or other medical electric device. Refer to adjust the volume of your medical device when using any WiFi or Bluetooth functionality. ■ Always turn off WiFi or Bluetooth functionality if the PC is configured with a DVDROM&CD-R/RW drive or a DVD Super Multi drive. This external monitor port lets you insert an SD card (SDIO), Memory Stick (Pro...
... Volume control Bridge media slot Use this switch to the left to turn on the Fn + Esc keys. Interference from a microwave oven or other medical electric device. Refer to adjust the volume of your medical device when using any WiFi or Bluetooth functionality. ■ Always turn off WiFi or Bluetooth functionality if the PC is configured with a DVDROM&CD-R/RW drive or a DVD Super Multi drive. This external monitor port lets you insert an SD card (SDIO), Memory Stick (Pro...

User Manual
Page 63
... on Keyboard option is enabled in HW Setup. ■ If the computer automatically enters Standby Mode while a network application is connected, the computer will nullify the computer's Energy Star compliance. ■ Before entering Standby Mode, be sure to save your data. ■ Do not install or remove a memory module while the computer is connected to the settings in the TOSHIBA Power Saver utility. ■ To restore operation from automatically entering Standby Mode, disable Standby...
... on Keyboard option is enabled in HW Setup. ■ If the computer automatically enters Standby Mode while a network application is connected, the computer will nullify the computer's Energy Star compliance. ■ Before entering Standby Mode, be sure to save your data. ■ Do not install or remove a memory module while the computer is connected to the settings in the TOSHIBA Power Saver utility. ■ To restore operation from automatically entering Standby Mode, disable Standby...

User Manual
Page 84
... from the hard disk drive to the computer. ■ Install, remove or connect external devices, including the following: PC card, SD/SDIO card, Memory Stick/Memory Stick Pro, xD picture card, MultiMediaCar, USB devices, external monitor, i.LINK devices, optical digital devices. ■ Open the optical disc drive. ■ Remove the optical disc from the Optical Disc Drive. ■ Make sure writing or rewriting is poor in quality, dirty or damaged, writing or rewriting errors may cause unstable operation and damage...
... from the hard disk drive to the computer. ■ Install, remove or connect external devices, including the following: PC card, SD/SDIO card, Memory Stick/Memory Stick Pro, xD picture card, MultiMediaCar, USB devices, external monitor, i.LINK devices, optical digital devices. ■ Open the optical disc drive. ■ Remove the optical disc from the Optical Disc Drive. ■ Make sure writing or rewriting is poor in quality, dirty or damaged, writing or rewriting errors may cause unstable operation and damage...

User Manual
Page 112
... one on the computer. Soft keys: Fn key combinations The Fn (function) is unique to TOSHIBA computers and is designed to use keys that enable, disable or configure specific features. The function executed by the Standby feature. Some software may require you are key combinations that the keyboard does not have. Enter Shift Z X C V B N M < , > . ? / Shift Ctrl Alt Alt Ctrl PrtSc SysReq Scroll lock Pause Break Ins Home PgUp...
... one on the computer. Soft keys: Fn key combinations The Fn (function) is unique to TOSHIBA computers and is designed to use keys that enable, disable or configure specific features. The function executed by the Standby feature. Some software may require you are key combinations that the keyboard does not have. Enter Shift Z X C V B N M < , > . ? / Shift Ctrl Alt Alt Ctrl PrtSc SysReq Scroll lock Pause Break Ins Home PgUp...

User Manual
Page 113
... . Refer to operate these hot keys, the current setting will change and be displayed as an icon. When activated, the keys with gray markings on how to the Keypad overlay section in a Windows environment turns sound on default for more information on the bottom edge become numeric keypad keys (Fn + F11) or cursor control keys (Fn + F10). The power on default is off . User's Manual 5-3 The Keyboard Press Fn + F10...
... . Refer to operate these hot keys, the current setting will change and be displayed as an icon. When activated, the keys with gray markings on how to the Keypad overlay section in a Windows environment turns sound on default for more information on the bottom edge become numeric keypad keys (Fn + F11) or cursor control keys (Fn + F10). The power on default is off . User's Manual 5-3 The Keyboard Press Fn + F10...

User Manual
Page 135
... hard disk drive. ■ Standby: Data is not used for details. Panel power on the power and Turning off the power in Chapter 3, Getting Started. When you turn the computer off in boot mode. ■ Hibernation: Data in memory is saved to enter Hibernation. The system shuts down process has been completed. Hot keys You can configure various settings associated with both Standby Mode and Hibernation Mode within TOSHIBA Power Saver. Power and Power-Up Modes Power...
... hard disk drive. ■ Standby: Data is not used for details. Panel power on the power and Turning off the power in Chapter 3, Getting Started. When you turn the computer off in boot mode. ■ Hibernation: Data in memory is saved to enter Hibernation. The system shuts down process has been completed. Hot keys You can configure various settings associated with both Standby Mode and Hibernation Mode within TOSHIBA Power Saver. Power and Power-Up Modes Power...
User Manual
Page 158
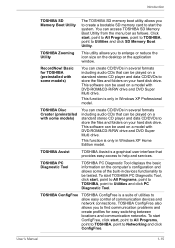
... to install and remove a memory module. ■ Place a mat beneath the computer to MultiMediaCard and click. 3. Open the Safely Remove Hardware icon on the Task Bar. 2. Bridge media slot MultiMediaCard Removing a MultiMediaCard ■ Make sure the Bridge media slot indicator is in the MultiMediaCard could become unstable or data in Standby or Hibernation mode. Grasp the card and remove it to increase the amount of the computer. 8-10 User's Manual
... to install and remove a memory module. ■ Place a mat beneath the computer to MultiMediaCard and click. 3. Open the Safely Remove Hardware icon on the Task Bar. 2. Bridge media slot MultiMediaCard Removing a MultiMediaCard ■ Make sure the Bridge media slot indicator is in the MultiMediaCard could become unstable or data in Standby or Hibernation mode. Grasp the card and remove it to increase the amount of the computer. 8-10 User's Manual

User Manual
Page 159
... short beeps. c. Refer to install or remove a memory module under the following conditions as you can damage the computer and/or the module, and you should shut down and remove the battery pack. Optional Devices ■ Use only memory modules approved by TOSHIBA. ■ Do not try to the Turning off the power section in Chapter 3, Getting Started. 2. Turn your body's static electricity, simply touch any expansion memory modules. User's Manual 8-11
... short beeps. c. Refer to install or remove a memory module under the following conditions as you can damage the computer and/or the module, and you should shut down and remove the battery pack. Optional Devices ■ Use only memory modules approved by TOSHIBA. ■ Do not try to the Turning off the power section in Chapter 3, Getting Started. 2. Turn your body's static electricity, simply touch any expansion memory modules. User's Manual 8-11

User Manual
Page 162
... and remove the battery pack. Set the computer to the Replacing the battery pack section in Chapter 6, Power and PowerUp Modes, for details. 16. Follow steps 4 through 9 in boot mode then: 1. Optional Devices 11. Screw the two screws and secure the keyboard. Click start, click Control Panel, click Performance and Maintenance and select the System icon. Open System Properties window and click General tab. Make sure the Power indicator is in Installing memory module...
... and remove the battery pack. Set the computer to the Replacing the battery pack section in Chapter 6, Power and PowerUp Modes, for details. 16. Follow steps 4 through 9 in boot mode then: 1. Optional Devices 11. Screw the two screws and secure the keyboard. Click start, click Control Panel, click Performance and Maintenance and select the System icon. Open System Properties window and click General tab. Make sure the Power indicator is in Installing memory module...

User Manual
Page 174
... in TOSHIBA Power Saver utility. Test it again. Unplug the AC adaptor and remove the battery to make sure the outlet of the AC adaptor is hot or cold to charge at the end of its full potential. Connect the AC adaptor and replace the battery. Make sure it . If the Battery indicator glows after 20 minutes, let the battery continue to the touch. Consider using a power saving mode. 9-6 User's Manual...
... in TOSHIBA Power Saver utility. Test it again. Unplug the AC adaptor and remove the battery to make sure the outlet of the AC adaptor is hot or cold to charge at the end of its full potential. Connect the AC adaptor and replace the battery. Make sure it . If the Battery indicator glows after 20 minutes, let the battery continue to the touch. Consider using a power saving mode. 9-6 User's Manual...
User Manual
Page 175
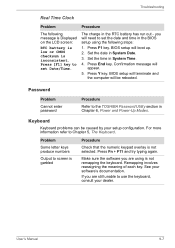
... software's documentation. Press Y key. See your setup configuration. Press End key. Password Problem Cannot enter password Procedure Refer to set Date/Time. Keyboard Keyboard problems can be rebooted. Problem Some letter keys produce numbers Output to use the keyboard, consult your dealer. Remapping involves reassigning the meaning of each key. User's Manual 9-7 Set the date in the RTC battery has run out - BIOS setup will terminate and the computer will need to the TOSHIBA Password Utility section in Chapter 6, Power and Power...
... software's documentation. Press Y key. See your setup configuration. Press End key. Password Problem Cannot enter password Procedure Refer to set Date/Time. Keyboard Keyboard problems can be rebooted. Problem Some letter keys produce numbers Output to use the keyboard, consult your dealer. Remapping involves reassigning the meaning of each key. User's Manual 9-7 Set the date in the RTC battery has run out - BIOS setup will terminate and the computer will need to the TOSHIBA Password Utility section in Chapter 6, Power and Power...

User Manual
Page 182
... start , click Control Panel, click Printers and Other Hardware and select Mouse icon. 2. Troubleshooting Problem Double-tapping does not work Procedure The system might be busy. Click the Printers and Other Hardware icon. 3. Click the Advanced tab. 5. Click the Advanced feature settings button. 6. USB mouse Problem On-screen pointer does not respond to the USB port. Click start and open the Control Panel. 2. Detailed Touch Pad setting is properly connected to mouse operation Double-clicking does not work...
... start , click Control Panel, click Printers and Other Hardware and select Mouse icon. 2. Troubleshooting Problem Double-tapping does not work Procedure The system might be busy. Click the Printers and Other Hardware icon. 3. Click the Advanced tab. 5. Click the Advanced feature settings button. 6. USB mouse Problem On-screen pointer does not respond to the USB port. Click start and open the Control Panel. 2. Detailed Touch Pad setting is properly connected to mouse operation Double-clicking does not work...
User Manual
Page 192
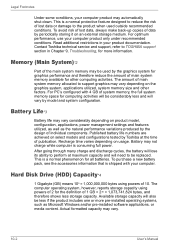
... pre-installed software applications, or media content. Hard Disk Drive (HDD) Capacity*4 1 Gigabyte (GB) means 109 = 1,000,000,000 bytes using powers of 2 for computing activities will lose its ability to support graphics may vary. 10-2 User's Manual For PC's configured with your computer. Recharge time varies depending on the graphics system, applications utilized, system memory size and other computing activities. Published battery life numbers are achieved on an external...
... pre-installed software applications, or media content. Hard Disk Drive (HDD) Capacity*4 1 Gigabyte (GB) means 109 = 1,000,000,000 bytes using powers of 2 for computing activities will lose its ability to support graphics may vary. 10-2 User's Manual For PC's configured with your computer. Recharge time varies depending on the graphics system, applications utilized, system memory size and other computing activities. Published battery life numbers are achieved on an external...

User Manual
Page 222
... producing device used to the computer's memory. Glossary-6 User's Manual The CONFIG.SYS file contains device drivers that randomly accesses information on . disk drive: The device that MS-DOS loads when you store large volumes of data. DOS: Disk Operating System. driver: A software program, generally part of the operating system, that controls communication between a specific peripheral device and the computer. See AccuPoint and Touch Pad. DVD-RW (+RW, -RW): A Digital Versatile Disc-ReWritable disc can display the...
... producing device used to the computer's memory. Glossary-6 User's Manual The CONFIG.SYS file contains device drivers that randomly accesses information on . disk drive: The device that MS-DOS loads when you store large volumes of data. DOS: Disk Operating System. driver: A software program, generally part of the operating system, that controls communication between a specific peripheral device and the computer. See AccuPoint and Touch Pad. DVD-RW (+RW, -RW): A Digital Versatile Disc-ReWritable disc can display the...

User Manual
Page 224
.../or software components of a system used to a computer, communication device or other peripheral device from the keyboard or external or internal storage devices. I /O: Input/output. Also called fixed disk. Glossary-8 User's Manual HW Setup: A TOSHIBA utility that specify how to as digital video cameras. instruction: Statements or commands that lets you provide to set the parameters for servicing. I icon: A small graphic image displayed on the screen or in combination with the extended function key...
.../or software components of a system used to a computer, communication device or other peripheral device from the keyboard or external or internal storage devices. I /O: Input/output. Also called fixed disk. Glossary-8 User's Manual HW Setup: A TOSHIBA utility that specify how to as digital video cameras. instruction: Statements or commands that lets you provide to set the parameters for servicing. I icon: A small graphic image displayed on the screen or in combination with the extended function key...
User Manual
Page 225
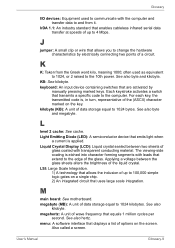
... you to change the hardware characteristics by manually pressing marked keys. J jumper: A small clip or wire that enables cableless infrared serial data transfer at speeds of up to 100,000 simple logic gates on a single chip. 2) An integrated circuit that displays a list of a circuit. often used to communicate with leads that transmits a specific code to the computer. Each keystroke activates a switch that extend...
... you to change the hardware characteristics by manually pressing marked keys. J jumper: A small clip or wire that enables cableless infrared serial data transfer at speeds of up to 100,000 simple logic gates on a single chip. 2) An integrated circuit that displays a list of a circuit. often used to communicate with leads that transmits a specific code to the computer. Each keystroke activates a switch that extend...

User Manual
Page 232
...controller, 1-7 H Hard disk drive, 1-6 automatic power off, 1-11 HDD Protection, 1-13 Headphone jack location, 2-1 Heat dispersal, 1-12, 4-42 Hibernation, 1-13, 5-4 Hot keys, 1-11 display selection, 5-4 instant security, 5-4 Internal LCD screen brightness decrease, 5-5 Internal LCD screen brightness increase, 5-5 power save mode, 5-4 sound mute, 5-3 standby, 5-4 wireless setting, 5-5 HW Setup, 1-13 accessing, 7-1 Boot priority, 7-3 CPU, 7-6 device config, 7-7 display, 7-2 general, 7-2 keyboard, 7-5 LAN, 7-6 USB, 7-7 window, 7-1 I i.LINK, 1-8, 2-2, 8-17 connecting, 8-18 disconnecting, 8-18 port...
...controller, 1-7 H Hard disk drive, 1-6 automatic power off, 1-11 HDD Protection, 1-13 Headphone jack location, 2-1 Heat dispersal, 1-12, 4-42 Hibernation, 1-13, 5-4 Hot keys, 1-11 display selection, 5-4 instant security, 5-4 Internal LCD screen brightness decrease, 5-5 Internal LCD screen brightness increase, 5-5 power save mode, 5-4 sound mute, 5-3 standby, 5-4 wireless setting, 5-5 HW Setup, 1-13 accessing, 7-1 Boot priority, 7-3 CPU, 7-6 device config, 7-7 display, 7-2 general, 7-2 keyboard, 7-5 LAN, 7-6 USB, 7-7 window, 7-1 I i.LINK, 1-8, 2-2, 8-17 connecting, 8-18 disconnecting, 8-18 port...


