User Guide
Page 5
... uninterrupted service. If these changes might affect your service or the operation of service may request that temporary discontinuance of your fax transmission, refer to the fax software instructions installed on this equipment causes harm to the telephone network, the telephone company will notify the customer as soon as possible. 5 Connection to party line service is experienced with this equipment, for repair...
... uninterrupted service. If these changes might affect your service or the operation of service may request that temporary discontinuance of your fax transmission, refer to the fax software instructions installed on this equipment causes harm to the telephone network, the telephone company will notify the customer as soon as possible. 5 Connection to party line service is experienced with this equipment, for repair...
User Guide
Page 35
... 156 Using a supervisor password 157 Using a user password 158 Deleting a user password 159 TOSHIBA Face Recognition Utility 160 TOSHIBA PC Diagnostic Tool Utility 161 TOSHIBA HDD Protection Utility 162 TOSHIBA SD™ Memory Card Format Utility .........163 Mouse Utility 164 TOSHIBA Hardware Setup 165 USB Sleep and Charge Utility 168 Starting the USB Sleep and Charge Utility.......168 USB Sleep and Charge 168 Enabling USB Sleep and Charge 170 Power supply mode settings 170 Battery settings 170 TOSHIBA Zooming Utility 171 TOSHIBA Button Support 172 TOSHIBA Accessibility 173...
... 156 Using a supervisor password 157 Using a user password 158 Deleting a user password 159 TOSHIBA Face Recognition Utility 160 TOSHIBA PC Diagnostic Tool Utility 161 TOSHIBA HDD Protection Utility 162 TOSHIBA SD™ Memory Card Format Utility .........163 Mouse Utility 164 TOSHIBA Hardware Setup 165 USB Sleep and Charge Utility 168 Starting the USB Sleep and Charge Utility.......168 USB Sleep and Charge 168 Enabling USB Sleep and Charge 170 Power supply mode settings 170 Battery settings 170 TOSHIBA Zooming Utility 171 TOSHIBA Button Support 172 TOSHIBA Accessibility 173...
User Guide
Page 60
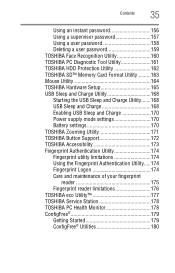
... least one memory module installed for the computer to a 30-degree angle and slide it out of computer Slot B Slot A (Sample Illustration) Removing the memory module 4 Replace the memory module slot cover and secure it using the screws. 5 Re-insert the main battery. Checking total memory When you add or remove a memory module, you can check that the module is displayed below the System heading. To do this: ❖ Click Start, Control Panel, System...
... least one memory module installed for the computer to a 30-degree angle and slide it out of computer Slot B Slot A (Sample Illustration) Removing the memory module 4 Replace the memory module slot cover and secure it using the screws. 5 Re-insert the main battery. Checking total memory When you add or remove a memory module, you can check that the module is displayed below the System heading. To do this: ❖ Click Start, Control Panel, System...
User Guide
Page 80
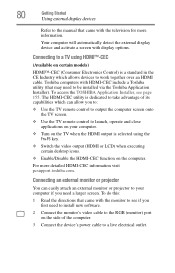
... LCD) when executing certain desktop icons. ❖ Enable/Disable the HDMI-CEC function on the computer. Toshiba computers with HDMI-CEC include a Toshiba utility (that may need to install new software. 2 Connect the monitor's video cable to the RGB (monitor) port on certain models) HDMI™-CEC (Consumer Electronics Control) is dedicated to take advantage of the computer. 3 Connect the device's power cable to be installed via the Toshiba Application Installer). For more information. 80 Getting Started Using external display devices Refer to the manual...
... LCD) when executing certain desktop icons. ❖ Enable/Disable the HDMI-CEC function on the computer. Toshiba computers with HDMI-CEC include a Toshiba utility (that may need to install new software. 2 Connect the monitor's video cable to the RGB (monitor) port on certain models) HDMI™-CEC (Consumer Electronics Control) is dedicated to take advantage of the computer. 3 Connect the device's power cable to be installed via the Toshiba Application Installer). For more information. 80 Getting Started Using external display devices Refer to the manual...
User Guide
Page 159
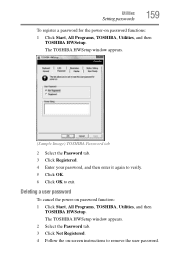
... Registered. 4 Enter your password, and then enter it again to verify. 5 Click OK. 6 Click OK to remove the user password. Deleting a user password To cancel the power-on password functions: 1 Click Start, All Programs, TOSHIBA, Utilities, and then TOSHIBA HWSetup. Utilities Setting passwords 159 To register a password for the power-on password function: 1 Click Start, All Programs, TOSHIBA, Utilities, and then TOSHIBA HWSetup. The TOSHIBA HWSetup window appears. 2 Select the Password tab. 3 Click Not Registered. 4 Follow the on-screen instructions to...
... Registered. 4 Enter your password, and then enter it again to verify. 5 Click OK. 6 Click OK to remove the user password. Deleting a user password To cancel the power-on password functions: 1 Click Start, All Programs, TOSHIBA, Utilities, and then TOSHIBA HWSetup. Utilities Setting passwords 159 To register a password for the power-on password function: 1 Click Start, All Programs, TOSHIBA, Utilities, and then TOSHIBA HWSetup. The TOSHIBA HWSetup window appears. 2 Select the Password tab. 3 Click Not Registered. 4 Follow the on-screen instructions to...
User Guide
Page 178
... status changes (e.g.: number of power button and Fn key combination uses, and AC adaptor, battery, LCD, fan, HDD, sound volume, wireless communication switch, docking and USB information), date of initial system use restrictions above, the data logged on the computer's internal storage drive. The stored data uses a very small portion of the computer and related devices and logs service-relevant information on the internal storage drive may also be transferred to install the updates if...
... status changes (e.g.: number of power button and Fn key combination uses, and AC adaptor, battery, LCD, fan, HDD, sound volume, wireless communication switch, docking and USB information), date of initial system use restrictions above, the data logged on the computer's internal storage drive. The stored data uses a very small portion of the computer and related devices and logs service-relevant information on the internal storage drive may also be transferred to install the updates if...
User Guide
Page 187
... way such as installing a new program or adding a device. The labels on the bottom of these options: ❖ Repair Your Computer ❖ Safe Mode ❖ Safe Mode with Networking ❖ Safe Mode with the desktop and used to the way the operating system responds to start . ❖ The operating system responds differently from the normal routine. ❖ The screen does not look right. To open the Startup menu: 1 Restart your...
... way such as installing a new program or adding a device. The labels on the bottom of these options: ❖ Repair Your Computer ❖ Safe Mode ❖ Safe Mode with Networking ❖ Safe Mode with the desktop and used to the way the operating system responds to start . ❖ The operating system responds differently from the normal routine. ❖ The screen does not look right. To open the Startup menu: 1 Restart your...
User Guide
Page 193
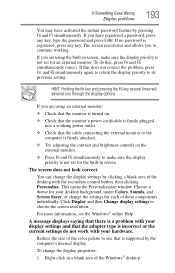
... the display options. To change the settings for the built-in a blank area of the desktop with your display settings and that the cable connecting the external monitor to the computer is firmly attached. ❖ Try adjusting the contrast and brightness controls on . ❖ Check that is registered, press any key, type the password and press Enter. If no password is supported by pressing Fn and F1 simultaneously. This opens...
... the display options. To change the settings for the built-in a blank area of the desktop with your display settings and that the cable connecting the external monitor to the computer is firmly attached. ❖ Try adjusting the contrast and brightness controls on . ❖ Check that is registered, press any key, type the password and press Enter. If no password is supported by pressing Fn and F1 simultaneously. This opens...
User Guide
Page 197
... properly into the slot. ❖ Make sure all cables are having trouble getting one or more of devices, such as a removable hard disk, additional memory, or a pager. Most ExpressCard problems occur during installation and setup of the drive when you are using the card under the operating system. If Something Goes Wrong Sound system problems 197 media formats, refer to the complete detail specifications for your computer. The disc will not come...
... properly into the slot. ❖ Make sure all cables are having trouble getting one or more of devices, such as a removable hard disk, additional memory, or a pager. Most ExpressCard problems occur during installation and setup of the drive when you are using the card under the operating system. If Something Goes Wrong Sound system problems 197 media formats, refer to the complete detail specifications for your computer. The disc will not come...
User Guide
Page 200
... with an internal Wi-Fi® adapter, verify that the Wireless antenna ON/OFF switch is ON (the wireless indicator light will be lit). The other system may be for more information. Try making a test transmission to check this. Wireless networking problems NOTE This section provides general troubleshooting tips for more advanced users. The modem is on certain models) This section lists common modem problems. The...
... with an internal Wi-Fi® adapter, verify that the Wireless antenna ON/OFF switch is ON (the wireless indicator light will be lit). The other system may be for more information. Try making a test transmission to check this. Wireless networking problems NOTE This section provides general troubleshooting tips for more advanced users. The modem is on certain models) This section lists common modem problems. The...
User Guide
Page 206
... internal storage drive fails. General tips for installing hardware and software Here are also widely available. An external hard drive is required. Most of new hardware (printers, pointing devices, external hard drives, DVD writers, scanners, etc.) and software (applications like Microsoft® Office and Adobe® Photoshop®, or utility software such as read from optical discs. Follow these steps to set a restore point (see the section titled restore points). If anything , use...
... internal storage drive fails. General tips for installing hardware and software Here are also widely available. An external hard drive is required. Most of new hardware (printers, pointing devices, external hard drives, DVD writers, scanners, etc.) and software (applications like Microsoft® Office and Adobe® Photoshop®, or utility software such as read from optical discs. Follow these steps to set a restore point (see the section titled restore points). If anything , use...
User Guide
Page 238
... the battery save mode. (2) A key or combination of keys that holds 1.44 MB of many Toshiba computers that you turn the computer off . Memory cache built into the processor to interact with the Fn key can set system options or control system parameters, such as a mouse. See also Sleep, Suspend. A 3.5-inch diskette that activates a memory resident program. See device. Internet - The decentralized, world-wide network of refreshing a computer screen...
... the battery save mode. (2) A key or combination of keys that holds 1.44 MB of many Toshiba computers that you turn the computer off . Memory cache built into the processor to interact with the Fn key can set system options or control system parameters, such as a mouse. See also Sleep, Suspend. A 3.5-inch diskette that activates a memory resident program. See device. Internet - The decentralized, world-wide network of refreshing a computer screen...
User Guide
Page 245
... missing files/trouble accessing a drive 194 running slow 195 diskette drive cannot insert a diskette 195 cannot read a diskette 196 display does not look normal/flickers 193 external monitor not working 194 display device connecting 79 external 79 display output settings 81 display panel opening 50 display problems screen is blank 192 display, external adjusting 82 disposal information 29 disposing of used batteries 132 DVD using 107 DVD player general problems 202 DVD-ROM or multi-function drive inserting discs 109 removing 110 E eject button optical drive 108...
... missing files/trouble accessing a drive 194 running slow 195 diskette drive cannot insert a diskette 195 cannot read a diskette 196 display does not look normal/flickers 193 external monitor not working 194 display device connecting 79 external 79 display output settings 81 display panel opening 50 display problems screen is blank 192 display, external adjusting 82 disposal information 29 disposing of used batteries 132 DVD using 107 DVD player general problems 202 DVD-ROM or multi-function drive inserting discs 109 removing 110 E eject button optical drive 108...
User Guide
Page 246
... 105 restoring 106 saving 103 fingerprint authentication 174 Fingerprint Authentication Utility using 174 Fn keys 99 function keys 100 H HDMI™ Out Port 79 headphones using 144 Help and Support Windows® operating system 189 Hibernation mode 85 configuring 89 hot key 222 starting again from 91 hot key backlight 228 disabling or enabling TouchPad™ 226 disabling or enabling wireless devices 225 display brightness 224 Hibernation mode 222 keyboard overlays 228 Lock (Instant security) 219 Output (Display switch) 223 power plan 220 Sleep mode 221 volume...
... 105 restoring 106 saving 103 fingerprint authentication 174 Fingerprint Authentication Utility using 174 Fn keys 99 function keys 100 H HDMI™ Out Port 79 headphones using 144 Help and Support Windows® operating system 189 Hibernation mode 85 configuring 89 hot key 222 starting again from 91 hot key backlight 228 disabling or enabling TouchPad™ 226 disabling or enabling wireless devices 225 display brightness 224 Hibernation mode 222 keyboard overlays 228 Lock (Instant security) 219 Output (Display switch) 223 power plan 220 Sleep mode 221 volume...
User Guide
Page 247
... Windows® keys 100 troubleshooting 192 using 99 keyboard, external 82 L light AC power 47 drive in-use indicator 108, 110 lock computer, using 95 M main battery changing 127 installing 127, 128 removing 127 safety precautions 130 manual eject hole optical drive 108, 110 memory adding 53 problem solving 190 removing memory module slot cover 55 memory module installation 53 installing inserting into socket 56 removing 59, 60 memory module slot 55 microphone using 143 modem connecting to telephone line 139 problem solving 200 monitor 79 connecting 79, 80 monitor problems monitor not working...
... Windows® keys 100 troubleshooting 192 using 99 keyboard, external 82 L light AC power 47 drive in-use indicator 108, 110 lock computer, using 95 M main battery changing 127 installing 127, 128 removing 127 safety precautions 130 manual eject hole optical drive 108, 110 memory adding 53 problem solving 190 removing memory module slot cover 55 memory module installation 53 installing inserting into socket 56 removing 59, 60 memory module slot 55 microphone using 143 modem connecting to telephone line 139 problem solving 200 monitor 79 connecting 79, 80 monitor problems monitor not working...
User Guide
Page 248
... O optical disc handling 112 inserting (slot-type drive) 109 inserting (tray-type drive) 110 positioning 112 optical drive drive in-use indicator light 108, 110 eject button 108, 110 manual eject hole 108, 110 problems 196 removing disc 114 troubleshooting 196 using 107 optical media recording 113 other documentation 42 P password deleting a supervisor 158 disabling a user 159 setting a user 158 supervisor set up 157 types 156 passwords instant, using 156 setting 156 port RGB 79 power computer will not start 184 connecting cable to...
... O optical disc handling 112 inserting (slot-type drive) 109 inserting (tray-type drive) 110 positioning 112 optical drive drive in-use indicator light 108, 110 eject button 108, 110 manual eject hole 108, 110 problems 196 removing disc 114 troubleshooting 196 using 107 optical media recording 113 other documentation 42 P password deleting a supervisor 158 disabling a user 159 setting a user 158 supervisor set up 157 types 156 passwords instant, using 156 setting 156 port RGB 79 power computer will not start 184 connecting cable to...
User Guide
Page 250
... Format Utility 163 TOSHIBA Service Station 178 TOSHIBA Zooming Utility 171 TouchPad™ adjusting settings 78 disabling 78 enabling 78 using 75 traveling tips 133 troubleshooting DVD player general problems 202 external keyboard 192 keyboard 192 optical drive 196 turning on the computer 51 turning on the power 51 U USB Sleep and Charge cannot use 208 USB Sleep and Charge Utility 168 USB Wakeup function does not work 208 USB-compatible printer 83 user password, disabling 159 user password, setting 158 using a file extension 104 Utilities 149 V video cables 79 video display device connecting...
... Format Utility 163 TOSHIBA Service Station 178 TOSHIBA Zooming Utility 171 TouchPad™ adjusting settings 78 disabling 78 enabling 78 using 75 traveling tips 133 troubleshooting DVD player general problems 202 external keyboard 192 keyboard 192 optical drive 196 turning on the computer 51 turning on the power 51 U USB Sleep and Charge cannot use 208 USB Sleep and Charge Utility 168 USB Wakeup function does not work 208 USB-compatible printer 83 user password, disabling 159 user password, setting 158 using a file extension 104 Utilities 149 V video cables 79 video display device connecting...
Resource Guide
Page 30
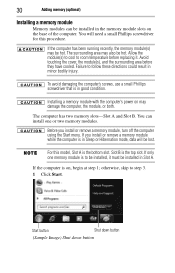
... in Sleep or Hibernation mode, data will need a small Phillips screwdriver for this model, Slot A is to room temperature before they have cooled. If you install or remove a memory module, turn off the computer using the Start menu. Slot B is on, begin at step 1; 30 Adding memory (optional) Installing a memory module Memory modules can install one memory module is the bottom slot. Installing a memory module with the computer's power on the base of the computer. Before you install or remove a memory module while...
... in Sleep or Hibernation mode, data will need a small Phillips screwdriver for this model, Slot A is to room temperature before they have cooled. If you install or remove a memory module, turn off the computer using the Start menu. Slot B is on, begin at step 1; 30 Adding memory (optional) Installing a memory module Memory modules can install one memory module is the bottom slot. Installing a memory module with the computer's power on the base of the computer. Before you install or remove a memory module while...
Resource Guide
Page 34
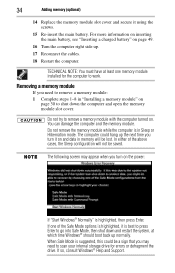
... inserting the main battery, see "Inserting a charged battery" on the power: If "Start Windows® Normally" is highlighted, then press Enter. If one of the above cases, the Sleep configuration will be saved. TECHNICAL NOTE: You must have at which time Windows® should boot back up . 17 Reconnect the cables. 18 Restart the computer. 34 Adding memory (optional) 14 Replace the memory module slot cover and secure it...
... inserting the main battery, see "Inserting a charged battery" on the power: If "Start Windows® Normally" is highlighted, then press Enter. If one of the above cases, the Sleep configuration will be saved. TECHNICAL NOTE: You must have at which time Windows® should boot back up . 17 Reconnect the cables. 18 Restart the computer. 34 Adding memory (optional) 14 Replace the memory module slot cover and secure it...
Resource Guide
Page 35
... on battery power. Any small bright dots that comes with the card to see "Inserting a charged battery" on your screen display when you may appear on top of the slot. 4 Replace the memory module slot cover and secure it using highprecision technology. This is also an intrinsic characteristic of the computer. TECHNICAL NOTE: You must have at least one another, you must remove the top module first...
... on battery power. Any small bright dots that comes with the card to see "Inserting a charged battery" on your screen display when you may appear on top of the slot. 4 Replace the memory module slot cover and secure it using highprecision technology. This is also an intrinsic characteristic of the computer. TECHNICAL NOTE: You must have at least one another, you must remove the top module first...


