
User Guide
Page 21
...partition 54 Recovering without changing the internal storage drive partitions 57 Creating recovery DVDs/media 59 Restoring from recovery DVDs/media 62 Erasing the Internal Storage Drive 64 Checking the internal storage drive operating status 65 Installing drivers and applications 66 Using the TouchPad 66 Adjusting TouchPad™ settings 70 Disabling or enabling the TouchPad 70 Using external display devices 71 Directing the display output when you turn on the computer 71 Adjusting the quality of the external display 72 Using an external keyboard 72 Using a mouse 73 Connecting...
...partition 54 Recovering without changing the internal storage drive partitions 57 Creating recovery DVDs/media 59 Restoring from recovery DVDs/media 62 Erasing the Internal Storage Drive 64 Checking the internal storage drive operating status 65 Installing drivers and applications 66 Using the TouchPad 66 Adjusting TouchPad™ settings 70 Disabling or enabling the TouchPad 70 Using external display devices 71 Directing the display output when you turn on the computer 71 Adjusting the quality of the external display 72 Using an external keyboard 72 Using a mouse 73 Connecting...

User Guide
Page 23
... used batteries 112 Traveling tips 113 Chapter 4: Exploring Your Computer's Features 114 Exploring the desktop 114 Finding your way around the desktop 115 Setting up for communications 117 Connecting your computer to a network .........118 Exploring audio features 118 Recording sounds 118 Using external speakers or headphones..........119 Using the Web Camera 120 Using the Memory card reader 120 Inserting memory media 121 Removing memory media 121 Chapter 5: Utilities 123 TOSHIBA Assist 124 Connect...
... used batteries 112 Traveling tips 113 Chapter 4: Exploring Your Computer's Features 114 Exploring the desktop 114 Finding your way around the desktop 115 Setting up for communications 117 Connecting your computer to a network .........118 Exploring audio features 118 Recording sounds 118 Using external speakers or headphones..........119 Using the Web Camera 120 Using the Memory card reader 120 Inserting memory media 121 Removing memory media 121 Chapter 5: Utilities 123 TOSHIBA Assist 124 Connect...
User Guide
Page 24
... 128 TOSHIBA Recovery Media Creator 129 TOSHIBA Application Installer 130 Setting passwords 131 Using an instant password 131 Using a supervisor password 132 Using a user password 133 Deleting a user password 134 TOSHIBA PC Diagnostic Tool Utility 135 TOSHIBA HDD Protection Utility 136 Mouse Utility 137 TOSHIBA Hardware Setup 138 USB Sleep and Charge Utility 140 Starting the USB Sleep and Charge Utility.......140 USB Sleep and Charge 140 Enabling/Disabling USB Sleep and Charge 142 Power supply mode settings 142 TOSHIBA Zooming Utility 143 TOSHIBA Accessibility 144 TOSHIBA eco...
... 128 TOSHIBA Recovery Media Creator 129 TOSHIBA Application Installer 130 Setting passwords 131 Using an instant password 131 Using a supervisor password 132 Using a user password 133 Deleting a user password 134 TOSHIBA PC Diagnostic Tool Utility 135 TOSHIBA HDD Protection Utility 136 Mouse Utility 137 TOSHIBA Hardware Setup 138 USB Sleep and Charge Utility 140 Starting the USB Sleep and Charge Utility.......140 USB Sleep and Charge 140 Enabling/Disabling USB Sleep and Charge 142 Power supply mode settings 142 TOSHIBA Zooming Utility 143 TOSHIBA Accessibility 144 TOSHIBA eco...
User Guide
Page 42
... the computer's memory if you install or remove a memory module, turn off the computer using the Start menu. Before you use a small Phillips screwdriver that is in the memory module slot on page 41. You may be lost. If the computer has been running recently, the memory module(s) may want to room temperature before they have cooled. NOTE Before adding external devices or memory, Toshiba recommends setting up your software" on...
... the computer's memory if you install or remove a memory module, turn off the computer using the Start menu. Before you use a small Phillips screwdriver that is in the memory module slot on page 41. You may be lost. If the computer has been running recently, the memory module(s) may want to room temperature before they have cooled. NOTE Before adding external devices or memory, Toshiba recommends setting up your software" on...
User Guide
Page 44
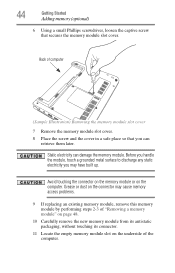
... memory module slot cover 7 Remove the memory module slot cover. 8 Place the screw and the cover in a safe place so that secures the memory module slot cover. 44 Getting Started Adding memory (optional) 6 Using a small Phillips screwdriver, loosen the captive screw that you may cause memory access problems. 9 If replacing an existing memory module, remove this memory module by performing steps 2-3 of "Removing a memory module" on page 48. 10 Carefully remove the new memory module from its antistatic packaging, without touching its connector. 11 Locate the empty memory module...
... memory module slot cover 7 Remove the memory module slot cover. 8 Place the screw and the cover in a safe place so that secures the memory module slot cover. 44 Getting Started Adding memory (optional) 6 Using a small Phillips screwdriver, loosen the captive screw that you may cause memory access problems. 9 If replacing an existing memory module, remove this memory module by performing steps 2-3 of "Removing a memory module" on page 48. 10 Carefully remove the new memory module from its antistatic packaging, without touching its connector. 11 Locate the empty memory module...
User Guide
Page 48
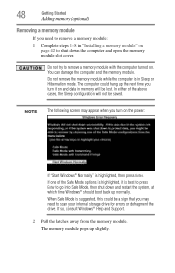
NOTE The following screen may need to remove a memory module: 1 Complete steps 1-8 in "Installing a memory module" on page 42 to go into Safe Mode, then shut down the computer and open the memory module slot cover. The computer could be a sign that you may appear when you turn it is in memory will not be lost. If one of the above cases, the Sleep configuration will be saved. You can...
NOTE The following screen may need to remove a memory module: 1 Complete steps 1-8 in "Installing a memory module" on page 42 to go into Safe Mode, then shut down the computer and open the memory module slot cover. The computer could be a sign that you may appear when you turn it is in memory will not be lost. If one of the above cases, the Sleep configuration will be saved. You can...
User Guide
Page 49
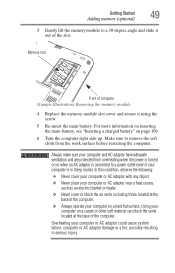
... and slide it using the screw. 5 Re-insert the main battery. Getting Started 49 Adding memory (optional) 3 Gently lift the memory module to remove the soft cloth from overheating when the power is turned on or when an AC adaptor is connected to a power outlet (even if your computer is in serious injury. Memory slot Front of computer (Sample Illustration) Removing the memory module 4 Replace the memory module slot cover and secure...
... and slide it using the screw. 5 Re-insert the main battery. Getting Started 49 Adding memory (optional) 3 Gently lift the memory module to remove the soft cloth from overheating when the power is turned on or when an AC adaptor is connected to a power outlet (even if your computer is in serious injury. Memory slot Front of computer (Sample Illustration) Removing the memory module 4 Replace the memory module slot cover and secure...

User Guide
Page 50
...; Click Start, Control Panel, System and Security, and then System. TECHNICAL NOTE: You must have at accessories.toshiba.com. Recovering the Internal Storage Drive NOTE To purchase an optional external writable optical drive or a USB Flash drive, visit the Toshiba Web site at least one memory module installed for the computer to perform the action, click Continue; Checking total memory When you add or remove a memory module, you were trying to work...
...; Click Start, Control Panel, System and Security, and then System. TECHNICAL NOTE: You must have at accessories.toshiba.com. Recovering the Internal Storage Drive NOTE To purchase an optional external writable optical drive or a USB Flash drive, visit the Toshiba Web site at least one memory module installed for the computer to perform the action, click Continue; Checking total memory When you add or remove a memory module, you were trying to work...
User Guide
Page 70
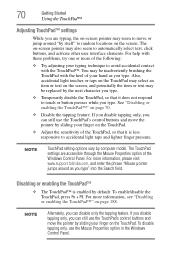
... still use the Mouse Properties option in the Windows Control Panel. If you disable tapping only, you can disable only the tapping feature. 70 Getting Started Using the TouchPad™ Adjusting TouchPad™ settings While you are accessible through the Mouse Properties option of the Windows Control Panel. The on page 70. ❖ Disable the tapping feature. For help with the TouchPad™. See "Disabling or enabling the TouchPad™" on -screen pointer may be replaced by...
... still use the Mouse Properties option in the Windows Control Panel. If you disable tapping only, you can disable only the tapping feature. 70 Getting Started Using the TouchPad™ Adjusting TouchPad™ settings While you are accessible through the Mouse Properties option of the Windows Control Panel. The on page 70. ❖ Disable the tapping feature. For help with the TouchPad™. See "Disabling or enabling the TouchPad™" on -screen pointer may be replaced by...
User Guide
Page 134
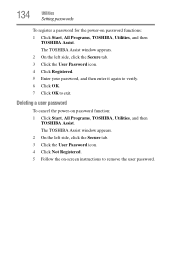
... the User Password icon. 4 Click Registered. 5 Enter your password, and then enter it again to verify. 6 Click OK. 7 Click OK to remove the user password. Deleting a user password To cancel the power-on password functions: 1 Click Start, All Programs, TOSHIBA, Utilities, and then TOSHIBA Assist. The TOSHIBA Assist window appears. 2 On the left side, click the Secure tab. 3 Click the User Password icon. 4 Click Not Registered. 5 Follow the on-screen instructions to exit...
... the User Password icon. 4 Click Registered. 5 Enter your password, and then enter it again to verify. 6 Click OK. 7 Click OK to remove the user password. Deleting a user password To cancel the power-on password functions: 1 Click Start, All Programs, TOSHIBA, Utilities, and then TOSHIBA Assist. The TOSHIBA Assist window appears. 2 On the left side, click the Secure tab. 3 Click the User Password icon. 4 Click Not Registered. 5 Follow the on-screen instructions to exit...
User Guide
Page 146
...'s internal storage drive. Those countries may or may affect the performance of your TOSHIBA computer. TOSHIBA PC Health Monitor The TOSHIBA PC Health Monitor software program monitors computer system functions such as required by your home country or region. The collected information includes device operation time and number of actuations or status changes (e.g.: number of power button and Fn key combination uses, and AC adaptor, battery, LCD, fan, HDD, sound volume, wireless communication switch, docking and USB information...
...'s internal storage drive. Those countries may or may affect the performance of your TOSHIBA computer. TOSHIBA PC Health Monitor The TOSHIBA PC Health Monitor software program monitors computer system functions such as required by your home country or region. The collected information includes device operation time and number of actuations or status changes (e.g.: number of power button and Fn key combination uses, and AC adaptor, battery, LCD, fan, HDD, sound volume, wireless communication switch, docking and USB information...
User Guide
Page 155
... installing a new program or adding a device. To do this indicates a power mismatch. If Something Goes Wrong The Windows® operating system is not working 155 The battery light is blinking when the computer is on page 173. If the specifications do not match, locate and use the options in the Startup menu to fix the problem. For example: ❖ The operating system fails to start after the initial startup appears. ❖ The operating...
... installing a new program or adding a device. To do this indicates a power mismatch. If Something Goes Wrong The Windows® operating system is not working 155 The battery light is blinking when the computer is on page 173. If the specifications do not match, locate and use the options in the Startup menu to fix the problem. For example: ❖ The operating system fails to start after the initial startup appears. ❖ The operating...
User Guide
Page 158
... is not caused by the device. The computer shuts down button in "Installing a memory module" on page 42, and making sure the module is not using resources. ❖ The Driver tab, which provides an array of the Start menu. The operating system displays the device Properties dialog box, which displays the drivers being used by the memory module. Memory problems Incorrectly connected or faulty memory modules may be hardware or even software related. This tab does...
... is not caused by the device. The computer shuts down button in "Installing a memory module" on page 42, and making sure the module is not using resources. ❖ The Driver tab, which provides an array of the Start menu. The operating system displays the device Properties dialog box, which displays the drivers being used by the memory module. Memory problems Incorrectly connected or faulty memory modules may be hardware or even software related. This tab does...
User Guide
Page 161
... activate the screen. This opens the Personalization window. If no password is registered, press any key to continue working power outlet. ❖ Check that the cable connecting the external monitor to the computer is firmly attached. ❖ Try adjusting the contrast and brightness controls on . ❖ Check that the monitor's power cord/cable is not set for an external monitor. The screen reactivates and allows you through the display options. If you are using an external monitor...
... activate the screen. This opens the Personalization window. If no password is registered, press any key to continue working power outlet. ❖ Check that the cable connecting the external monitor to the computer is firmly attached. ❖ Try adjusting the contrast and brightness controls on . ❖ Check that the monitor's power cord/cable is not set for an external monitor. The screen reactivates and allows you through the display options. If you are using an external monitor...
User Guide
Page 170
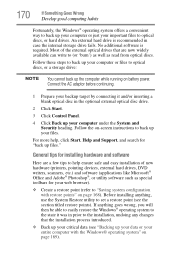
...; Create a restore point (refer to "Saving system configuration with the Windows® operating system" on -screen instructions to back up your computer under the System and Security heading. Most of new hardware (printers, pointing devices, external hard drives, DVD writers, scanners, etc.) and software (applications like Microsoft® Office and Adobe® Photoshop®, or utility software such as read from optical discs. If anything , use the System Restore utility to set a restore...
...; Create a restore point (refer to "Saving system configuration with the Windows® operating system" on -screen instructions to back up your computer under the System and Security heading. Most of new hardware (printers, pointing devices, external hard drives, DVD writers, scanners, etc.) and software (applications like Microsoft® Office and Adobe® Photoshop®, or utility software such as read from optical discs. If anything , use the System Restore utility to set a restore...
User Guide
Page 200
... operating system automatically recognize the change. hot key - (1) A feature in which only every other line of pixels is returned to create a complete screen image. I icon - Hard disks hold much more information than analog signal. The physical components of data. Compare software. HDMI - A feature of many Toshiba computers that saves to the internal storage drive the current state of keys that can be magnetically coded with HDMI cable. internal device...
... operating system automatically recognize the change. hot key - (1) A feature in which only every other line of pixels is returned to create a complete screen image. I icon - Hard disks hold much more information than analog signal. The physical components of data. Compare software. HDMI - A feature of many Toshiba computers that saves to the internal storage drive the current state of keys that can be magnetically coded with HDMI cable. internal device...
User Guide
Page 207
... charging 38, 100 conserving power 104 disposal 112 installing 107, 109 low charge 103 maintaining 111 monitoring power 38, 101 not charging 159 notifications 104 power plan 182 power plan hot key 106 real-time clock (RTC) 98, 100 remaining power 103 removing 108 safety precautions 110 BIOS Setup see TOSHIBA Hardware Setup button power 40 start 116 C Call2Recycle™ battery 113 changing main battery 107 character keys 88 charging the battery 38 checking device properties 157 communications set...
... charging 38, 100 conserving power 104 disposal 112 installing 107, 109 low charge 103 maintaining 111 monitoring power 38, 101 not charging 159 notifications 104 power plan 182 power plan hot key 106 real-time clock (RTC) 98, 100 remaining power 103 removing 108 safety precautions 110 BIOS Setup see TOSHIBA Hardware Setup button power 40 start 116 C Call2Recycle™ battery 113 changing main battery 107 character keys 88 charging the battery 38 checking device properties 157 communications set...
User Guide
Page 209
... disabling or enabling wireless devices 187 display brightness 186 Hibernation mode 184 keyboard overlays 190 Lock (Instant security) 181 Output (Display switch) 185 power plan 182 Sleep mode 183 volume mute 180 Zoom (Display resolution) 189 zooming in 190 zooming out 190 Hot Key Cards 176 Hot key functions 180 hot key power plan 106 I icon 115 desktop 115 moving to desktop 115 recycle bin 115 safety 30 installation memory module 42 installing main battery 107, 109 memory modules 42 mouse 73 Internet bookmarked...
... disabling or enabling wireless devices 187 display brightness 186 Hibernation mode 184 keyboard overlays 190 Lock (Instant security) 181 Output (Display switch) 185 power plan 182 Sleep mode 183 volume mute 180 Zoom (Display resolution) 189 zooming in 190 zooming out 190 Hot Key Cards 176 Hot key functions 180 hot key power plan 106 I icon 115 desktop 115 moving to desktop 115 recycle bin 115 safety 30 installation memory module 42 installing main battery 107, 109 memory modules 42 mouse 73 Internet bookmarked...
User Guide
Page 210
... memory module slot 44 microphone using 118 monitor connecting 71 monitor problems monitor not working 161 mouse installing 73 mouse utility 137 N networking wireless 117 notification area 117 O other documentation 31 overlay keys 89 P password deleting a supervisor 133 disabling a user 134 setting a user 133 supervisor set up 132 types 131 passwords instant, using 131 setting 131 port monitor 71 power computer will not start 152 connecting cable to AC adaptor 37 cord/cable 37 cord/cable connectors 191 energy-saving features 97 problem solving 159 turning on 40 power button...
... memory module slot 44 microphone using 118 monitor connecting 71 monitor problems monitor not working 161 mouse installing 73 mouse utility 137 N networking wireless 117 notification area 117 O other documentation 31 overlay keys 89 P password deleting a supervisor 133 disabling a user 134 setting a user 133 supervisor set up 132 types 131 passwords instant, using 131 setting 131 port monitor 71 power computer will not start 152 connecting cable to AC adaptor 37 cord/cable 37 cord/cable connectors 191 energy-saving features 97 problem solving 159 turning on 40 power button...
User Guide
Page 212
... Recovery Media Creator 129 TOSHIBA Service Station 146 TOSHIBA Zooming Utility 143 TouchPad™ adjusting settings 70 disabling 70 enabling 70 using 66 traveling tips 113 troubleshooting external keyboard 160 keyboard 160 turning on the computer 40 turning on the power 40 U USB Sleep and Charge not working 171 USB Sleep and Charge Utility 140 USB Wakeup function does not work 172 USB-compatible printer 73 user password, disabling 134 user password, setting 133 using a file extension 94 Utilities 123 V video projector adjusting display 72 W warranty standard limited warranty 31 Web Camera...
... Recovery Media Creator 129 TOSHIBA Service Station 146 TOSHIBA Zooming Utility 143 TouchPad™ adjusting settings 70 disabling 70 enabling 70 using 66 traveling tips 113 troubleshooting external keyboard 160 keyboard 160 turning on the computer 40 turning on the power 40 U USB Sleep and Charge not working 171 USB Sleep and Charge Utility 140 USB Wakeup function does not work 172 USB-compatible printer 73 user password, disabling 134 user password, setting 133 using a file extension 94 Utilities 123 V video projector adjusting display 72 W warranty standard limited warranty 31 Web Camera...


