User Manual
Page 1
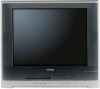
DIGITAL VIDEO Introduction 2 Connections 13 COMBINATION FLAT COLOR Basic setup 19 TELEVISION AND VIDEO CASSETTE RECORDER / DVD VIDEO PLAYER TVoperation 24 MW27H62 Playback (VCR) 40 Recording (VCR) 45 OWNER'S MANUAL Other functions (VCR) 49 Basic playback (DVD) 51 Advanced playback 54 (DVD) Function setup (DVD) 66 Others 72 ©2006 Toshiba Corporation This device does not tape-record copy protected DVD video discs. 5V60101A [E]Cover 1 2/22/06, 1:02 PM
DIGITAL VIDEO Introduction 2 Connections 13 COMBINATION FLAT COLOR Basic setup 19 TELEVISION AND VIDEO CASSETTE RECORDER / DVD VIDEO PLAYER TVoperation 24 MW27H62 Playback (VCR) 40 Recording (VCR) 45 OWNER'S MANUAL Other functions (VCR) 49 Basic playback (DVD) 51 Advanced playback 54 (DVD) Function setup (DVD) 66 Others 72 ©2006 Toshiba Corporation This device does not tape-record copy protected DVD video discs. 5V60101A [E]Cover 1 2/22/06, 1:02 PM

User Manual
Page 5
...SAFETY PRECAUTION/ Power source WARNING: This equipment has been tested and found to comply with the limits for a Class B digital device, pursuant to Part 15 of the following measures: - TO ENSURE PROPER USE OF THIS PRODUCT, PLEASE READ THIS OWNER... polarized AC outlet. Reorient or relocate the receiving antenna. - However, there is wider than the specified voltage (120V 60Hz). CAUTION: THIS DIGITAL VIDEO PLAYER EMPLOYS A LASER SYSTEM. VISIBLE LASER RADIATION MAY BE PRESENT WHEN THE ENCLOSURE IS OPENED. IMPORTANT RECYCLING INFORMATION This product uses both ...
...SAFETY PRECAUTION/ Power source WARNING: This equipment has been tested and found to comply with the limits for a Class B digital device, pursuant to Part 15 of the following measures: - TO ENSURE PROPER USE OF THIS PRODUCT, PLEASE READ THIS OWNER... polarized AC outlet. Reorient or relocate the receiving antenna. - However, there is wider than the specified voltage (120V 60Hz). CAUTION: THIS DIGITAL VIDEO PLAYER EMPLOYS A LASER SYSTEM. VISIBLE LASER RADIATION MAY BE PRESENT WHEN THE ENCLOSURE IS OPENED. IMPORTANT RECYCLING INFORMATION This product uses both ...

User Manual
Page 7
... picture formats ....... 36 Sound control adjustment 37 Setting the StableSound 37 Setting the surround sound 37 Stereo and Second Audio Program (SAP) ..... 38 Setting the digital setup (digital mode 39 Other functions (VCR) Duplicating a video tape 49 Recording a DVD/CD disc 50 Basic playback (DVD) Playing a disc 51 Advanced playback (DVD) Zooming...
... picture formats ....... 36 Sound control adjustment 37 Setting the StableSound 37 Setting the surround sound 37 Stereo and Second Audio Program (SAP) ..... 38 Setting the digital setup (digital mode 39 Other functions (VCR) Duplicating a video tape 49 Recording a DVD/CD disc 50 Basic playback (DVD) Playing a disc 51 Advanced playback (DVD) Zooming...

User Manual
Page 9
...the creation of DVD and CD Software and/or the manufacture of DVD and CD discs, Toshiba cannot assure that the DVD player contained in this television, please contact Toshiba Customer Service. Because of problems and errors that allows specific or limited operation during operation. ... sided disc) Approx. 8 hours (double sided disc) 8 cm Approx. 80 minutes (single sided disc) Approx. 160 minutes (double sided disc) Video CDs DIGITAL VIDEO Audio + Video (moving pictures) Approx. 74 minutes 12 cm (single sided disc) Approx. 20 minutes 8 cm (single sided disc) Audio CDs Audio Approx...
...the creation of DVD and CD Software and/or the manufacture of DVD and CD discs, Toshiba cannot assure that the DVD player contained in this television, please contact Toshiba Customer Service. Because of problems and errors that allows specific or limited operation during operation. ... sided disc) Approx. 8 hours (double sided disc) 8 cm Approx. 80 minutes (single sided disc) Approx. 160 minutes (double sided disc) Video CDs DIGITAL VIDEO Audio + Video (moving pictures) Approx. 74 minutes 12 cm (single sided disc) Approx. 20 minutes 8 cm (single sided disc) Audio CDs Audio Approx...

User Manual
Page 10
Rear panel COAXIAL DIGITAL AUDIO OUT jack 16 % RF IN (VHF/UHF) jack 13 AC power cord 5 10 ColorStream (COMPONENT) VIDEO/AUDIO (L/R) IN jacks # AUDIO (L/R)/VIDEO IN (LINE 1 IN) ...
Rear panel COAXIAL DIGITAL AUDIO OUT jack 16 % RF IN (VHF/UHF) jack 13 AC power cord 5 10 ColorStream (COMPONENT) VIDEO/AUDIO (L/R) IN jacks # AUDIO (L/R)/VIDEO IN (LINE 1 IN) ...

User Manual
Page 15
...) inputs. Signal flow Rear of the unit DTV receiver / set -top box with component video can greatly enhance picture quality and realism. Analog channel Digital channel VIDEO1 (Back) SOURCE SELECTION VIDEO1 0. Signal flow To S-Video out (yellow) (white) (red) To Audio/Video out S-Video cable (not...S-video cable (plus the standard audio cables) instead of a standard video cable for 4 seconds. "VIDEO1", "VIDEO2", "ColorStream", Analog channel or Digital channel will be sure to turn off the power and unplug all of DVD video discs or audio CDs by connecting the unit to optional...
...) inputs. Signal flow Rear of the unit DTV receiver / set -top box with component video can greatly enhance picture quality and realism. Analog channel Digital channel VIDEO1 (Back) SOURCE SELECTION VIDEO1 0. Signal flow To S-Video out (yellow) (white) (red) To Audio/Video out S-Video cable (not...S-video cable (plus the standard audio cables) instead of a standard video cable for 4 seconds. "VIDEO1", "VIDEO2", "ColorStream", Analog channel or Digital channel will be sure to turn off the power and unplug all of DVD video discs or audio CDs by connecting the unit to optional...

User Manual
Page 16
... used in theaters showing the latest movies, and is now available to a 6 channel amplifier equipped with a Dolby Digital decoder or Dolby Digital processor. Manufactured under license from Dolby Laboratories. You can enjoy motion picture and live concert DVD video discs with this...speaker : Rear speaker : Sub woofer : Center speaker : Signal flow Connecting to an amplifier equipped with a Dolby® Digital decoder Dolby Digital Dolby Digital is the surround sound technology used in theaters and now available for Video CDs and Audio CDs. * Amplifier equipped with Dolby...
... used in theaters showing the latest movies, and is now available to a 6 channel amplifier equipped with a Dolby Digital decoder or Dolby Digital processor. Manufactured under license from Dolby Laboratories. You can enjoy motion picture and live concert DVD video discs with this...speaker : Rear speaker : Sub woofer : Center speaker : Signal flow Connecting to an amplifier equipped with a Dolby® Digital decoder Dolby Digital Dolby Digital is the surround sound technology used in theaters and now available for Video CDs and Audio CDs. * Amplifier equipped with Dolby...

User Manual
Page 17
...by connecting an amplifier equipped with an MPEG2 audio decoder or MPEG2 audio processor. Amplifier equipped with an MPEG2 audio decoder To COAXIAL type digital audio input To COAXIAL DIGITAL AUDIO OUT 75 Ω coaxial cable (not supplied) • Use DVD video discs encoded via the Dolby... system. This input on your A/V Receiver is reserved for Laserdisc use only and is incompatible with the COAXIAL DIGITAL AUDIO OUT jack of the unit. • Connect the COAXIAL DIGITAL AUDIO OUT jack of the unit to the "COAXIAL" input of a Receiver or Processor. • Refer to the owner's manual of...
...by connecting an amplifier equipped with an MPEG2 audio decoder or MPEG2 audio processor. Amplifier equipped with an MPEG2 audio decoder To COAXIAL type digital audio input To COAXIAL DIGITAL AUDIO OUT 75 Ω coaxial cable (not supplied) • Use DVD video discs encoded via the Dolby... system. This input on your A/V Receiver is reserved for Laserdisc use only and is incompatible with the COAXIAL DIGITAL AUDIO OUT jack of the unit. • Connect the COAXIAL DIGITAL AUDIO OUT jack of the unit to the "COAXIAL" input of a Receiver or Processor. • Refer to the owner's manual of...

User Manual
Page 18
... that are compatible with them in DISC mode $ . • Do not connect or disconnect the TV's power cord while any memory card reader/writer or digital camera that accepts USB Mass Storage Class. This restriction applies no matter what the operating mode of the TV unless the TV is connected to...
... that are compatible with them in DISC mode $ . • Do not connect or disconnect the TV's power cord while any memory card reader/writer or digital camera that accepts USB Mass Storage Class. This restriction applies no matter what the operating mode of the TV unless the TV is connected to...
User Manual
Page 19
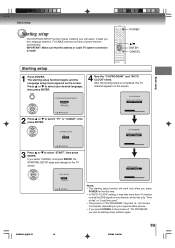
... Language selection, TV/CABLE selection and auto channel memory automatically. POWER / ENTER CANCEL Basic setup Starting setup 1 Press POWER. CHANNEL PLAN TV CABLE CH PROGRAM DIGITAL CH SEARCH STOP : CANCEL 3 Press or to select "TV" or "CABLE", then press ENTER. Press or to the TV screen. The starting setup function again...
... Language selection, TV/CABLE selection and auto channel memory automatically. POWER / ENTER CANCEL Basic setup Starting setup 1 Press POWER. CHANNEL PLAN TV CABLE CH PROGRAM DIGITAL CH SEARCH STOP : CANCEL 3 Press or to select "TV" or "CABLE", then press ENTER. Press or to the TV screen. The starting setup function again...

User Manual
Page 23
... option. LANGUAGE / IDIOMA / LANGUE ENGLISH E S PA Ñ O L FRANCAIS / / ENTER / MENU 4 Press MENU repeatedly until the menu screen is available. When the TV receives a digital signal, press once, the digital information will appear. Channel number Station name Remaining time Program name Content rating 51-3 CITYHD Moon Star Sun Jan 01 12:00 PM...
... option. LANGUAGE / IDIOMA / LANGUE ENGLISH E S PA Ñ O L FRANCAIS / / ENTER / MENU 4 Press MENU repeatedly until the menu screen is available. When the TV receives a digital signal, press once, the digital information will appear. Channel number Station name Remaining time Program name Content rating 51-3 CITYHD Moon Star Sun Jan 01 12:00 PM...

User Manual
Page 24
...+0 # To change to select channel 015-001, press 0, 1, 5, , 0, 0, 1. VOLUME 32 3 Set the TV/CABLE selection to a specific digital channel: Press the first 3 digits, then press , followed by green bars. VHF/UHF channels CABLE - This is not a malfunction. • If a channel with no broadcast is selected, the... sound will automatically be indicated on the screen by the remaining 3 digits. TV - SOURCE SELECTION 0. When you turn on the unit, press POWER. The volume level will be muted. • If a ...
...+0 # To change to select channel 015-001, press 0, 1, 5, , 0, 0, 1. VOLUME 32 3 Set the TV/CABLE selection to a specific digital channel: Press the first 3 digits, then press , followed by green bars. VHF/UHF channels CABLE - This is not a malfunction. • If a channel with no broadcast is selected, the... sound will automatically be indicated on the screen by the remaining 3 digits. TV - SOURCE SELECTION 0. When you turn on the unit, press POWER. The volume level will be muted. • If a ...

User Manual
Page 27
...ENTER. SERIF, PROP W. Press or to adjust, then press or . DIGITAL SETUP ADD / ERASE CLOSED CAPTION CC ADVANCED AUDIO LANGUAGE DIGITAL OUTPUT PCM SIGNAL METER MENU 4 Press / / / to select "CLOSED CAPTION", . V-CHIP DIGITAL SETUP / / / MENU 3 Press or then press to select the desired...T4 CS 5 C4 OFF ENTER MENU 5 Press MENU repeatedly until the menu screen is cleared. 1 Follow the left steps 1-2. 2 Press or press . V-CHIP DIGITAL SETUP / / / / MENU 2 Press or to select option. SERIF, MONO W/O SERIF, PROP W/O SERIF, CASUAL, CURSIVE, SMALL CAPITALS TEXT EDGE: AUTO,...
...ENTER. SERIF, PROP W. Press or to adjust, then press or . DIGITAL SETUP ADD / ERASE CLOSED CAPTION CC ADVANCED AUDIO LANGUAGE DIGITAL OUTPUT PCM SIGNAL METER MENU 4 Press / / / to select "CLOSED CAPTION", . V-CHIP DIGITAL SETUP / / / MENU 3 Press or then press to select the desired...T4 CS 5 C4 OFF ENTER MENU 5 Press MENU repeatedly until the menu screen is cleared. 1 Follow the left steps 1-2. 2 Press or press . V-CHIP DIGITAL SETUP / / / / MENU 2 Press or to select option. SERIF, MONO W/O SERIF, PROP W/O SERIF, CASUAL, CURSIVE, SMALL CAPITALS TEXT EDGE: AUTO,...

User Manual
Page 28
...channels CABLE - LANGUAGE / IDIOMA / LANGUE CLOCK SET AUTO CLOCK ON STANDARD TIME / / / / MENU 2 Press or to select "TV" or "CABLE". CH PROGRAM DIGITAL CH SEARCH STOP : MENU Note: You cannot select "TV/CABLE" and "CH PROGRAM" features if you set the channel to "VIDEO1", "VIDEO2" or "ColorStream...". (Digital tuning) 4 When channel programming is cleared. TV operation To memorize channels This unit is equipped with an antenna, set the TV/CABLE selection to ...
...channels CABLE - LANGUAGE / IDIOMA / LANGUE CLOCK SET AUTO CLOCK ON STANDARD TIME / / / / MENU 2 Press or to select "TV" or "CABLE". CH PROGRAM DIGITAL CH SEARCH STOP : MENU Note: You cannot select "TV/CABLE" and "CH PROGRAM" features if you set the channel to "VIDEO1", "VIDEO2" or "ColorStream...". (Digital tuning) 4 When channel programming is cleared. TV operation To memorize channels This unit is equipped with an antenna, set the TV/CABLE selection to ...

User Manual
Page 29
... / MENU 3 Select the desired channel to be memorized or deleted using or . V-CHIP DIGITAL SETUP 2 Press or to select "ADD/ERASE", then press . Then select "ADDING CHANNEL" in the digital mode, then press or to select option. Then press or to select either ADD or ERASE.... manually. Then press / to select either ADD or ERASE. to select "ADD/ERASE", then DIGITAL SETUP ADD / ERASE CLOSED CAPTION CC ADVANCED AUDIO LANGUAGE DIGITAL OUTPUT PCM SIGNAL METER MENU 4 Press or to select "DIGITAL SETUP", then press . ADD / ERASE SAP OFF CLOSED CAPTION V-CHIP / / / / MENU...
... / MENU 3 Select the desired channel to be memorized or deleted using or . V-CHIP DIGITAL SETUP 2 Press or to select "ADD/ERASE", then press . Then select "ADDING CHANNEL" in the digital mode, then press or to select option. Then press or to select either ADD or ERASE.... manually. Then press / to select either ADD or ERASE. to select "ADD/ERASE", then DIGITAL SETUP ADD / ERASE CLOSED CAPTION CC ADVANCED AUDIO LANGUAGE DIGITAL OUTPUT PCM SIGNAL METER MENU 4 Press or to select "DIGITAL SETUP", then press . ADD / ERASE SAP OFF CLOSED CAPTION V-CHIP / / / / MENU...

User Manual
Page 30
... the number. 4 Enter the same password again using Number buttons (0-9) for safety, then press ENTER. V-CHIP DIGITAL SETUP (Digital mode) ADD / ERASE SAP OFF CLOSED CAPTION V-CHIP (Analog mode) V-CHIP DIGITAL SETUP (Digital mode) 3 Enter the password (4 digits) using Number buttons (0-9), then press ENTER. Now the password was registered and V-Chip setting menu will appear...
... the number. 4 Enter the same password again using Number buttons (0-9) for safety, then press ENTER. V-CHIP DIGITAL SETUP (Digital mode) ADD / ERASE SAP OFF CLOSED CAPTION V-CHIP (Analog mode) V-CHIP DIGITAL SETUP (Digital mode) 3 Enter the password (4 digits) using Number buttons (0-9), then press ENTER. Now the password was registered and V-Chip setting menu will appear...

User Manual
Page 32
... CH 51-001 CANCEL CANCEL / / / MENU 4 Press . SAT CANCEL OFF TIMER 12:00AM CANCEL / / / / ENTER / MENU ON / OFF TIMER ON TIMER 7:00AM DIGITAL MON - Notes: • The unit will be highlighted. ENTER /// MENU To set the OFF TIMER, press then follow above steps 1~5, then press or to correct... TIMER" will automatically turn off . • To cancel the ON TIMER, follow the steps 4~6 on page !! . • If you want to correct the digits while setting, press or until the item you to have the unit automatically turn on timer This feature allows you want to correct, then press...
... CH 51-001 CANCEL CANCEL / / / MENU 4 Press . SAT CANCEL OFF TIMER 12:00AM CANCEL / / / / ENTER / MENU ON / OFF TIMER ON TIMER 7:00AM DIGITAL MON - Notes: • The unit will be highlighted. ENTER /// MENU To set the OFF TIMER, press then follow above steps 1~5, then press or to correct... TIMER" will automatically turn off . • To cancel the ON TIMER, follow the steps 4~6 on page !! . • If you want to correct the digits while setting, press or until the item you to have the unit automatically turn on timer This feature allows you want to correct, then press...

User Manual
Page 33
...OFF TIMER 11:30AM CH 51-001 CANCEL CANCEL / / / / ENTER / MENU 6 Press or to select "OFF TIMER", then ON / OFF TIMER ON TIMER 12:00AM DIGITAL SUN - to select "SET". SAT OFF TIMER 11:30AM CH 51-001 CANCEL SET / / / / ENTER / MENU 7 Press MENU repeatedly until the menu screen is cleared...above steps 1~5, press or to select option. You can also select ON/OFF TIMER by pressing PROGRAM twice. ON / OFF TIMER ON TIMER 12:00AM DIGITAL SUN - to have the unit turn off at the same time everyday. /// MENU PROGRAM To set the off timer EXAMPLE: Turning off automatically at 11...
...OFF TIMER 11:30AM CH 51-001 CANCEL CANCEL / / / / ENTER / MENU 6 Press or to select "OFF TIMER", then ON / OFF TIMER ON TIMER 12:00AM DIGITAL SUN - to select "SET". SAT OFF TIMER 11:30AM CH 51-001 CANCEL SET / / / / ENTER / MENU 7 Press MENU repeatedly until the menu screen is cleared...above steps 1~5, press or to select option. You can also select ON/OFF TIMER by pressing PROGRAM twice. ON / OFF TIMER ON TIMER 12:00AM DIGITAL SUN - to have the unit turn off at the same time everyday. /// MENU PROGRAM To set the off timer EXAMPLE: Turning off automatically at 11...

User Manual
Page 36
...p30-39 36 2/22/06, 1:05 PM Available picture sizes for 16:9 format programs) • If receiving a 4:3 format (analog or digital) program, the ZOOM PIC SIZE is not available. • If receiving a 4:3 format analog program, selecting 16:9 PIC SIZE will typically ... the program you . proportion. The way the image displays in its original formatted proportion. proportion. • If receiving a 16:9 format (digital) program, selecting 4:3 PIC SIZE will typically display the image stretched taller (squeezed.) ZOOM picture size (for the various input sources : available ...
...p30-39 36 2/22/06, 1:05 PM Available picture sizes for 16:9 format programs) • If receiving a 4:3 format (analog or digital) program, the ZOOM PIC SIZE is not available. • If receiving a 4:3 format analog program, selecting 16:9 PIC SIZE will typically ... the program you . proportion. The way the image displays in its original formatted proportion. proportion. • If receiving a 16:9 format (digital) program, selecting 4:3 PIC SIZE will typically display the image stretched taller (squeezed.) ZOOM picture size (for the various input sources : available ...

User Manual
Page 39
.../ / / MENU 3 Press or then press to select "DIGITAL SETUP", then press . 2 Press or then press DIGITAL. V-CHIP DIGITAL SETUP / / / / MENU 2 Press or to select "AUDIO LANGUAGE", . NO INFO. 7. ENGLISH2 2. SIGNAL METER CHANNEL (DIGITAL) 62-001 WEAK NORMAL GOOD ENTER MENU 3 Press MENU repeatedly ... minutes, SIGNAL METER screen will return to normal TV-operation automatically. • When you connect a Dolby Digital decoder or other digital audio system to the coaxial digital audio output on the TV. 1 Follow the left steps 1-2. 2 Press press or to select "SIGNAL METER...
.../ / / MENU 3 Press or then press to select "DIGITAL SETUP", then press . 2 Press or then press DIGITAL. V-CHIP DIGITAL SETUP / / / / MENU 2 Press or to select "AUDIO LANGUAGE", . NO INFO. 7. ENGLISH2 2. SIGNAL METER CHANNEL (DIGITAL) 62-001 WEAK NORMAL GOOD ENTER MENU 3 Press MENU repeatedly ... minutes, SIGNAL METER screen will return to normal TV-operation automatically. • When you connect a Dolby Digital decoder or other digital audio system to the coaxial digital audio output on the TV. 1 Follow the left steps 1-2. 2 Press press or to select "SIGNAL METER...


