User Manual
Page 4
... letterbox format media viewed on a 4:3 aspect ratio display (with gray or black bars on the left or right of the TV, or if sunlight or room lights reflect on a widescreen/16:9 aspect ratio display (with gray or black bars at the top and bottom of the screen); Never leave the TV on the lenses. Opening and removing the covers may make occasional snapping or popping sounds...
... letterbox format media viewed on a 4:3 aspect ratio display (with gray or black bars on the left or right of the TV, or if sunlight or room lights reflect on a widescreen/16:9 aspect ratio display (with gray or black bars at the top and bottom of the screen); Never leave the TV on the lenses. Opening and removing the covers may make occasional snapping or popping sounds...

User Manual
Page 5
.... TO ENSURE PROPER USE OF THIS PRODUCT, PLEASE READ THIS OWNER'S MANUAL CAREFULLY AND RETAIN FOR FUTURE REFERENCE. Staring directly at the beam through the DVD disc tray or the ventilation openings. It is plugged in for the first time, wait for operation on a circuit different from the AC outlet and plug it back in a particular installation. Introduction SAFETY PRECAUTION/ Power source WARNING...
.... TO ENSURE PROPER USE OF THIS PRODUCT, PLEASE READ THIS OWNER'S MANUAL CAREFULLY AND RETAIN FOR FUTURE REFERENCE. Staring directly at the beam through the DVD disc tray or the ventilation openings. It is plugged in for the first time, wait for operation on a circuit different from the AC outlet and plug it back in a particular installation. Introduction SAFETY PRECAUTION/ Power source WARNING...

User Manual
Page 7
... playback (DVD) Playing a disc 45 Advanced playback (DVD) Zooming 48 Locating desired scene 48 Repeat playback 49 A-B Repeat playback 49 Program playback 50 Random playback 50 Changing angles 51 Title selection 51 DVD menu 51 Changing soundtrack language 52 Subtitles 52 Disc status 53 To turn off the PBC 53 MP3/WMA/JPEG/DivX® and Audio CD operation 54 Function setup (DVD) Customizing the function settings 60 Temporary disabling of rating level by DVD disc 65 Others Language code list 66 Reception disturbances 67 Troubleshooting 68 Specifications...
... playback (DVD) Playing a disc 45 Advanced playback (DVD) Zooming 48 Locating desired scene 48 Repeat playback 49 A-B Repeat playback 49 Program playback 50 Random playback 50 Changing angles 51 Title selection 51 DVD menu 51 Changing soundtrack language 52 Subtitles 52 Disc status 53 To turn off the PBC 53 MP3/WMA/JPEG/DivX® and Audio CD operation 54 Function setup (DVD) Customizing the function settings 60 Temporary disabling of rating level by DVD disc 65 Others Language code list 66 Reception disturbances 67 Troubleshooting 68 Specifications...

User Manual
Page 8
... Video CDs This DVD supports Video CDs equipped with the PBC (Version 2.0) function. (PBC is protected by using the menu displayed on types of discs. • Video CD not equipped with PBC function (Version 1.1) Sound and movie can enjoy playback of interactive software with search function by method claims of Playback Control.) You can enjoy two playback variations depending on the TV screen (Menu Playback). Notes on the disc cause picture and sound deterioration...
... Video CDs This DVD supports Video CDs equipped with the PBC (Version 2.0) function. (PBC is protected by using the menu displayed on types of discs. • Video CD not equipped with PBC function (Version 1.1) Sound and movie can enjoy playback of interactive software with search function by method claims of Playback Control.) You can enjoy two playback variations depending on the TV screen (Menu Playback). Notes on the disc cause picture and sound deterioration...
User Manual
Page 9
... manufactured using the highest standards of DVD-RAM, DVD-ROM, Photo CD, etc., or non standardized discs even if they may appear on a Toshiba DVD player, please feel free to call our Contact listed in a manner that the operation is not permitted by DRM (digital rights management) is designed to Obtain Warranty Service" (see back cover page). Refer to you happen to operate with USB connectivity...
... manufactured using the highest standards of DVD-RAM, DVD-ROM, Photo CD, etc., or non standardized discs even if they may appear on a Toshiba DVD player, please feel free to call our Contact listed in a manner that the operation is not permitted by DRM (digital rights management) is designed to Obtain Warranty Service" (see back cover page). Refer to you happen to operate with USB connectivity...
User Manual
Page 11
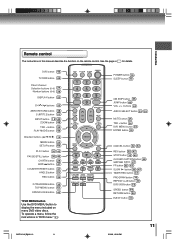
..."% TIMER REC button " PROGRAM button ! REPEAT A-B button "' DVD/USB button ## SPEED button !' ZOOM button "& TRK - DVD button "# TV/VCR button Direct channel Selection buttons (0-9) " Number buttons (0-9) & DISPLAY button ! RETURN button $ EJECT button !" 2/3/06, 12:08 PM 11 CH / buttons # ZERO RETURN button !& SUBTITLE button # INPUT button # "! D.TRACKING button !$ TOP MENU button # OPEN/CLOSE button "# *DVD MENU button Use the DVD MENU button to display the menu included on the remote control. buttons " AUDIO SELECT button !! # MUTE button # TRK + button !$ DVD MENU...
..."% TIMER REC button " PROGRAM button ! REPEAT A-B button "' DVD/USB button ## SPEED button !' ZOOM button "& TRK - DVD button "# TV/VCR button Direct channel Selection buttons (0-9) " Number buttons (0-9) & DISPLAY button ! RETURN button $ EJECT button !" 2/3/06, 12:08 PM 11 CH / buttons # ZERO RETURN button !& SUBTITLE button # INPUT button # "! D.TRACKING button !$ TOP MENU button # OPEN/CLOSE button "# *DVD MENU button Use the DVD MENU button to display the menu included on the remote control. buttons " AUDIO SELECT button !! # MUTE button # TRK + button !$ DVD MENU...

User Manual
Page 14
... service which is scrambled. Follow the connections shown below . Some cable companies offer "premium pay channels" in the "A" position, tune your unit. Descrambling these signals for normal viewing requires the use of a converter/descrambler box, connect the incoming 75 ohm coaxial cable to the output channel of the converter/descrambler box (usually channel 3 or 4) and use of a descrambler device which requires the use the converter/descrambler box to select channels. Set...
... service which is scrambled. Follow the connections shown below . Some cable companies offer "premium pay channels" in the "A" position, tune your unit. Descrambling these signals for normal viewing requires the use of a converter/descrambler box, connect the incoming 75 ohm coaxial cable to the output channel of the converter/descrambler box (usually channel 3 or 4) and use of a descrambler device which requires the use the converter/descrambler box to select channels. Set...

User Manual
Page 16
... left front speakers, a center speaker, and one or two rear speakers. The output sound from Dolby Laboratories. Amplifier equipped with a Dolby Digital decoder VHF/UHF OUT PUT VIDEO DIGITAL AUDIO COAXIAL L AUDIO R LINE 1 IN VIDEO L(MONO) AUDIO R To COAXIAL type digital audio input To COAXIAL DIGITAL AUDIO OUT 75 Ω coaxial cable (not supplied) • Use DVD video discs encoded via the DTS recording system. Connections Connecting to optional equipment (Continued) You can enjoy high quality...
... left front speakers, a center speaker, and one or two rear speakers. The output sound from Dolby Laboratories. Amplifier equipped with a Dolby Digital decoder VHF/UHF OUT PUT VIDEO DIGITAL AUDIO COAXIAL L AUDIO R LINE 1 IN VIDEO L(MONO) AUDIO R To COAXIAL type digital audio input To COAXIAL DIGITAL AUDIO OUT 75 Ω coaxial cable (not supplied) • Use DVD video discs encoded via the DTS recording system. Connections Connecting to optional equipment (Continued) You can enjoy high quality...
User Manual
Page 20
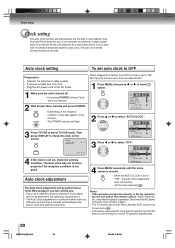
... to select "AUTO CLOCK". Auto clock adjustment The Auto clock adjustment will light. 3 Press TV/VCR to select TV/VCR mode. Basic setup Clock setting The auto clock function will automatically set the built-in clock (Month, Day, Year and Time) when the unit is connected to an antenna or cable system and it again. • The TV section has its own menu and also DVD section has its own menu $ . • If no buttons are pressed for auto clock, the auto clock needs...
... to select "AUTO CLOCK". Auto clock adjustment The Auto clock adjustment will light. 3 Press TV/VCR to select TV/VCR mode. Basic setup Clock setting The auto clock function will automatically set the built-in clock (Month, Day, Year and Time) when the unit is connected to an antenna or cable system and it again. • The TV section has its own menu and also DVD section has its own menu $ . • If no buttons are pressed for auto clock, the auto clock needs...
User Manual
Page 35
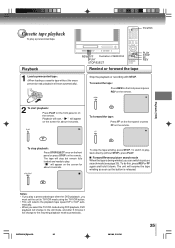
... remote. Forward/Reverse picture search mode When the tape is released. Cassette tape playback To play a prerecorded tape after the DVD playback, you select the TV/VCR mode during DVD playback, DVD playback will change to the still mode, and after 5 minutes it down. Playback will start playback: Press PLAY on the front panel or on the screen for about 4 seconds. matically. • When you must set the unit to TV/VCR mode using the TV/VCR button...
... remote. Forward/Reverse picture search mode When the tape is released. Cassette tape playback To play a prerecorded tape after the DVD playback, you select the TV/VCR mode during DVD playback, DVD playback will change to the still mode, and after 5 minutes it down. Playback will start playback: Press PLAY on the front panel or on the screen for about 4 seconds. matically. • When you must set the unit to TV/VCR mode using the TV/VCR button...

User Manual
Page 39
... function will blink on the front panel will automatically turn off the VCR. • The unit channel cannot be changed during OTR and timer recording). The unauthorized recording, use, distribution, or revision of the United States and other materials, is switched off during recording, the TV and the DVD sections go off . Recording (VCR) Recording a TV program Recording and viewing the same TV program. Press PAUSE/STILL or REC to select...
... function will blink on the front panel will automatically turn off the VCR. • The unit channel cannot be changed during OTR and timer recording). The unauthorized recording, use, distribution, or revision of the United States and other materials, is switched off during recording, the TV and the DVD sections go off . Recording (VCR) Recording a TV program Recording and viewing the same TV program. Press PAUSE/STILL or REC to select...

User Manual
Page 42
.... The menu screen is Friday. Program 1 8 : 00 9 : 00 10 : 00 11 : 00 Program 2 Program 3 Recording Control Settings Prog.1 Deleted Parts Non Recorded Portion Parts Prog.2 Prog.3 Notes: • The daily/weekly recording can be made continuously until the desired setting appears. At picture 4 press or repeatedly until the recording is canceled or the tape reaches the end. • During timer recording the automatic rewinding mechanism does not function. •...
.... The menu screen is Friday. Program 1 8 : 00 9 : 00 10 : 00 11 : 00 Program 2 Program 3 Recording Control Settings Prog.1 Deleted Parts Non Recorded Portion Parts Prog.2 Prog.3 Notes: • The daily/weekly recording can be made continuously until the desired setting appears. At picture 4 press or repeatedly until the recording is canceled or the tape reaches the end. • During timer recording the automatic rewinding mechanism does not function. •...

User Manual
Page 43
... SP mode on the recording VCR for best results. 2 Press INPUT once or twice to select AUDIO/ VIDEO input position. Playback VCR To VIDEO OUT Audio/Video cable (not supplied) To AUDIO (R) OUT To AUDIO (L) OUT Recording VCR LINE1: on the rear panel LINE2: on the playback VCR or camcorder. 5 Press STOP when you finish after duplicating. Playback Camcorder Recording VCR 4 Press PLAY on the front panel 3 Press REC. The unauthorized recording, use, distribution, or revision of television programs, videotapes, DVDs and...
... SP mode on the recording VCR for best results. 2 Press INPUT once or twice to select AUDIO/ VIDEO input position. Playback VCR To VIDEO OUT Audio/Video cable (not supplied) To AUDIO (R) OUT To AUDIO (L) OUT Recording VCR LINE1: on the rear panel LINE2: on the playback VCR or camcorder. 5 Press STOP when you finish after duplicating. Playback Camcorder Recording VCR 4 Press PLAY on the front panel 3 Press REC. The unauthorized recording, use, distribution, or revision of television programs, videotapes, DVDs and...
User Manual
Page 48
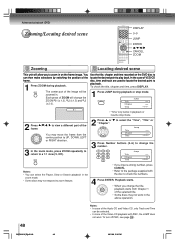
... from Chapter 1 of the Video-CD playback with the disc to a 1:1 view ( Off). 2 Press or "Chapter". Each press of ZOOM will change the ZOOM 1 (x 1.3), 2 (x 1.5) and 3 (x 2.0). 1 Use the title, chapter and time recorded on the frame image. Jump Title Chapter Time • "Time" only works in playback or resume stop mode. Playback starts. • When you change the number. Advanced playback (DVD) Zooming/Locating desired scene DISPLAY 0-9 JUMP ENTER /// CANCEL ZOOM...
... from Chapter 1 of the Video-CD playback with the disc to a 1:1 view ( Off). 2 Press or "Chapter". Each press of ZOOM will change the ZOOM 1 (x 1.3), 2 (x 1.5) and 3 (x 2.0). 1 Use the title, chapter and time recorded on the frame image. Jump Title Chapter Time • "Time" only works in playback or resume stop mode. Playback starts. • When you change the number. Advanced playback (DVD) Zooming/Locating desired scene DISPLAY 0-9 JUMP ENTER /// CANCEL ZOOM...

User Manual
Page 54
... making too many different types of recording on MP3/WMA/JPEG/DivX® playback • MP3/WMA/JPEG/DivX® CD/USB Mass Storage are replaced in this unit to read 600 files per disc. and are used under score). • Other characters than one directory has more than those above are standardized by ISO9660, its structure. • Music recorded by "Joliet Recording Specification" can read...
... making too many different types of recording on MP3/WMA/JPEG/DivX® playback • MP3/WMA/JPEG/DivX® CD/USB Mass Storage are replaced in this unit to read 600 files per disc. and are used under score). • Other characters than one directory has more than those above are standardized by ISO9660, its structure. • Music recorded by "Joliet Recording Specification" can read...
User Manual
Page 59
... add into Program list. 4 Press B/A or C/D to remove, then press ENTER. To remove file from program list. Folder-1 Folder-2 MP3-1 MP3-2 Repeat :Off Mode :Off Edit Mode MP3 3 When "Edit Mode" is removed from program list In the Edit Mode, switch to playback in programmed order that you . 3 Press B/A or C/D to select "Add To Program". Program View shows only the programed files that were added by you have added in Step 2. Marked file is black color, you...
... add into Program list. 4 Press B/A or C/D to remove, then press ENTER. To remove file from program list. Folder-1 Folder-2 MP3-1 MP3-2 Repeat :Off Mode :Off Edit Mode MP3 3 When "Edit Mode" is removed from program list In the Edit Mode, switch to playback in programmed order that you . 3 Press B/A or C/D to select "Add To Program". Program View shows only the programed files that were added by you have added in Step 2. Marked file is black color, you...

User Manual
Page 63
... Screen Saver : On DRC DRC (Dynamic Range Control) enables you to control the dynamic range so as explosion or similar is connected to achieve a suitable sound for playback of film content pictures. Suitable for your equipment. Notes: • This function works only during playback of Dolby Digital recorded discs. • The level of Dynamic Range Reduction may be most effective under this position normally. The progressive output feature...
... Screen Saver : On DRC DRC (Dynamic Range Control) enables you to control the dynamic range so as explosion or similar is connected to achieve a suitable sound for playback of film content pictures. Suitable for your equipment. Notes: • This function works only during playback of Dolby Digital recorded discs. • The level of Dynamic Range Reduction may be most effective under this position normally. The progressive output feature...
User Manual
Page 69
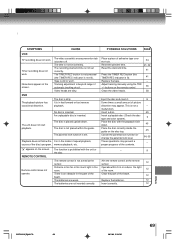
... the remote control at the sensor. " " appears on the remote control. 36 Clean the video heads. 38 Eject the disc and clean it. Place the disc with the unit or the disc. It is in fast forward or fast reverse playback. These operations may appear. REMOTE CONTROL The function is inserted. Some times a small amount of picture distortion may prevent a proper progress of the disc's program. Operate within the guide. buttons on the screen. This is...
... the remote control at the sensor. " " appears on the remote control. 36 Clean the video heads. 38 Eject the disc and clean it. Place the disc with the unit or the disc. It is in fast forward or fast reverse playback. These operations may appear. REMOTE CONTROL The function is inserted. Some times a small amount of picture distortion may prevent a proper progress of the disc's program. Operate within the guide. buttons on the screen. This is...
User Manual
Page 70
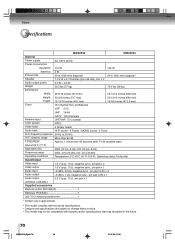
...˚F), Operating status: Horizontal Video input Video output Audio input Audio output Audio output 1.0 V (p-p), 75 Ω, negative sync., pin jack x 2 1.0 V (p-p), 75 Ω, negative sync., pin jack x 1 -8 dBm, 50 kΩ, negative sync., pin jack (L/R) x 2 -8 dBm, 1 kΩ, negative sync., pin jack (L/R) x 1 0.5 V (p-p), 75 Ω, pin jack x 1 (DIGITAL COAXIAL) Supplied accessories Remote control (WC-SBU2 1 Batteries (R03/AAA 2 300-75 Ω matching transformer 1 * Screen size is approximate. • This model complies...
...˚F), Operating status: Horizontal Video input Video output Audio input Audio output Audio output 1.0 V (p-p), 75 Ω, negative sync., pin jack x 2 1.0 V (p-p), 75 Ω, negative sync., pin jack x 1 -8 dBm, 50 kΩ, negative sync., pin jack (L/R) x 2 -8 dBm, 1 kΩ, negative sync., pin jack (L/R) x 1 0.5 V (p-p), 75 Ω, pin jack x 1 (DIGITAL COAXIAL) Supplied accessories Remote control (WC-SBU2 1 Batteries (R03/AAA 2 300-75 Ω matching transformer 1 * Screen size is approximate. • This model complies...
User Manual
Page 72
... the operating instructions in this manual and reviewing the section entitled "Troubleshooting," you find that service is needed: (1) To find the nearest TACP Authorized Service Station, visit TACP's website at www.tacp.toshiba.com/service or contact TACP's Consumer Solution Center toll free at 1-800-631-3811. (2) You must pay for all transportation and insurance charges for set installation, setup, adjustment of customer controls, and installation or repair of...
... the operating instructions in this manual and reviewing the section entitled "Troubleshooting," you find that service is needed: (1) To find the nearest TACP Authorized Service Station, visit TACP's website at www.tacp.toshiba.com/service or contact TACP's Consumer Solution Center toll free at 1-800-631-3811. (2) You must pay for all transportation and insurance charges for set installation, setup, adjustment of customer controls, and installation or repair of...


