Toshiba Online Users Guide for Tecra M5
Page 27
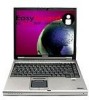
... Your computer's features and specifications ....53 Turning on the power 53 Using the Toshiba Dual Pointing Device 54 Using the TouchPad 55 Disabling or enabling the Dual Pointing Device.56 Adding memory (optional 57 Installing a memory module 57 Removing a memory module 62 Hard Drive Recovery Utilities 65 Creating Recovery CDs/DVDs 65 Hard Disk... devices 80 Connecting the display device 80 Directing the display output when you turn on the computer 82 Adjusting the quality of the external display......83 Display limitations 83 Turning off the computer 84
... Your computer's features and specifications ....53 Turning on the power 53 Using the Toshiba Dual Pointing Device 54 Using the TouchPad 55 Disabling or enabling the Dual Pointing Device.56 Adding memory (optional 57 Installing a memory module 57 Removing a memory module 62 Hard Drive Recovery Utilities 65 Creating Recovery CDs/DVDs 65 Hard Disk... devices 80 Connecting the display device 80 Directing the display output when you turn on the computer 82 Adjusting the quality of the external display......83 Display limitations 83 Turning off the computer 84
Toshiba Online Users Guide for Tecra M5
Page 31
... module from the Slim SelectBay 159 Inserting a module into the Slim SelectBay®...160 Chapter 5: Toshiba Utilities 161 TOSHIBA Assist 162 Connect 163 Secure 164 Protect & Fix 165 Optimize 165 TOSHIBA Application Installer 166 Setting passwords 167 Using an instant password 168 Using a supervisor or user password 168... keyboard or pointing device to assign a key 176 Viewing existing key assignments 178 Changing or removing existing key assignments 178 TOSHIBA Hotkey Utility 178 TOSHIBA SD™ Memory Card Format Utility .........179 TOSHIBA SD™ Memory Boot Utility 180
... module from the Slim SelectBay 159 Inserting a module into the Slim SelectBay®...160 Chapter 5: Toshiba Utilities 161 TOSHIBA Assist 162 Connect 163 Secure 164 Protect & Fix 165 Optimize 165 TOSHIBA Application Installer 166 Setting passwords 167 Using an instant password 168 Using a supervisor or user password 168... keyboard or pointing device to assign a key 176 Viewing existing key assignments 178 Changing or removing existing key assignments 178 TOSHIBA Hotkey Utility 178 TOSHIBA SD™ Memory Card Format Utility .........179 TOSHIBA SD™ Memory Boot Utility 180
Toshiba Online Users Guide for Tecra M5
Page 33
... can help you 228 Resolving a hardware conflict 229 A plan of action 229 Resolving hardware conflicts on your own .....230 Fixing a problem with Device Manager ...........231 Memory problems 233 Power and the batteries 234 Keyboard problems 236 Display problems 237 Disk drive problems 239 CD-RW/DVD-ROM or multi-function drive...
... can help you 228 Resolving a hardware conflict 229 A plan of action 229 Resolving hardware conflicts on your own .....230 Fixing a problem with Device Manager ...........231 Memory problems 233 Power and the batteries 234 Keyboard problems 236 Display problems 237 Disk drive problems 239 CD-RW/DVD-ROM or multi-function drive...

Toshiba Online Users Guide for Tecra M5
Page 45
... air intake, preventing air from reaching the CPU. To prevent possible overheating of the computer. Do not use external power or to , a mouse, keyboard, printer, memory, and PC Cards.
... air intake, preventing air from reaching the CPU. To prevent possible overheating of the computer. Do not use external power or to , a mouse, keyboard, printer, memory, and PC Cards.

Toshiba Online Users Guide for Tecra M5
Page 47
... your computer for the first time, you click the final screen, your computer restarts automatically. If you opt not to register at www.register.toshiba.com. Adding external devices NOTE Before adding external devices or memory, Toshiba recommends setting up your software" on page 77) Once you may want to: ❖ Add more...
... your computer for the first time, you click the final screen, your computer restarts automatically. If you opt not to register at www.register.toshiba.com. Adding external devices NOTE Before adding external devices or memory, Toshiba recommends setting up your software" on page 77) Once you may want to: ❖ Add more...
Toshiba Online Users Guide for Tecra M5
Page 57
...will become hot. For more information on the base of today's popular applications. NOTE Before adding external devices or memory, Toshiba recommends setting up your software" on page 46. To avoid damaging the computer's screws, use complex software or ... to increase the computer's memory if you replace it. Getting Started Adding memory (optional) 57 Adding memory (optional) HINT: To purchase additional memory modules, see the accessories information packaged with your computer, or visit accessories.toshiba.com. Your computer comes with enough memory to run most of your...
...will become hot. For more information on the base of today's popular applications. NOTE Before adding external devices or memory, Toshiba recommends setting up your software" on page 46. To avoid damaging the computer's screws, use complex software or ... to increase the computer's memory if you replace it. Getting Started Adding memory (optional) 57 Adding memory (optional) HINT: To purchase additional memory modules, see the accessories information packaged with your computer, or visit accessories.toshiba.com. Your computer comes with enough memory to run most of your...
Toshiba Online Users Guide for Tecra M5
Page 58
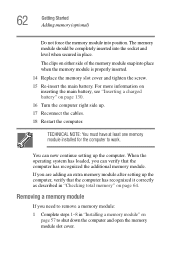
... Down window appears. 2 Click Turn Off or Shut down to locate the memory module slot cover. 58 Getting Started Adding memory (optional) Installing a memory module with the computer's power on , begin at step 1; If you install or remove a memory module, turn the computer upside down . The Turn off the computer using ... For information on removing the main battery, see "Removing the battery from the computer" on the system). You can install one or two memory modules. otherwise skip to the computer, including the AC adapter. 4 Remove the main battery. Before you install or remove...
... Down window appears. 2 Click Turn Off or Shut down to locate the memory module slot cover. 58 Getting Started Adding memory (optional) Installing a memory module with the computer's power on , begin at step 1; If you install or remove a memory module, turn the computer upside down . The Turn off the computer using ... For information on removing the main battery, see "Removing the battery from the computer" on the system). You can install one or two memory modules. otherwise skip to the computer, including the AC adapter. 4 Remove the main battery. Before you install or remove...
Toshiba Online Users Guide for Tecra M5
Page 59
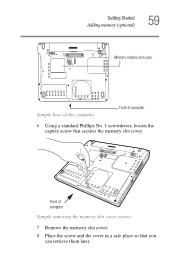
Front of computer 6 Using a standard Phillips No. 1 screwdriver, loosen the captive screw that you can retrieve them later. Getting Started Adding memory (optional) 59 Memory module slot cover Sample base of the computer Front of computer Sample removing the memory slot cover screws 7 Remove the memory slot cover. 8 Place the screw and the cover in a safe place so that secures the memory slot cover.
Front of computer 6 Using a standard Phillips No. 1 screwdriver, loosen the captive screw that you can retrieve them later. Getting Started Adding memory (optional) 59 Memory module slot cover Sample base of the computer Front of computer Sample removing the memory slot cover screws 7 Remove the memory slot cover. 8 Place the screw and the cover in a safe place so that secures the memory slot cover.
Toshiba Online Users Guide for Tecra M5
Page 60
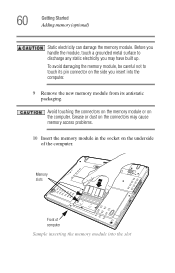
... Getting Started Adding memory (optional) Static electricity can damage the memory module. Avoid touching the connectors on the memory module or on the connectors may have built up. Before you insert into the slot Memory slots Front of the computer. To avoid damaging the memory module, be careful... not to discharge any static electricity you may cause memory access problems. 10 Insert the memory module in the socket on the side you handle...
... Getting Started Adding memory (optional) Static electricity can damage the memory module. Avoid touching the connectors on the memory module or on the connectors may have built up. Before you insert into the slot Memory slots Front of the computer. To avoid damaging the memory module, be careful... not to discharge any static electricity you may cause memory access problems. 10 Insert the memory module in the socket on the side you handle...
Toshiba Online Users Guide for Tecra M5
Page 61
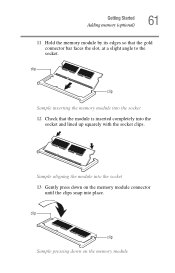
clip clip Sample pressing down on the memory module clip clip Sample inserting the memory module into the socket 12 Check that the gold connector bar faces the slot, at a slight angle to the socket. Sample aligning the module into the socket 13 Gently press down on the memory module connector until the clips snap into place. Getting Started Adding memory (optional) 61 11 Hold the memory module by its edges so that the module is inserted completely into the socket and lined up squarely with the socket clips.
clip clip Sample pressing down on the memory module clip clip Sample inserting the memory module into the socket 12 Check that the gold connector bar faces the slot, at a slight angle to the socket. Sample aligning the module into the socket 13 Gently press down on the memory module connector until the clips snap into place. Getting Started Adding memory (optional) 61 11 Hold the memory module by its edges so that the module is inserted completely into the socket and lined up squarely with the socket clips.
Toshiba Online Users Guide for Tecra M5
Page 62
...more information on inserting the main battery, see "Inserting a charged battery" on either side of the memory module snap into place when the memory module is properly inserted. 14 Replace the memory slot cover and tighten the screw. 15 Re-insert the main battery. You can verify that the computer... has recognized it correctly as described in "Checking total memory" on page 57 to shut down the computer and open the memory module slot cover. If you need to work. The memory module should be completely inserted into position. TECHNICAL NOTE: You must have at...
...more information on inserting the main battery, see "Inserting a charged battery" on either side of the memory module snap into place when the memory module is properly inserted. 14 Replace the memory slot cover and tighten the screw. 15 Re-insert the main battery. You can verify that the computer... has recognized it correctly as described in "Checking total memory" on page 57 to shut down the computer and open the memory module slot cover. If you need to work. The memory module should be completely inserted into position. TECHNICAL NOTE: You must have at...

Toshiba Online Users Guide for Tecra M5
Page 63
... pops up when you turn the power on again. 2 Pull the clips away from the memory module. Memory slots Front of the slot. Do not remove the memory module while the computer is in memory will not be lost. In either of the above cases, the Standby configuration will be saved. The ...perform the following: Press the power button and hold it down for at least ten seconds, then turn it out of computer Sample removing the memory module The following message appears when you turn on the power: Warning: Resume Failure Press Any Key To Continue If the computer hangs up slightly...
... pops up when you turn the power on again. 2 Pull the clips away from the memory module. Memory slots Front of the slot. Do not remove the memory module while the computer is in memory will not be lost. In either of the above cases, the Standby configuration will be saved. The ...perform the following: Press the power button and hold it down for at least ten seconds, then turn it out of computer Sample removing the memory module The following message appears when you turn on the power: Warning: Resume Failure Press Any Key To Continue If the computer hangs up slightly...
Toshiba Online Users Guide for Tecra M5
Page 64
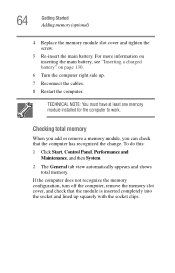
...the socket and lined up . 7 Reconnect the cables. 8 Restart the computer. If the computer does not recognize the memory configuration, turn off the computer, remove the memory slot cover, and check that the computer has recognized the change. To do this: 1 Click Start, Control Panel, ...Performance and Maintenance, and then System. 2 The General tab view automatically appears and shows total memory. For more information on inserting the main battery, see "Inserting a charged battery" on page 130. 6 Turn the computer right side up squarely...
...the socket and lined up . 7 Reconnect the cables. 8 Restart the computer. If the computer does not recognize the memory configuration, turn off the computer, remove the memory slot cover, and check that the computer has recognized the change. To do this: 1 Click Start, Control Panel, ...Performance and Maintenance, and then System. 2 The General tab view automatically appears and shows total memory. For more information on inserting the main battery, see "Inserting a charged battery" on page 130. 6 Turn the computer right side up squarely...

Toshiba Online Users Guide for Tecra M5
Page 85
... and consumes less main battery power than does turning off the computer. ❖ Since information is being retrieved from the hard disk rather than from memory, restarting from Hibernation takes a little more time and consumes more main battery power to start up than when restarting from Standby. ❖ When starting up...
... and consumes less main battery power than does turning off the computer. ❖ Since information is being retrieved from the hard disk rather than from memory, restarting from Hibernation takes a little more time and consumes more main battery power to start up than when restarting from Standby. ❖ When starting up...
Toshiba Online Users Guide for Tecra M5
Page 86
... power than restarting from turning off the computer or using Hibernation mode. ❖ When starting up again, the computer returns to the mode in system memory (RAM) so that, when you restart the computer, you can continue working from where you left it, including all open programs and files you power...
... power than restarting from turning off the computer or using Hibernation mode. ❖ When starting up again, the computer returns to the mode in system memory (RAM) so that, when you restart the computer, you can continue working from where you left it, including all open programs and files you power...

Toshiba Online Users Guide for Tecra M5
Page 95
... you can be configured to discs (or other removable storage media) on a regular basis. Label the backup copies clearly and store them in the computer's memory until you when the battery is running low. Computing tips ❖ Save your work if, for details. ❖ Back up your file to the hard...
... you can be configured to discs (or other removable storage media) on a regular basis. Label the backup copies clearly and store them in the computer's memory until you when the battery is running low. Computing tips ❖ Save your work if, for details. ❖ Back up your file to the hard...
Toshiba Online Users Guide for Tecra M5
Page 117
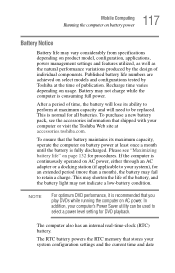
...depending on product model, configuration, applications, power management settings and features utilized, as well as the natural performance variations produced by Toshiba at least once a month until the battery is fully discharged. This is continuously operated on select models and configurations tested by the.... If the computer is normal for DVD playback. The RTC battery powers the RTC memory that the battery maintains its ability to your computer or visit the Toshiba Web site at maximum capacity and will lose its maximum capacity, operate the computer on battery ...
...depending on product model, configuration, applications, power management settings and features utilized, as well as the natural performance variations produced by Toshiba at least once a month until the battery is fully discharged. This is continuously operated on select models and configurations tested by the.... If the computer is normal for DVD playback. The RTC battery powers the RTC memory that the battery maintains its ability to your computer or visit the Toshiba Web site at maximum capacity and will lose its maximum capacity, operate the computer on battery ...
Toshiba Online Users Guide for Tecra M5
Page 120
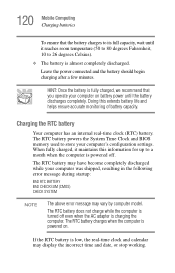
... completely discharged. Leave the power connected and the battery should begin charging after a few minutes. The RTC battery powers the System Time Clock and BIOS memory used to its full capacity, wait until the battery discharges completely. Charging the RTC battery Your computer has an internal real-time clock (RTC) battery...
... completely discharged. Leave the power connected and the battery should begin charging after a few minutes. The RTC battery powers the System Time Clock and BIOS memory used to its full capacity, wait until the battery discharges completely. Charging the RTC battery Your computer has an internal real-time clock (RTC) battery...
Toshiba Online Users Guide for Tecra M5
Page 156
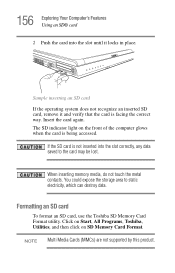
...accessed. NOTE Multi Media Cards (MMCs) are not supported by this product. The SD indicator light on SD Memory Card Format. Formatting an SD card To format an SD card, use the Toshiba SD Memory Card Format utility. You could expose the storage area to the card may be lost. If the SD... card is facing the correct way. When inserting memory media, do not touch the metal contacts. Sample inserting an SD...
...accessed. NOTE Multi Media Cards (MMCs) are not supported by this product. The SD indicator light on SD Memory Card Format. Formatting an SD card To format an SD card, use the Toshiba SD Memory Card Format utility. You could expose the storage area to the card may be lost. If the SD... card is facing the correct way. When inserting memory media, do not touch the metal contacts. Sample inserting an SD...
Toshiba Online Users Guide for Tecra M5
Page 158
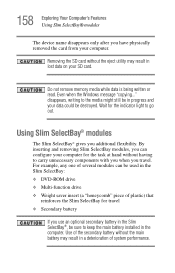
... SelectBay® modules The Slim SelectBay® gives you have physically removed the card from your SD card. Use of system performance. Do not remove memory media while data is being written or read. Wait for the indicator light to the media might still be in progress and your computer for...
... SelectBay® modules The Slim SelectBay® gives you have physically removed the card from your SD card. Use of system performance. Do not remove memory media while data is being written or read. Wait for the indicator light to the media might still be in progress and your computer for...


