
Tecta M2 User's Guide (PDF)
Page 5
... the telephone network, the telephone company will be required. Contact the state public utility commission, public service commission or corporation commission for repair or limited warranty information, please contact Toshiba Corporation, Toshiba America Information Systems, Inc. Telephone Company Procedures The goal of your right to maintain uninterrupted service. or an authorized representative of Toshiba, or the Toshiba Support Centre within...
... the telephone network, the telephone company will be required. Contact the state public utility commission, public service commission or corporation commission for repair or limited warranty information, please contact Toshiba Corporation, Toshiba America Information Systems, Inc. Telephone Company Procedures The goal of your right to maintain uninterrupted service. or an authorized representative of Toshiba, or the Toshiba Support Centre within...

Tecta M2 User's Guide (PDF)
Page 29
... computer 61 Adjusting the quality of the external display 62 Video limitations 62 Using a keyboard 63 Connecting a keyboard 63 Making your external keyboard emulate the Fn key 63 Using a mouse 64 Connecting a mouse 64 Connecting a local printer 64 Connecting a USB printer 65 Connecting a parallel printer 66 Connecting an optional external diskette drive 67 Connecting external speakers or headphones 68 Connecting an external microphone 68 Using an expansion device 69 Adding memory 70 Installing memory modules 70 Using Slim SelectBay® modules 80 Removing a module from the...
... computer 61 Adjusting the quality of the external display 62 Video limitations 62 Using a keyboard 63 Connecting a keyboard 63 Making your external keyboard emulate the Fn key 63 Using a mouse 64 Connecting a mouse 64 Connecting a local printer 64 Connecting a USB printer 65 Connecting a parallel printer 66 Connecting an optional external diskette drive 67 Connecting external speakers or headphones 68 Connecting an external microphone 68 Using an expansion device 69 Adding memory 70 Installing memory modules 70 Using Slim SelectBay® modules 80 Removing a module from the...

Tecta M2 User's Guide (PDF)
Page 60
... computer. Selecting video cables To connect a device to the S-video port, you 'll need to purchase an S-video cable. Connecting to the S-video port NOTE Video cables are not included with the device for the location of its S-video-in a dull or fuzzy picture, poor color, ghosting, video noise, or loss of the computer. 3 Turn on the external video device. Using a poor quality cable may result in port. 2 Connect the other video display device to the computer's S-video port, first refer...
... computer. Selecting video cables To connect a device to the S-video port, you 'll need to purchase an S-video cable. Connecting to the S-video port NOTE Video cables are not included with the device for the location of its S-video-in a dull or fuzzy picture, poor color, ghosting, video noise, or loss of the computer. 3 Turn on the external video device. Using a poor quality cable may result in port. 2 Connect the other video display device to the computer's S-video port, first refer...
Tecta M2 User's Guide (PDF)
Page 70
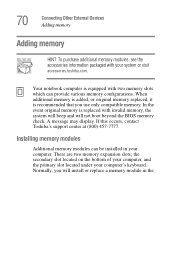
... use only compatible memory. Installing memory modules Additional memory modules can provide various memory configurations. If this occurs, contact Toshiba's support center at (800) 457-7777. Your notebook computer is recommended that you will not boot beyond the BIOS memory check. the secondary slot located on the bottom of your computer, and the primary slot located under your computer. A message may display. 70 Connecting Other External Devices Adding memory Adding memory HINT: To purchase additional memory modules...
... use only compatible memory. Installing memory modules Additional memory modules can provide various memory configurations. If this occurs, contact Toshiba's support center at (800) 457-7777. Your notebook computer is recommended that you will not boot beyond the BIOS memory check. the secondary slot located on the bottom of your computer, and the primary slot located under your computer. A message may display. 70 Connecting Other External Devices Adding memory Adding memory HINT: To purchase additional memory modules...

Tecta M2 User's Guide (PDF)
Page 72
Installing a memory module with the computer's power on may have connected. 4 Turn the computer upside down, remove the battery, and locate the memory module cover to the memory slot. 72 Connecting Other External Devices Adding memory 2 Unplug the computer. Memory module cover Locating the sample memory module cover 5 Using a standard Phillips no. 1 screwdriver, unscrew the screw that you may damage the computer, the module, or both. 3 Close the display panel and remove any cables you can retrieve them later. Place the screw...
Installing a memory module with the computer's power on may have connected. 4 Turn the computer upside down, remove the battery, and locate the memory module cover to the memory slot. 72 Connecting Other External Devices Adding memory 2 Unplug the computer. Memory module cover Locating the sample memory module cover 5 Using a standard Phillips no. 1 screwdriver, unscrew the screw that you may damage the computer, the module, or both. 3 Close the display panel and remove any cables you can retrieve them later. Place the screw...

Tecta M2 User's Guide (PDF)
Page 74
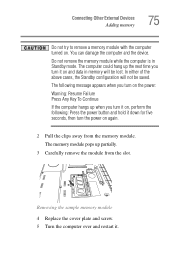
74 Connecting Other External Devices Adding memory Inserting the sample memory module into the secondary slot Avoid touching the connectors on the memory module or on the connectors may cause memory access problems. 10 Replace the cover slot and the screw. 11 Turn the computer over and restart it automatically recognizes the additional memory. When you need to remove a secondary memory module: 1 Complete steps 1-5 in "Installing a memory module in the secondary slot" to shut down the computer...
74 Connecting Other External Devices Adding memory Inserting the sample memory module into the secondary slot Avoid touching the connectors on the memory module or on the connectors may cause memory access problems. 10 Replace the cover slot and the screw. 11 Turn the computer over and restart it automatically recognizes the additional memory. When you need to remove a secondary memory module: 1 Complete steps 1-5 in "Installing a memory module in the secondary slot" to shut down the computer...
Tecta M2 User's Guide (PDF)
Page 75
... configuration will be saved. The computer could hang up partially. 3 Carefully remove the module from the memory module. Removing the sample memory module 4 Replace the cover plate and screw. 5 Turn the computer over and restart it on again. 2 Pull the clips away from the slot. You can damage the computer and the device. Connecting Other External Devices Adding memory 75 Do not try to remove a memory module with the computer turned...
... configuration will be saved. The computer could hang up partially. 3 Carefully remove the module from the memory module. Removing the sample memory module 4 Replace the cover plate and screw. 5 Turn the computer over and restart it on again. 2 Pull the clips away from the slot. You can damage the computer and the device. Connecting Other External Devices Adding memory 75 Do not try to remove a memory module with the computer turned...
Tecta M2 User's Guide (PDF)
Page 92
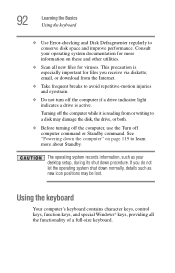
... command. Using the keyboard Your computer's keyboard contains character keys, control keys, function keys, and special Windows® keys, providing all new files for more information on page 119 to avoid repetitive-motion injuries and eyestrain. ❖ Do not turn off the computer if a drive indicator light indicates a drive is reading from the Internet. ❖ Take frequent breaks to learn more about Standby. See "Powering down procedure. Turning off the...
... command. Using the keyboard Your computer's keyboard contains character keys, control keys, function keys, and special Windows® keys, providing all new files for more information on page 119 to avoid repetitive-motion injuries and eyestrain. ❖ Do not turn off the computer if a drive indicator light indicates a drive is reading from the Internet. ❖ Take frequent breaks to learn more about Standby. See "Powering down procedure. Turning off the...
Tecta M2 User's Guide (PDF)
Page 93
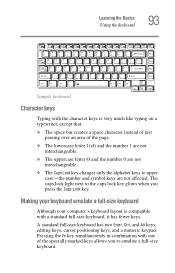
... Enter, Ctrl, and Alt keys, editing keys, cursor positioning keys, and a numeric keypad. Pressing the Fn key simultaneously in combination with a standard full-size keyboard, it has fewer keys. The caps lock light next to the caps lock key glows when you to upper case-the number and symbol keys are not affected. Learning the Basics Using the keyboard 93 Sample keyboard Character keys Typing with the character keys...
... Enter, Ctrl, and Alt keys, editing keys, cursor positioning keys, and a numeric keypad. Pressing the Fn key simultaneously in combination with a standard full-size keyboard, it has fewer keys. The caps lock light next to the caps lock key glows when you to upper case-the number and symbol keys are not affected. Learning the Basics Using the keyboard 93 Sample keyboard Character keys Typing with the character keys...
Tecta M2 User's Guide (PDF)
Page 116
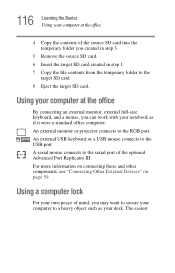
... card created in step 1. 7 Copy the file contents from the temporary folder to the target SD card. 8 Eject the target SD card. A serial mouse connects to the USB port. Using a computer lock For your own peace of the optional Advanced Port Replicator III. The easiest 116 Learning the Basics Using your computer at the office By connecting an external monitor, external full-size keyboard, and a mouse, you can work with your notebook...
... card created in step 1. 7 Copy the file contents from the temporary folder to the target SD card. 8 Eject the target SD card. A serial mouse connects to the USB port. Using a computer lock For your own peace of the optional Advanced Port Replicator III. The easiest 116 Learning the Basics Using your computer at the office By connecting an external monitor, external full-size keyboard, and a mouse, you can work with your notebook...

Tecta M2 User's Guide (PDF)
Page 134
...; Install a secondary battery module in the Control Panel. What to do when the battery alarm sounds The Windows operating system has additional power management options that can be configured to warn you of a low battery charge condition so you can be accessed through an icon in the computer's Slim SelectBay. ❖ Connect your needs. You Windows operating system offers two alarms before your system shuts down your computer and replace the...
...; Install a secondary battery module in the Control Panel. What to do when the battery alarm sounds The Windows operating system has additional power management options that can be configured to warn you of a low battery charge condition so you can be accessed through an icon in the computer's Slim SelectBay. ❖ Connect your needs. You Windows operating system offers two alarms before your system shuts down your computer and replace the...
Tecta M2 User's Guide (PDF)
Page 167
... to change the key assignment, click Direct... Accessing TOSHIBA HW Setup To access TOSHIBA HW Setup, press the TOSHIBA Console button above the left side of the keyboard. Double-click on the HW Setup icon to access the TOSHIBA HW Setup program. and continue as if you view general system settings and specify the display, boot priority, keyboard, USB, LAN, CPU, device configuration and parallel/printer options for communication ports, use the Windows Device Manager. NOTE If the supervisor password is a hardware configuration management...
... to change the key assignment, click Direct... Accessing TOSHIBA HW Setup To access TOSHIBA HW Setup, press the TOSHIBA Console button above the left side of the keyboard. Double-click on the HW Setup icon to access the TOSHIBA HW Setup program. and continue as if you view general system settings and specify the display, boot priority, keyboard, USB, LAN, CPU, device configuration and parallel/printer options for communication ports, use the Windows Device Manager. NOTE If the supervisor password is a hardware configuration management...
Tecta M2 User's Guide (PDF)
Page 188
... a password service diskette: 1 Connect your password. 3 Insert the password service diskette into the diskette drive and press Enter. For instructions, see "Connecting an optional external diskette drive" on page 67. 2 Turn on an SD memory card To delete a user token, insert the SD Memory Card that contains the token information and click Disable. After three incorrect attempts, the system turns off automatically. 188 Keeping Your Files Safe Using a power-on (user-level) password 3 Click the User password icon...
... a password service diskette: 1 Connect your password. 3 Insert the password service diskette into the diskette drive and press Enter. For instructions, see "Connecting an optional external diskette drive" on page 67. 2 Turn on an SD memory card To delete a user token, insert the SD Memory Card that contains the token information and click Disable. After three incorrect attempts, the system turns off automatically. 188 Keeping Your Files Safe Using a power-on (user-level) password 3 Click the User password icon...
Tecta M2 User's Guide (PDF)
Page 202
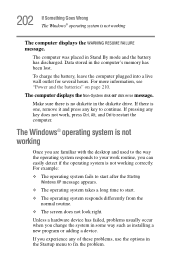
..., Alt, and Del to fix the problem. 202 If Something Goes Wrong The Windows® operating system is not working Once you change the system in some way such as installing a new program or adding a device. The computer displays the Non-System disk or disk error message. The Windows® operating system is one, remove it and press any key to start. ❖ The operating system responds differently from...
..., Alt, and Del to fix the problem. 202 If Something Goes Wrong The Windows® operating system is not working Once you change the system in some way such as installing a new program or adding a device. The computer displays the Non-System disk or disk error message. The Windows® operating system is one, remove it and press any key to start. ❖ The operating system responds differently from...
Tecta M2 User's Guide (PDF)
Page 234
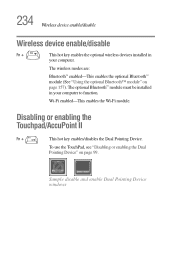
... optional Bluetooth™ module" on page 99. To use the TouchPad, see "Disabling or enabling the Dual Pointing Device" on page 157). 234 Wireless device enable/disable Wireless device enable/disable Fn + This hot key enables the optional wireless devices installed in your computer. Sample disable and enable Dual Pointing Device windows Disabling or enabling the Touchpad/AccuPoint II Fn + This hot key enables/disables the Dual Pointing Device. Wi-Fi enabled-This enables the Wi-Fi module. The optional Bluetooth™ module must be installed in your computer to function...
... optional Bluetooth™ module" on page 99. To use the TouchPad, see "Disabling or enabling the Dual Pointing Device" on page 157). 234 Wireless device enable/disable Wireless device enable/disable Fn + This hot key enables the optional wireless devices installed in your computer. Sample disable and enable Dual Pointing Device windows Disabling or enabling the Touchpad/AccuPoint II Fn + This hot key enables/disables the Dual Pointing Device. Wi-Fi enabled-This enables the Wi-Fi module. The optional Bluetooth™ module must be installed in your computer to function...

Tecta M2 User's Guide (PDF)
Page 238
... has a wired or wireless connection. Starting ConfigFree To start the desired ConfigFree utilities. When you start and setup ConfigFree. For more detailed information on setting up and using ConfigFree, see the Help File included in the application. 238 Getting Started Getting Started This section contains information about the ConfigFree main screen, and how to start a search for wireless devices, ConfigFree Launcher displays on your computer desktop...
... has a wired or wireless connection. Starting ConfigFree To start the desired ConfigFree utilities. When you start and setup ConfigFree. For more detailed information on setting up and using ConfigFree, see the Help File included in the application. 238 Getting Started Getting Started This section contains information about the ConfigFree main screen, and how to start a search for wireless devices, ConfigFree Launcher displays on your computer desktop...
Tecta M2 User's Guide (PDF)
Page 244
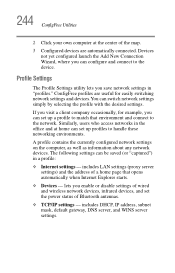
... disable settings of wired and wireless network devices, infrared devices, and set the power status of a home page that environment and connect to the network. lets you can configure and connect to the device. includes DHCP, IP address, subnet mask, default gateway, DNS server, and WINS server settings. 244 ConfigFree Utilities 2 Click your own computer at home can set up a profile to match that opens automatically when Internet Explorer starts...
... disable settings of wired and wireless network devices, infrared devices, and set the power status of a home page that environment and connect to the network. lets you can configure and connect to the device. includes DHCP, IP address, subnet mask, default gateway, DNS server, and WINS server settings. 244 ConfigFree Utilities 2 Click your own computer at home can set up a profile to match that opens automatically when Internet Explorer starts...

Tecta M2 User's Guide (PDF)
Page 259
... have the operating system automatically recognize the change. K keyboard shortcut-A key or combination of your work , including all open files and programs, when you turn on the screen that activates a memory resident program. When you use to the same state it was when the computer was turned off . Interlaced monitors take two passes to the hard disk the current state of keys that you turn the computer...
... have the operating system automatically recognize the change. K keyboard shortcut-A key or combination of your work , including all open files and programs, when you turn on the screen that activates a memory resident program. When you use to the same state it was when the computer was turned off . Interlaced monitors take two passes to the hard disk the current state of keys that you turn the computer...
Tecta M2 User's Guide (PDF)
Page 266
... message 202 configuring hard drive passwords 192 password 182 PC Cards 88 connecting headphones 68 memory module 70 modem to telephone line 89 monitor 60, 61 PC Cards 86 speakers 68 television 60 video projector 60 connection set up 155 conserving power 140 control buttons 99 critical applications 3 D desktop major features 143 desktop icons 144 Device Manager 207 checking properties 208 disabling a device 208 devices external display 59 disc, positioning 112 Disk Defragmenter 215 disk drive corrupted/damaged...
... message 202 configuring hard drive passwords 192 password 182 PC Cards 88 connecting headphones 68 memory module 70 modem to telephone line 89 monitor 60, 61 PC Cards 86 speakers 68 television 60 video projector 60 connection set up 155 conserving power 140 control buttons 99 critical applications 3 D desktop major features 143 desktop icons 144 Device Manager 207 checking properties 208 disabling a device 208 devices external display 59 disc, positioning 112 Disk Defragmenter 215 disk drive corrupted/damaged...
Tecta M2 User's Guide (PDF)
Page 269
... removing expansion slot cover 72 microphone external 68 jack 68, 147 Microsoft Support Online Web site 205 modem connecting to telephone line 89 determining COM port 153 problem solving 222 resetting port to default settings 153 sending or receiving a fax 89 upgrading 153 warning 90 monitor connecting 60, 61 not working 212 mouse connecting to Advanced Port Replicator 64 MP3 149 playing 149 recording 149 N network accessing 154 Dial-Up Networking Wizard 154 networking wireless 154 O optional devices...
... removing expansion slot cover 72 microphone external 68 jack 68, 147 Microsoft Support Online Web site 205 modem connecting to telephone line 89 determining COM port 153 problem solving 222 resetting port to default settings 153 sending or receiving a fax 89 upgrading 153 warning 90 monitor connecting 60, 61 not working 212 mouse connecting to Advanced Port Replicator 64 MP3 149 playing 149 recording 149 N network accessing 154 Dial-Up Networking Wizard 154 networking wireless 154 O optional devices...


