User Guide
Page 30
Contents Introduction 37 This guide 39 Safety icons 40 Other icons used 40 Your computer's features and specifications ....41 Other documentation 41 Service options 41 Chapter 1: Getting Started 42 Selecting a place to work 42 Setting up a work environment 42 Keeping yourself comfortable 43 Precautions 43 Important information on your computer's cooling fan 45 Setting up your computer 45 Connecting to a power source 46 Charging the main battery 48 Using the computer for the first time 49 Opening the display panel 49 30
Contents Introduction 37 This guide 39 Safety icons 40 Other icons used 40 Your computer's features and specifications ....41 Other documentation 41 Service options 41 Chapter 1: Getting Started 42 Selecting a place to work 42 Setting up a work environment 42 Keeping yourself comfortable 43 Precautions 43 Important information on your computer's cooling fan 45 Setting up your computer 45 Connecting to a power source 46 Charging the main battery 48 Using the computer for the first time 49 Opening the display panel 49 30
User Guide
Page 32
... Character keys 94 Ctrl, Fn, and Alt keys 95 Function keys 95 Special Windows® keys 95 Starting a program 96 Starting a program from the Start menu...........96 Starting a program from Windows® Explorer ...97 Starting a program using the Start Search field 98 Saving your work 98 Printing your work 100 Backing up your work 101 Restoring... media 106 Recording optical media 106 Removing a disc with the computer on...........107 Removing a disc with the computer off ..........107 Caring for optical discs 108 Toshiba's online resources 108
... Character keys 94 Ctrl, Fn, and Alt keys 95 Function keys 95 Special Windows® keys 95 Starting a program 96 Starting a program from the Start menu...........96 Starting a program from Windows® Explorer ...97 Starting a program using the Start Search field 98 Saving your work 98 Printing your work 100 Backing up your work 101 Restoring... media 106 Recording optical media 106 Removing a disc with the computer on...........107 Removing a disc with the computer off ..........107 Caring for optical discs 108 Toshiba's online resources 108

User Guide
Page 35
... Health Monitor 162 Enabling the TOSHIBA PC Health Monitor ......163 ConfigFree 165 Getting Started 165 ConfigFree® Utilities 166 Chapter 6: If Something Goes Wrong 169 Problems that are easy to fix 169 Problems when you turn on the computer............... good computing habits 189 Data and system configuration backup in the Windows® operating system 190 If you need further assistance 195 Before you contact Toshiba 195 Contacting Toshiba 195 Other Toshiba Internet Web sites 196 Toshiba's worldwide offices 196
... Health Monitor 162 Enabling the TOSHIBA PC Health Monitor ......163 ConfigFree 165 Getting Started 165 ConfigFree® Utilities 166 Chapter 6: If Something Goes Wrong 169 Problems that are easy to fix 169 Problems when you turn on the computer............... good computing habits 189 Data and system configuration backup in the Windows® operating system 190 If you need further assistance 195 Before you contact Toshiba 195 Contacting Toshiba 195 Other Toshiba Internet Web sites 196 Toshiba's worldwide offices 196
User Guide
Page 42
... computer. The "Instruction Manual for Safety and Comfort," that could cause bodily injury, property damage, or damage the computer. Otherwise, they may overheat. Chapter 1 Getting Started This chapter provides tips for using , such as a printer.
... computer. The "Instruction Manual for Safety and Comfort," that could cause bodily injury, property damage, or damage the computer. Otherwise, they may overheat. Chapter 1 Getting Started This chapter provides tips for using , such as a printer.
User Guide
Page 43
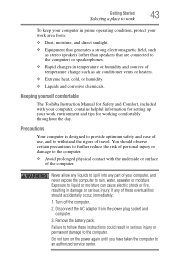
..., and never expose the computer to liquid or moisture can cause electric shock or fire, resulting in damage or serious injury. Getting Started Selecting a place to work 43 To keep your computer in prime operating condition, protect your work environment and tips for working comfortably...your computer, contains helpful information for setting up your work area from the power plug socket and computer. 3. Keeping yourself comfortable The Toshiba Instruction Manual for Safety and Comfort, included with the underside or surface of use, and to the computer. Precautions Your computer is ...
..., and never expose the computer to liquid or moisture can cause electric shock or fire, resulting in damage or serious injury. Getting Started Selecting a place to work 43 To keep your computer in prime operating condition, protect your work environment and tips for working comfortably...your computer, contains helpful information for setting up your work area from the power plug socket and computer. 3. Keeping yourself comfortable The Toshiba Instruction Manual for Safety and Comfort, included with the underside or surface of use, and to the computer. Precautions Your computer is ...

User Guide
Page 44
...; Scan all new files for viruses. Avoid touching the surface of the computer. ❖ Computer base and palm rest can erase important files. 44 Getting Started Selecting a place to skin. Placing a magnet too close to drop a heavy object onto the computer. Information on the computer and be careful not to a disk...
...; Scan all new files for viruses. Avoid touching the surface of the computer. ❖ Computer base and palm rest can erase important files. 44 Getting Started Selecting a place to skin. Placing a magnet too close to drop a heavy object onto the computer. Information on the computer and be careful not to a disk...
User Guide
Page 45
... base of the computer. ❖ Always operate your computer on a hard flat surface. To use it. See "Connecting to a power source" on the computer. Getting Started Setting up your software" on page 51 before you must complete all setup steps up to and including "Setting up your computer 45 Important information...
... base of the computer. ❖ Always operate your computer on a hard flat surface. To use it. See "Connecting to a power source" on the computer. Getting Started Setting up your software" on page 51 before you must complete all setup steps up to and including "Setting up your computer 45 Important information...
User Guide
Page 46
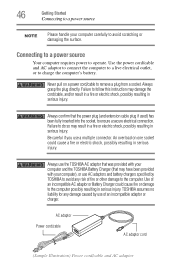
...Getting Started Connecting to a power source NOTE Please handle your computer), or use AC adaptors and battery chargers specified by use of an incompatible AC adaptor or Battery Charger could cause a fire or electric shock, possibly resulting in serious injury. Always grasp the plug directly. TOSHIBA assumes... no liability for any damage caused by TOSHIBA to avoid any risk of fire or other damage to the computer. AC adaptor Power cord/cable AC adaptor ...
...Getting Started Connecting to a power source NOTE Please handle your computer), or use AC adaptors and battery chargers specified by use of an incompatible AC adaptor or Battery Charger could cause a fire or electric shock, possibly resulting in serious injury. Always grasp the plug directly. TOSHIBA assumes... no liability for any damage caused by TOSHIBA to avoid any risk of fire or other damage to the computer. AC adaptor Power cord/cable AC adaptor ...

User Guide
Page 47
... disconnect a power plug with wet hands. The AC power light on this instruction could result in an electric shock, possibly resulting in serious injury. Getting Started Connecting to a power source 47 To connect AC power to the computer: 1 Connect the power cord/cable to the AC adaptor. (Sample Illustration) Connecting the...
... disconnect a power plug with wet hands. The AC power light on this instruction could result in an electric shock, possibly resulting in serious injury. Getting Started Connecting to a power source 47 To connect AC power to the computer: 1 Connect the power cord/cable to the AC adaptor. (Sample Illustration) Connecting the...
User Guide
Page 48
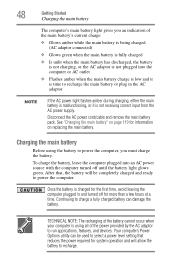
... from the AC power supply. Continuing to power the computer. After that reduces the power required for information on replacing the main battery. 48 Getting Started Charging the main battery The computer's main battery light gives you must charge the battery.
... from the AC power supply. Continuing to power the computer. After that reduces the power required for information on replacing the main battery. 48 Getting Started Charging the main battery The computer's main battery light gives you must charge the battery.
User Guide
Page 49
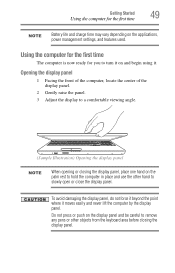
... raise the panel. 3 Adjust the display to a comfortable viewing angle. (Sample Illustration) Opening the display panel NOTE When opening or closing the display panel. Getting Started Using the computer for you to turn it on the applications, power management settings, and features used. Using the computer for the first time The...
... raise the panel. 3 Adjust the display to a comfortable viewing angle. (Sample Illustration) Opening the display panel NOTE When opening or closing the display panel. Getting Started Using the computer for you to turn it on the applications, power management settings, and features used. Using the computer for the first time The...
User Guide
Page 50
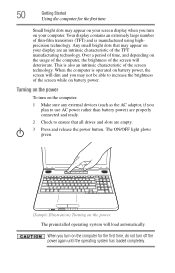
... bright dots that all drives and slots are an intrinsic characteristic of the screen will load automatically. When you turn on your computer. 50 Getting Started Using the computer for the first time Small bright dots may appear on your display are empty. 3 Press and release the power button.
... bright dots that all drives and slots are an intrinsic characteristic of the screen will load automatically. When you turn on your computer. 50 Getting Started Using the computer for the first time Small bright dots may appear on your display are empty. 3 Press and release the power button.
User Guide
Page 51
... may restart your computer. Failure to complete the setup process. 7 Click Start when the Thank You message appears. Registering your computer with Toshiba Product registration is strongly recommended, and allows Toshiba to send you must be connected to your software setup choices. The Windows...® operating system checks the system's performance, and then may vary according to the Internet. Getting Started Registering your computer with Toshiba 51 Setting up your software. 1 From the Welcome screen click Next to your product. Product registration can be ...
... may restart your computer. Failure to complete the setup process. 7 Click Start when the Thank You message appears. Registering your computer with Toshiba Product registration is strongly recommended, and allows Toshiba to send you must be connected to your software setup choices. The Windows...® operating system checks the system's performance, and then may vary according to the Internet. Getting Started Registering your computer with Toshiba 51 Setting up your software. 1 From the Welcome screen click Next to your product. Product registration can be ...
User Guide
Page 52
... optional external devices Adding optional external devices NOTE Before adding external devices or memory, Toshiba recommends setting up your software. After starting your computer for the first time you use complex software or process large amounts of today's popular applications. You may want to ... memory modules, see the accessories information packaged with enough memory to run most of data. NOTE Before adding external devices or memory, Toshiba recommends setting up your software" on page 51. See "Setting up your software. See "Setting up your system or visit accessories...
... optional external devices Adding optional external devices NOTE Before adding external devices or memory, Toshiba recommends setting up your software. After starting your computer for the first time you use complex software or process large amounts of today's popular applications. You may want to ... memory modules, see the accessories information packaged with enough memory to run most of data. NOTE Before adding external devices or memory, Toshiba recommends setting up your software" on page 51. See "Setting up your software. See "Setting up your system or visit accessories...
User Guide
Page 53
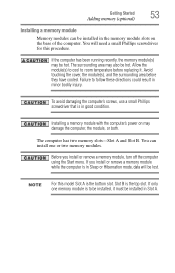
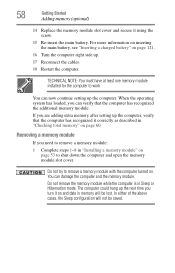
Getting Started Adding memory (optional) 53 Installing a memory module Memory modules can install one memory module is the bottom slot. The surrounding area may also be hot. ... computer has two memory slots-Slot A and Slot B. You can be lost. If you install or remove a memory module, turn off the computer using the Start menu. Failure to be installed in the memory module slots on may be hot. If the computer has been running recently, the memory module(s) may...
Getting Started Adding memory (optional) 53 Installing a memory module Memory modules can install one memory module is the bottom slot. The surrounding area may also be hot. ... computer has two memory slots-Slot A and Slot B. You can be lost. If you install or remove a memory module, turn off the computer using the Start menu. Failure to be installed in the memory module slots on may be hot. If the computer has been running recently, the memory module(s) may...
User Guide
Page 54
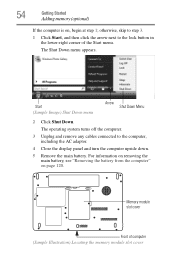
...Memory module slot cover Front of the Start menu. Start (Sample Image) Shut Down menu Arrow Shut Down Menu 2 Click Shut Down. For information on removing the main battery, see "Removing the battery from the computer" on , begin at step 1; 54 Getting Started Adding memory (optional) If the computer ...is on page 120. otherwise, skip to step 3. 1 Click Start, and then click the arrow next to the computer, including the AC adaptor. 4 Close the ...
...Memory module slot cover Front of the Start menu. Start (Sample Image) Shut Down menu Arrow Shut Down Menu 2 Click Shut Down. For information on removing the main battery, see "Removing the battery from the computer" on , begin at step 1; 54 Getting Started Adding memory (optional) If the computer ...is on page 120. otherwise, skip to step 3. 1 Click Start, and then click the arrow next to the computer, including the AC adaptor. 4 Close the ...
User Guide
Page 55
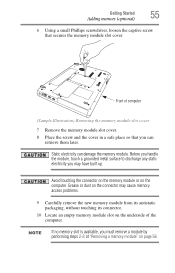
... touching the connector on the memory module or on the underside of the computer. Grease or dust on the connector may have built up. Getting Started Adding memory (optional) 55 6 Using a small Phillips screwdriver, loosen the captive screw that you must remove a module by performing steps 2-3 of "Removing a memory module" on...
... touching the connector on the memory module or on the underside of the computer. Grease or dust on the connector may have built up. Getting Started Adding memory (optional) 55 6 Using a small Phillips screwdriver, loosen the captive screw that you must remove a module by performing steps 2-3 of "Removing a memory module" on...
User Guide
Page 56
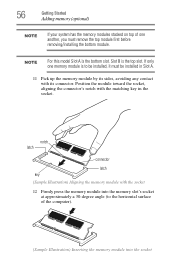
... (Sample Illustration) Aligning the memory module with the socket 12 Firmly press the memory module into the socket Slot B is the top slot. 56 Getting Started Adding memory (optional) NOTE If your system has the memory modules stacked on top of the computer). (Sample Illustration) Inserting the memory module into the...
... (Sample Illustration) Aligning the memory module with the socket 12 Firmly press the memory module into the socket Slot B is the top slot. 56 Getting Started Adding memory (optional) NOTE If your system has the memory modules stacked on top of the computer). (Sample Illustration) Inserting the memory module into the...
User Guide
Page 57
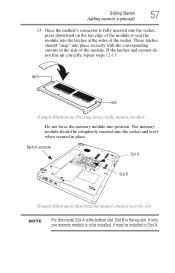
... completely inserted into place securely with the corresponding cutouts in Slot A. If only one memory module is the bottom slot. Back of the socket. Getting Started Adding memory (optional) 57 13 Once the module's connector is the top slot.
... completely inserted into place securely with the corresponding cutouts in Slot A. If only one memory module is the bottom slot. Back of the socket. Getting Started Adding memory (optional) 57 13 Once the module's connector is the top slot.
User Guide
Page 58
... 60. Removing a memory module If you can verify that the computer has recognized it using the screw. 15 Re-insert the main battery. You can damage the computer and the memory module. 58 Getting Started Adding memory (optional) 14 Replace the memory module slot cover and secure it correctly as described in...
... 60. Removing a memory module If you can verify that the computer has recognized it using the screw. 15 Re-insert the main battery. You can damage the computer and the memory module. 58 Getting Started Adding memory (optional) 14 Replace the memory module slot cover and secure it correctly as described in...


