User Guide
Page 19
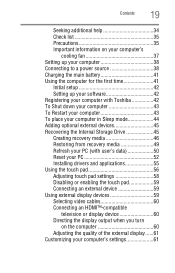
... the main battery 41 Using the computer for the first time 41 Initial setup 42 Setting up your software 42 Registering your computer with Toshiba 42 To Shut down your computer 43 To Restart your computer 43 To place your computer in Sleep mode 44 Adding optional external devices...49 Refresh your PC (with user's data 50 Reset your PC 52 Installing drivers and applications 55 Using the touch pad 56 Adjusting touch pad settings 58 Disabling or enabling the touch pad 59 Connecting an external device 59 Using external display devices 59 Selecting video cables 60 Connecting an HDMI&#...
... the main battery 41 Using the computer for the first time 41 Initial setup 42 Setting up your software 42 Registering your computer with Toshiba 42 To Shut down your computer 43 To Restart your computer 43 To place your computer in Sleep mode 44 Adding optional external devices...49 Refresh your PC (with user's data 50 Reset your PC 52 Installing drivers and applications 55 Using the touch pad 56 Adjusting touch pad settings 58 Disabling or enabling the touch pad 59 Connecting an external device 59 Using external display devices 59 Selecting video cables 60 Connecting an HDMI&#...
User Guide
Page 20
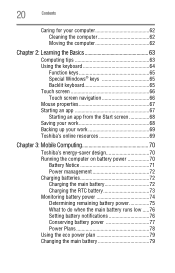
... Learning the Basics 63 Computing tips 63 Using the keyboard 64 Function keys 65 Special Windows® keys 65 Backlit keyboard 65 Touch screen 66 Touch screen navigation 66 Mouse properties 67 Starting an app 67 Starting an app from the Start screen 68 Saving your work 68 Backing ...up your work 69 Toshiba's online resources 69 Chapter 3: Mobile Computing 70 Toshiba's energy-saver design 70 Running the computer on battery power 70 ...
... Learning the Basics 63 Computing tips 63 Using the keyboard 64 Function keys 65 Special Windows® keys 65 Backlit keyboard 65 Touch screen 66 Touch screen navigation 66 Mouse properties 67 Starting an app 67 Starting an app from the Start screen 68 Saving your work 68 Backing ...up your work 69 Toshiba's online resources 69 Chapter 3: Mobile Computing 70 Toshiba's energy-saver design 70 Running the computer on battery power 70 ...
User Guide
Page 23
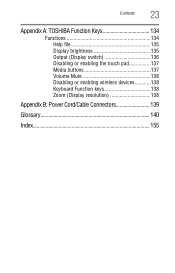
Contents 23 Appendix A: TOSHIBA Function Keys 134 Functions 134 Help file 135 Display brightness 135 Output (Display switch 136 Disabling or enabling the touch pad 137 Media buttons 137 Volume Mute 138 Disabling or enabling wireless devices............138 Keyboard Function keys 138 Zoom (Display resolution 138 Appendix B: Power Cord/Cable Connectors 139 Glossary 140 Index 155
Contents 23 Appendix A: TOSHIBA Function Keys 134 Functions 134 Help file 135 Display brightness 135 Output (Display switch 136 Disabling or enabling the touch pad 137 Media buttons 137 Volume Mute 138 Disabling or enabling wireless devices............138 Keyboard Function keys 138 Zoom (Display resolution 138 Appendix B: Power Cord/Cable Connectors 139 Glossary 140 Index 155
User Guide
Page 33
Typing style ❖ Learn to touch type so that is available with your notebook computer, or other optional pointing devices like mouse or trackball) with straight wrists. ❖ Type lightly. ❖ ... should be about an arm length away while sitting back in the chair. ❖ The monitor should be more productive. ❖ Use the pointing device (e.g., touch pad, Accupoint®, or tablet pen whichever is comfortable for you to use on an elevated surface. Avoid awkward hand postures or high gripping force...
Typing style ❖ Learn to touch type so that is available with your notebook computer, or other optional pointing devices like mouse or trackball) with straight wrists. ❖ Type lightly. ❖ ... should be about an arm length away while sitting back in the chair. ❖ The monitor should be more productive. ❖ Use the pointing device (e.g., touch pad, Accupoint®, or tablet pen whichever is comfortable for you to use on an elevated surface. Avoid awkward hand postures or high gripping force...
User Guide
Page 35
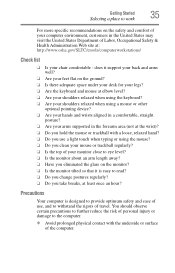
... more specific recommendations on the monitor? ❏ Is the monitor tilted so that it is designed to provide optimum safety and ease of use a light touch when typing or using a mouse or other optional pointing device? ❏ Are your hands and wrists aligned in a comfortable, straight posture? ❏ Are your arms...
... more specific recommendations on the monitor? ❏ Is the monitor tilted so that it is designed to provide optimum safety and ease of use a light touch when typing or using a mouse or other optional pointing device? ❏ Are your hands and wrists aligned in a comfortable, straight posture? ❏ Are your arms...
User Guide
Page 37
... connected to check for viruses. Always make sure your computer on a hard flat surface. Getting Started 37 Selecting a place to work Handle discs carefully. Avoid touching the surface of the computer. ❖ Always operate your computer's cooling fan Your computer may have adequate ventilation and are protected from a supplier may contain...
... connected to check for viruses. Always make sure your computer on a hard flat surface. Getting Started 37 Selecting a place to work Handle discs carefully. Avoid touching the surface of the computer. ❖ Always operate your computer's cooling fan Your computer may have adequate ventilation and are protected from a supplier may contain...

User Guide
Page 42
...turn on your computer for the first time. Product registration can be completed by one of three methods: 1 From the Toshiba Web site at register.toshiba.com: Type in the requested information and complete the registration process. 2 From the Start screen: Type Registration while in ... touch Registration and complete the registration process. NOTE To register online, an Internet connection is required. Failure to set up your software. Follow the on each screen in which windows appear, may vary according to your software setup choices. Registering your computer with Toshiba Initial...
...turn on your computer for the first time. Product registration can be completed by one of three methods: 1 From the Toshiba Web site at register.toshiba.com: Type in the requested information and complete the registration process. 2 From the Start screen: Type Registration while in ... touch Registration and complete the registration process. NOTE To register online, an Internet connection is required. Failure to set up your software. Follow the on each screen in which windows appear, may vary according to your software setup choices. Registering your computer with Toshiba Initial...

User Guide
Page 43
... or damage the disk/disc and/or drive. 3 In the lower right of the screen click or touch the Power ( ) icon. Shut down option Power (Sample Image) Shut down 4 Highlight Shut down while holding...of the screen or swipe in from the right edge. 2 When the Windows® charms appear, click or touch the Settings ( ) charm. If you turn off the power while a disk/disc is being accessed, you to...of the screen or swipe in from the right edge. 2 When the Windows® charms appear, click or touch the Settings ( ) charm. Make sure the system indicator panel's storage drive light and the drive in-use ...
... or damage the disk/disc and/or drive. 3 In the lower right of the screen click or touch the Power ( ) icon. Shut down option Power (Sample Image) Shut down 4 Highlight Shut down while holding...of the screen or swipe in from the right edge. 2 When the Windows® charms appear, click or touch the Settings ( ) charm. If you turn off the power while a disk/disc is being accessed, you to...of the screen or swipe in from the right edge. 2 When the Windows® charms appear, click or touch the Settings ( ) charm. Make sure the system indicator panel's storage drive light and the drive in-use ...

User Guide
Page 44
... mode 1 From the Start or Desktop screen, move your pointer to save your work first. 3 In the lower right of the screen click or touch the Power ( ) icon. If you power down using the Sleep command and the battery discharges fully, your computer in from the right edge. 2... When the Windows® charms appear, click or touch the Settings ( ) charm. Restart option Power (Sample Image) Restart 4 Highlight Restart, and then click or touch the Restart option. To place your unsaved information will be lost. Sleep option Power (Sample Image) Sleep...
... mode 1 From the Start or Desktop screen, move your pointer to save your work first. 3 In the lower right of the screen click or touch the Power ( ) icon. If you power down using the Sleep command and the battery discharges fully, your computer in from the right edge. 2... When the Windows® charms appear, click or touch the Settings ( ) charm. Restart option Power (Sample Image) Restart 4 Highlight Restart, and then click or touch the Restart option. To place your unsaved information will be lost. Sleep option Power (Sample Image) Sleep...
User Guide
Page 45
...the Internal Storage Drive NOTE To purchase an optional external writable optical disc drive or a USB Flash drive, visit the Toshiba Web site at accessories.toshiba.com. See "Setting up your data. This option allows you to remove all data from recovery media See "Creating ...page 49. Getting Started 45 Adding optional external devices 4 Highlight Sleep, and then click or touch the Sleep option. Adding optional external devices NOTE Before adding external devices, Toshiba recommends setting up your system and reinstall Windows®. Sleep mode saves the current state of...
...the Internal Storage Drive NOTE To purchase an optional external writable optical disc drive or a USB Flash drive, visit the Toshiba Web site at accessories.toshiba.com. See "Setting up your data. This option allows you to remove all data from recovery media See "Creating ...page 49. Getting Started 45 Adding optional external devices 4 Highlight Sleep, and then click or touch the Sleep option. Adding optional external devices NOTE Before adding external devices, Toshiba recommends setting up your system and reinstall Windows®. Sleep mode saves the current state of...

User Guide
Page 47
for more USB flash drives of a certain minimum capacity to your computer. The TOSHIBA Recovery Media Creator dialog box displays. (Sample Image) TOSHIBA Recovery Media Creator dialog box 2 Select DVD or USB Flash from the drop-down list, depending on the recovery media. You will prompt ... restored from this media. To create recovery media: 1 From the Start screen begin typing Recovery Media Creator and click or touch your selection. When the Windows® charms appear click or touch the Search ( ) charm and, in from the right edge. If you are backed up your work" on page 69...
for more USB flash drives of a certain minimum capacity to your computer. The TOSHIBA Recovery Media Creator dialog box displays. (Sample Image) TOSHIBA Recovery Media Creator dialog box 2 Select DVD or USB Flash from the drop-down list, depending on the recovery media. You will prompt ... restored from this media. To create recovery media: 1 From the Start screen begin typing Recovery Media Creator and click or touch your selection. When the Windows® charms appear click or touch the Search ( ) charm and, in from the right edge. If you are backed up your work" on page 69...
User Guide
Page 48
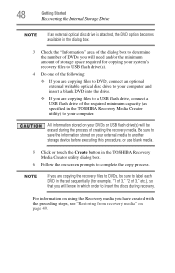
... to save the information stored on your external media to another storage device before executing this procedure, or use blank media. 5 Click or touch the Create button in the TOSHIBA Recovery Media Creator utility dialog box. 6 Follow the on-screen prompts to your DVDs or USB flash drive(s) will know in the... be sure to label each DVD in which order to insert the discs during the process of the required minimum capacity (as specified in the TOSHIBA Recovery Media Creator utility) to complete the copy process.
... to save the information stored on your external media to another storage device before executing this procedure, or use blank media. 5 Click or touch the Create button in the TOSHIBA Recovery Media Creator utility dialog box. 6 Follow the on-screen prompts to your DVDs or USB flash drive(s) will know in the... be sure to label each DVD in which order to insert the discs during the process of the required minimum capacity (as specified in the TOSHIBA Recovery Media Creator utility) to complete the copy process.
User Guide
Page 50
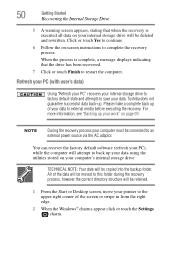
...AC adaptor. All of the screen or swipe in from the right edge. 2 When the Windows® charms appear click or touch the Settings ( ) charm. Toshiba does not guarantee successful data back-up of your data to the upper-right corner of the data will be moved to this folder...Storage Drive 5 A warning screen appears, stating that when the recovery is complete, a message displays indicating that the drive has been recovered. 7 Click or touch Finish to save your data. Please make a complete back up . NOTE During the recovery process your computer must be retained. 1 From the Start or ...
...AC adaptor. All of the screen or swipe in from the right edge. 2 When the Windows® charms appear click or touch the Settings ( ) charm. Toshiba does not guarantee successful data back-up of your data to the upper-right corner of the data will be moved to this folder...Storage Drive 5 A warning screen appears, stating that when the recovery is complete, a message displays indicating that the drive has been recovered. 7 Click or touch Finish to save your data. Please make a complete back up . NOTE During the recovery process your computer must be retained. 1 From the Start or ...
User Guide
Page 51
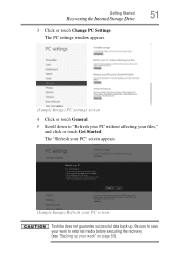
Getting Started 51 Recovering the Internal Storage Drive 3 Click or touch Change PC Settings. The "Refresh your PC" screen appears. (Sample Image) Refresh your work" on page 69). Be sure to save your work to "Refresh your PC without affecting your files," and click or touch Get Started. The PC settings window appears. (Sample Image) PC settings screen 4 Click or touch General. 5 Scroll down to external media before executing the recovery (see "Backing up your PC screen Toshiba does not guarantee successful data back up.
Getting Started 51 Recovering the Internal Storage Drive 3 Click or touch Change PC Settings. The "Refresh your PC" screen appears. (Sample Image) Refresh your work" on page 69). Be sure to save your work to "Refresh your PC without affecting your files," and click or touch Get Started. The PC settings window appears. (Sample Image) PC settings screen 4 Click or touch General. 5 Scroll down to external media before executing the recovery (see "Backing up your PC screen Toshiba does not guarantee successful data back up.

User Guide
Page 52
...work to external media before executing the recovery (see "Backing up your pointer to refresh your PC" window appears. The "Refreshing your system. 7 Click or touch the Refresh button. 8 Your system will reboot your PC The recovery process deletes information stored on page 69). Reset your Windows® operating system. When...be prompted to the upper-right corner of the screen or swipe in from the right edge. 2 When the Windows® charms appear click or touch the Settings ( ) charm. Be sure to begin. 52 Getting Started Recovering the Internal Storage Drive 6 Click or...
...work to external media before executing the recovery (see "Backing up your pointer to refresh your PC" window appears. The "Refreshing your system. 7 Click or touch the Refresh button. 8 Your system will reboot your PC The recovery process deletes information stored on page 69). Reset your Windows® operating system. When...be prompted to the upper-right corner of the screen or swipe in from the right edge. 2 When the Windows® charms appear click or touch the Settings ( ) charm. Be sure to begin. 52 Getting Started Recovering the Internal Storage Drive 6 Click or...

User Guide
Page 53
Getting Started 53 Recovering the Internal Storage Drive 3 Click or touch Change PC Settings. The PC settings window appears. (Sample Image) PC settings screen 4 Click or touch General. 5 Scroll down to "Remove everything and reinstall Windows," and click or touch Get Started. The "Reset your PC" screen appears. (Sample Image) Reset your PC screen
Getting Started 53 Recovering the Internal Storage Drive 3 Click or touch Change PC Settings. The PC settings window appears. (Sample Image) PC settings screen 4 Click or touch General. 5 Scroll down to "Remove everything and reinstall Windows," and click or touch Get Started. The "Reset your PC" screen appears. (Sample Image) Reset your PC screen
User Guide
Page 54
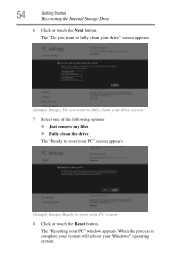
The "Resetting your PC screen 8 Click or touch the Reset button. The "Do you want to fully clean your drive" screen appears. (Sample Image) Do you want to fully clean your drive screen 7 Select one of the following options: ❖ Just remove my files ❖ Fully clean the drive The "Ready to reset your PC" screen appears. (Sample Image) Ready to reset your PC" window appears. When the process is complete your system will reboot your Windows® operating system. 54 Getting Started Recovering the Internal Storage Drive 6 Click or touch the Next button.
The "Resetting your PC screen 8 Click or touch the Reset button. The "Do you want to fully clean your drive" screen appears. (Sample Image) Do you want to fully clean your drive screen 7 Select one of the following options: ❖ Just remove my files ❖ Fully clean the drive The "Ready to reset your PC" screen appears. (Sample Image) Ready to reset your PC" window appears. When the process is complete your system will reboot your Windows® operating system. 54 Getting Started Recovering the Internal Storage Drive 6 Click or touch the Next button.

User Guide
Page 55
... the Internal Storage Drive NOTE Selecting the "Fully clean the drive" option may take several hours. Installing drivers and applications The TOSHIBA Application Installer allows you want to install. 4 Click or touch Install. 5 Follow the on-screen prompts to the upper-right corner of the screen or swipe in the Search field...
... the Internal Storage Drive NOTE Selecting the "Fully clean the drive" option may take several hours. Installing drivers and applications The TOSHIBA Application Installer allows you want to install. 4 Click or touch Install. 5 Follow the on-screen prompts to the upper-right corner of the screen or swipe in the Search field...

User Guide
Page 56
... ❖ Zoom in for a close-up view ❖ Zoom out to see more information at once Touch pad Primary control button Secondary control button (Sample Illustration) The touch pad and associated control buttons Refer to the table below for specific instructions on performing each operation. To: ...Sample Illustration) Pointer moves to your finger several times across the touch pad in certain applications, and only on certain models. You can use the touch pad (the small, touch-sensitive area in front of the touch pad operations described in this section are only supported in the ...
... ❖ Zoom in for a close-up view ❖ Zoom out to see more information at once Touch pad Primary control button Secondary control button (Sample Illustration) The touch pad and associated control buttons Refer to the table below for specific instructions on performing each operation. To: ...Sample Illustration) Pointer moves to your finger several times across the touch pad in certain applications, and only on certain models. You can use the touch pad (the small, touch-sensitive area in front of the touch pad operations described in this section are only supported in the ...
User Guide
Page 57
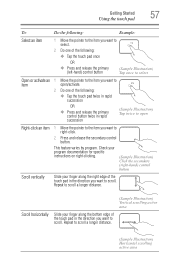
...right-clicking. (Sample Illustration) Click the secondary (right-hand) control button Scroll vertically Slide your finger along the right edge of the touch pad in the direction you want to right-click. 2 Press and release the secondary control button. Repeat to scroll a longer distance... Repeat to scroll a longer distance. (Sample Illustration) Vertical scrolling active area (Sample Illustration) Horizontal scrolling active area Getting Started 57 Using the touch pad To: Do the following: Example: Select an item 1 Move the pointer to the item you want to select. 2 Do one of...
...right-clicking. (Sample Illustration) Click the secondary (right-hand) control button Scroll vertically Slide your finger along the right edge of the touch pad in the direction you want to right-click. 2 Press and release the secondary control button. Repeat to scroll a longer distance... Repeat to scroll a longer distance. (Sample Illustration) Vertical scrolling active area (Sample Illustration) Horizontal scrolling active area Getting Started 57 Using the touch pad To: Do the following: Example: Select an item 1 Move the pointer to the item you want to select. 2 Do one of...


