

Owners Manual
Page 4
... disassembly is spilled on the sides of Electrical Shock and Fire • Do not handle the power cord with this 480p DVD recorder, please contact Toshiba Customer Service. 4 EN E9KGAUD_D-VR610KU_EN.indd 4 2007/12/18 17:09:31 PRECAUTIONS Installation Location For safety and optimum performance of the unit. Do... The unauthorized recording, use this unit, unplug the power cord immediately and take the unit to strong vibration or strong magnetic fields. Supplied Accessories remote control with batteries (AAx2) RCA audio/video cables Avoid the Hazards of the unit.
... disassembly is spilled on the sides of Electrical Shock and Fire • Do not handle the power cord with this 480p DVD recorder, please contact Toshiba Customer Service. 4 EN E9KGAUD_D-VR610KU_EN.indd 4 2007/12/18 17:09:31 PRECAUTIONS Installation Location For safety and optimum performance of the unit. Do... The unauthorized recording, use this unit, unplug the power cord immediately and take the unit to strong vibration or strong magnetic fields. Supplied Accessories remote control with batteries (AAx2) RCA audio/video cables Avoid the Hazards of the unit.

Owners Manual
Page 5
...Interface are trademarks of PCM recording, also saves recordable disc space, allowing for higher video resolution or extended recording time on remote control toward the radio. Note • Remember to read the instructions along with operations, please stay near the unit. This ...Dolby Digital Recording will be prepared to explain this problem. Manufactured under license under license from the center to remote control, press and hold a button on remote control. All Rights Reserved. EN 5 Playback Editing Function Setup VCR Function Others E9KGAUD_D-VR610KU_EN.indd 5 2007/12/...
...Interface are trademarks of PCM recording, also saves recordable disc space, allowing for higher video resolution or extended recording time on remote control toward the radio. Note • Remember to read the instructions along with operations, please stay near the unit. This ...Dolby Digital Recording will be prepared to explain this problem. Manufactured under license under license from the center to remote control, press and hold a button on remote control. All Rights Reserved. EN 5 Playback Editing Function Setup VCR Function Others E9KGAUD_D-VR610KU_EN.indd 5 2007/12/...

Owners Manual
Page 6
CONTENTS Introduction PRECAUTIONS 2 FEATURES 8 Symbols Used in this Owner's Manual 8 FUNCTIONAL OVERVIEW 11 Installing the Batteries in the Remote Control 12 Using a Remote Control 12 THE VCR / DVD RECORDER SWITCHING 14 GUIDE TO ON-SCREEN DISPLAYS AND MENUS . . . . 15 On-Screen Display / Menu 15 Main Menu 17 FRONT PANEL ...
CONTENTS Introduction PRECAUTIONS 2 FEATURES 8 Symbols Used in this Owner's Manual 8 FUNCTIONAL OVERVIEW 11 Installing the Batteries in the Remote Control 12 Using a Remote Control 12 THE VCR / DVD RECORDER SWITCHING 14 GUIDE TO ON-SCREEN DISPLAYS AND MENUS . . . . 15 On-Screen Display / Menu 15 Main Menu 17 FRONT PANEL ...

Owners Manual
Page 11
...buttons or by inserting a cassette tape. 1. C STOP button (DVD) Press to this unit. 2. Infrared sensor window (DVD/VCR) Receive signals from your remote control so that you wish to the unit. AC Power Cord (DVD/VCR) Connect to a standard AC outlet to supply power to stop cassette tape playback... EN 11 Editing Function Setup VCR Function Others E9KGAUD_D-VR610KU_EN.indd 11 2007/12/18 17:09:38 Press to VCR) duplication which you can control the unit from the cassette compartment. DUBBING button (DVD/VCR) Press to start playback. 19. A OPEN/CLOSE button (DVD)* Press to ...
...buttons or by inserting a cassette tape. 1. C STOP button (DVD) Press to this unit. 2. Infrared sensor window (DVD/VCR) Receive signals from your remote control so that you wish to the unit. AC Power Cord (DVD/VCR) Connect to a standard AC outlet to supply power to stop cassette tape playback... EN 11 Editing Function Setup VCR Function Others E9KGAUD_D-VR610KU_EN.indd 11 2007/12/18 17:09:38 Press to VCR) duplication which you can control the unit from the cassette compartment. DUBBING button (DVD/VCR) Press to start playback. 19. A OPEN/CLOSE button (DVD)* Press to ...

Owners Manual
Page 12
... in the operating range of the remote control. 1 Open the cover. 2 Insert batteries. Using a Remote Control Keep in mind the following when using remote control for different devices can interfere with new ones. on the infrared sensor window of the unit. • Remote control for other . FUNCTIONAL OVERVIEW Remote Control Installing the Batteries in the Remote Control Install the batteries (AAx2) matching...
... in the operating range of the remote control. 1 Open the cover. 2 Insert batteries. Using a Remote Control Keep in mind the following when using remote control for different devices can interfere with new ones. on the infrared sensor window of the unit. • Remote control for other . FUNCTIONAL OVERVIEW Remote Control Installing the Batteries in the Remote Control Install the batteries (AAx2) matching...

Owners Manual
Page 13
... DVD mode: • Press to clear the password once entered, to cancel the programming for CD, to use [OPEN/CLOSE A] or [STOP C / EJECT A] on the remote control is in a slightly faster/slower speed while keeping the sound output. 28. REC MODE button • Press to select the DVD output mode. 32. DVD...
... DVD mode: • Press to clear the password once entered, to cancel the programming for CD, to use [OPEN/CLOSE A] or [STOP C / EJECT A] on the remote control is in a slightly faster/slower speed while keeping the sound output. 28. REC MODE button • Press to select the DVD output mode. 32. DVD...
Owners Manual
Page 14
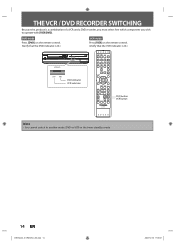
... that the DVD indicator is lit.) VCR mode Press [VCR] on the remote control. (Verify that the VCR indicator is a combination of a VCR and a DVD recorder, you must select first which component you wish to another mode (DVD or ...
... that the DVD indicator is lit.) VCR mode Press [VCR] on the remote control. (Verify that the VCR indicator is a combination of a VCR and a DVD recorder, you must select first which component you wish to another mode (DVD or ...

Owners Manual
Page 21
... this feature, you the higher quality images than the traditional output system. To utilize this unit directly to "ON". Press a button on the TV's original remote control that selects an external input channel until the DVD recorder's opening picture appears. The feature provides you must set progressive scan mode, refer to page...
... this feature, you the higher quality images than the traditional output system. To utilize this unit directly to "ON". Press a button on the TV's original remote control that selects an external input channel until the DVD recorder's opening picture appears. The feature provides you must set progressive scan mode, refer to page...

Owners Manual
Page 37
... set the recording time in the title list. (Refer to "Guide to a Title List" on the TV screen. Press [DISPLAY] to see it on the remote control. • You cannot use the unit continuously. Press [PAUSE F]] or [REC I ] repeatedly until the desired length appears. • To cancel one -touch timer recording is...
... set the recording time in the title list. (Refer to "Guide to a Title List" on the TV screen. Press [DISPLAY] to see it on the remote control. • You cannot use the unit continuously. Press [PAUSE F]] or [REC I ] repeatedly until the desired length appears. • To cancel one -touch timer recording is...

Owners Manual
Page 40
... information E35 PCA full *1 E46 E36 Already finalized video format disc Some portion has not been recorded because of the unit. [STOP C] on the remote control is not effective. Recording did not complete correctly, the error number appears in the timer programming list. Timer Programming JAN/ 2/08 12:00 AM L1 ...
... information E35 PCA full *1 E46 E36 Already finalized video format disc Some portion has not been recorded because of the unit. [STOP C] on the remote control is not effective. Recording did not complete correctly, the error number appears in the timer programming list. Timer Programming JAN/ 2/08 12:00 AM L1 ...

Owners Manual
Page 46
... the DVC is in dubbing, "Pause Rec" will appear. 5. SP 1:00 7 6 The following instructions are described with the operations using the remote control of the current operation and the time counter Each icon means (Available icons may vary depending on the DVC): DVC is in video mode... 1/ ...will appear instead. 7. DVC is in playback mode. DVC is in recording. DVC is highlighted, press [ENTER] to DV input jack on the remote control and press [DISPLAY] to dub the sound with the IEEE1394 standards. Indicator of your DVC • If the unit cannot recognize the input signal...
... the DVC is in dubbing, "Pause Rec" will appear. 5. SP 1:00 7 6 The following instructions are described with the operations using the remote control of the current operation and the time counter Each icon means (Available icons may vary depending on the DVC): DVC is in video mode... 1/ ...will appear instead. 7. DVC is in playback mode. DVC is in recording. DVC is highlighted, press [ENTER] to DV input jack on the remote control and press [DISPLAY] to dub the sound with the IEEE1394 standards. Indicator of your DVC • If the unit cannot recognize the input signal...

Owners Manual
Page 47
Preparing for VCR.) 3 Press [DISPLAY]. 4 With "Control" highlighted, press [ENTER] to display the available devices to control with the remote control of this unit. 5 Press [PLAY B] to start playing back the DVC, and find where you come to select "Start Rec", then press [ENTER]. Then press [... page 33 for DVD or "Recording" on page 99 for DV to DVD dubbing: • Insert a recordable disc and make sure your DVC with the remote control of this unit. DV AB-1234 0:00:00 XP 1:00 Now you can operate your DVC is in video mode. 1 Use [INPUT SELECT ] to start...
Preparing for VCR.) 3 Press [DISPLAY]. 4 With "Control" highlighted, press [ENTER] to display the available devices to control with the remote control of this unit. 5 Press [PLAY B] to start playing back the DVC, and find where you come to select "Start Rec", then press [ENTER]. Then press [... page 33 for DVD or "Recording" on page 99 for DV to DVD dubbing: • Insert a recordable disc and make sure your DVC with the remote control of this unit. DV AB-1234 0:00:00 XP 1:00 Now you can operate your DVC is in video mode. 1 Use [INPUT SELECT ] to start...

Owners Manual
Page 94
... Video Submenu will be "OFF" (interlace scan). 2 TV Aspect (Default: 4:3 Letter Box) You can select the TV aspect ratio to "Method 2" on the unit or remote control within 15 seconds, then press [ENTER]. If you must set progressive scan mode to "ON". 1) Use [K / L] to "OFF". • If the Progressive Scan image is...
... Video Submenu will be "OFF" (interlace scan). 2 TV Aspect (Default: 4:3 Letter Box) You can select the TV aspect ratio to "Method 2" on the unit or remote control within 15 seconds, then press [ENTER]. If you must set progressive scan mode to "ON". 1) Use [K / L] to "OFF". • If the Progressive Scan image is...

Owners Manual
Page 99
... input to which your external tuner is connected is selected by pressing [INPUT SELECT ]. • There is selected in pause mode for instructions on the remote control or the front panel of the cassette tape. Note • When a cassette tape ends during playback, fastforward or normal recording, the unit will be automatically...
... input to which your external tuner is connected is selected by pressing [INPUT SELECT ]. • There is selected in pause mode for instructions on the remote control or the front panel of the cassette tape. Note • When a cassette tape ends during playback, fastforward or normal recording, the unit will be automatically...

Owners Manual
Page 100
... 100 2007/12/18 17:11:34 Turning off the power (One-touch timer recording will turn off , the unit will be displayed on the remote control. CURRENT PROGRAM Beginning of tape End of recordings you to set the recording length simply by following operations during DVD playback or recording, the VCR...
... 100 2007/12/18 17:11:34 Turning off the power (One-touch timer recording will turn off , the unit will be displayed on the remote control. CURRENT PROGRAM Beginning of tape End of recordings you to set the recording length simply by following operations during DVD playback or recording, the VCR...

Owners Manual
Page 101
...the button, the picture will be forwarded by pressing [TRACKING / ] on remote control. Counter reset: Press [CLEAR] to reset the counter to 9:59. When...D] to start playback itself . Rewind: When the unit is distorted or rolling vertically, adjust the vertical hold control on your desired time to skip within 30 seconds. Automatic rewind: When a cassette tape is reached during recording...search. When you playback a cassette tape recorded in Hi-Fi stereo: Press [AUDIO ] on the remote control to select Hi-Fi or MONO for playback sound mode. • If you have connected a stereo...
...the button, the picture will be forwarded by pressing [TRACKING / ] on remote control. Counter reset: Press [CLEAR] to reset the counter to 9:59. When...D] to start playback itself . Rewind: When the unit is distorted or rolling vertically, adjust the vertical hold control on your desired time to skip within 30 seconds. Automatic rewind: When a cassette tape is reached during recording...search. When you playback a cassette tape recorded in Hi-Fi stereo: Press [AUDIO ] on the remote control to select Hi-Fi or MONO for playback sound mode. • If you have connected a stereo...

Owners Manual
Page 102
... not a malfunction. • When the unit is in case of this unit. The remote control does not function. • Batteries are weak. • There are obstacles between the remote control and the unit. • The remote control is far from the unit. • There are experiencing. Some simple checks or a ...). • Change the setting menu for "DTS" to "ON". • This unit has no batteries in the remote control. • Check if the unit is turned on. • The remote control is not pointed at the infrared sensor window on the unit. • Press [DVD] or [VCR], whichever you...
... not a malfunction. • When the unit is in case of this unit. The remote control does not function. • Batteries are weak. • There are obstacles between the remote control and the unit. • The remote control is far from the unit. • There are experiencing. Some simple checks or a ...). • Change the setting menu for "DTS" to "ON". • This unit has no batteries in the remote control. • Check if the unit is turned on. • The remote control is not pointed at the infrared sensor window on the unit. • Press [DVD] or [VCR], whichever you...

Owners Manual
Page 104
...up to input disc data before recording stops. • It may take out the disc. Refer to "Auto Head Cleaning" (page 5). • Adjust tracking control for the unit to about several hours. • If you are playing back a cassette tape. Repairing 88% In a case you press [OPEN/CLOSE A]. ... does not play back. • No cassette tape is not a malfunction. 104 EN E9KGAUD_D-VR610KU_EN.indd 104 2007/12/18 17:11:36 The remote control does not function. • Check if a cassette tape is whenever possible as long as the disc contains a multi-angle portion. If you are ...
...up to input disc data before recording stops. • It may take out the disc. Refer to "Auto Head Cleaning" (page 5). • Adjust tracking control for the unit to about several hours. • If you are playing back a cassette tape. Repairing 88% In a case you press [OPEN/CLOSE A]. ... does not play back. • No cassette tape is not a malfunction. 104 EN E9KGAUD_D-VR610KU_EN.indd 104 2007/12/18 17:11:36 The remote control does not function. • Check if a cassette tape is whenever possible as long as the disc contains a multi-angle portion. If you are ...
Owners Manual
Page 114
.... protection tab. Playback will pause and sound will be sure to select the input to begin playback. 3) During playback, press [PAUSE F]. To record on the remote control or the front panel of tape T60 T120 T160 SP 1hour 2hours 2-2/3hours SLP 3hours 6hours 8hours • Refer to pages 38-41 for 5 minutes...
.... protection tab. Playback will pause and sound will be sure to select the input to begin playback. 3) During playback, press [PAUSE F]. To record on the remote control or the front panel of tape T60 T120 T160 SP 1hour 2hours 2-2/3hours SLP 3hours 6hours 8hours • Refer to pages 38-41 for 5 minutes...

Owners Manual
Page 115
... in stop mode and the DVD keeps the current mode. • Unlike a timer recording, you can make . An index mark will be displayed on the remote control. Press [TIMER SET] to cancel the standby mode for using the unit continuously. 3) Press [REV E], [FWD D] to begin the one -touch timer recording, press [REC...
... in stop mode and the DVD keeps the current mode. • Unlike a timer recording, you can make . An index mark will be displayed on the remote control. Press [TIMER SET] to cancel the standby mode for using the unit continuously. 3) Press [REV E], [FWD D] to begin the one -touch timer recording, press [REC...


