
Installation Guide - English
Page 1
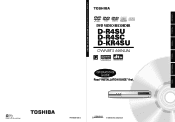
Introduction Connections DIGITAL VIDEO DVD VIDEO RECORDER D-R4SU D-R4SC D-KR4SU OWNER'S MANUAL INSTALLATION GUIDE Read this booklet first. Basic Setup P000416400 H PM0020460011 © 2005 Toshiba Corporation
Introduction Connections DIGITAL VIDEO DVD VIDEO RECORDER D-R4SU D-R4SC D-KR4SU OWNER'S MANUAL INSTALLATION GUIDE Read this booklet first. Basic Setup P000416400 H PM0020460011 © 2005 Toshiba Corporation

Installation Guide - English
Page 10
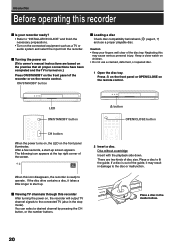
... Accessories Remote control Batteries (AAA) x 2 Coaxial cable Video/audio cable • Owner's manual (INSTALLATION GUIDE) • Owner's manual (OPERATIONS GUIDE) Introduction Installation procedure Read carefully "SAFETY PRECAUTIONS", "IMPORTANT SAFETY INSTRUCTIONS" and "Precautions". ( pages 2 to 9) Check the supplied accessories. (See right) Load the batteries in the remote control. ( ...
... Accessories Remote control Batteries (AAA) x 2 Coaxial cable Video/audio cable • Owner's manual (INSTALLATION GUIDE) • Owner's manual (OPERATIONS GUIDE) Introduction Installation procedure Read carefully "SAFETY PRECAUTIONS", "IMPORTANT SAFETY INSTRUCTIONS" and "Precautions". ( pages 2 to 9) Check the supplied accessories. (See right) Load the batteries in the remote control. ( ...
Owner's Manual - English
Page 1
Printed on 70% Recycled Paper TOSHIBA DVD VIDEO RECORDER D-R4SU/D-R4SC/D-KR4SU DIGITAL VIDEO DVD VIDEO RECORDER D-R4SU D-R4SC D-KR4SU OWNER'S MANUAL OPERATIONS GUIDE Read "INSTALLATION GUIDE" first. Printed in China P000416410 H PM0020461012 © 2005 Toshiba Corporation Others Function setup Editing Playback Recording Introduction
Printed on 70% Recycled Paper TOSHIBA DVD VIDEO RECORDER D-R4SU/D-R4SC/D-KR4SU DIGITAL VIDEO DVD VIDEO RECORDER D-R4SU D-R4SC D-KR4SU OWNER'S MANUAL OPERATIONS GUIDE Read "INSTALLATION GUIDE" first. Printed in China P000416410 H PM0020461012 © 2005 Toshiba Corporation Others Function setup Editing Playback Recording Introduction

Owner's Manual - English
Page 4
Introduction Caution for safety Read "SAFETY PRECAUTIONS", "IMPORTANT SAFETY INSTRUCTIONS", and all other sections of the "INSTALLATION GUIDE" that came with this product prior to reading this "OPERATIONS GUIDE". 4
Introduction Caution for safety Read "SAFETY PRECAUTIONS", "IMPORTANT SAFETY INSTRUCTIONS", and all other sections of the "INSTALLATION GUIDE" that came with this product prior to reading this "OPERATIONS GUIDE". 4
Owner's Manual - English
Page 12
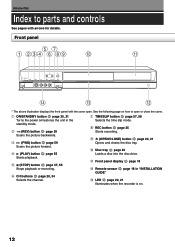
... and closes the disc tray. !0 Disc tray page 20 Loads a disc into the disc drive. !1 Front panel display page 18 !2 Remote sensor page 18 in "INSTALLATION GUIDE" !3 LED page 20, 21 Illuminates when the recorder is on /restores the unit in the standby mode. Introduction Index to open . y CH buttons page 20...
... and closes the disc tray. !0 Disc tray page 20 Loads a disc into the disc drive. !1 Front panel display page 18 !2 Remote sensor page 18 in "INSTALLATION GUIDE" !3 LED page 20, 21 Illuminates when the recorder is on /restores the unit in the standby mode. Introduction Index to open . y CH buttons page 20...
Owner's Manual - English
Page 14
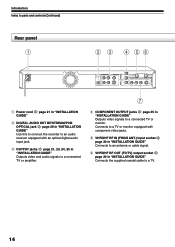
... signals to a connected TV or amplifier. 7 r COMPONENT OUTPUT jacks page 25 in "INSTALLATION GUIDE" Connects to an antenna or cable signal. t VHF/UHF RF IN (FROM ANT.) input socket page 20 in "INSTALLATION GUIDE" Outputs video signals to a connected TV or monitor. Connects to a TV or monitor ...equipped with an optical digital audio input jack. y VHF/UHF RF OUT (TO TV) output socket page 20 in "INSTALLATION GUIDE" Use this to connect the recorder to an audio receiver equipped with component video jacks. Introduction Index to parts and controls (Continued) Rear panel...
... signals to a connected TV or amplifier. 7 r COMPONENT OUTPUT jacks page 25 in "INSTALLATION GUIDE" Connects to an antenna or cable signal. t VHF/UHF RF IN (FROM ANT.) input socket page 20 in "INSTALLATION GUIDE" Outputs video signals to a connected TV or monitor. Connects to a TV or monitor ...equipped with an optical digital audio input jack. y VHF/UHF RF OUT (TO TV) output socket page 20 in "INSTALLATION GUIDE" Use this to connect the recorder to an audio receiver equipped with component video jacks. Introduction Index to parts and controls (Continued) Rear panel...
Owner's Manual - English
Page 17
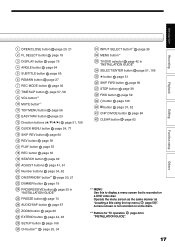
... button page 106 30 CH button*2 page 20, 34 31 INPUT SELECT button*2 page 39 32 MENU button*1 33 TV/DVD selector page 42 in "INSTALLATION GUIDE". 17 Others Function setup Editing Playback Recording Introduction Operate the menu screen as the same manner as "Locating a title using the top menu ( page 56...)". A menu screen is not recorded on some discs. *2 Buttons for TV operation page 42 in "INSTALLATION GUIDE" 34 SELECT/ENTER button page 51, 106 35 button page 51 36 SKIP FWD button page 60 37 STOP button page 39 38 FWD button...
... button page 106 30 CH button*2 page 20, 34 31 INPUT SELECT button*2 page 39 32 MENU button*1 33 TV/DVD selector page 42 in "INSTALLATION GUIDE". 17 Others Function setup Editing Playback Recording Introduction Operate the menu screen as the same manner as "Locating a title using the top menu ( page 56...)". A menu screen is not recorded on some discs. *2 Buttons for TV operation page 42 in "INSTALLATION GUIDE" 34 SELECT/ENTER button page 51, 106 35 button page 51 36 SKIP FWD button page 60 37 STOP button page 39 38 FWD button...
Owner's Manual - English
Page 20
...to the connected TV (also in the stop mode). Place a disc in damage to "INSTALLATION GUIDE" and finish the necessary preparations. • Turn on , the recorder will output TV channel signals to fit the guide. Neglecting this may result in the inside hollow. 20 Loading When this icon disappears, the... number buttons. 2 Insert a disc. There are based on the premise that all proper connections have been completed and the TV is out of the guide, it takes a little longer to operate. page 6, 7) Caution • Keep your recorder ready? • Refer to the disc or malfunction. ...
...to the connected TV (also in the stop mode). Place a disc in damage to "INSTALLATION GUIDE" and finish the necessary preparations. • Turn on , the recorder will output TV channel signals to fit the guide. Neglecting this may result in the inside hollow. 20 Loading When this icon disappears, the... number buttons. 2 Insert a disc. There are based on the premise that all proper connections have been completed and the TV is out of the guide, it takes a little longer to operate. page 6, 7) Caution • Keep your recorder ready? • Refer to the disc or malfunction. ...
Owner's Manual - English
Page 26
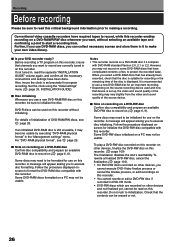
... Check that have complicated contents (often, to protect the recorded data). Set the clock using the "Initial settings" menu ( page 33, INSTALLATION GUIDE). Disc initializing Whenever you can be used and how that the disc is suitable for recording or the remaining time of the disc is set...RAM discs, you use on the source recording device used on this recorder. Recording Before recording Please be sure to read the separate "INSTALLATION GUIDE" volume again, and confirm all the necessary connections and settings have been done. When you use on a DVD-RAM disc if it...
... Check that have complicated contents (often, to protect the recorded data). Set the clock using the "Initial settings" menu ( page 33, INSTALLATION GUIDE). Disc initializing Whenever you can be used and how that the disc is suitable for recording or the remaining time of the disc is set...RAM discs, you use on the source recording device used on this recorder. Recording Before recording Please be sure to read the separate "INSTALLATION GUIDE" volume again, and confirm all the necessary connections and settings have been done. When you use on a DVD-RAM disc if it...
Owner's Manual - English
Page 42
... set for D /M1. Dolby Digital 192 kbps is set summer time on the clock of the recorder, see the notes on page 34 in the "INSTALLATION GUIDE". ** The digital recording technology for consumer products of the disc. (If the disc does not have room for details on "Video" . • If you use...
... set for D /M1. Dolby Digital 192 kbps is set summer time on the clock of the recorder, see the notes on page 34 in the "INSTALLATION GUIDE". ** The digital recording technology for consumer products of the disc. (If the disc does not have room for details on "Video" . • If you use...

Owner's Manual - English
Page 66
...; The zoom feature is canceled when the disc menu is operated. • The magnification level varies depending on the picture size you select ( page 40, "INSTALLATION GUIDE"). • The zoom feature is not available while displaying a GUI. • The zoom feature is canceled when you stop playback or start playback. OPEN/CLOSE...
...; The zoom feature is canceled when the disc menu is operated. • The magnification level varies depending on the picture size you select ( page 40, "INSTALLATION GUIDE"). • The zoom feature is not available while displaying a GUI. • The zoom feature is canceled when you stop playback or start playback. OPEN/CLOSE...
Owner's Manual - English
Page 70
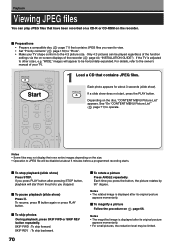
... rotate a picture Press ANGLE repeatedly. See "On "CONTENT MENU Picture List"" ( page 71) to other sizes, e.g. Depending on -screen displays of the recorder ( page 40, "INSTALLATION GUIDE"). To pause playback (slide show does not start from the photo you want to view. • Set "Priority contents" ( page 116) to the 4:3 picture size...
... rotate a picture Press ANGLE repeatedly. See "On "CONTENT MENU Picture List"" ( page 71) to other sizes, e.g. Depending on -screen displays of the recorder ( page 40, "INSTALLATION GUIDE"). To pause playback (slide show does not start from the photo you want to view. • Set "Priority contents" ( page 116) to the 4:3 picture size...
Owner's Manual - English
Page 109
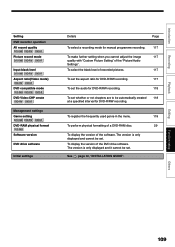
To display the version of the software. The version is only displayed and cannot be set . See page 30, "INSTALLATION GUIDE". The version is only displayed and it cannot be automatically created 118 at a specified interval for manual programme recording. 117 To make further setting when ...
To display the version of the software. The version is only displayed and cannot be set . See page 30, "INSTALLATION GUIDE". The version is only displayed and it cannot be automatically created 118 at a specified interval for manual programme recording. 117 To make further setting when ...
Owner's Manual - English
Page 115
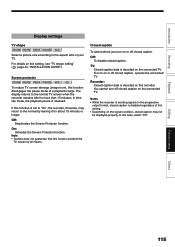
.... To turn on this function protects the TV screen by leaving it for more than 15 minutes. Note • Toshiba does not guarantee that this setting, see "TV shape setting" ( page 40, "INSTALLATION GUIDE"). Off: To disable closed caption on the connected TV. Recorder: Closed caption data is decoded on the connected TV...
.... To turn on this function protects the TV screen by leaving it for more than 15 minutes. Note • Toshiba does not guarantee that this setting, see "TV shape setting" ( page 40, "INSTALLATION GUIDE"). Off: To disable closed caption on the connected TV. Recorder: Closed caption data is decoded on the connected TV...
Owner's Manual - English
Page 116
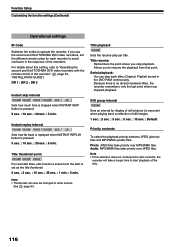
... settings (Continued) Operational settings IR Code Switches the codes to "Operating the second and third TOSHIBA DVD video recorders with the remote control of this recorder" ( page 44, "INSTALLATION GUIDE"). Title thumbnail point DVD-RAM DVD-RW DVD-R For recorded titles, sets how far a scene... from that point. Allows you use the second and third TOSHIBA DVD video recorders, set as the title thumbnail. 0 sec. : 3...
... settings (Continued) Operational settings IR Code Switches the codes to "Operating the second and third TOSHIBA DVD video recorders with the remote control of this recorder" ( page 44, "INSTALLATION GUIDE"). Title thumbnail point DVD-RAM DVD-RW DVD-R For recorded titles, sets how far a scene... from that point. Allows you use the second and third TOSHIBA DVD video recorders, set as the title thumbnail. 0 sec. : 3...
Owner's Manual - English
Page 123
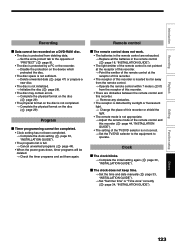
... again. Program Timer programming cannot be completed. • Clock setting has not been completed. → Complete the clock setting ( page 33, "INSTALLATION GUIDE"). • The programs list is full. → Cancel unwanted programs ( page 44). • When the power goes down, timer programs will...• The remote mode is not appropriate. → Adjust the remote mode of the remote control and this recorder ( page 44, "INSTALLATION GUIDE"). • The setting of this recorder. • There are exhausted. → Replace all the batteries in the remote control are obstacles...
... again. Program Timer programming cannot be completed. • Clock setting has not been completed. → Complete the clock setting ( page 33, "INSTALLATION GUIDE"). • The programs list is full. → Cancel unwanted programs ( page 44). • When the power goes down, timer programs will...• The remote mode is not appropriate. → Adjust the remote mode of the remote control and this recorder ( page 44, "INSTALLATION GUIDE"). • The setting of this recorder. • There are exhausted. → Replace all the batteries in the remote control are obstacles...
