Satellite A60/A65 Users Guide
Page 29
... computer's features and specifications.... 53 Turning on the power 53 Activating the power-on password 54 Using the TouchPad 55 Using TOSHIBA Touch and Launch 58 Installing additional memory (optional 62 Removing a memory module 66 Using an external keyboard 68 Connecting a mouse 68 Connecting a printer 69 Connecting a USB printer 69 Connecting a parallel printer...
... computer's features and specifications.... 53 Turning on the power 53 Activating the power-on password 54 Using the TouchPad 55 Using TOSHIBA Touch and Launch 58 Installing additional memory (optional 62 Removing a memory module 66 Using an external keyboard 68 Connecting a mouse 68 Connecting a printer 69 Connecting a USB printer 69 Connecting a parallel printer...
Satellite A60/A65 Users Guide
Page 33
... 157 Customize Your Computer 159 Security 159 Power Management 159 Toshiba Hardware Setup 161 TOSHIBA Zooming Utility 163 Application Launch Button 164 Chapter 6: If Something Goes Wrong 165 Problems that are easy to fix 165 Problems when you turn ... help you 170 Resolving a hardware conflict 171 A plan of action 171 Resolving hardware conflicts on your own .... 172 Fixing a problem with Device Manager .......... 174 Memory module problems 176 Power and the batteries 177 Keyboard problems 178 Display problems 179 Disk drive problems 182 DVD-ROM or multi-function drive problems...
... 157 Customize Your Computer 159 Security 159 Power Management 159 Toshiba Hardware Setup 161 TOSHIBA Zooming Utility 163 Application Launch Button 164 Chapter 6: If Something Goes Wrong 165 Problems that are easy to fix 165 Problems when you turn ... help you 170 Resolving a hardware conflict 171 A plan of action 171 Resolving hardware conflicts on your own .... 172 Fixing a problem with Device Manager .......... 174 Memory module problems 176 Power and the batteries 177 Keyboard problems 178 Display problems 179 Disk drive problems 182 DVD-ROM or multi-function drive problems...
Satellite A60/A65 Users Guide
Page 46
46 Getting Started Setting up your computer Setting up your computer TECHNICAL NOTE: You must attach the AC adapter. See "Connecting to , a mouse, keyboard, printer, memory, and PC cards. To use external power or to enter the information about your computer. The first time you turn on your computer, the Setup ...
46 Getting Started Setting up your computer Setting up your computer TECHNICAL NOTE: You must attach the AC adapter. See "Connecting to , a mouse, keyboard, printer, memory, and PC cards. To use external power or to enter the information about your computer. The first time you turn on your computer, the Setup ...

Satellite A60/A65 Users Guide
Page 47
... site at www.register.toshiba.com. Registering your computer with Toshiba icon on the desktop. NOTE If you chose not to register now, you ." 4 Click Finish to : ❖ Add more memory (see "Installing additional memory (optional)" on page 46. A window displays the message,... "Thank you may also want to continue. Adding external devices NOTE Before adding external devices, Toshiba recommends setting up your software first. Your computer ...
... site at www.register.toshiba.com. Registering your computer with Toshiba icon on the desktop. NOTE If you chose not to register now, you ." 4 Click Finish to : ❖ Add more memory (see "Installing additional memory (optional)" on page 46. A window displays the message,... "Thank you may also want to continue. Adding external devices NOTE Before adding external devices, Toshiba recommends setting up your software first. Your computer ...
Satellite A60/A65 Users Guide
Page 62
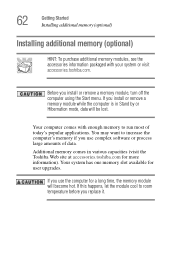
... more information). Your computer comes with your system or visit accessories.toshiba.com. 62 Getting Started Installing additional memory (optional) Installing additional memory (optional) HINT: To purchase additional memory modules, see the accessories information packaged with enough memory to run most of data. Additional memory comes in Stand by or Hibernation mode, data will become hot...
... more information). Your computer comes with your system or visit accessories.toshiba.com. 62 Getting Started Installing additional memory (optional) Installing additional memory (optional) HINT: To purchase additional memory modules, see the accessories information packaged with enough memory to run most of data. Additional memory comes in Stand by or Hibernation mode, data will become hot...
Satellite A60/A65 Users Guide
Page 63
...display panel and turn the computer upside down command" on . The operating system turns off the computer via the Start menu. Getting Started Installing additional memory (optional) 63 Do not try to the DVD-ROM or multi-function drive has been turned on . 2. You need a standard Phillips no .... screws, use the computer, begin at step 1, otherwise skip to install a memory module. The computer is on page 102. Power to install a memory module under the following conditions. Do not install or remove a memory module while the DVD-ROM or multi-function drive power is turned on . ...
...display panel and turn the computer upside down command" on . The operating system turns off the computer via the Start menu. Getting Started Installing additional memory (optional) 63 Do not try to the DVD-ROM or multi-function drive has been turned on . 2. You need a standard Phillips no .... screws, use the computer, begin at step 1, otherwise skip to install a memory module. The computer is on page 102. Power to install a memory module under the following conditions. Do not install or remove a memory module while the DVD-ROM or multi-function drive power is turned on . ...
Satellite A60/A65 Users Guide
Page 64
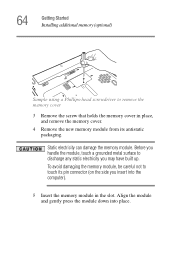
... its antistatic packaging. Align the module and gently press the module down into the computer). 5 Insert the memory module in place, and remove the memory cover. 4 Remove the new memory module from its pin connector (on the side you may have built up. Before you handle the module,... touch a grounded metal surface to discharge any static electricity you insert into place. 64 Getting Started Installing additional memory (optional) Sample ...
... its antistatic packaging. Align the module and gently press the module down into the computer). 5 Insert the memory module in place, and remove the memory cover. 4 Remove the new memory module from its pin connector (on the side you may have built up. Before you handle the module,... touch a grounded metal surface to discharge any static electricity you insert into place. 64 Getting Started Installing additional memory (optional) Sample ...
Satellite A60/A65 Users Guide
Page 65
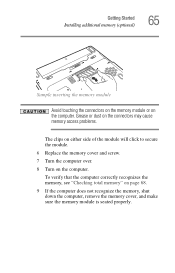
...recognizes the memory, see "Checking total memory" on the computer. Getting Started Installing additional memory (optional) 65 Sample inserting the memory module Avoid touching the connectors on the memory module or on page 68. 9 If the computer does not recognize the memory, shut down the computer, remove the memory cover,... and make sure the memory module is seated properly. Grease or dust on the connectors may cause memory access problems. The clips on either side of the module ...
...recognizes the memory, see "Checking total memory" on the computer. Getting Started Installing additional memory (optional) 65 Sample inserting the memory module Avoid touching the connectors on the memory module or on page 68. 9 If the computer does not recognize the memory, shut down the computer, remove the memory cover,... and make sure the memory module is seated properly. Grease or dust on the connectors may cause memory access problems. The clips on either side of the module ...
Satellite A60/A65 Users Guide
Page 66
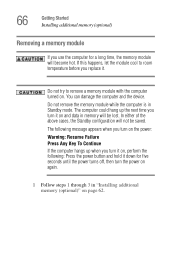
... it on, perform the following: Press the power button and hold it down for a long time, the memory module will become hot. Do not remove the memory module while the computer is in "Installing additional memory (optional)" on again. 1 Follow steps 1 through 3 in Standby mode. The computer could hang up when you turn... to room temperature before you use the computer for five seconds until the power turns off, then turn it on . 66 Getting Started Installing additional memory (optional) Removing a memory module If you replace it. If this happens, let the module cool to remove...
... it on, perform the following: Press the power button and hold it down for a long time, the memory module will become hot. Do not remove the memory module while the computer is in "Installing additional memory (optional)" on again. 1 Follow steps 1 through 3 in Standby mode. The computer could hang up when you turn... to room temperature before you use the computer for five seconds until the power turns off, then turn it on . 66 Getting Started Installing additional memory (optional) Removing a memory module If you replace it. If this happens, let the module cool to remove...
Satellite A60/A65 Users Guide
Page 67
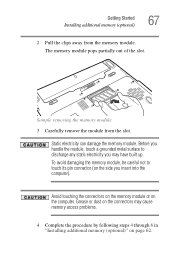
...to touch its pin connector (on the side you may cause memory access problems. 4 Complete the procedure by following steps 4 through 8 in "Installing additional memory (optional)" on the computer. Getting Started Installing additional memory (optional) 67 2 Pull the clips away from the slot.... To avoid damaging the memory module, be careful not to discharge any static electricity you ...
...to touch its pin connector (on the side you may cause memory access problems. 4 Complete the procedure by following steps 4 through 8 in "Installing additional memory (optional)" on the computer. Getting Started Installing additional memory (optional) 67 2 Pull the clips away from the slot.... To avoid damaging the memory module, be careful not to discharge any static electricity you ...
Satellite A60/A65 Users Guide
Page 68
... when using a USB keyboard. Connecting a mouse You may want to use a mouse instead of the TouchPad, the computer's built-in "Installing additional memory (optional)" on the computer. To connect a USB mouse, plug the mouse cable into one to one of the computer's USB ports. NOTE The ...Fn emulation key is USB-compatible. 68 Getting Started Using an external keyboard Checking total memory When you add or remove memory, you can attach one of the USB ports. To connect a keyboard, attach its cable to your computer provided that the...
... when using a USB keyboard. Connecting a mouse You may want to use a mouse instead of the TouchPad, the computer's built-in "Installing additional memory (optional)" on the computer. To connect a USB mouse, plug the mouse cable into one to one of the computer's USB ports. NOTE The ...Fn emulation key is USB-compatible. 68 Getting Started Using an external keyboard Checking total memory When you add or remove memory, you can attach one of the USB ports. To connect a keyboard, attach its cable to your computer provided that the...
Satellite A60/A65 Users Guide
Page 75
... 640 x 480 resolution, you are using the computer for a while. Powering off the computer It is a good idea to turn off your system settings to memory so that, when you turn on the computer again, you will automatically return to where you have work in the Display Properties window, click Advanced...
... 640 x 480 resolution, you are using the computer for a while. Powering off the computer It is a good idea to turn off your system settings to memory so that, when you turn on the computer again, you will automatically return to where you have work in the Display Properties window, click Advanced...

Satellite A60/A65 Users Guide
Page 79
... computing tips and provides important information about basic features. See "Setting battery alarms" on . You will lose all unsaved work temporarily stays in the computer's memory until you save feature which you can be configured to the hard disk at preset intervals. Your computer can turn on page 124. Computing tips...
... computing tips and provides important information about basic features. See "Setting battery alarms" on . You will lose all unsaved work temporarily stays in the computer's memory until you save feature which you can be configured to the hard disk at preset intervals. Your computer can turn on page 124. Computing tips...
Satellite A60/A65 Users Guide
Page 94
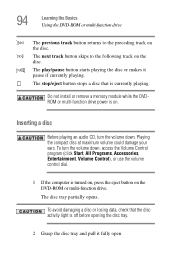
... that the disc activity light is turned on, press the eject button on the DVD-ROM or multi-function drive. Do not install or remove a memory module while the DVDROM or multi-function drive power is currently playing. To avoid damaging a disc or losing data, check that is on. The disc...
... that the disc activity light is turned on, press the eject button on the DVD-ROM or multi-function drive. Do not install or remove a memory module while the DVDROM or multi-function drive power is currently playing. To avoid damaging a disc or losing data, check that is on. The disc...

Satellite A60/A65 Users Guide
Page 101
... a disc or place heavy objects on the surface of a compact disc can prevent the drive from reading the data properly. ❖ Avoid exposing discs to memory and enters a low power mode ❖ Restart, which restarts the computer Powering down the computer NOTE Pushing the power button before inserting it in a circle...
... a disc or place heavy objects on the surface of a compact disc can prevent the drive from reading the data properly. ❖ Avoid exposing discs to memory and enters a low power mode ❖ Restart, which restarts the computer Powering down the computer NOTE Pushing the power button before inserting it in a circle...
Satellite A60/A65 Users Guide
Page 103
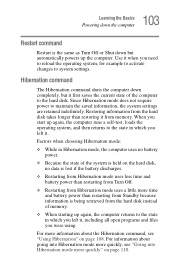
103 Learning the Basics Powering down the computer Restart command Restart is being retrieved from memory. Use it from the hard disk instead of the computer to system settings. When you start up again, the computer runs a self-test, loads... saved information, the system settings are retained indefinitely. Hibernation command The Hibernation command shuts the computer down but it first saves the current state of memory. ❖ When starting up the computer. Restoring information from Hibernation mode uses a little more quickly, see "Using Hibernation" on page 110. For more ...
103 Learning the Basics Powering down the computer Restart command Restart is being retrieved from memory. Use it from the hard disk instead of the computer to system settings. When you start up again, the computer runs a self-test, loads... saved information, the system settings are retained indefinitely. Hibernation command The Hibernation command shuts the computer down but it first saves the current state of memory. ❖ When starting up the computer. Restoring information from Hibernation mode uses a little more quickly, see "Using Hibernation" on page 110. For more ...
Satellite A60/A65 Users Guide
Page 104
... going into Standby mode more quickly" on page 112. 104 Learning the Basics Powering down using . Standby holds the current state of the computer in memory so that, when you restart the computer, you can continue working from Turn Off or Hibernation mode. ❖ When starting up again, the computer returns...
... going into Standby mode more quickly" on page 112. 104 Learning the Basics Powering down using . Standby holds the current state of the computer in memory so that, when you restart the computer, you can continue working from Turn Off or Hibernation mode. ❖ When starting up again, the computer returns...
Satellite A60/A65 Users Guide
Page 112
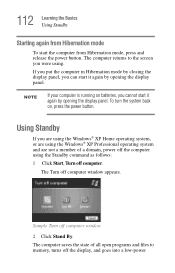
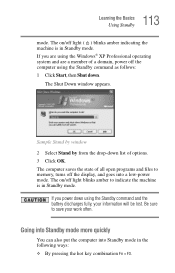
... it again by opening the display panel. Sample Turn off computer window appears. The Turn off computer window 2 Click Stand By. The computer returns to memory, turns off computer. NOTE If your computer is running on , press the power button. To turn the system back on batteries, you were using the...
... it again by opening the display panel. Sample Turn off computer window appears. The Turn off computer window 2 Click Stand By. The computer returns to memory, turns off computer. NOTE If your computer is running on , press the power button. To turn the system back on batteries, you were using the...
Satellite A60/A65 Users Guide
Page 113
... Fn + F3. If you power down using the Standby command as follows: 1 Click Start, then Shut down list of all open programs and files to memory, turns off light blinks amber to save your information will be lost. The Shut Down window appears. The computer saves the state of options. 3 Click...
... Fn + F3. If you power down using the Standby command as follows: 1 Click Start, then Shut down list of all open programs and files to memory, turns off light blinks amber to save your information will be lost. The Shut Down window appears. The computer saves the state of options. 3 Click...
Satellite A60/A65 Users Guide
Page 120
.... When fully charged it powered on for up to store your computer on page 129. The RTC battery powers the System Time Clock and BIOS memory used to a month when the computer is powered off even when the AC adapter is low, the real-time clock and calendar may vary by...
.... When fully charged it powered on for up to store your computer on page 129. The RTC battery powers the System Time Clock and BIOS memory used to a month when the computer is powered off even when the AC adapter is low, the real-time clock and calendar may vary by...


