
Owners Manual
Page 3
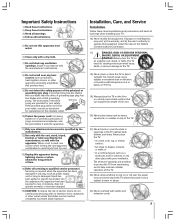
..., liquid has been spilled or objects have fallen into your outlet, consult an electrician for replacement of the obsolete outlet. 10) Protect the power cord from overheating and to help maintain reliable operation of the polarized or grounding type plug. QUALIFIED SERVICE TECHNICIAN 21) Never block or cover ..., and the point where it exits the apparatus. 19) Always place the TV on top of the unit. 20) Never place items such as power supply cord or plug is used, use attachments/accessories specified by the manufacturer. 12) Use only with the cart, stand, tripod, bracket, or ...
..., liquid has been spilled or objects have fallen into your outlet, consult an electrician for replacement of the obsolete outlet. 10) Protect the power cord from overheating and to help maintain reliable operation of the polarized or grounding type plug. QUALIFIED SERVICE TECHNICIAN 21) Never block or cover ..., and the point where it exits the apparatus. 19) Always place the TV on top of the unit. 20) Never place items such as power supply cord or plug is used, use attachments/accessories specified by the manufacturer. 12) Use only with the cart, stand, tripod, bracket, or ...

Owners Manual
Page 4
... sunlight or room lights reflect on left and right sides of time, the image can become frequent or continuous, unplug the power cord and contact a Toshiba Authorized Service Center. Care For better performance and safer operation of your TV on the screen, and then remove the source of... the National Electric Code). Turn the TV off . Never locate the antenna near overhead power lines or other hazards. QUALIFIED SERVICE TECHNICIAN 35...
... sunlight or room lights reflect on left and right sides of time, the image can become frequent or continuous, unplug the power cord and contact a Toshiba Authorized Service Center. Care For better performance and safer operation of your TV on the screen, and then remove the source of... the National Electric Code). Turn the TV off . Never locate the antenna near overhead power lines or other hazards. QUALIFIED SERVICE TECHNICIAN 35...

Owners Manual
Page 6
... the ON/OFF timer 82 Setting the sleep timer 82 Displaying TV setting information on-screen 83 Viewing the demo mode 83 Understanding the auto power off feature 83 Understanding the last mode memory feature 83 Chapter 9: Using the Locks menu 84 Entering the PIN code 84 If you cannot remember... Guide On Screen FAQs 90 Chapter 11: Appendix 93 Specifications 93 Limited United States Warranty 94 Limited Canada Warranty 95 Index 98 6 Copyright © 2003 TOSHIBA CORPORATION. All rights reserved.
... the ON/OFF timer 82 Setting the sleep timer 82 Displaying TV setting information on-screen 83 Viewing the demo mode 83 Understanding the auto power off feature 83 Understanding the last mode memory feature 83 Chapter 9: Using the Locks menu 84 Entering the PIN code 84 If you cannot remember... Guide On Screen FAQs 90 Chapter 11: Appendix 93 Specifications 93 Limited United States Warranty 94 Limited Canada Warranty 95 Index 98 6 Copyright © 2003 TOSHIBA CORPORATION. All rights reserved.

Owners Manual
Page 7
... of Dolby Laboratories. IN NO EVENT SHALL GEMSTAR-TV GUIDE INTERNATIONAL, INC., AND/OR ITS RELATED AFFILIATES, AND/OR TOSHIBA AMERICA CONSUMER PRODUCTS BE LIABLE FOR ANY AMOUNTS REPRESENTING LOSS OF PROFITS, LOSS OF BUSINESS, OR INDIRECT, SPECIAL, OR ...International and/or one of its affiliates. All rights reserved. 7 To stop the Quick Connect Guide, press EXIT or POWER. This feature provides on connecting other devices to your TV. • Model 57HX93 is required for the TV Guide ...same name as possible. • This manual applies to models 51HX93, 57HX93, and 65HX93.
... of Dolby Laboratories. IN NO EVENT SHALL GEMSTAR-TV GUIDE INTERNATIONAL, INC., AND/OR ITS RELATED AFFILIATES, AND/OR TOSHIBA AMERICA CONSUMER PRODUCTS BE LIABLE FOR ANY AMOUNTS REPRESENTING LOSS OF PROFITS, LOSS OF BUSINESS, OR INDIRECT, SPECIAL, OR ...International and/or one of its affiliates. All rights reserved. 7 To stop the Quick Connect Guide, press EXIT or POWER. This feature provides on connecting other devices to your TV. • Model 57HX93 is required for the TV Guide ...same name as possible. • This manual applies to models 51HX93, 57HX93, and 65HX93.

Owners Manual
Page 8
...:bomle. Carefully read the "Important Safety Precautions for Split Cabinet Feature" on pages 88-92. 23. THIS TYPE OF DAMAGE IS NOT COVERED UNDER THE TOSHIBA WARRANTY BECAUSE IT IS A RESULT OF MISUSE. • Read "Installation" on the floor only. • Place the TV in the remote control (...where light does not reflect on using the TV Guide On Screen™ program guide (if available in any power cords until AFTER you have connected all cables and devices, plug in the power cords for a quick overview of the TV's menu structure and navigation (pages 34-35). ➚ ANT...
...:bomle. Carefully read the "Important Safety Precautions for Split Cabinet Feature" on pages 88-92. 23. THIS TYPE OF DAMAGE IS NOT COVERED UNDER THE TOSHIBA WARRANTY BECAUSE IT IS A RESULT OF MISUSE. • Read "Installation" on the floor only. • Place the TV in the remote control (...where light does not reflect on using the TV Guide On Screen™ program guide (if available in any power cords until AFTER you have connected all cables and devices, plug in the power cords for a quick overview of the TV's menu structure and navigation (pages 34-35). ➚ ANT...
Owners Manual
Page 9
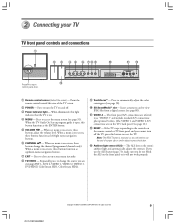
...button. 5 VOLUME x • - When a menu is on -screen menu instantly. 8 TV/VIDEO - Press to turn off . 3 Power indicator light - When no menu is on and off the TV, press this button functions as left/right menu navigation buttons. 6 CHANNEL yz...RESET button is on the front panel or it will need to use the end of the TV screen. 2 POWER - Point the remote control toward this light indicates that the TV is on-screen, these buttons change the ... use the ALS feature (page 73), make sure you are on . 4 MENU - Copyright © 2003 TOSHIBA CORPORATION. All rights reserved. 9
...button. 5 VOLUME x • - When a menu is on -screen menu instantly. 8 TV/VIDEO - Press to turn off . 3 Power indicator light - When no menu is on and off the TV, press this button functions as left/right menu navigation buttons. 6 CHANNEL yz...RESET button is on the front panel or it will need to use the end of the TV screen. 2 POWER - Point the remote control toward this light indicates that the TV is on-screen, these buttons change the ... use the ALS feature (page 73), make sure you are on . 4 MENU - Copyright © 2003 TOSHIBA CORPORATION. All rights reserved. 9
Owners Manual
Page 11
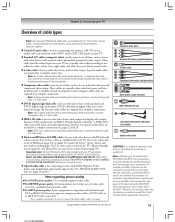
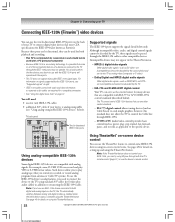
...that meets CEA specifications for a complete connection. Separate audio cables are required for a complete connection. DVI-D cable delivers digital video in any power cords until you want to use an S-video cable instead of a standard (composite) video cable. ● For BEST picture quality: If ... your TV includes both video and audio information; These cables are typically color-coded red, green, and blue. (ColorStream® is Toshiba's brand of three and are for use with video devices with uncompressed DVI-D digital single-link output. Note: Component video cables provide...
...that meets CEA specifications for a complete connection. Separate audio cables are required for a complete connection. DVI-D cable delivers digital video in any power cords until you want to use an S-video cable instead of a standard (composite) video cable. ● For BEST picture quality: If ... your TV includes both video and audio information; These cables are typically color-coded red, green, and blue. (ColorStream® is Toshiba's brand of three and are for use with video devices with uncompressed DVI-D digital single-link output. Note: Component video cables provide...
Owners Manual
Page 21
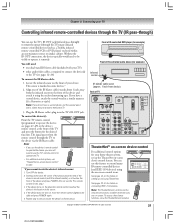
...set up and using TheaterNet. To access other audio/video cables as a Toshiba infrared remote-controlled VCR or DVD player) enclosed within an entertainment center or similar cabinet. TV CABLE/SAT VCR LIGHT SLEEP POWER DVD AUDIO1 AUDIO2 MODE 123 456 PIC SIZE 78 ACTION MENU +10 .../SPTUEDPTVDECXPLLISERTAEAKCYRIAPL/LSEARFMFCUHTE VTCVR/ AM/FM DISC STOP REC POP CH SPLIT SWAP POP DIRECT CH FREEZE CH SCAN SOURCE Copyright © 2003 TOSHIBA CORPORATION. If the device turns on some devices.* 2. All rights reserved. 21 You will need to use the TV's remote control...
...set up and using TheaterNet. To access other audio/video cables as a Toshiba infrared remote-controlled VCR or DVD player) enclosed within an entertainment center or similar cabinet. TV CABLE/SAT VCR LIGHT SLEEP POWER DVD AUDIO1 AUDIO2 MODE 123 456 PIC SIZE 78 ACTION MENU +10 .../SPTUEDPTVDECXPLLISERTAEAKCYRIAPL/LSEARFMFCUHTE VTCVR/ AM/FM DISC STOP REC POP CH SPLIT SWAP POP DIRECT CH FREEZE CH SCAN SOURCE Copyright © 2003 TOSHIBA CORPORATION. If the device turns on some devices.* 2. All rights reserved. 21 You will need to use the TV's remote control...
Owners Manual
Page 22
... supported by the TV, these ports are compatible with the TV's remote control (page 21) or use the device's remote control. 22 Copyright © 2003 TOSHIBA CORPORATION. Such devices allow the TV to control the Cable box through IEEE-1394. - Using TheaterNet™ on-screen device control You can use the... with analog signals. See page 45 for details on setting up and using the TheaterNet feature. EIA-775 digital control allows tuning devices (such as power, play VHS or S-VHS format videos.
... supported by the TV, these ports are compatible with the TV's remote control (page 21) or use the device's remote control. 22 Copyright © 2003 TOSHIBA CORPORATION. Such devices allow the TV to control the Cable box through IEEE-1394. - Using TheaterNet™ on-screen device control You can use the... with analog signals. See page 45 for details on setting up and using the TheaterNet feature. EIA-775 digital control allows tuning devices (such as power, play VHS or S-VHS format videos.

Owners Manual
Page 24
...two IEEE-1394 ports for longer distances between each of the chain or leave the power switch ON at the end of the chain will interfere with your existing IEEE-1394A devices. 24 Copyright © 2003 TOSHIBA CORPORATION. Chain connection Connect the first IEEE-1394 device to one of the TV...'s IEEE-1394 inputs, and then connect each chain. The higher the "S" number, the faster the device. If the power switch is OFF, it in the chain back ...
...two IEEE-1394 ports for longer distances between each of the chain or leave the power switch ON at the end of the chain will interfere with your existing IEEE-1394A devices. 24 Copyright © 2003 TOSHIBA CORPORATION. Chain connection Connect the first IEEE-1394 device to one of the TV...'s IEEE-1394 inputs, and then connect each chain. The higher the "S" number, the faster the device. If the power switch is OFF, it in the chain back ...
Owners Manual
Page 25
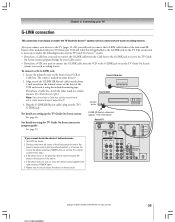
...LINK jack on some devices.* 2. This connection is the location of VCR Infrared sensor For details on the front of the device and press POWER. (Do not use the TV Guide On Screen system's one-touch recording feature. Align one -touch recording features. Starting at right.) ... AUDIO AUDIO R R OUT VIDEO L/ MONO AUDIO R AUDIO CENTER CHANNEL IN L VAR AUDIO ON OFF R DIGITAL AUDIO OUT TheaterNet IR OUT Copyright © 2003 TOSHIBA CORPORATION. To connect to connect the G-LINK cable (either of TV ANT( 75 ) ANT-1 ANT-2 REC OUT G-LINK DVI/HDCP IN TheaterNet IEEE1394 1 IEEE1394 2...
...LINK jack on some devices.* 2. This connection is the location of VCR Infrared sensor For details on the front of the device and press POWER. (Do not use the TV Guide On Screen system's one-touch recording feature. Align one -touch recording features. Starting at right.) ... AUDIO AUDIO R R OUT VIDEO L/ MONO AUDIO R AUDIO CENTER CHANNEL IN L VAR AUDIO ON OFF R DIGITAL AUDIO OUT TheaterNet IR OUT Copyright © 2003 TOSHIBA CORPORATION. To connect to connect the G-LINK cable (either of TV ANT( 75 ) ANT-1 ANT-2 REC OUT G-LINK DVI/HDCP IN TheaterNet IEEE1394 1 IEEE1394 2...
Owners Manual
Page 26
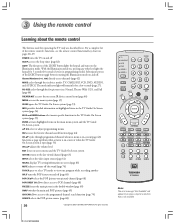
... channel search function (page 70) SOURCE selects the POP picture source (page 68) 26 Copyright © 2003 TOSHIBA CORPORATION. For a complete list of the LIGHT button lights the keypad and turns on and off . POWER turns the TV on the Illumination mode. VCR+ REC POP CH SPLIT POP DIRECT CH FREEZE SWAP...
... channel search function (page 70) SOURCE selects the POP picture source (page 68) 26 Copyright © 2003 TOSHIBA CORPORATION. For a complete list of the LIGHT button lights the keypad and turns on and off . POWER turns the TV on the Illumination mode. VCR+ REC POP CH SPLIT POP DIRECT CH FREEZE SWAP...
Owners Manual
Page 28
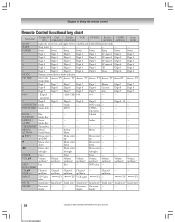
... (BLUE) / Blue --- --- --- AUDIO Guide Key THEATERNET TheaterNet --- --- --- --- --- --- --- Menu --- --- --- Menu select --- Menu select --- --- --- POWER Power Power Power Power Power Power Power Power 1 Digit 1 Digit 1 Digit 1 Digit 1 Digit 1 AV input 1 Digit 1 Digit 1 2 Digit 2 Digit 2 Digit 2 Digit 2 Digit 2 AV input ...TV TV VCR input TV --- Enter --- --- --- INFO --- display display display 28 Copyright © 2003 TOSHIBA CORPORATION. DVD setup --- --- --- TITLE= --- --- --- Menu select --- --- --- Exit --- up/...
... (BLUE) / Blue --- --- --- AUDIO Guide Key THEATERNET TheaterNet --- --- --- --- --- --- --- Menu --- --- --- Menu select --- Menu select --- --- --- POWER Power Power Power Power Power Power Power Power 1 Digit 1 Digit 1 Digit 1 Digit 1 Digit 1 AV input 1 Digit 1 Digit 1 2 Digit 2 Digit 2 Digit 2 Digit 2 Digit 2 AV input ...TV TV VCR input TV --- Enter --- --- --- INFO --- display display display 28 Copyright © 2003 TOSHIBA CORPORATION. DVD setup --- --- --- TITLE= --- --- --- Menu select --- --- --- Exit --- up/...

Owners Manual
Page 30
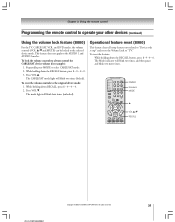
... to the remote control, and then press RECALL. ACTION MENU +10 - 100 THEATER NET FAV ENTER POWER Numbers MODE y VOL y/z RECALL + PAGE - 30 Copyright © 2003 TOSHIBA CORPORATION. Note: In addition to that all necessary keys on certain devices you are not operational, repeat ...1, AUDIO 2) lights up . 2. While holding down RECALL, press 8 - 5 - 0 - 0. All rights reserved. Point the remote control at the device and press POWER to control the TV. The mode indicator will blink twice and the remote control will enter program mode. 3. Press MODE until you want to the...
... to the remote control, and then press RECALL. ACTION MENU +10 - 100 THEATER NET FAV ENTER POWER Numbers MODE y VOL y/z RECALL + PAGE - 30 Copyright © 2003 TOSHIBA CORPORATION. Note: In addition to that all necessary keys on certain devices you are not operational, repeat ...1, AUDIO 2) lights up . 2. While holding down RECALL, press 8 - 5 - 0 - 0. All rights reserved. Point the remote control at the device and press POWER to control the TV. The mode indicator will blink twice and the remote control will enter program mode. 3. Press MODE until you want to the...
Owners Manual
Page 31
... features not related to "Device code set up" and resets the Volume Lock to select CABLE/SAT mode. 2. Copyright © 2003 TOSHIBA CORPORATION. Repeatedly press MODE to "TV." To reset the volume controls to always control the CABLE/SAT device volume (for example): 1.... 0 - 0. 2. While holding down the RECALL button, press 8 - 0 - 0 - 0. 3. Press VOL y. All rights reserved. 31 ACTION MENU +10 - 100 THEATER NET FAV ENTER POWER Numbers MODE y VOL y/z RECALL + PAGE - The Mode indicator will blink two times, and then pause and blink two more times. While holding down the RECALL...
... features not related to "Device code set up" and resets the Volume Lock to select CABLE/SAT mode. 2. Copyright © 2003 TOSHIBA CORPORATION. Repeatedly press MODE to "TV." To reset the volume controls to always control the CABLE/SAT device volume (for example): 1.... 0 - 0. 2. While holding down the RECALL button, press 8 - 0 - 0 - 0. 3. Press VOL y. All rights reserved. 31 ACTION MENU +10 - 100 THEATER NET FAV ENTER POWER Numbers MODE y VOL y/z RECALL + PAGE - The Mode indicator will blink two times, and then pause and blink two more times. While holding down the RECALL...

Owners Manual
Page 36
... on your preferred language (English, French, or Spanish) for on-screen menus. (See page 41 for details on this feature.) - Press ENTER to the TOSHIBA Quick Connect Guide. All rights reserved. Note: If you have to manually restart the Quick Connect Guide (see below . If you turned on the TV... for on the previous page. This Guide will have not already connected your devices and cables to your TV, turn off your TV, unplug the power cord, and connect your devices according to use for details on this feature.) Note: Review "Navigating the menu system" on -screen menus and messages ...
... on your preferred language (English, French, or Spanish) for on-screen menus. (See page 41 for details on this feature.) - Press ENTER to the TOSHIBA Quick Connect Guide. All rights reserved. Note: If you have to manually restart the Quick Connect Guide (see below . If you turned on the TV... for on the previous page. This Guide will have not already connected your devices and cables to your TV, turn off your TV, unplug the power cord, and connect your devices according to use for details on this feature.) Note: Review "Navigating the menu system" on -screen menus and messages ...

Owners Manual
Page 40
...you have a VCR connected, turn it ON. 3. Thank you have a Cable box connected, leave it OFF. (Do not unplug the power cord.) 4. Highlight NEXT and press ENTER. Antenna Cable Programming channels into the channel memory Press ENTER to change channels. • For details... The TV will enable you prefer, and then press ENTER. • For details on -screen instructions. 40 Copyright © 2003 TOSHIBA CORPORATION. This will automatically adjust the convergence of the three picture tubes. Configuring the ANT 1 input source Highlight your source. Back Next...
...you have a VCR connected, turn it ON. 3. Thank you have a Cable box connected, leave it OFF. (Do not unplug the power cord.) 4. Highlight NEXT and press ENTER. Antenna Cable Programming channels into the channel memory Press ENTER to change channels. • For details... The TV will enable you prefer, and then press ENTER. • For details on -screen instructions. 40 Copyright © 2003 TOSHIBA CORPORATION. This will automatically adjust the convergence of the three picture tubes. Configuring the ANT 1 input source Highlight your source. Back Next...
Owners Manual
Page 51
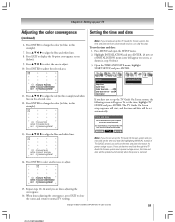
... will be set automatically. The TV Guide On Screen setup sequence will start, and the time and date will be updated automatically when the power is recommended you can provide accurate time and date information. Press ENTER to change the color (to adjust the selected area. Press y z.... 2. Press y z x • to display the 56-point convergence screen (below .) 3. To set the time and date: 1. Copyright © 2003 TOSHIBA CORPORATION. Chapter 6: Setting up the TV Guide On Screen system and you manually set the time and date (by highlighting MANUAL instead of INSTALLATION menu...
... will be set automatically. The TV Guide On Screen setup sequence will start, and the time and date will be updated automatically when the power is recommended you can provide accurate time and date information. Press ENTER to change the color (to adjust the selected area. Press y z.... 2. Press y z x • to display the 56-point convergence screen (below .) 3. To set the time and date: 1. Copyright © 2003 TOSHIBA CORPORATION. Chapter 6: Setting up the TV Guide On Screen system and you manually set the time and date (by highlighting MANUAL instead of INSTALLATION menu...
Owners Manual
Page 52
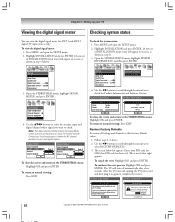
...Antenna Channel (Digital) OK Peak 0 1 134 To close the screen and return to their factory default valuesY.es No OK 52 Copyright © 2003 TOSHIBA CORPORATION. Setup Installation Sleep Timer On/Off Timer Digital Tuner Hold Off Slide Show Interval 2 Sec Convergence System Status System Information 4. Restore Factory Defaults To... restore all settings and channels to the TERRESTRIAL menu: Highlight OK and press ENTER. After the TV turns off, unplug the TV power cord and then plug it Type in your PIN code (or 0000 if no PIN has been set) to restore settings to obtain the...
...Antenna Channel (Digital) OK Peak 0 1 134 To close the screen and return to their factory default valuesY.es No OK 52 Copyright © 2003 TOSHIBA CORPORATION. Setup Installation Sleep Timer On/Off Timer Digital Tuner Hold Off Slide Show Interval 2 Sec Convergence System Status System Information 4. Restore Factory Defaults To... restore all settings and channels to the TERRESTRIAL menu: Highlight OK and press ENTER. After the TV turns off, unplug the TV power cord and then plug it Type in your PIN code (or 0000 if no PIN has been set) to restore settings to obtain the...
Owners Manual
Page 82
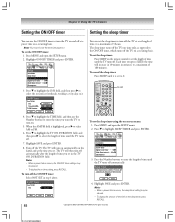
...the day(s) and at the time you set the sleep timer: Press SLEEP on the sleep timer, press RECALL. 82 Copyright © 2003 TOSHIBA CORPORATION. Each time you want the TV to turn on a recurring basis. Sleep Timer Enter total minutes until the TV turns off automatically. ... of 180 minutes. Setup Installation Sleep Timer On/Off Timer Digital Tuner Hold Off Slide Show Interval 2 Sec Convergence 3. Note: • When a power failure occurs, the sleep timer setting may be cleared. • To display the amount of time left on the remote control to highlight SLEEP TIMER...
...the day(s) and at the time you set the sleep timer: Press SLEEP on the sleep timer, press RECALL. 82 Copyright © 2003 TOSHIBA CORPORATION. Each time you want the TV to turn on a recurring basis. Sleep Timer Enter total minutes until the TV turns off automatically. ... of 180 minutes. Setup Installation Sleep Timer On/Off Timer Digital Tuner Hold Off Slide Show Interval 2 Sec Convergence 3. Note: • When a power failure occurs, the sleep timer setting may be cleared. • To display the amount of time left on the remote control to highlight SLEEP TIMER...


