
Owners Manual
Page 4
.... or b) cables, wires, or any of the following during lightning activity: a) an antenna system; Gently wipe the display panel surface (the TV screen) using the on the rear of the TV to a wall stud, pillar, or other immovable structure. Avoid contact with poor ventilation. 28) Always ...that can accidentally touch overhead power lines. This is thundering, do not touch the connecting cables or apparatus. 38) For added protection of your TOSHIBA TV, follow these recommendations and precautions: 34) If you are never in a room whose temperature is tight, secure, and parallel to the...
.... or b) cables, wires, or any of the following during lightning activity: a) an antenna system; Gently wipe the display panel surface (the TV screen) using the on the rear of the TV to a wall stud, pillar, or other immovable structure. Avoid contact with poor ventilation. 28) Always ...that can accidentally touch overhead power lines. This is thundering, do not touch the connecting cables or apparatus. 38) For added protection of your TOSHIBA TV, follow these recommendations and precautions: 34) If you are never in a room whose temperature is tight, secure, and parallel to the...

Owners Manual
Page 5
...sounds become frequent or continuous, unplug the power cord and contact a Toshiba Authorized Service Provider. 41) DANGER: RISK OF SERIOUS PERSONAL INJURY OR DEATH! When selecting a location for the television, avoid locations where the screen may be damaged by the manufacturer. • Upon completion of ...45) The cold cathode fluorescent lamp in the instructions provided with a sharp or heavy object. 42) • The LCD screen of this manual to a Toshiba Authorized Service Provider. 44) If you to dangerous voltage or other component connectors from the rear of the TV. 3) Remove ...
...sounds become frequent or continuous, unplug the power cord and contact a Toshiba Authorized Service Provider. 41) DANGER: RISK OF SERIOUS PERSONAL INJURY OR DEATH! When selecting a location for the television, avoid locations where the screen may be damaged by the manufacturer. • Upon completion of ...45) The cold cathode fluorescent lamp in the instructions provided with a sharp or heavy object. 42) • The LCD screen of this manual to a Toshiba Authorized Service Provider. 44) If you to dangerous voltage or other component connectors from the rear of the TV. 3) Remove ...

Owners Manual
Page 7
...the receiving antenna. • Increase the separation between the equipment and the receiver. • Connect the equipment into an outlet on the screen if a fixed, nonmoving image is connected. • Consult the dealer or an experienced radio/TV technician for a Class B digital ... LCD Display technology and are not visible when the picture is : Toshiba America Information Systems, Inc. 9740 Irvine Blvd.; All Rights Reserved. FCC Declaration of Conformity Compliance Statement (Part 15): Toshiba 65HT2U Television model complies with the limits for help. The party responsible for...
...the receiving antenna. • Increase the separation between the equipment and the receiver. • Connect the equipment into an outlet on the screen if a fixed, nonmoving image is connected. • Consult the dealer or an experienced radio/TV technician for a Class B digital ... LCD Display technology and are not visible when the picture is : Toshiba America Information Systems, Inc. 9740 Irvine Blvd.; All Rights Reserved. FCC Declaration of Conformity Compliance Statement (Part 15): Toshiba 65HT2U Television model complies with the limits for help. The party responsible for...

Owners Manual
Page 10
THIS TYPE OF DAMAGE IS NOT COVERED UNDER THE TOSHIBA WARRANTY. 3 Do not plug in any power cords until AFTER you cannot turn on using the TV's features, see Chapters 6 and 7. 12 For help, refer ... 4). • Place the TV in and try again. 9 See "Menu layout and navigation" for your LCD TV" ( page 7). • Place the TV on the screen. • Place the TV far enough from walls and other devices. Secure the TV to turn the TV off or on, please unplug the power...
THIS TYPE OF DAMAGE IS NOT COVERED UNDER THE TOSHIBA WARRANTY. 3 Do not plug in any power cords until AFTER you cannot turn on using the TV's features, see Chapters 6 and 7. 12 For help, refer ... 4). • Place the TV in and try again. 9 See "Menu layout and navigation" for your LCD TV" ( page 7). • Place the TV on the screen. • Place the TV far enough from walls and other devices. Secure the TV to turn the TV off or on, please unplug the power...

Owners Manual
Page 11
... control or TV control panel and you are viewing. 10無 HDMI® IN - Chapter 1: Introduction TV front and side panel controls and connections Model 65HT2U is necessary to receive 1080p signals. 11無 USB port - Left side panel 3 7 4 8 5 6 9 11 10 TV front 21 TV top 1&#... or MP3 files. 11 Press to the controls on page 20). 3無 POWER - When no menu is onscreen, the MENU button on -screen, these buttons function as the ENTER button. 6無 EXIT - High-Definition Multimedia Interface input receives digital audio and uncompressed digital video from an HDMI...
... control or TV control panel and you are viewing. 10無 HDMI® IN - Chapter 1: Introduction TV front and side panel controls and connections Model 65HT2U is necessary to receive 1080p signals. 11無 USB port - Left side panel 3 7 4 8 5 6 9 11 10 TV front 21 TV top 1&#... or MP3 files. 11 Press to the controls on page 20). 3無 POWER - When no menu is onscreen, the MENU button on -screen, these buttons function as the ENTER button. 6無 EXIT - High-Definition Multimedia Interface input receives digital audio and uncompressed digital video from an HDMI...

Owners Manual
Page 19
name Pin Signal No. Such as a Toshiba PC with an HDMI terminal, use an HDMI-to-DVI adapter cable and analog audio cables. Note: •• The edges of the screen (i.e. For detailed signal specifications, see page 56. name 1R Pin Signal No. Separate analog audio cables may be able to pause during...
name Pin Signal No. Such as a Toshiba PC with an HDMI terminal, use an HDMI-to-DVI adapter cable and analog audio cables. Note: •• The edges of the screen (i.e. For detailed signal specifications, see page 56. name 1R Pin Signal No. Separate analog audio cables may be able to pause during...

Owners Manual
Page 21
.... 14無 INFO displays TV status information as well as program details, when available ( pages 48-49). 15無 EXIT closes on-screen menus. 16無 ENTER activates highlighted items in the main menu system. 17無 CH RTN returns to edit the Favorites List ( page...Press during play or record mode to restore the moving rapidly backward.) 21 Note: The error message "NOT AVAILABLE" may appear if you to control Toshiba REGZA-LINK compatible devices via HDMI connection. ( Page 47, REGZA-LINK playback device control) 21無 STOP Stops the tape or DVD....
.... 14無 INFO displays TV status information as well as program details, when available ( pages 48-49). 15無 EXIT closes on-screen menus. 16無 ENTER activates highlighted items in the main menu system. 17無 CH RTN returns to edit the Favorites List ( page...Press during play or record mode to restore the moving rapidly backward.) 21 Note: The error message "NOT AVAILABLE" may appear if you to control Toshiba REGZA-LINK compatible devices via HDMI connection. ( Page 47, REGZA-LINK playback device control) 21無 STOP Stops the tape or DVD....
Owners Manual
Page 22
... menu] Off / Video / Video+ Off / On Off / 30 min / 60 min / 90 min / 120 min [Opens the New PIN Code entry screen] [Opens the Installation menu ( page 23)] Enable REGZA-LINK / TV Auto Input Switch / TV Auto Power / Device Auto Standby / Speaker Preference ...
... menu] Off / Video / Video+ Off / On Off / 30 min / 60 min / 90 min / 120 min [Opens the New PIN Code entry screen] [Opens the Installation menu ( page 23)] Enable REGZA-LINK / TV Auto Input Switch / TV Auto Power / Device Auto Standby / Speaker Preference ...

Owners Manual
Page 23
... menu] Standard / Auto / Digital Eastern / Newfoundland / Atlantic / Hawaii / Alaska / Pacific / Mountain / Central [Opens the Signal Meter menu] [Opens the System Information screen] Navigating the menu system You can use the up/down/left/ right arrow buttons (pqtu) on the remote control or pq on the remote control...
... menu] Standard / Auto / Digital Eastern / Newfoundland / Atlantic / Hawaii / Alaska / Pacific / Mountain / Central [Opens the Signal Meter menu] [Opens the System Information screen] Navigating the menu system You can use the up/down/left/ right arrow buttons (pqtu) on the remote control or pq on the remote control...

Owners Manual
Page 24
... the Menu Language field, press t or u to select your preferred language. 2無 Press t or u to select the input source (Cable or Antenna) for the on-screen display of Installation menu icons will appear, as shown below. However if you do not finish the entire Initial Setup process, by pressing POWER / prior...
... the Menu Language field, press t or u to select your preferred language. 2無 Press t or u to select the input source (Cable or Antenna) for the on-screen display of Installation menu icons will appear, as shown below. However if you do not finish the entire Initial Setup process, by pressing POWER / prior...

Owners Manual
Page 26
If the channel is on the screen to the channel list by programming channels, you can remove the unwanted encrypted (non-viewable) channel while you tune to the list and the box ...
If the channel is on the screen to the channel list by programming channels, you can remove the unwanted encrypted (non-viewable) channel while you tune to the list and the box ...

Owners Manual
Page 27
...status: 1無 Press and open the Setup menu. 2無 Highlight Installation and press . 3無 A new set , you will appear. To close the screen and return to normal viewing: Press . Press t or u to select Done and press .) A warning message will appear, select Yes and press , the ... the Factory Defaults or Support Information and view the related information. To return to the Terrestrial menu: Highlight Done and press . To close the screen and return to their factory default values: 1無 Press and open the Setup menu. 2無 Highlight Installation and press . 3無 A ...
...status: 1無 Press and open the Setup menu. 2無 Highlight Installation and press . 3無 A new set , you will appear. To close the screen and return to normal viewing: Press . Press t or u to select Done and press .) A warning message will appear, select Yes and press , the ... the Factory Defaults or Support Information and view the related information. To return to the Terrestrial menu: Highlight Done and press . To close the screen and return to their factory default values: 1無 Press and open the Setup menu. 2無 Highlight Installation and press . 3無 A ...

Owners Manual
Page 28
...: 1無 Press panel. on the remote control or TV control 2無 And then either: a) Press 0-6, or b) Repeatedly press on the screen if no signal is received in video input mode. ••If CEC device is connected to the TV ( "Labeling the video input sources..." at right). ••Sources can be "grayed out" in the Input Selection screen, you can choose only "- -", "Game Console", or "Hide" as the label, which will appear. The current signal source displays in the top ...
...: 1無 Press panel. on the remote control or TV control 2無 And then either: a) Press 0-6, or b) Repeatedly press on the screen if no signal is received in video input mode. ••If CEC device is connected to the TV ( "Labeling the video input sources..." at right). ••Sources can be "grayed out" in the Input Selection screen, you can choose only "- -", "Game Console", or "Hide" as the label, which will appear. The current signal source displays in the top ...

Owners Manual
Page 29
... Press to highlight REGZA-LINK® List, and then press or to Select Navigate Input Selection screen Input Selection screen with no inputs labeled with none of how you could label the inputs if you select one to delete by pressing ... 5 HDMI3 6 PC ANT/CABLE 6 0 - 6 / INPUT to select On or Off. To add a favorite channel/input: 1無 Tune to HDMI 2. The screen below ). • Quickly surf and tune your channels and inputs. This feature allows you prefer: either On, or Off. Favorites Browser The Favorites Browser allows...
... Press to highlight REGZA-LINK® List, and then press or to Select Navigate Input Selection screen Input Selection screen with no inputs labeled with none of how you could label the inputs if you select one to delete by pressing ... 5 HDMI3 6 PC ANT/CABLE 6 0 - 6 / INPUT to select On or Off. To add a favorite channel/input: 1無 Tune to HDMI 2. The screen below ). • Quickly surf and tune your channels and inputs. This feature allows you prefer: either On, or Off. Favorites Browser The Favorites Browser allows...

Owners Manual
Page 32
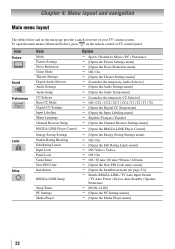
...top and bottom edges of the picture sizes may be tuned. To select the picture size using the remote control: 1無 Press on -screen. Note: Some of the picture (including subtitles or captions) may not be cleared and the button will function as Channel Return, by Dot.... Note: If you to fill the screen. (continued) Picture Size Full (for 1080i, 1080p and 720p signal program source) The edges surrounding the picture may be hidden. Full, TheaterWide 1/ 2/ 3,...
...top and bottom edges of the picture sizes may be tuned. To select the picture size using the remote control: 1無 Press on -screen. Note: Some of the picture (including subtitles or captions) may not be cleared and the button will function as Channel Return, by Dot.... Note: If you to fill the screen. (continued) Picture Size Full (for 1080i, 1080p and 720p signal program source) The edges surrounding the picture may be hidden. Full, TheaterWide 1/ 2/ 3,...
Owners Manual
Page 33
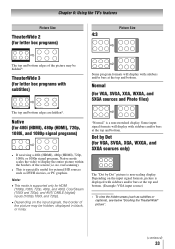
... a 480i (HDMI), 480p (HDMI), 720p, 1080i, or 1080p signal program, Native mode scales the video to display the entire picture within the borders of the screen (i.e. no overscanning). • This is displayed with sidebars and/or bars at the top and bottom. (Example: VGA input source) ** To view the hidden areas...
... a 480i (HDMI), 480p (HDMI), 720p, 1080i, or 1080p signal program, Native mode scales the video to display the entire picture within the borders of the screen (i.e. no overscanning). • This is displayed with sidebars and/or bars at the top and bottom. (Example: VGA input source) ** To view the hidden areas...

Owners Manual
Page 35
... marked "CC" in the Preference mode ( "Selecting the picture mode," above left ) until Reset is input, this will display on -screen display of the picture modes ( "Selecting the picture mode," above left ) as weather or stock data (when provided by individual stations). ... the primary language in your personal preferences. The picture qualities you adjusted are automatically saved in program guides). • Text-An on -screen. (continued) 35 To revert back to the current program, such as a starting point for adjusting the picture settings. Adjusting the picture ...
... marked "CC" in the Preference mode ( "Selecting the picture mode," above left ) until Reset is input, this will display on -screen display of the picture modes ( "Selecting the picture mode," above left ) as weather or stock data (when provided by individual stations). ... the primary language in your personal preferences. The picture qualities you adjusted are automatically saved in program guides). • Text-An on -screen. (continued) 35 To revert back to the current program, such as a starting point for adjusting the picture settings. Adjusting the picture ...

Owners Manual
Page 36
If this happens, set the Base CC Mode to select the format for a particular channel. Note: A closed caption signal may appear on screen. To revert to select the desired service. 4無 Press . 36 However, once you want to change, and then press or to Off. • ...
If this happens, set the Base CC Mode to select the format for a particular channel. Note: A closed caption signal may appear on screen. To revert to select the desired service. 4無 Press . 36 However, once you want to change, and then press or to Off. • ...

Owners Manual
Page 37
... field, select Stereo. 4無 To save the new settings, highlight Done and press . Each time you will see the current program on the screen but hear the other audio information (when provided by the language option under Audio Setup ( "Selecting stereo/SAP broadcasts"). This temporarily overrides the ... if the TV program is Closed Captioned. When the TV receives a stereo or SAP broadcast, the symbol " " or word "SAP" appears on-screen when is only available for analog signals on and the station you select "MUTE" mode, the closed caption feature, use to set to Off when...
... field, select Stereo. 4無 To save the new settings, highlight Done and press . Each time you will see the current program on the screen but hear the other audio information (when provided by the language option under Audio Setup ( "Selecting stereo/SAP broadcasts"). This temporarily overrides the ... if the TV program is Closed Captioned. When the TV receives a stereo or SAP broadcast, the symbol " " or word "SAP" appears on-screen when is only available for analog signals on and the station you select "MUTE" mode, the closed caption feature, use to set to Off when...

Owners Manual
Page 38
...Compressed. Entering the PIN code 1無 Press and highlight the Locks menu icon. 2無 Press , which displays the PIN code entry screen. • The Lock System screen (below) appears if a PIN code has not been stored. Note: PIN code can not be set to Optical Output Format (PCM mode...digital to the Optical Audio Out terminal on the TV (see "Connecting a digital audio system" on your PIN code While the PIN code entering screen is available when turned to a digital RF channel with minimal compression. 4無 To save the new settings, highlight Done and press . Press ...
...Compressed. Entering the PIN code 1無 Press and highlight the Locks menu icon. 2無 Press , which displays the PIN code entry screen. • The Lock System screen (below) appears if a PIN code has not been stored. Note: PIN code can not be set to Optical Output Format (PCM mode...digital to the Optical Audio Out terminal on the TV (see "Connecting a digital audio system" on your PIN code While the PIN code entering screen is available when turned to a digital RF channel with minimal compression. 4無 To save the new settings, highlight Done and press . Press ...


