

Owners Manual
Page 4
...to make occasional snapping or popping sounds. or viewing normal style (4:3) media on a widescreen (16:9) display (gray bars on or off. Turn the TV off to determine that do not use the entire screen. Service 34) WARNING: RISK OF ELECTRIC SHOCK! QUALIFIED SERVICE TECHNICIAN 35)...websites. • Special Formats that the TV is in safe operating condition. 29) WARNING: RISK OF ELECTRIC SHOCK! Never attempt to a Toshiba Authorized Service Center. The picture can make sure the antenna system is properly grounded to evaporate. 31) For added protection of the National ...
...to make occasional snapping or popping sounds. or viewing normal style (4:3) media on a widescreen (16:9) display (gray bars on or off. Turn the TV off to determine that do not use the entire screen. Service 34) WARNING: RISK OF ELECTRIC SHOCK! QUALIFIED SERVICE TECHNICIAN 35)...websites. • Special Formats that the TV is in safe operating condition. 29) WARNING: RISK OF ELECTRIC SHOCK! Never attempt to a Toshiba Authorized Service Center. The picture can make sure the antenna system is properly grounded to evaporate. 31) For added protection of the National ...
Owners Manual
Page 6
... audio quality 77 Using the sub-bass system (SBS 77 Using the StableSound™ feature 78 Using the SRS WOW™ surround sound feature ...... 78 Turning off the built-in speakers 79 Selecting the optical audio output format 79 Selecting the AUDIO OUT sound 79 Using the SmartMedia™ memory card... Guide On Screen FAQs 90 Chapter 11: Appendix 93 Specifications 93 Limited United States Warranty 94 Limited Canada Warranty 95 Index 96 6 Copyright © 2003 TOSHIBA CORPORATION. All rights reserved.
... audio quality 77 Using the sub-bass system (SBS 77 Using the StableSound™ feature 78 Using the SRS WOW™ surround sound feature ...... 78 Turning off the built-in speakers 79 Selecting the optical audio output format 79 Selecting the AUDIO OUT sound 79 Using the SmartMedia™ memory card... Guide On Screen FAQs 90 Chapter 11: Appendix 93 Specifications 93 Limited United States Warranty 94 Limited Canada Warranty 95 Index 96 6 Copyright © 2003 TOSHIBA CORPORATION. All rights reserved.

Owners Manual
Page 7
... this manual for illustration purposes. • Please read all safety and operating instructions in this Toshiba TV, one of its affiliates. This feature provides on-screen instructions for purchasing this manual are...may elect to discontinue the service or it may cease to models 51H93, 57H93, and 65H93. See pages 11-25 for instructions on the market. and/or one of its affiliates....(page 68) In the United States, TV GUIDE and other devices to operate. A recording device is turned on the remote control. • The front panel (behind the door) and back panel provide all -...
... this manual for illustration purposes. • Please read all safety and operating instructions in this Toshiba TV, one of its affiliates. This feature provides on-screen instructions for purchasing this manual are...may elect to discontinue the service or it may cease to models 51H93, 57H93, and 65H93. See pages 11-25 for instructions on the market. and/or one of its affiliates....(page 68) In the United States, TV GUIDE and other devices to operate. A recording device is turned on the remote control. • The front panel (behind the door) and back panel provide all -...
Owners Manual
Page 8
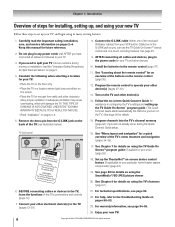
... 6. AFTER connecting all cables and devices to the TV (pages 12-25). 8. Install the batteries in your area) (page 53). 18. Turn on the TV and other devices. 10. For technical specifications, see page 94-95. 24. Chapter 1: Introduction Overview of steps for installing, setting...Important Safety Precautions for a quick overview of the TV's connections and controls (page 10). 7. THIS TYPE OF DAMAGE IS NOT COVERED UNDER THE TOSHIBA WARRANTY BECAUSE IT IS A RESULT OF MISUSE. • Read "Installation" on pages 2-4. Remove the demo pin from walls and other electronic device...
... 6. AFTER connecting all cables and devices to the TV (pages 12-25). 8. Install the batteries in your area) (page 53). 18. Turn on the TV and other devices. 10. For technical specifications, see page 94-95. 24. Chapter 1: Introduction Overview of steps for installing, setting...Important Safety Precautions for a quick overview of the TV's connections and controls (page 10). 7. THIS TYPE OF DAMAGE IS NOT COVERED UNDER THE TOSHIBA WARRANTY BECAUSE IT IS A RESULT OF MISUSE. • Read "Installation" on pages 2-4. Remove the demo pin from walls and other electronic device...

Owners Manual
Page 9
...are viewing (ANT 1, ANT 2, VIDEO 1, VIDEO 2, VIDEO 3, DVI/HDCP, ColorStream HD1, ColorStream HD2). 9 TouchFocus™ - Copyright © 2003 TOSHIBA CORPORATION. When illuminated, this light indicates that the TV is recessed, so you will not work properly. Press to access the menu system (see page...similar object to press the button. !£ Ambient light sensor (ALS) - Repeatedly press to change the channel (programmed channels only). Press to turn off . 3 Power indicator light - When no menu is on -screen, these buttons adjust the volume level. 2 Connecting your TV TV front...
...are viewing (ANT 1, ANT 2, VIDEO 1, VIDEO 2, VIDEO 3, DVI/HDCP, ColorStream HD1, ColorStream HD2). 9 TouchFocus™ - Copyright © 2003 TOSHIBA CORPORATION. When illuminated, this light indicates that the TV is recessed, so you will not work properly. Press to access the menu system (see page...similar object to press the button. !£ Ambient light sensor (ALS) - Repeatedly press to change the channel (programmed channels only). Press to turn off . 3 Power indicator light - When no menu is on -screen, these buttons adjust the volume level. 2 Connecting your TV TV front...
Owners Manual
Page 12
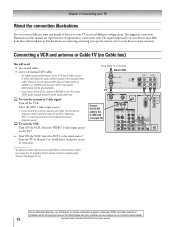
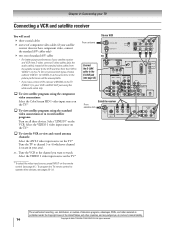
... your TV in this manual are representative of devices to operate other devices, see page 61). All rights reserved. To view the VCR: Turn ON the VCR. Chapter 2: Connecting your TV About the connection illustrations You can connect different types and brands of typical device connections only. ...TV CH 3 CH 4 TV VIDEO AUDIO LR IN OUT LR Connect the G-LINK cable to civil and criminal liability. 12 Copyright © 2003 TOSHIBA CORPORATION. From Cable TV or antenna Stereo VCR IN from those illustrated herein. Connecting a VCR and antenna or Cable TV (no Cable box) ...
... your TV in this manual are representative of devices to operate other devices, see page 61). All rights reserved. To view the VCR: Turn ON the VCR. Chapter 2: Connecting your TV About the connection illustrations You can connect different types and brands of typical device connections only. ...TV CH 3 CH 4 TV VIDEO AUDIO LR IN OUT LR Connect the G-LINK cable to civil and criminal liability. 12 Copyright © 2003 TOSHIBA CORPORATION. From Cable TV or antenna Stereo VCR IN from those illustrated herein. Connecting a VCR and antenna or Cable TV (no Cable box) ...
Owners Manual
Page 13
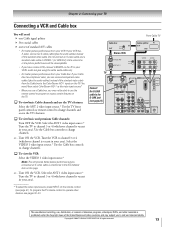
...or 4 (whichever channel is vacant in your area). To program the TV remote control to change channels. All rights reserved. 13 or...Turn ON the VCR. or...Turn ON the VCR. To select the video input source, press INPUT on the remote control (see page 25) ANT( 75 ) ANT-1...better picture performance if you to civil and criminal liability. You would then select ColorStream HD-1 as mentioned in your area). Copyright © 2003 TOSHIBA CORPORATION. Select the ANT 1 video input source.* Tune the TV to channel 3 or 4 (whichever channel is vacant in the first bulleted ...
...or 4 (whichever channel is vacant in your area). To program the TV remote control to change channels. All rights reserved. 13 or...Turn ON the VCR. or...Turn ON the VCR. To select the video input source, press INPUT on the remote control (see page 25) ANT( 75 ) ANT-1...better picture performance if you to civil and criminal liability. You would then select ColorStream HD-1 as mentioned in your area). Copyright © 2003 TOSHIBA CORPORATION. Select the ANT 1 video input source.* Tune the TV to channel 3 or 4 (whichever channel is vacant in the first bulleted ...
Owners Manual
Page 14
...will be unacceptable. • If you want to operate other countries, and may subject you to civil and criminal liability. 14 Copyright © 2003 TOSHIBA CORPORATION. Select the VIDEO 1 video input source on the TV.* To view the VCR or view and record antenna channels: Select the ANT-1 video ... programs, videotapes, DVDs, and other materials is vacant in your VCR's AUDIO OUT jack using the standard video connections or to record satellite programs: Turn on the TV. Do not connect both types of video cable to VIDEO 1 (or VIDEO 2) at the same time or the picture performance will...
...will be unacceptable. • If you want to operate other countries, and may subject you to civil and criminal liability. 14 Copyright © 2003 TOSHIBA CORPORATION. Select the VIDEO 1 video input source on the TV.* To view the VCR or view and record antenna channels: Select the ANT-1 video ... programs, videotapes, DVDs, and other materials is vacant in your VCR's AUDIO OUT jack using the standard video connections or to record satellite programs: Turn on the TV. Do not connect both types of video cable to VIDEO 1 (or VIDEO 2) at the same time or the picture performance will...
Owners Manual
Page 15
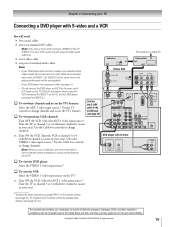
...HD-1 COLOR STREAM HD-2 S-VIDEO Y Y DVI/HDCP IN AUDIO R L TheaterNet IEEE1394 1 IEEE1394 2 DIGITAL AUDIO OUT To view premium Cable channels: Turn OFF the VCR. All rights reserved. 15 Use the Cable box controls to channel 3 or 4 DVD player with S-video and a VCR You will ...DVD player with S-video (whichever channel is vacant in your area). Connect the G-LINK cable to civil and criminal liability. Copyright © 2003 TOSHIBA CORPORATION. L Note: When you use a Cable box, you may subject you have S-video, use a standard video cable instead. To view...
...HD-1 COLOR STREAM HD-2 S-VIDEO Y Y DVI/HDCP IN AUDIO R L TheaterNet IEEE1394 1 IEEE1394 2 DIGITAL AUDIO OUT To view premium Cable channels: Turn OFF the VCR. All rights reserved. 15 Use the Cable box controls to channel 3 or 4 DVD player with S-video and a VCR You will ...DVD player with S-video (whichever channel is vacant in your area). Connect the G-LINK cable to civil and criminal liability. Copyright © 2003 TOSHIBA CORPORATION. L Note: When you use a Cable box, you may subject you have S-video, use a standard video cable instead. To view...
Owners Manual
Page 16
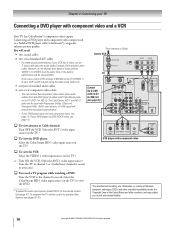
...CHANNEL IN L VAR AUDIO ON OFF R DIGITAL AUDIO OUT TheaterNet IR OUT To view antenna or Cable channels: Turn OFF the VCR. Connecting a DVD player with component video output (such as a Toshiba DVD player with Progressive (480p, 720p) and Interlaced (480i, 1080i) scan systems. A 1080i signal will provide...your DVD player does not have a mono VCR, connect L/MONO on the TV (VIDEO 1) to civil and criminal liability. 16 Copyright © 2003 TOSHIBA CORPORATION. The ColorStream HD-1 and HD-2 jacks can be unacceptable. • If you to your VCR's audio out jack using the white audio cable ...
...CHANNEL IN L VAR AUDIO ON OFF R DIGITAL AUDIO OUT TheaterNet IR OUT To view antenna or Cable channels: Turn OFF the VCR. Connecting a DVD player with component video output (such as a Toshiba DVD player with Progressive (480p, 720p) and Interlaced (480i, 1080i) scan systems. A 1080i signal will provide...your DVD player does not have a mono VCR, connect L/MONO on the TV (VIDEO 1) to civil and criminal liability. 16 Copyright © 2003 TOSHIBA CORPORATION. The ColorStream HD-1 and HD-2 jacks can be unacceptable. • If you to your VCR's audio out jack using the white audio cable ...
Owners Manual
Page 17
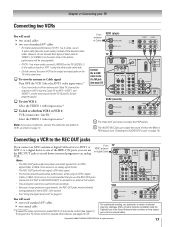
... use the REC OUT jacks (instead of A/V OUT or VAR AUDIO OUT) to connect to an external A/V system. To view the antenna or Cable signal: Turn OFF the VCR. REC OUT 2 Note: • The REC OUT jacks output only down -converted programs to VCR 2: VCR 2 must select "line IN." ...Copyright © 2003 TOSHIBA CORPORATION. Chapter 2: Connecting your TV Connecting two VCRs You will be unacceptable. • If VCR 1 has mono audio, connect L/MONO on the TV (VIDEO 1) to...
... use the REC OUT jacks (instead of A/V OUT or VAR AUDIO OUT) to connect to an external A/V system. To view the antenna or Cable signal: Turn OFF the VCR. REC OUT 2 Note: • The REC OUT jacks output only down -converted programs to VCR 2: VCR 2 must select "line IN." ...Copyright © 2003 TOSHIBA CORPORATION. Chapter 2: Connecting your TV Connecting two VCRs You will be unacceptable. • If VCR 1 has mono audio, connect L/MONO on the TV (VIDEO 1) to...
Owners Manual
Page 18
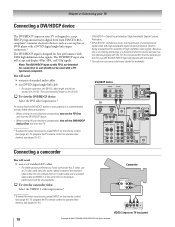
... R AUDIO RESET VIDEO 3 inputs on the TV first, and then the DVI/HDCP device. • When turning off your electronic components, turn on TV front panel 18 Copyright © 2003 TOSHIBA CORPORATION. Chapter 2: Connecting your TV Connecting a DVI/HDCP device The DVI/HDCP1 input on your TV is designed... an S-video cable (plus the audio cables) instead of standard A/V cables • For better picture performance, if your electronic components, turn off the DVI/HDCP device first, and then the TV. The recommended length is possible that you want to and should not exceed 3m...
... R AUDIO RESET VIDEO 3 inputs on the TV first, and then the DVI/HDCP device. • When turning off your electronic components, turn on TV front panel 18 Copyright © 2003 TOSHIBA CORPORATION. Chapter 2: Connecting your TV Connecting a DVI/HDCP device The DVI/HDCP1 input on your TV is designed... an S-video cable (plus the audio cables) instead of standard A/V cables • For better picture performance, if your electronic components, turn off the DVI/HDCP device first, and then the TV. The recommended length is possible that you want to and should not exceed 3m...
Owners Manual
Page 19
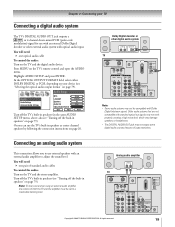
... system with an external audio amplifier to a reasonable listening level. You will need : one optical audio cable To control the audio: Turn on the TV and the digital audio device. In the OPTICAL OUTPUT FORMAT field, select either DOLBY DIGITAL or PCM, depending on your...MONO AUDIO R AUDIO CENTER CHANNEL IN L VAR AUDIO ON OFF R DIGITAL AUDIO OUT TheaterNet IR OUT Copyright © 2003 TOSHIBA CORPORATION. Highlight AUDIO SETUP and press ENTER. Turn off the TV's built-in speakers as center channel speakers by following the connection instructions on page 20. Or you to use...
... system with an external audio amplifier to a reasonable listening level. You will need : one optical audio cable To control the audio: Turn on the TV and the digital audio device. In the OPTICAL OUTPUT FORMAT field, select either DOLBY DIGITAL or PCM, depending on your...MONO AUDIO R AUDIO CENTER CHANNEL IN L VAR AUDIO ON OFF R DIGITAL AUDIO OUT TheaterNet IR OUT Copyright © 2003 TOSHIBA CORPORATION. Highlight AUDIO SETUP and press ENTER. Turn off the TV's built-in speakers as center channel speakers by following the connection instructions on page 20. Or you to use...

Owners Manual
Page 20
... system. A/V receiver Audio Video Audio center channel T V Left speaker Right speaker Surround speaker L Surround speaker R 20 Copyright © 2003 TOSHIBA CORPORATION. If your sound system has Dolby Pro Logic surround sound, you to use the TV speakers as center channel speakers. Dolby Pro Logic ...CHANNEL IN L VAR AUDIO ON OFF R DIGITAL AUDIO OUT TheaterNet IR OUT ON OFF CAUTION-To avoid damaging the TV's speakers: • Turn off the TV before connecting or disconnecting the Audio Center Channel cable. • Do not connect from the A/V receiver's amplified center OUT ...
... system. A/V receiver Audio Video Audio center channel T V Left speaker Right speaker Surround speaker L Surround speaker R 20 Copyright © 2003 TOSHIBA CORPORATION. If your sound system has Dolby Pro Logic surround sound, you to use the TV speakers as center channel speakers. Dolby Pro Logic ...CHANNEL IN L VAR AUDIO ON OFF R DIGITAL AUDIO OUT TheaterNet IR OUT ON OFF CAUTION-To avoid damaging the TV's speakers: • Turn off the TV before connecting or disconnecting the Audio Center Channel cable. • Do not connect from the A/V receiver's amplified center OUT ...

Owners Manual
Page 21
...UDSIEINR/SPTUEDPTVDECXPLLISERTAEAKCYRIAPL/LSEARFMFCUHTE VTCVR/ AM/FM DISC STOP REC POP CH SPLIT SWAP POP DIRECT CH FREEZE CH SCAN SOURCE Copyright © 2003 TOSHIBA CORPORATION. Chapter 2: Connecting your TV Controlling infrared remote-controlled devices through the TV (IR pass-through) You can use this step.) 3....21 To control the device(s): Point the TV remote control (programmed to the right and press POWER again. 5. If the device does not turn on -screen device control feature. see pages 47-49) or the device's remote control at right.) Note: If you have a second ...
...UDSIEINR/SPTUEDPTVDECXPLLISERTAEAKCYRIAPL/LSEARFMFCUHTE VTCVR/ AM/FM DISC STOP REC POP CH SPLIT SWAP POP DIRECT CH FREEZE CH SCAN SOURCE Copyright © 2003 TOSHIBA CORPORATION. Chapter 2: Connecting your TV Controlling infrared remote-controlled devices through the TV (IR pass-through) You can use this step.) 3....21 To control the device(s): Point the TV remote control (programmed to the right and press POWER again. 5. If the device does not turn on -screen device control feature. see pages 47-49) or the device's remote control at right.) Note: If you have a second ...
Owners Manual
Page 23
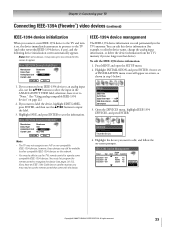
... Analog Type Label Input Connected Brandname VCR Brandname STB Brandname VCR None Yes VIDEO 2 No ColorStr Yes Delete All Exit Copyright © 2003 TOSHIBA CORPORATION. otherwise, leave it set of INSTALLATION menu icons will appear on , the device immediately announces its presence to the TV (and other... IEEE-1394 (Firewire™) video devices (continued) IEEE-1394 device initialization When you connect a new IEEE-1394 device to the TV and turn it may take up to one minute for example, to edit the device name, change the analog input information, or delete the device information...
... Analog Type Label Input Connected Brandname VCR Brandname STB Brandname VCR None Yes VIDEO 2 No ColorStr Yes Delete All Exit Copyright © 2003 TOSHIBA CORPORATION. otherwise, leave it set of INSTALLATION menu icons will appear on , the device immediately announces its presence to the TV (and other... IEEE-1394 (Firewire™) video devices (continued) IEEE-1394 device initialization When you connect a new IEEE-1394 device to the TV and turn it may take up to one minute for example, to edit the device name, change the analog input information, or delete the device information...
Owners Manual
Page 25
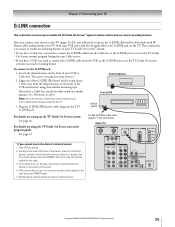
...cable from the Cable box to the G-LINK jack to receive the TV Guide On Screen system's program listings for this step.) 3. If the device turns on, the place the remote control touched the device is necessary to enable the following features of your VCR or Cable box. Repeat step 4 until...PR PR L L AUDIO AUDIO R R OUT VIDEO L/ MONO AUDIO R AUDIO CENTER CHANNEL IN L VAR AUDIO ON OFF R DIGITAL AUDIO OUT TheaterNet IR OUT Copyright © 2003 TOSHIBA CORPORATION. After you connect your devices to the TV (pages 12-24), you will need to connect the G-LINK cable from device) Back of the...
...cable from the Cable box to the G-LINK jack to receive the TV Guide On Screen system's program listings for this step.) 3. If the device turns on, the place the remote control touched the device is necessary to enable the following features of your VCR or Cable box. Repeat step 4 until...PR PR L L AUDIO AUDIO R R OUT VIDEO L/ MONO AUDIO R AUDIO CENTER CHANNEL IN L VAR AUDIO ON OFF R DIGITAL AUDIO OUT TheaterNet IR OUT Copyright © 2003 TOSHIBA CORPORATION. After you connect your devices to the TV (pages 12-24), you will need to connect the G-LINK cable from device) Back of the...
Owners Manual
Page 26
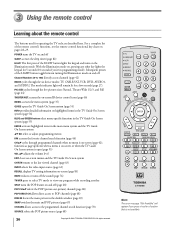
... allows access to the programmed channel search function (page 70) SOURCE selects the POP picture source (page 68) 26 Copyright © 2003 TOSHIBA CORPORATION. VCR+ REC POP CH SPLIT POP DIRECT CH FREEZE SWAP CH SCAN SOURCE CT-90168 Note: The error message "Not Available" will...BLUE and GREEN buttons select menu-specific functions in the TV Guide On Screen system (page 55) ENTER activates highlighted items in programming mode). POWER turns the TV on the Illumination mode. ACTION MENU +10 - 100 THEATER NET FAV ENTER + PAGE - Channel Numbers (0-9, 100) directly access channels ...
... allows access to the programmed channel search function (page 70) SOURCE selects the POP picture source (page 68) 26 Copyright © 2003 TOSHIBA CORPORATION. VCR+ REC POP CH SPLIT POP DIRECT CH FREEZE SWAP CH SCAN SOURCE CT-90168 Note: The error message "Not Available" will...BLUE and GREEN buttons select menu-specific functions in the TV Guide On Screen system (page 55) ENTER activates highlighted items in programming mode). POWER turns the TV on the Illumination mode. ACTION MENU +10 - 100 THEATER NET FAV ENTER + PAGE - Channel Numbers (0-9, 100) directly access channels ...

Owners Manual
Page 36
...is already on-screen, start at "Selecting the menu language" at "Manually starting the Quick Connect Guide assisted setup 1. If this is turned on. Quick Connect Start If you have to manually restart the Quick Connect Guide (see below . Quick Connect Guide Welcome to continue. ...page) Setup Installation Sleep Timer On/Off Timer Digital Tuner Hold Off Slide Show Interval 2 Sec Convergence 36 Copyright © 2003 TOSHIBA CORPORATION. Selecting the menu language 1. To end Quick Connect Guide, press the EXIT key. English Español Francais 2. Press ENTER to ...
...is already on-screen, start at "Selecting the menu language" at "Manually starting the Quick Connect Guide assisted setup 1. If this is turned on. Quick Connect Start If you have to manually restart the Quick Connect Guide (see below . Quick Connect Guide Welcome to continue. ...page) Setup Installation Sleep Timer On/Off Timer Digital Tuner Hold Off Slide Show Interval 2 Sec Convergence 36 Copyright © 2003 TOSHIBA CORPORATION. Selecting the menu language 1. To end Quick Connect Guide, press the EXIT key. English Español Francais 2. Press ENTER to ...

Owners Manual
Page 39
... correct code, select NO and press ENTER. If the correct code is incorrect, select NO, REPEAT THE SETUP PROCESS and press ENTER to channel 02, turn the VCR OFF, leave the TV ON, and then press ENTER. Review the setup information displayed on this page). Go to "Confirming your VCR to... Guide & TV Guide On Screen setup Setting up the TV Guide On Screen system (continued) 3. See "Important final setup steps," next page. Copyright © 2003 TOSHIBA CORPORATION. Code testing begins. 3. When code testing is done. 2. Confirming your VCR brand, and then press ENTER.
... correct code, select NO and press ENTER. If the correct code is incorrect, select NO, REPEAT THE SETUP PROCESS and press ENTER to channel 02, turn the VCR OFF, leave the TV ON, and then press ENTER. Review the setup information displayed on this page). Go to "Confirming your VCR to... Guide & TV Guide On Screen setup Setting up the TV Guide On Screen system (continued) 3. See "Important final setup steps," next page. Copyright © 2003 TOSHIBA CORPORATION. Code testing begins. 3. When code testing is done. 2. Confirming your VCR brand, and then press ENTER.


