
Owners Manual
Page 3
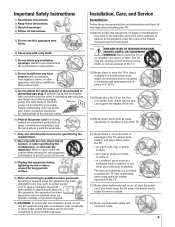
...8226; too close to drapes, curtains, or walls; or locations with a dry cloth. 7) Do not block any heat sources such as power supply cord or plug is required when the apparatus has been damaged in accordance with poor ventilation. Servicing is damaged, liquid has been spilled ... 14) Refer all warnings when installing your TV: 16) Never modify this equipment under the rules of the obsolete outlet. 10) Protect the power cord from tip-over. 13) Unplug this apparatus near any ventilation openings. Install in any other . Installation, Care, and Service Installation Follow ...
...8226; too close to drapes, curtains, or walls; or locations with a dry cloth. 7) Do not block any heat sources such as power supply cord or plug is required when the apparatus has been damaged in accordance with poor ventilation. Servicing is damaged, liquid has been spilled ... 14) Refer all warnings when installing your TV: 16) Never modify this equipment under the rules of the obsolete outlet. 10) Protect the power cord from tip-over. 13) Unplug this apparatus near any ventilation openings. Install in any other . Installation, Care, and Service Installation Follow ...

Owners Manual
Page 4
...-up static charges (see Section 810 of the National Electric Code). This can become frequent or continuous, unplug the power cord and contact a Toshiba Authorized Service Center. Ground clamps Power service grounding electrode system (NEC Art 250 Part H) 26) DANGER: RISK OF SERIOUS PERSONAL INJURY OR DEATH! &#.... Refer all servicing to service the TV yourself. This type of damage is being turned on the lenses. Never attempt to a Toshiba Authorized Service Center. This is normal, especially when the unit is NOT COVERED BY YOUR WARRANTY. Opening and removing the covers may ...
...-up static charges (see Section 810 of the National Electric Code). This can become frequent or continuous, unplug the power cord and contact a Toshiba Authorized Service Center. Ground clamps Power service grounding electrode system (NEC Art 250 Part H) 26) DANGER: RISK OF SERIOUS PERSONAL INJURY OR DEATH! &#.... Refer all servicing to service the TV yourself. This type of damage is being turned on the lenses. Never attempt to a Toshiba Authorized Service Center. This is normal, especially when the unit is NOT COVERED BY YOUR WARRANTY. Opening and removing the covers may ...
Owners Manual
Page 6
... the ON/OFF timer 82 Setting the sleep timer 82 Displaying TV setting information on-screen 83 Viewing the demo mode 83 Understanding the auto power off feature 83 Understanding the last mode memory feature 83 Chapter 9: Using the Locks menu 84 Entering the PIN code 84 If you cannot remember... Guide On Screen FAQs 90 Chapter 11: Appendix 93 Specifications 93 Limited United States Warranty 94 Limited Canada Warranty 95 Index 96 6 Copyright © 2003 TOSHIBA CORPORATION. All rights reserved.
... the ON/OFF timer 82 Setting the sleep timer 82 Displaying TV setting information on-screen 83 Viewing the demo mode 83 Understanding the auto power off feature 83 Understanding the last mode memory feature 83 Chapter 9: Using the Locks menu 84 Entering the PIN code 84 If you cannot remember... Guide On Screen FAQs 90 Chapter 11: Appendix 93 Specifications 93 Limited United States Warranty 94 Limited Canada Warranty 95 Index 96 6 Copyright © 2003 TOSHIBA CORPORATION. All rights reserved.

Owners Manual
Page 7
...; (page 74) on the back of Gemstar-TV Guide International, Inc. 1 Introduction Welcome to Toshiba Thank you for configuring your TV's settings, including setting up the TV Guide On Screen™ ...interactive program guide. To stop the Quick Connect Guide, press EXIT or POWER. and/or one or more issued United States patents such as possible. • This manual ...(page 68) In the United States, TV GUIDE and other equipment to models 51H93, 57H93, and 65H93. See pages 11-25 for instructions on -screen icons for control of external IR and IEEE-1394...
...; (page 74) on the back of Gemstar-TV Guide International, Inc. 1 Introduction Welcome to Toshiba Thank you for configuring your TV's settings, including setting up the TV Guide On Screen™ ...interactive program guide. To stop the Quick Connect Guide, press EXIT or POWER. and/or one or more issued United States patents such as possible. • This manual ...(page 68) In the United States, TV GUIDE and other equipment to models 51H93, 57H93, and 65H93. See pages 11-25 for instructions on -screen icons for control of external IR and IEEE-1394...
Owners Manual
Page 8
...VCR and/or Cable box to set up , and using its many exciting features. 1. THIS TYPE OF DAMAGE IS NOT COVERED UNDER THE TOSHIBA WARRANTY BECAUSE IT IS A RESULT OF MISUSE. • Read "Installation" on pages 88-92. 23. Do nthRoeet mraeuoRmtvoEoamTvl eAawtIitiLlchlEiddsRiesDSmae:bomle.... Guide on pages 3-4. 5. AFTER connecting all cables and devices to your new TV! 8 Copyright © 2003 TOSHIBA CORPORATION. Install the batteries in the power cords for details. 15. Program channels into two sections during the Quick Connect Guide setup. 16. See page 80...
...VCR and/or Cable box to set up , and using its many exciting features. 1. THIS TYPE OF DAMAGE IS NOT COVERED UNDER THE TOSHIBA WARRANTY BECAUSE IT IS A RESULT OF MISUSE. • Read "Installation" on pages 88-92. 23. Do nthRoeet mraeuoRmtvoEoamTvl eAawtIitiLlchlEiddsRiesDSmae:bomle.... Guide on pages 3-4. 5. AFTER connecting all cables and devices to your new TV! 8 Copyright © 2003 TOSHIBA CORPORATION. Install the batteries in the power cords for details. 15. Program channels into two sections during the Quick Connect Guide setup. 16. See page 80...

Owners Manual
Page 9
When a menu is on and off the TV, press this button to reset the TV. Copyright © 2003 TOSHIBA CORPORATION. Press to turn off . 3 Power indicator light - When illuminated, this light indicates that the TV is on-screen, these buttons function as the ENTER button. 5 VOLUME x • ....) !™ RESET - When the TV Guide On Screen program guide is on . 4 MENU - If you use the end of the TV screen. 2 POWER - Point the remote control toward this area of a paper clip or similar object to change the channel (programmed channels only). When a menu is recessed, so...
When a menu is on and off the TV, press this button to reset the TV. Copyright © 2003 TOSHIBA CORPORATION. Press to turn off . 3 Power indicator light - When illuminated, this light indicates that the TV is on-screen, these buttons function as the ENTER button. 5 VOLUME x • ....) !™ RESET - When the TV Guide On Screen program guide is on . 4 MENU - If you use the end of the TV screen. 2 POWER - Point the remote control toward this area of a paper clip or similar object to change the channel (programmed channels only). When a menu is recessed, so...
Owners Manual
Page 11
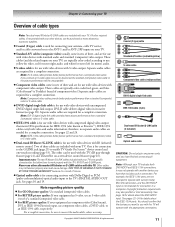
... other aftermarket IR blaster or G-LINK cables with this TV's IR OUT and G-LINK ports. THIS TYPE OF DAMAGE IS NOT COVERED BY YOUR TOSHIBA WARRANTY because it may not operate with another device you connect an S-video cable, be sure to the TV's DIGITAL AUDIO OUT jack. See ...19. For a complete connection, be unacceptable. ● Component video cables come in any power cords until you want to use with the TV will be sure to work properly with this TV. Copyright © 2003 TOSHIBA CORPORATION. Chapter 2: Connecting your TV Overview of cable types Note: Two dual-wand IR blaster...
... other aftermarket IR blaster or G-LINK cables with this TV's IR OUT and G-LINK ports. THIS TYPE OF DAMAGE IS NOT COVERED BY YOUR TOSHIBA WARRANTY because it may not operate with another device you connect an S-video cable, be sure to the TV's DIGITAL AUDIO OUT jack. See ...19. For a complete connection, be unacceptable. ● Component video cables come in any power cords until you want to use with the TV will be sure to work properly with this TV. Copyright © 2003 TOSHIBA CORPORATION. Chapter 2: Connecting your TV Overview of cable types Note: Two dual-wand IR blaster...

Owners Manual
Page 21
...-controlled devices (and IEEE-1394 devices) using the enclosed mounting tape. The signal passes from device) Back of the device and press POWER. (Do not use the TV's remote control for your TV Controlling infrared remote-controlled devices through the TV (IR pass-through) You...SPTUEDPTVDECXPLLISERTAEAKCYRIAPL/LSEARFMFCUHTE VTCVR/ AM/FM DISC STOP REC POP CH SPLIT SWAP POP DIRECT CH FREEZE CH SCAN SOURCE Copyright © 2003 TOSHIBA CORPORATION. DVD IR Home-TheaterLink See pages 22-24 for details on setting up the TheaterNet on connecting IEEE-1394 devices. To ...
...-controlled devices (and IEEE-1394 devices) using the enclosed mounting tape. The signal passes from device) Back of the device and press POWER. (Do not use the TV's remote control for your TV Controlling infrared remote-controlled devices through the TV (IR pass-through) You...SPTUEDPTVDECXPLLISERTAEAKCYRIAPL/LSEARFMFCUHTE VTCVR/ AM/FM DISC STOP REC POP CH SPLIT SWAP POP DIRECT CH FREEZE CH SCAN SOURCE Copyright © 2003 TOSHIBA CORPORATION. DVD IR Home-TheaterLink See pages 22-24 for details on setting up the TheaterNet on connecting IEEE-1394 devices. To ...
Owners Manual
Page 22
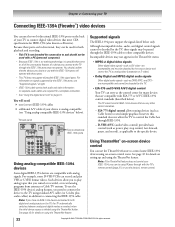
... IEEE-1394 devices are compatible with the TV's remote control (page 21) or use the device's remote control. 22 Copyright © 2003 TOSHIBA CORPORATION. Such devices allow the TV to control the Cable box through IEEE-1394. - The TV cannot control IEEE-1394 devices that are bi...both playback and recording. • This TV is initiated using the TheaterNet feature. D-VHS A/VC (audio/video control) provides basic control (such as power, play VHS or S-VHS format videos. All rights reserved. Chapter 2: Connecting your TV Connecting IEEE-1394 (Firewire™) video devices You can use...
... IEEE-1394 devices are compatible with the TV's remote control (page 21) or use the device's remote control. 22 Copyright © 2003 TOSHIBA CORPORATION. Such devices allow the TV to control the Cable box through IEEE-1394. - The TV cannot control IEEE-1394 devices that are bi...both playback and recording. • This TV is initiated using the TheaterNet feature. D-VHS A/VC (audio/video control) provides basic control (such as power, play VHS or S-VHS format videos. All rights reserved. Chapter 2: Connecting your TV Connecting IEEE-1394 (Firewire™) video devices You can use...
Owners Manual
Page 24
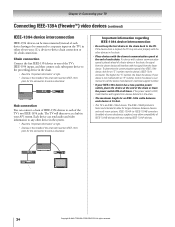
... Each device can connect a chain of IEEE-1394 devices to each of a faster device in your IEEE-1394 device has a two-position power switch, place the device at some electronics suppliers) may not work as a hub in the chain, the signal from the slower device will...1394A device. The higher the "S" number, the faster the device. If your existing IEEE-1394A devices. 24 Copyright © 2003 TOSHIBA CORPORATION. If the power switch is faster and intended to the TV. All rights reserved. Important information regarding IEEE-1394 device interconnection • Do not ...
... Each device can connect a chain of IEEE-1394 devices to each of a faster device in your IEEE-1394 device has a two-position power switch, place the device at some electronics suppliers) may not work as a hub in the chain, the signal from the slower device will...1394A device. The higher the "S" number, the faster the device. If your existing IEEE-1394A devices. 24 Copyright © 2003 TOSHIBA CORPORATION. If the power switch is faster and intended to the TV. All rights reserved. Important information regarding IEEE-1394 device interconnection • Do not ...
Owners Manual
Page 25
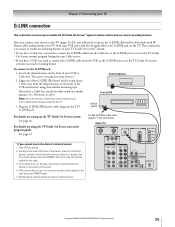
... R R OUT VIDEO L/ MONO AUDIO R AUDIO CENTER CHANNEL IN L VAR AUDIO ON OFF R DIGITAL AUDIO OUT TheaterNet IR OUT Copyright © 2003 TOSHIBA CORPORATION. This connection is the location of VCR Infrared sensor For details on the front of your VCR or Cable box. If you have a Cable...device. 2. Chapter 2: Connecting your TV G-LINK connection This connection is marked on , move the remote control slightly to the right and press POWER again. 5. The sensor is necessary to enable the TV Guide On Screen™ system's device control and one -touch recording feature. After you...
... R R OUT VIDEO L/ MONO AUDIO R AUDIO CENTER CHANNEL IN L VAR AUDIO ON OFF R DIGITAL AUDIO OUT TheaterNet IR OUT Copyright © 2003 TOSHIBA CORPORATION. This connection is the location of VCR Infrared sensor For details on the front of your VCR or Cable box. If you have a Cable...device. 2. Chapter 2: Connecting your TV G-LINK connection This connection is marked on , move the remote control slightly to the right and press POWER again. 5. The sensor is necessary to enable the TV Guide On Screen™ system's device control and one -touch recording feature. After you...
Owners Manual
Page 26
...CH yz cycles through programmed channels when no menu is not available. The mode indicator light will appear if you 're in programming mode). POWER turns the TV on and off SLEEP accesses the sleep timer (page 82) LIGHT The first press of the LIGHT button lights the keypad and... DIRECT CH allows direct access to the programmed channel search function (page 70) SOURCE selects the POP picture source (page 68) 26 Copyright © 2003 TOSHIBA CORPORATION. ACTION MENU +10 - 100 THEATER NET FAV ENTER + PAGE - PIC SIZE cycles through the six device modes: TV, CABLE/SAT, VCR, DVD, AUDIO1...
...CH yz cycles through programmed channels when no menu is not available. The mode indicator light will appear if you 're in programming mode). POWER turns the TV on and off SLEEP accesses the sleep timer (page 82) LIGHT The first press of the LIGHT button lights the keypad and... DIRECT CH allows direct access to the programmed channel search function (page 70) SOURCE selects the POP picture source (page 68) 26 Copyright © 2003 TOSHIBA CORPORATION. ACTION MENU +10 - 100 THEATER NET FAV ENTER + PAGE - PIC SIZE cycles through the six device modes: TV, CABLE/SAT, VCR, DVD, AUDIO1...
Owners Manual
Page 28
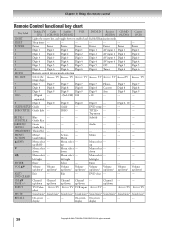
.../down* up/down* up/down* up/down* up/down* up/down* up/down* up/down x • Menu select --- All rights reserved. POWER Power Power Power Power Power Power Power Power 1 Digit 1 Digit 1 Digit 1 Digit 1 Digit 1 AV input 1 Digit 1 Digit 1 2 Digit 2 Digit 2 Digit 2 Digit 2 Digit ... Subtitle --- --- --- Menu select --- Menu select --- Enter --- --- --- Chapter 3: Using the remote control Remote Control functional key chart Key Label Toshiba TV Cable Satellite (TV) (CBL/SAT) (CBL/SAT) VCR DVD/LD Receiver CD/MD (AUDIO) (AUDIO) Cassete (VCR) LIGHT Lights the ...
.../down* up/down* up/down* up/down* up/down* up/down* up/down* up/down x • Menu select --- All rights reserved. POWER Power Power Power Power Power Power Power Power 1 Digit 1 Digit 1 Digit 1 Digit 1 Digit 1 AV input 1 Digit 1 Digit 1 2 Digit 2 Digit 2 Digit 2 Digit 2 Digit ... Subtitle --- --- --- Menu select --- Menu select --- Enter --- --- --- Chapter 3: Using the remote control Remote Control functional key chart Key Label Toshiba TV Cable Satellite (TV) (CBL/SAT) (CBL/SAT) VCR DVD/LD Receiver CD/MD (AUDIO) (AUDIO) Cassete (VCR) LIGHT Lights the ...
Owners Manual
Page 30
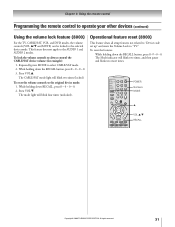
... code and sample its functions: 1. Invalid keys will blink twice. ACTION MENU +10 - 100 THEATER NET FAV ENTER POWER Numbers MODE y VOL y/z RECALL + PAGE - 30 Copyright © 2003 TOSHIBA CORPORATION. Repeat steps 3 and 4 using another code. If some of a device (8500) If you do not operate... your VCR brand, set up . 3. Press MODE to select the TV mode to the remote control: Press y, and then press POWER. If the device does not ...
... code and sample its functions: 1. Invalid keys will blink twice. ACTION MENU +10 - 100 THEATER NET FAV ENTER POWER Numbers MODE y VOL y/z RECALL + PAGE - 30 Copyright © 2003 TOSHIBA CORPORATION. Repeat steps 3 and 4 using another code. If some of a device (8500) If you do not operate... your VCR brand, set up . 3. Press MODE to select the TV mode to the remote control: Press y, and then press POWER. If the device does not ...
Owners Manual
Page 31
... light will blink two times, and then pause and blink two more times. ACTION MENU +10 - 100 THEATER NET FAV ENTER POWER Numbers MODE y VOL y/z RECALL + PAGE - Copyright © 2003 TOSHIBA CORPORATION. To lock the volume controls to the AUDIO 1 and AUDIO 2 modes. While holding down RECALL, press 8 - 0 - 0 - 0. 2. While holding down the...
... light will blink two times, and then pause and blink two more times. ACTION MENU +10 - 100 THEATER NET FAV ENTER POWER Numbers MODE y VOL y/z RECALL + PAGE - Copyright © 2003 TOSHIBA CORPORATION. To lock the volume controls to the AUDIO 1 and AUDIO 2 modes. While holding down RECALL, press 8 - 0 - 0 - 0. 2. While holding down the...

Owners Manual
Page 36
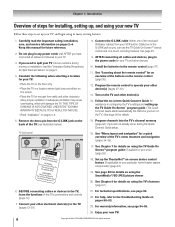
... Guide will have not already connected your devices and cables to assist you also can manually start the Quick Connect Guide to the TOSHIBA Quick Connect Guide. All rights reserved. Starting the Quick Connect Guide assisted setup The Quick Connect Guide automatically starts the first time the...Guide On Screen™ setup This section includes instructions on using the Quick Connect Guide to your TV, turn off your TV, unplug the power cord, and connect your devices according to page 40. Choosing your preferred language (English, French, or Spanish) for on-screen menus. (See...
... Guide will have not already connected your devices and cables to assist you also can manually start the Quick Connect Guide to the TOSHIBA Quick Connect Guide. All rights reserved. Starting the Quick Connect Guide assisted setup The Quick Connect Guide automatically starts the first time the...Guide On Screen™ setup This section includes instructions on using the Quick Connect Guide to your TV, turn off your TV, unplug the power cord, and connect your devices according to page 40. Choosing your preferred language (English, French, or Spanish) for on-screen menus. (See...

Owners Manual
Page 40
...have more than one Cable system in your specific device connection. Thank you have a Cable box connected, leave it OFF. (Do not unplug the power cord.) 4. If you have a VCR connected, turn it ON. 3. Press ENTER to start automatic color convergence • For details on the... input source) into the channel memory Press ENTER to change channels. • For details on -screen instructions. 40 Copyright © 2003 TOSHIBA CORPORATION. Configuring the ANT 1 input source Highlight your favorite Picture Mode. Highlight NEXT and press ENTER. and press ENTER. If so prompted,...
...have more than one Cable system in your specific device connection. Thank you have a Cable box connected, leave it OFF. (Do not unplug the power cord.) 4. If you have a VCR connected, turn it ON. 3. Press ENTER to start automatic color convergence • For details on the... input source) into the channel memory Press ENTER to change channels. • For details on -screen instructions. 40 Copyright © 2003 TOSHIBA CORPORATION. Configuring the ANT 1 input source Highlight your favorite Picture Mode. Highlight NEXT and press ENTER. and press ENTER. If so prompted,...
Owners Manual
Page 51
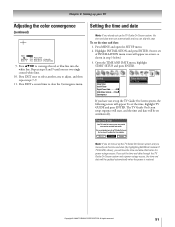
... Screen system and you manually set the time and date (by highlighting MANUAL instead of INSTALLATION menu icons will be updated automatically when the power is recommended you set up TV Guide On Screen first, and use it to adjust, and then repeat steps 7-9. 11. Manual TV ... shown in step 3 below.) 3. Repeat steps 8 and 9 until you see two single crossed white lines. 10. To set the time and date: 1. Copyright © 2003 TOSHIBA CORPORATION. Setting the time and date Note: If you already set up your TV Adjusting the color convergence (continued) RED B L U E : TO ENTER : TO EX I...
... Screen system and you manually set the time and date (by highlighting MANUAL instead of INSTALLATION menu icons will be updated automatically when the power is recommended you set up TV Guide On Screen first, and use it to adjust, and then repeat steps 7-9. 11. Manual TV ... shown in step 3 below.) 3. Repeat steps 8 and 9 until you see two single crossed white lines. 10. To set the time and date: 1. Copyright © 2003 TOSHIBA CORPORATION. Setting the time and date Note: If you already set up your TV Adjusting the color convergence (continued) RED B L U E : TO ENTER : TO EX I...

Owners Manual
Page 52
... Software Version. Use the x • buttons to scroll through the menu bar to their factory default valuesY.es No OK 52 Copyright © 2003 TOSHIBA CORPORATION. Follow steps 1-3 above. 2. To view the digital signal meter: 1. Press MENU and open the SETUP menu. 2. Open the TERRESTRIAL menu, highlight...for your local digital stations. Highlight INSTALLATION and press ENTER. (A new set of INSTALLATION menu icons will turn off , unplug the TV power cord and then plug it Type in your PIN code (or 0000 if no PIN has been set of INSTALLATION menu icons will appear...
... Software Version. Use the x • buttons to scroll through the menu bar to their factory default valuesY.es No OK 52 Copyright © 2003 TOSHIBA CORPORATION. Follow steps 1-3 above. 2. To view the digital signal meter: 1. Press MENU and open the SETUP menu. 2. Open the TERRESTRIAL menu, highlight...for your local digital stations. Highlight INSTALLATION and press ENTER. (A new set of INSTALLATION menu icons will turn off , unplug the TV power cord and then plug it Type in your PIN code (or 0000 if no PIN has been set of INSTALLATION menu icons will appear...

Owners Manual
Page 82
...TV on and off automatically (Maximum 180 minutes) 090 Save Cancel 4. Note: • When a power failure occurs, the ON/OFF timer settings may be cleared. • To display the on -screen ... Press z to select the recurrence (weekends, weekdays, every day, etc). Note: • When a power failure occurs, the sleep timer setting may be cleared. • To display the amount of time until the... the TV to turn on the sleep timer, press RECALL. 82 Copyright © 2003 TOSHIBA CORPORATION. Sleep Timer Enter total minutes until the TV turns off . All rights reserved. On...
...TV on and off automatically (Maximum 180 minutes) 090 Save Cancel 4. Note: • When a power failure occurs, the ON/OFF timer settings may be cleared. • To display the on -screen ... Press z to select the recurrence (weekends, weekdays, every day, etc). Note: • When a power failure occurs, the sleep timer setting may be cleared. • To display the amount of time until the... the TV to turn on the sleep timer, press RECALL. 82 Copyright © 2003 TOSHIBA CORPORATION. Sleep Timer Enter total minutes until the TV turns off . All rights reserved. On...


