
Owners Manual
Page 2
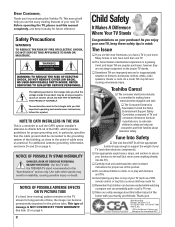
... TV. Use appropriate furniture large enough to climb on the TV screen for proper use the many exciting features of time, the image can become excited while watching a program and can become permanently engrained in the picture tube. NOTICE OF POSSIBLE ADVERSE EFFECTS ON TV PICTURE TUBE If a fixed (non-moving) pattern remains on or play with other enclosed instructions for long periods of your TV...
... TV. Use appropriate furniture large enough to climb on the TV screen for proper use the many exciting features of time, the image can become excited while watching a program and can become permanently engrained in the picture tube. NOTICE OF POSSIBLE ADVERSE EFFECTS ON TV PICTURE TUBE If a fixed (non-moving) pattern remains on or play with other enclosed instructions for long periods of your TV...

Owners Manual
Page 4
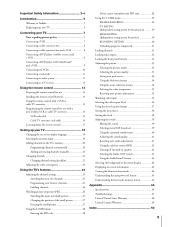
Antenna lead-in the picture tube and cause subtle but permanent ghost images. Never locate the antenna near overhead power lines or other hazards. For example, viewing letterbox style (16:9) media on left or right of time while it as a ladder or screwdriver) can become frequent or continuous, unplug the power cord and contact a Toshiba Authorized Service Center. Turn the TV off to install any of any item...
Antenna lead-in the picture tube and cause subtle but permanent ghost images. Never locate the antenna near overhead power lines or other hazards. For example, viewing letterbox style (16:9) media on left or right of time while it as a ladder or screwdriver) can become frequent or continuous, unplug the power cord and contact a Toshiba Authorized Service Center. Turn the TV off to install any of any item...
Owners Manual
Page 5
... 13 Installing the remote control batteries 13 Using the remote control with a VCR or cable TV converter 13 Programming the remote control for use with a non-Toshiba VCR or cable TV converter 14 VCR code table 15 Cable TV converter code table 16 Learning about the remote control 17 Setting up your TV 18 Changing the on-screen display language 19 Selecting the antenna input 19 Adding channels to the TV's memory 20 Programming channels automatically 20 Adding and erasing channels manually 21 Changing channels 21 Changing channels using SpeedSurf 21 Adjusting the color convergence...
... 13 Installing the remote control batteries 13 Using the remote control with a VCR or cable TV converter 13 Programming the remote control for use with a non-Toshiba VCR or cable TV converter 14 VCR code table 15 Cable TV converter code table 16 Learning about the remote control 17 Setting up your TV 18 Changing the on-screen display language 19 Selecting the antenna input 19 Adding channels to the TV's memory 20 Programming channels automatically 20 Adding and erasing channels manually 21 Changing channels 21 Changing channels using SpeedSurf 21 Adjusting the color convergence...
Owners Manual
Page 6
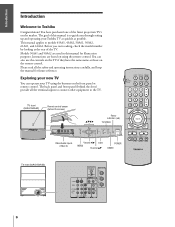
... SOURCE PLAY PIP REC TV/VCR REW FF Video/Audio inputs (Video 3) Volume x • EXIT MENU Channel yz POWER DEMO STILL LOCATE SWAP TV rear (50A61/50A62) AUDIO CENTER CHANNEL IN ANT( 75 ) ANT-1 S-VIDEO ON OFF OUT OUT R L VAR AUDIO ANT-2 Y VIDEO L/ MONO PB L AUDIO R AUDIO PR COLOR R VIDEO 1 VIDEO 2 STREAM INPUT IN DVD IN VIDEO L/ MONO AUDIO R OUT Using the TV's Features Appendix Index 6 Introduction Connecting your TV Using the Remote Control Setting up and operating your Toshiba TV as quickly as those on using the buttons on...
... SOURCE PLAY PIP REC TV/VCR REW FF Video/Audio inputs (Video 3) Volume x • EXIT MENU Channel yz POWER DEMO STILL LOCATE SWAP TV rear (50A61/50A62) AUDIO CENTER CHANNEL IN ANT( 75 ) ANT-1 S-VIDEO ON OFF OUT OUT R L VAR AUDIO ANT-2 Y VIDEO L/ MONO PB L AUDIO R AUDIO PR COLOR R VIDEO 1 VIDEO 2 STREAM INPUT IN DVD IN VIDEO L/ MONO AUDIO R OUT Using the TV's Features Appendix Index 6 Introduction Connecting your TV Using the Remote Control Setting up and operating your Toshiba TV as quickly as those on using the buttons on...
Owners Manual
Page 7
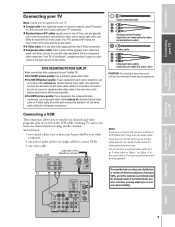
...: Use a standard yellow video cable. Standard stereo A/V cables usually come in from Cable Box or Antenna VIDEO AUDIO LR IN OUT OUT to TV IN from ANT CH 3 CH 4 TV AUDIO CENTER CHANNEL IN ANT( 75 ) ANT-1 S-VIDEO VIDEO L/ MONO ON R Y OFF OUT L VAR AUDIO VIDEO OUT ANT-2 PB L L/ MONO AUDIO AUDIO PR R COLOR R VIDEO 1 VIDEO 2 STREAM INPUT IN DVD IN AUDIO R OUT Note: If you have finished connecting all equipment. Component video cables come in sets of a standard video cable for audio) S-video cable Component video cables (typically color-coded red, green, blue...
...: Use a standard yellow video cable. Standard stereo A/V cables usually come in from Cable Box or Antenna VIDEO AUDIO LR IN OUT OUT to TV IN from ANT CH 3 CH 4 TV AUDIO CENTER CHANNEL IN ANT( 75 ) ANT-1 S-VIDEO VIDEO L/ MONO ON R Y OFF OUT L VAR AUDIO VIDEO OUT ANT-2 PB L L/ MONO AUDIO AUDIO PR R COLOR R VIDEO 1 VIDEO 2 STREAM INPUT IN DVD IN AUDIO R OUT Note: If you have finished connecting all equipment. Component video cables come in sets of a standard video cable for audio) S-video cable Component video cables (typically color-coded red, green, blue...

Owners Manual
Page 9
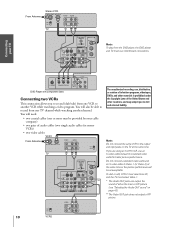
... record one TV channel while watching another channel. AUDIO CENTER CHANNEL IN ANT( 75 ) ANT-1 S-VIDEO ON OFF OUT OUT R L VAR AUDIO ANT-2 Y VIDEO L/ MONO PB L AUDIO R AUDIO PR COLOR R VIDEO 1 VIDEO 2 STREAM INPUT IN DVD IN VIDEO L/ MONO AUDIO R OUT The unauthorized recording, use an S-video cable instead of using ColorStream (component video). Introduction Connecting your TV Connecting a DVD player or satellite receiver and a VCR This connection allows you to civil and criminal liability. You will need : • two...
... record one TV channel while watching another channel. AUDIO CENTER CHANNEL IN ANT( 75 ) ANT-1 S-VIDEO ON OFF OUT OUT R L VAR AUDIO ANT-2 Y VIDEO L/ MONO PB L AUDIO R AUDIO PR COLOR R VIDEO 1 VIDEO 2 STREAM INPUT IN DVD IN VIDEO L/ MONO AUDIO R OUT The unauthorized recording, use an S-video cable instead of using ColorStream (component video). Introduction Connecting your TV Connecting a DVD player or satellite receiver and a VCR This connection allows you to civil and criminal liability. You will need : • two...
Owners Manual
Page 10
...; two pairs of audio cables (two single audio cables for better picture performance. Note: Do not connect the same VCR to Video-1 (or Video-2) at the same time. Do not connect a standard video cable and an S-video cable to the output and input jacks on page 43). ** The Video OUT jack does not output a PIP picture. If you are using an S-VHS VCR, use , distribution, or revision of television programs, videotapes, DVDs, and other materials...
...; two pairs of audio cables (two single audio cables for better picture performance. Note: Do not connect the same VCR to Video-1 (or Video-2) at the same time. Do not connect a standard video cable and an S-video cable to the output and input jacks on page 43). ** The Video OUT jack does not output a PIP picture. If you are using an S-VHS VCR, use , distribution, or revision of television programs, videotapes, DVDs, and other materials...

Owners Manual
Page 12
... TV speakers as center channel speakers only. A/V receiver Setting up your cable company) • one pair of Dolby Pro Logic surround system VCR Audio Video Video Audio LDP/DVD Caution: To avoid damaging the speakers: • Turn off the TV before connecting or disconnecting the Audio Center Channel cable. • Do not connect from the A/V receiver's Center Speaker OUT (amplified signal) to the TV's Audio Center Channel IN. You will function as center channel speakers. To adjust the center channel speaker volume, use...
... TV speakers as center channel speakers only. A/V receiver Setting up your cable company) • one pair of Dolby Pro Logic surround system VCR Audio Video Video Audio LDP/DVD Caution: To avoid damaging the speakers: • Turn off the TV before connecting or disconnecting the Audio Center Channel cable. • Do not connect from the A/V receiver's Center Speaker OUT (amplified signal) to the TV's Audio Center Channel IN. You will function as center channel speakers. To adjust the center channel speaker volume, use...
Owners Manual
Page 13
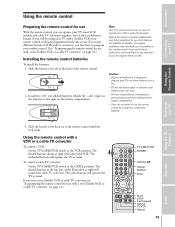
... use the original remote control. Slide the battery cover off of the back of batteries in the top part of VCRs and/or converters, you first have features not available on page 14.) LIGHT RECALL POWER TV CABLE VCR MUTE TV/VIDEO TIMER TV/CABLE/VCR POWER 123 CH 456 7 100 C.CAPT 89 CH RTN VOL 0 ENT ADV/ PIP CH FAV ENTER FAV Channel yz Chanel Number Enter MENU RESET EXIT ADV/ PIP...
... use the original remote control. Slide the battery cover off of the back of batteries in the top part of VCRs and/or converters, you first have features not available on page 14.) LIGHT RECALL POWER TV CABLE VCR MUTE TV/VIDEO TIMER TV/CABLE/VCR POWER 123 CH 456 7 100 C.CAPT 89 CH RTN VOL 0 ENT ADV/ PIP CH FAV ENTER FAV Channel yz Chanel Number Enter MENU RESET EXIT ADV/ PIP...
Owners Manual
Page 14
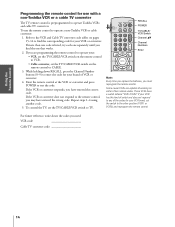
... RECALL, press the Channel Number buttons (0-9) to enter the code for your TV Using the TV's Features Appendix Index 14 Point the remote control at the VCR or converter and press POWER to find the one that works. 2. LIGHT RECALL POWER TV CABLE VCR MUTE TV/VIDEO TIMER 123 CH 456 789 CH RTN VOL 100 0 ENT ADV/ PIP CH RECALL POWER TV/CABLE/ VCR Switch Channel yz Channel Numbers Enter C.CAPT EXIT MENU RESET FAV ENTER FAV ADV/ PIP CH Note: Every time...
... RECALL, press the Channel Number buttons (0-9) to enter the code for your TV Using the TV's Features Appendix Index 14 Point the remote control at the VCR or converter and press POWER to find the one that works. 2. LIGHT RECALL POWER TV CABLE VCR MUTE TV/VIDEO TIMER 123 CH 456 789 CH RTN VOL 100 0 ENT ADV/ PIP CH RECALL POWER TV/CABLE/ VCR Switch Channel yz Channel Numbers Enter C.CAPT EXIT MENU RESET FAV ENTER FAV ADV/ PIP CH Note: Every time...

Owners Manual
Page 17
..., 38) TIMER sets the TV to turn off automatically (page 38) RECALL displays time, status, channel, and rating information on-screen (page 44) TV/VIDEO selects the video input source (page 36) MUTE turns off the sound (page 39) LIGHT back-lights the remote control keys for 5 seconds TV/CABLE/VCR switches between TV, Cable, and VCR modes (page 14) Channel yz cycles through programmed channels (page 21) Channel Numbers (0-9, 100) allow direct access to channels (page 21) Volume yz adjusts the volume level CH...
..., 38) TIMER sets the TV to turn off automatically (page 38) RECALL displays time, status, channel, and rating information on-screen (page 44) TV/VIDEO selects the video input source (page 36) MUTE turns off the sound (page 39) LIGHT back-lights the remote control keys for 5 seconds TV/CABLE/VCR switches between TV, Cable, and VCR modes (page 14) Channel yz cycles through programmed channels (page 21) Channel Numbers (0-9, 100) allow direct access to channels (page 21) Volume yz adjusts the volume level CH...
Owners Manual
Page 19
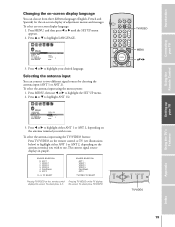
... 34 35 3. To select, press 0-5. LIGHT RECALL POWER TV CABLE VCR MUTE TV/VIDEO TIMER 123 CH 456 7 100 C.CAPT 89 CH RTN VOL 0 ENT ADV/ PIP CH MENU TV/VIDEO MENU FAV ENTER FAV RESET ADV/ EXIT PIP CH yzx • MENU CH EXIT TV/VIDEO DEMO P VOL VOL CH TV/VIDEO Setting up your TV Using the TV's Features Appendix Index 19 Press MENU, then use . The current signal source displays in purple. 1 2 3 4 5 6 7 8 9 10 11 12...
... 34 35 3. To select, press 0-5. LIGHT RECALL POWER TV CABLE VCR MUTE TV/VIDEO TIMER 123 CH 456 7 100 C.CAPT 89 CH RTN VOL 0 ENT ADV/ PIP CH MENU TV/VIDEO MENU FAV ENTER FAV RESET ADV/ EXIT PIP CH yzx • MENU CH EXIT TV/VIDEO DEMO P VOL VOL CH TV/VIDEO Setting up your TV Using the TV's Features Appendix Index 19 Press MENU, then use . The current signal source displays in purple. 1 2 3 4 5 6 7 8 9 10 11 12...

Owners Manual
Page 22
... green (or white) line. The red, green, and blue images are projected onto the screen where they converge to adjust in the circumference convergence menu, and then repeat steps 7-9. 11. To check and adjust the color convergence: 1. If you can drift over time or if you see a clear picture only when the three images converge correctly. Make this adjustment only after the TV has been on your TV screen, skip this procedure. Introduction Connecting your TV Using the Remote Control Setting...
... green (or white) line. The red, green, and blue images are projected onto the screen where they converge to adjust in the circumference convergence menu, and then repeat steps 7-9. 11. To check and adjust the color convergence: 1. If you can drift over time or if you see a clear picture only when the three images converge correctly. Make this adjustment only after the TV has been on your TV screen, skip this procedure. Introduction Connecting your TV Using the Remote Control Setting...

Owners Manual
Page 28
... 35 LOCKS menu • Blocking reset status (to store a new 4-digit PIN code, and then press ENTER. LIGHT RECALL POWER TV CABLE VCR MUTE TV/VIDEO TIMER RECALL 123 CH 456 789 CH RTN VOL 100 0 ENT ADV/ PIP CH C.CAPT EXIT MENU RESET FAV ENTER FAV ADV/ PIP CH Channel Numbers MENU ENTER yzx • The numbers you previously stored, and then press ENTER. 2. Entering the PIN code 1. Press y or z to set each...
... 35 LOCKS menu • Blocking reset status (to store a new 4-digit PIN code, and then press ENTER. LIGHT RECALL POWER TV CABLE VCR MUTE TV/VIDEO TIMER RECALL 123 CH 456 789 CH RTN VOL 100 0 ENT ADV/ PIP CH C.CAPT EXIT MENU RESET FAV ENTER FAV ADV/ PIP CH Channel Numbers MENU ENTER yzx • The numbers you previously stored, and then press ENTER. 2. Entering the PIN code 1. Press y or z to set each...
Owners Manual
Page 33
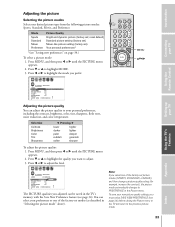
... LIGHT RECALL POWER TV CABLE VCR MUTE TV/VIDEO TIMER 123 CH 456 7 100 C.CAPT 89 CH RTN VOL 0 ENT ADV/ PIP CH MENU FAV ENTER FAV RESET ADV/ EXIT PIP CH MENU yzx • To adjust the picture quality: 1. Mode Sports Standard Movie Preference Picture Quality Bright and dynamic picture (factory set modes (as described in the TV's memory with the Save New Preference feature (see page 34) before closing the Picture menu or the TV...
... LIGHT RECALL POWER TV CABLE VCR MUTE TV/VIDEO TIMER 123 CH 456 7 100 C.CAPT 89 CH RTN VOL 0 ENT ADV/ PIP CH MENU FAV ENTER FAV RESET ADV/ EXIT PIP CH MENU yzx • To adjust the picture quality: 1. Mode Sports Standard Movie Preference Picture Quality Bright and dynamic picture (factory set modes (as described in the TV's memory with the Save New Preference feature (see page 34) before closing the Picture menu or the TV...
Owners Manual
Page 39
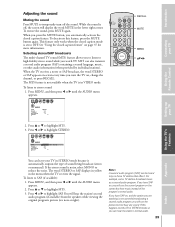
... TV Adjusting the sound Muting the sound Press MUTE to reduce the noise. To listen to highlight SAP. For example, some TV stations broadcast music as a second audio program. If this feature, press the MUTE button again. To restore the sound, press MUTE again. See "Using the closed caption mode is in VIDEO mode. The MTS feature is not available when the TV is set to high-fidelity stereo sound...
... TV Adjusting the sound Muting the sound Press MUTE to reduce the noise. To listen to highlight SAP. For example, some TV stations broadcast music as a second audio program. If this feature, press the MUTE button again. To restore the sound, press MUTE again. See "Using the closed caption mode is in VIDEO mode. The MTS feature is not available when the TV is set to high-fidelity stereo sound...
Owners Manual
Page 47
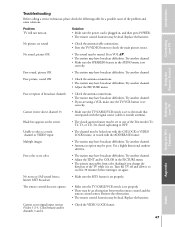
Connecting your TV Cannot receive above channel 13 • Make sure the TV/CABLE/VCR switch is set correctly. Try another channel. • If you change the direction of the Text modes (T1, T2, T3, or T4). Try another channel. • Make sure the SPEAKERS feature in the AUDIO menu is on. Try another channel. Use a highly directional outdoor antenna. Index Cannot access signal input sources (Video 1-2-3, ColorStream) and/or channels 3 and 4. • Check the VIDEO LOCK feature...
Connecting your TV Cannot receive above channel 13 • Make sure the TV/CABLE/VCR switch is set correctly. Try another channel. • If you change the direction of the Text modes (T1, T2, T3, or T4). Try another channel. • Make sure the SPEAKERS feature in the AUDIO menu is on. Try another channel. Use a highly directional outdoor antenna. Index Cannot access signal input sources (Video 1-2-3, ColorStream) and/or channels 3 and 4. • Check the VIDEO LOCK feature...
Owners Manual
Page 48
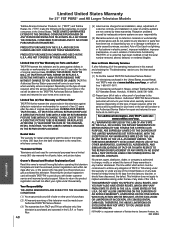
... in your home or the set installation, setup, adjustment of customer controls, and installation or repair of antenna systems are not covered by an Authorized TACP/THI Service Station. (3) The warranties from TACP and THI are your home at www.toshiba.com/tacp, or call toll free 1-800-631-3811. Owner's Manual and Product Registration Card Read this owner's manual thoroughly before operating this television. DO NOT ALLOW LIMITATIONS...
... in your home or the set installation, setup, adjustment of customer controls, and installation or repair of antenna systems are not covered by an Authorized TACP/THI Service Station. (3) The warranties from TACP and THI are your home at www.toshiba.com/tacp, or call toll free 1-800-631-3811. Owner's Manual and Product Registration Card Read this owner's manual thoroughly before operating this television. DO NOT ALLOW LIMITATIONS...
Owners Manual
Page 49
... dealer and operated in materials or workmanship as limited above and do not extend to any television or parts that have a limited ninety (90) day warranty for set installation, setup, adjustment of customer controls, and installation or repair of antenna systems are your bill of sale or other proof of purchase to the Authorized Service Depot. THIS WARRANTY GIVES YOU SPECIFIC LEGAL RIGHTS...
... dealer and operated in materials or workmanship as limited above and do not extend to any television or parts that have a limited ninety (90) day warranty for set installation, setup, adjustment of customer controls, and installation or repair of antenna systems are your bill of sale or other proof of purchase to the Authorized Service Depot. THIS WARRANTY GIVES YOU SPECIFIC LEGAL RIGHTS...
Owners Manual
Page 50
...Connecting your TV Using the Remote Control Setting up your TV Index A A/V receiver connection 12 ANT 1/2 19 Antenna cables 7 Audio cables 7 AUDIO OUT sound, selecting 43 Audio system connection 11 Auto power off 45 B Back of the TV 6 BACKGROUND selection 44 C Cable box connection 8 Camcorder connection 11 C.CAPT button 37 CH LABEL 24 CH LOCK 31 CH RTN button 23 Channel number buttons 23 Channel programming ADD/ERASE 21 Automatic programming 20 TV/CABLE selection 20 Channel y z buttons 21 Clock 38 Closed caption 37 ColorStream cables 7 Convergence adjustment 21 Color...
...Connecting your TV Using the Remote Control Setting up your TV Index A A/V receiver connection 12 ANT 1/2 19 Antenna cables 7 Audio cables 7 AUDIO OUT sound, selecting 43 Audio system connection 11 Auto power off 45 B Back of the TV 6 BACKGROUND selection 44 C Cable box connection 8 Camcorder connection 11 C.CAPT button 37 CH LABEL 24 CH LOCK 31 CH RTN button 23 Channel number buttons 23 Channel programming ADD/ERASE 21 Automatic programming 20 TV/CABLE selection 20 Channel y z buttons 21 Clock 38 Closed caption 37 ColorStream cables 7 Convergence adjustment 21 Color...


