
Owners Manual
Page 2
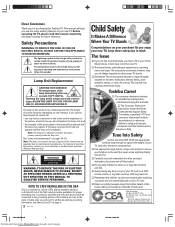
... their families about this Toshiba TV. If the lamp ruptures, the TV will help you use of this manual completely, and keep these safety tips in the colors and/or brightness of the picture, at this temperature will be strong enough to cause an electric shock. NOTE TO CATV INSTALLERS IN THE USA This is replaced. If you use exceeds 392°F (200...
... their families about this Toshiba TV. If the lamp ruptures, the TV will help you use of this manual completely, and keep these safety tips in the colors and/or brightness of the picture, at this temperature will be strong enough to cause an electric shock. NOTE TO CATV INSTALLERS IN THE USA This is replaced. If you use exceeds 392°F (200...
Owners Manual
Page 4
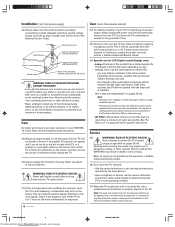
... follow these sounds become frequent or continuous, unplug the power cord and contact a Toshiba Authorized Service Center. 34) Special care for specific instructions. from the TV and as possible. Installation (cont. See "Air filter care" on pages 59-62. Antenna lead-in death or serious injury. See "Lamp unit replacement" on pages 63-64 for LCD (liquid crystal display) units: • Lamp-The lamp in this...
... follow these sounds become frequent or continuous, unplug the power cord and contact a Toshiba Authorized Service Center. 34) Special care for specific instructions. from the TV and as possible. Installation (cont. See "Air filter care" on pages 59-62. Antenna lead-in death or serious injury. See "Lamp unit replacement" on pages 63-64 for LCD (liquid crystal display) units: • Lamp-The lamp in this...

Owners Manual
Page 5
... the user's authority to operate this equipment. 57HLX82(E)02-05 5 Downloaded from a normal viewing distance (see page 18. The air intake for a Class B digital device, pursuant to a computer, see item 28 on page 4). 6) The green and red LED lights on the control touchpad (on the lower right corner of LCOS technology and is no picture to full picture brightness each time you must replace the lamp unit...
... the user's authority to operate this equipment. 57HLX82(E)02-05 5 Downloaded from a normal viewing distance (see page 18. The air intake for a Class B digital device, pursuant to a computer, see item 28 on page 4). 6) The green and red LED lights on the control touchpad (on the lower right corner of LCOS technology and is no picture to full picture brightness each time you must replace the lamp unit...
Owners Manual
Page 6
... volume lock feature (8000 23 Operational feature reset (8900 23 Device code table 24 VCR setup codes 24 Cable box setup codes 24 CD Player setup codes 25 Receiver setup codes 25 Cassette Player setup codes 25 Laser Disc setup codes 25 DVD setup codes 25 Satellite Receiver setup codes 25 Learning about the remote control 26 Setting up your TV 27 Learning about the menu system 27 Using the Quick Connect Guide 28 Changing the on-screen display language 29 Selecting the antenna input 29 Adding channels to the TV's memory 30 Programming channels...
... volume lock feature (8000 23 Operational feature reset (8900 23 Device code table 24 VCR setup codes 24 Cable box setup codes 24 CD Player setup codes 25 Receiver setup codes 25 Cassette Player setup codes 25 Laser Disc setup codes 25 DVD setup codes 25 Satellite Receiver setup codes 25 Learning about the remote control 26 Setting up your TV 27 Learning about the menu system 27 Using the Quick Connect Guide 28 Changing the on-screen display language 29 Selecting the antenna input 29 Adding channels to the TV's memory 30 Programming channels...
Owners Manual
Page 8
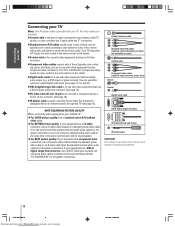
... white audio cables connected to remotely control other A/V equipment (equipped with your TV. You can use an S-video cable instead of a standard yellow video cable. (You still must connect the standard red and white audio cables for audio) S-video cable Component video cables (typically color-coded red, green, blue) Optical Coaxial Digital audio cable NOTE REGARDING PICTURE QUALITY When connecting video equipment to your TV Using the TV's Features Appendix Index 8 57HLX82(E)08-18 8 Downloaded from www.Manualslib.com manuals search engine 10/29/02, 10:28 AM DVI-D digital...
... white audio cables connected to remotely control other A/V equipment (equipped with your TV. You can use an S-video cable instead of a standard yellow video cable. (You still must connect the standard red and white audio cables for audio) S-video cable Component video cables (typically color-coded red, green, blue) Optical Coaxial Digital audio cable NOTE REGARDING PICTURE QUALITY When connecting video equipment to your TV Using the TV's Features Appendix Index 8 57HLX82(E)08-18 8 Downloaded from www.Manualslib.com manuals search engine 10/29/02, 10:28 AM DVI-D digital...
Owners Manual
Page 12
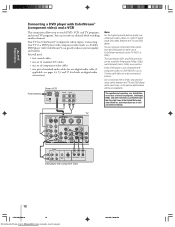
... S-Video and standard video cables between the TV and DVD player. The unauthorized recording, use component video cables (or a DVI-D digital single-link cable) between the TV and DVD player at the same time, or the picture performance will need: • two coaxial cables • one set of standard A/V cables • one set of ColorStream terminals on digital audio connection) From Antenna Stereo VCR IN from the DVD player to either set of component video cables • one pair of television programs, videotapes, DVDs...
... S-Video and standard video cables between the TV and DVD player. The unauthorized recording, use component video cables (or a DVI-D digital single-link cable) between the TV and DVD player at the same time, or the picture performance will need: • two coaxial cables • one set of standard A/V cables • one set of ColorStream terminals on digital audio connection) From Antenna Stereo VCR IN from the DVD player to either set of component video cables • one pair of television programs, videotapes, DVDs...
Owners Manual
Page 14
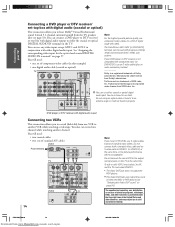
... S-video cable to another channel. You do not need : • two coaxial cables • two sets of either the Main or POP picture (see page 53). To dub or edit, VCR 2 must select Line IN, and the TV must select VIDEO 1. * The Video OUT jack does not output the POP picture. **The Audio OUT jacks can connect a DVD player or DTV receiver/ set-top box with digital audio output to the output and input jacks...
... S-video cable to another channel. You do not need : • two coaxial cables • two sets of either the Main or POP picture (see page 53). To dub or edit, VCR 2 must select Line IN, and the TV must select VIDEO 1. * The Video OUT jack does not output the POP picture. **The Audio OUT jacks can connect a DVD player or DTV receiver/ set-top box with digital audio output to the output and input jacks...
Owners Manual
Page 17
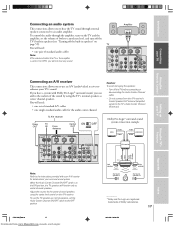
... AUDIO DVI/HDCP For PC OUT IN A/V receiver Audio Video Audio center channel T V Left speaker Right speaker Note: Refer to the instructions provided with Dolby Pro Logic® surround sound, you can add to the realism of Dolby Laboratories. 17 Using the TV's Features Appendix Index 57HLX82(E)08-18 17 Downloaded from the A/V receiver's Center Speaker OUT terminal (amplified signal) to the TV's Audio Center Channel IN terminal. Introduction Connecting your TV Using the Remote Control Setting...
... AUDIO DVI/HDCP For PC OUT IN A/V receiver Audio Video Audio center channel T V Left speaker Right speaker Note: Refer to the instructions provided with Dolby Pro Logic® surround sound, you can add to the realism of Dolby Laboratories. 17 Using the TV's Features Appendix Index 57HLX82(E)08-18 17 Downloaded from the A/V receiver's Center Speaker OUT terminal (amplified signal) to the TV's Audio Center Channel IN terminal. Introduction Connecting your TV Using the Remote Control Setting...
Owners Manual
Page 19
... codes Mode Default device TV Toshiba TV CABLE/SAT Toshiba Satellite receiver VCR DVD AUDIO1 Toshiba VCR Toshiba DVD Pioneer Audio receiver AUDIO2 Pioneer LD MODE Repeatedly press MODE to the remote control until the lock snaps. 19 57HLX82(E)19-26 19 Downloaded from leaking into a fire. • Do not mix battery types or combine used batteries with new ones. • If the batteries are as follows: Target device/Mode mapping Mode Device TV Toshiba TV CABLE/SAT Universal Cable...
... codes Mode Default device TV Toshiba TV CABLE/SAT Toshiba Satellite receiver VCR DVD AUDIO1 Toshiba VCR Toshiba DVD Pioneer Audio receiver AUDIO2 Pioneer LD MODE Repeatedly press MODE to the remote control until the lock snaps. 19 57HLX82(E)19-26 19 Downloaded from leaking into a fire. • Do not mix battery types or combine used batteries with new ones. • If the batteries are as follows: Target device/Mode mapping Mode Device TV Toshiba TV CABLE/SAT Universal Cable...
Owners Manual
Page 27
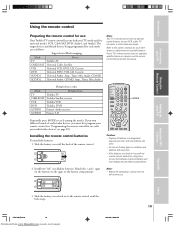
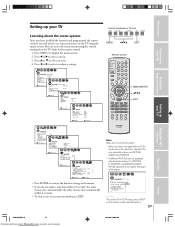
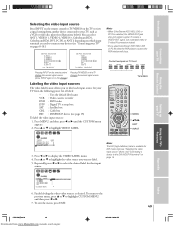
... need to set some preferences on the TV using the control touchpad on the TV front or the remote control. 1. the other menus close automatically within 15 seconds, the main menus close an on-screen menu instantly, press EXIT. See page 48 for details. Control touchpad on TV front MENU VOLUME CHANNEL EXIT TV/VIDEO MENU x •zy EXIT Remote control P I CTURE ANTENNA MODE SPORTS CONTRAST 100 BR I GHTNESS 50 COLOR 50 T I NT 0 SHARPNESS 50 RESET...
... need to set some preferences on the TV using the control touchpad on the TV front or the remote control. 1. the other menus close automatically within 15 seconds, the main menus close an on-screen menu instantly, press EXIT. See page 48 for details. Control touchpad on TV front MENU VOLUME CHANNEL EXIT TV/VIDEO MENU x •zy EXIT Remote control P I CTURE ANTENNA MODE SPORTS CONTRAST 100 BR I GHTNESS 50 COLOR 50 T I NT 0 SHARPNESS 50 RESET...
Owners Manual
Page 32
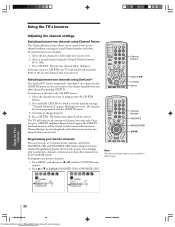
... were selected. Continue to view. 2. To switch between two channels using Channel Return The Channel Return feature allows you press CH RTN and then change channels. 4. To memorize a channel in ANT2 mode. Because this feature scans through only your favorite channels You can return to switch between two channels using the Channel Number buttons (0-9, 100). 3. To program your TV Using the TV's features Adjusting the channel settings Switching between two channels: 1. Select the channel you press CH RTN...
... were selected. Continue to view. 2. To switch between two channels using Channel Return The Channel Return feature allows you press CH RTN and then change channels. 4. To memorize a channel in ANT2 mode. Because this feature scans through only your favorite channels You can return to switch between two channels using the Channel Number buttons (0-9, 100). 3. To program your TV Using the TV's features Adjusting the channel settings Switching between two channels: 1. Select the channel you press CH RTN...
Owners Manual
Page 46
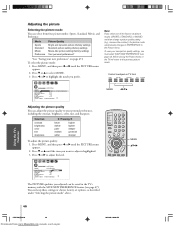
... MENU VOLUME CHANNEL EXIT TV/VIDEO P I CTURE ANTENNA MODE SPORTS / STANDARD / MOV I E / PREFERENCE CONTRAST 80 BR I GHTNESS 50 COLOR 50 T I NT 0 SHARPNESS 50 RESET SAVE NEW PREFERENCE The PICTURE qualities you select one of the factory-set options, as described under "Selecting the picture mode" above. Press z or y to adjust is highlighted. 3. Control touchpad on page 47.) To select the picture mode: 1. Press x or • to the previous picture mode. Using...
... MENU VOLUME CHANNEL EXIT TV/VIDEO P I CTURE ANTENNA MODE SPORTS / STANDARD / MOV I E / PREFERENCE CONTRAST 80 BR I GHTNESS 50 COLOR 50 T I NT 0 SHARPNESS 50 RESET SAVE NEW PREFERENCE The PICTURE qualities you select one of the factory-set options, as described under "Selecting the picture mode" above. Press z or y to adjust is highlighted. 3. Control touchpad on page 47.) To select the picture mode: 1. Press x or • to the previous picture mode. Using...
Owners Manual
Page 48
...; to adjust the image to highlight RESET. 3. To adjust the horizontal/vertical position and image flicker: 1. Setting up . Introduction Connecting your TV Using the Remote Control Resetting your picture quality adjustments The RESET function returns your picture quality adjustments: 1. Cool Brightness center (50) DNR Auto Color center (50) Mode Sports Tint center (0) Sharpness center (50) To reset your picture quality adjustments to display the PICTURE menu. 2. The menu displays "DONE." Press MENU, and then press x or • to the following factory settings: Contrast...
...; to adjust the image to highlight RESET. 3. To adjust the horizontal/vertical position and image flicker: 1. Setting up . Introduction Connecting your TV Using the Remote Control Resetting your picture quality adjustments The RESET function returns your picture quality adjustments: 1. Cool Brightness center (50) DNR Auto Color center (50) Mode Sports Tint center (0) Sharpness center (50) To reset your picture quality adjustments to display the PICTURE menu. 2. The menu displays "DONE." Press MENU, and then press x or • to the following factory settings: Contrast...
Owners Manual
Page 49
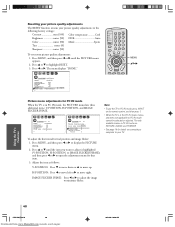
... label name : Video cassette recorder : DVD video : Digital TV set-top box : Satellite box : Cable box : DVI/HDCP device (see illustrations below). To receive a VIDEO OUT signal, use a standard video or S-video IN connection instead. • If you select ColorStream HD1/HD2, DVI, or PC IN while the POP picture is selected, the VIDEO OUT jack does not output a signal. CUSTOM V I DEO LABEL V I DEO1 V I DEO2 V I DEO3 Color Stream HD1 Color Stream HD2 DVI CUSTOM MENU -/ VCR / DVD / DTV...
... label name : Video cassette recorder : DVD video : Digital TV set-top box : Satellite box : Cable box : DVI/HDCP device (see illustrations below). To receive a VIDEO OUT signal, use a standard video or S-video IN connection instead. • If you select ColorStream HD1/HD2, DVI, or PC IN while the POP picture is selected, the VIDEO OUT jack does not output a signal. CUSTOM V I DEO LABEL V I DEO1 V I DEO2 V I DEO3 Color Stream HD1 Color Stream HD2 DVI CUSTOM MENU -/ VCR / DVD / DTV...
Owners Manual
Page 62
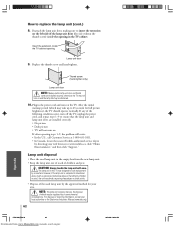
... used lamp unit in this TV was designed for safe replacement by the approved method for full picture brightness), the TV should operate normally. The lamp unit in the empty box from www.Manualslib.com manuals search engine 10/29/02, 10:29 AM Reattach the lamp unit door, making sure to ensure that the lamp unit and lamp unit door are installed securely; Connecting your TV Using the Remote Control Setting...
... used lamp unit in this TV was designed for safe replacement by the approved method for full picture brightness), the TV should operate normally. The lamp unit in the empty box from www.Manualslib.com manuals search engine 10/29/02, 10:29 AM Reattach the lamp unit door, making sure to ensure that the lamp unit and lamp unit door are installed securely; Connecting your TV Using the Remote Control Setting...
Owners Manual
Page 64
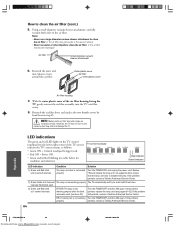
... cover Using the Remote Control Setting up your TV How to clean the air filter, or the air filter may enter and damage the TV. If the problem still persists, contact a Toshiba Authorized Service Center. The lamp unit door is not working Turn the POWER OFF and then ON again. persists, contact a Toshiba Authorized Service Center. 64 Appendix Index 57HLX82(E)59-70 64 Downloaded from www.Manualslib.com manuals search engine...
... cover Using the Remote Control Setting up your TV How to clean the air filter, or the air filter may enter and damage the TV. If the problem still persists, contact a Toshiba Authorized Service Center. The lamp unit door is not working Turn the POWER OFF and then ON again. persists, contact a Toshiba Authorized Service Center. 64 Appendix Index 57HLX82(E)59-70 64 Downloaded from www.Manualslib.com manuals search engine...
Owners Manual
Page 66
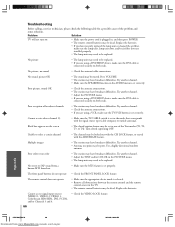
... are installed properly. • The lamp unit may be dead. Try another channel. • Check the antenna connections. • If you are using a DVI/HDCP device, make sure the TV/VCR button is connected securely on the screen • The closed captioning OFF. Try another channel. • Adjust the PICTURE menu. • If you are using a VCR, make sure the DVI cable is set to be replaced. Cannot access signal input sources (VIDEO 1, VIDEO 2, VIDEO 3, ColorStream HD1/HD2, DVI, PC...
... are installed properly. • The lamp unit may be dead. Try another channel. • Check the antenna connections. • If you are using a DVI/HDCP device, make sure the TV/VCR button is connected securely on the screen • The closed captioning OFF. Try another channel. • Adjust the PICTURE menu. • If you are using a VCR, make sure the DVI cable is set to be replaced. Cannot access signal input sources (VIDEO 1, VIDEO 2, VIDEO 3, ColorStream HD1/HD2, DVI, PC...
Owners Manual
Page 67
... in any obligation of the operating instructions in violation of the U.S.A. LABOR CHARGES FOR LAMP UNIT REPLACEMENT ARE NOT COVERED UNDER WARRANTY. Complete and mail the enclosed product registration card within which action must be commenced to your TV Limited United States Warranty for set installation, setup, adjustment of customer controls, and installation or repair of repair required, either the service will be performed in materials...
... in any obligation of the operating instructions in violation of the U.S.A. LABOR CHARGES FOR LAMP UNIT REPLACEMENT ARE NOT COVERED UNDER WARRANTY. Complete and mail the enclosed product registration card within which action must be commenced to your TV Limited United States Warranty for set installation, setup, adjustment of customer controls, and installation or repair of repair required, either the service will be performed in materials...
Owners Manual
Page 68
... the lamp unit in this television against defects in this manual and checking the "Troubleshooting" section, you or to damage to television or parts caused by use of this product and the connected equipment. Limited Ninety (90) Day Warranty on the type of repair required, either the service will be performed in Canada. (4) Labor service charges for set installation, setup, adjustment of customer controls, and installation or repair of antenna...
... the lamp unit in this television against defects in this manual and checking the "Troubleshooting" section, you or to damage to television or parts caused by use of this product and the connected equipment. Limited Ninety (90) Day Warranty on the type of repair required, either the service will be performed in Canada. (4) Labor service charges for set installation, setup, adjustment of customer controls, and installation or repair of antenna...
Owners Manual
Page 71
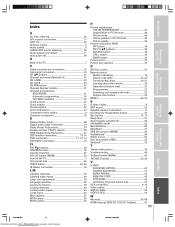
... 37 Picture size selection 35 R RECALL button 57 Remote control Battery installation 19 Device code table 24-25 Functional key chart 20-21 Learning about the buttons 26 Operational feature reset 23 Programming 22 Searching and sampling the code 22 Volume Lock feature 23 RESET 48, 54 S S-video cables 8 SAP sound 52 Satellite receiver connection 11 Scrolling the Theater Wide picture 37 Set-top box 13, 14 Sleep timer 51 Sound quality adjustments 54 SPEAKERS on/off 55 Specifications...
... 37 Picture size selection 35 R RECALL button 57 Remote control Battery installation 19 Device code table 24-25 Functional key chart 20-21 Learning about the buttons 26 Operational feature reset 23 Programming 22 Searching and sampling the code 22 Volume Lock feature 23 RESET 48, 54 S S-video cables 8 SAP sound 52 Satellite receiver connection 11 Scrolling the Theater Wide picture 37 Set-top box 13, 14 Sleep timer 51 Sound quality adjustments 54 SPEAKERS on/off 55 Specifications...


