

Owner's Manual - English
Page 2
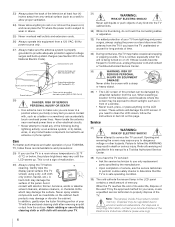
... Listed wall bracket appropriate for installation. Follow the manufacturer's recommendations for the safe installation and use of your LCD TV, please read and understand all enclosed instructions for proper use a UL Listed wall bracket appropriate for the size and weight of this television for proper grounding and, in accordance with furniture and television sets. • Don't place flat panel displays on furniture that can be heavy. Some wall mounts are mounting the display is...
... Listed wall bracket appropriate for installation. Follow the manufacturer's recommendations for the safe installation and use of your LCD TV, please read and understand all enclosed instructions for proper use a UL Listed wall bracket appropriate for the size and weight of this television for proper grounding and, in accordance with furniture and television sets. • Don't place flat panel displays on furniture that can be heavy. Some wall mounts are mounting the display is...
Owner's Manual - English
Page 4
... need to clean the LCD screen, follow this manual to a Toshiba Authorized Service Center. 38) If you use of a dirty cleaning cloth or stiff cloth will damage the LCD screen. Refer all servicing not specified in death or serious injury. 23) Always place the back of the television at least four (4) inches away from any home theater component connected to an antenna or phone system. A hard...
... need to clean the LCD screen, follow this manual to a Toshiba Authorized Service Center. 38) If you use of a dirty cleaning cloth or stiff cloth will damage the LCD screen. Refer all servicing not specified in death or serious injury. 23) Always place the back of the television at least four (4) inches away from any home theater component connected to an antenna or phone system. A hard...
Owner's Manual - English
Page 5
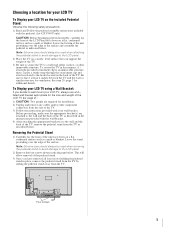
... end to wall mount your LCD TV, always use a ULlisted wall bracket appropriate for the size and weight of the LCD TV (- Be sure to the wall and the back of the TV, remove the pedestal stand from the rear of the TV. 3) Follow the instructions provided with the wall bracket. 4) After attaching the appropriate bracket(s) to leave at least 4 inches between the TV and the wall or similar...
... end to wall mount your LCD TV, always use a ULlisted wall bracket appropriate for the size and weight of the LCD TV (- Be sure to the wall and the back of the TV, remove the pedestal stand from the rear of the TV. 3) Follow the instructions provided with the wall bracket. 4) After attaching the appropriate bracket(s) to leave at least 4 inches between the TV and the wall or similar...
Owner's Manual - English
Page 7
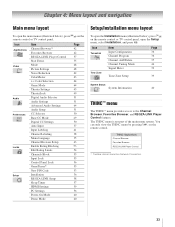
... Setup/Installation menu layout 33 THINC™ menu 33 Navigating the menu system 34 Chapter 5: Setting up your TV 35 Setting the Demo Mode 35 Selecting the menu language 35 Configuring the input source for the ANT/CABLE terminal 36 Programming channels into the TV's channel memory . . . . 36 Programming channels automatically 36 Manually adding and deleting channels in the channel memory 37 Setting the Auto Input feature 37 Labeling channels 38 Setting the HDMI™ audio mode 39 Viewing the digital signal...
... Setup/Installation menu layout 33 THINC™ menu 33 Navigating the menu system 34 Chapter 5: Setting up your TV 35 Setting the Demo Mode 35 Selecting the menu language 35 Configuring the input source for the ANT/CABLE terminal 36 Programming channels into the TV's channel memory . . . . 36 Programming channels automatically 36 Manually adding and deleting channels in the channel memory 37 Setting the Auto Input feature 37 Labeling channels 38 Setting the HDMI™ audio mode 39 Viewing the digital signal...
Owner's Manual - English
Page 9
...(s). 6 AFTER connecting all cables and devices, plug in HDMI signals and allows for sending of wider color signals from the TV remote via HDMI connection (- page 62). • Channel Browser™ allows you 're watching (- page 6). • Place the TV in any power cords until AFTER you turn off the On-Screen demonstration mode by default. Note: After you have connected all channels and inputs (- Deep Color feature allows the HDMI source to...
...(s). 6 AFTER connecting all cables and devices, plug in HDMI signals and allows for sending of wider color signals from the TV remote via HDMI connection (- page 62). • Channel Browser™ allows you 're watching (- page 6). • Place the TV in any power cords until AFTER you turn off the On-Screen demonstration mode by default. Note: After you have connected all channels and inputs (- Deep Color feature allows the HDMI source to...
Owner's Manual - English
Page 10
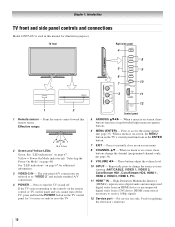
... remote sensor. The side panel A/V connections are viewing (ANT/CABLE, VIDEO 1, VIDEO 2, ColorStream HD1, ColorStream HD2, HDMI 1, HDMI 2, HDMI 3, HDMI 4, PC). 11 HDMI™ IN - page 33). When a menu is on-screen, these buttons change the source you cannot turn the TV on and off the TV, press and hold the POWER button on page 67 for 5 or more seconds to change the channel (programmed channels only; - page 36). 9 VOLUME C c - These buttons adjust the volume level. 10 INPUT - Press to access...
... remote sensor. The side panel A/V connections are viewing (ANT/CABLE, VIDEO 1, VIDEO 2, ColorStream HD1, ColorStream HD2, HDMI 1, HDMI 2, HDMI 3, HDMI 4, PC). 11 HDMI™ IN - page 33). When a menu is on-screen, these buttons change the source you cannot turn the TV on and off the TV, press and hold the POWER button on page 67 for 5 or more seconds to change the channel (programmed channels only; - page 36). 9 VOLUME C c - These buttons adjust the volume level. 10 INPUT - Press to access...

Owner's Manual - English
Page 11
... are trademarks of HDMI Licensing LLC. Manufactured under license from a DVI device. Two sets of cable types and connections, see pages 12-19. 1 TV back 2 3 4 Power cord Cable Strap 5 67 8 1 DIGITAL AUDIO OUT - For controlling infrared remote-controlled devices through features. 9 ANT/CABLE - Optical audio output in the Audio Setup menu (- Analog audio outputs for a complete connection. 9 6 VIDEO 1 IN - RF input that supports analog (NTSC) and digital (ATSC) off-air antenna signals and analog and digital Cable TV (QAM) signals. separate audio cables are required for...
... are trademarks of HDMI Licensing LLC. Manufactured under license from a DVI device. Two sets of cable types and connections, see pages 12-19. 1 TV back 2 3 4 Power cord Cable Strap 5 67 8 1 DIGITAL AUDIO OUT - For controlling infrared remote-controlled devices through features. 9 ANT/CABLE - Optical audio output in the Audio Setup menu (- Analog audio outputs for a complete connection. 9 6 VIDEO 1 IN - RF input that supports analog (NTSC) and digital (ATSC) off-air antenna signals and analog and digital Cable TV (QAM) signals. separate audio cables are required for...
Owner's Manual - English
Page 12
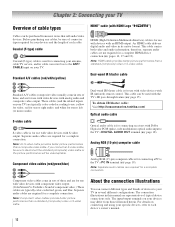
... video cable. The connection illustrations in this manual are required for use with video devices with IR (infrared) remote control. For details on your TV) are required for use with video devices with component video output. (ColorStream® is Toshiba's brand of devices to each cable. This cable can connect different types and brands of component video.) These cables are for a complete connection. Note: Separate audio cables are representative of three, and are typically color-coded red, green...
... video cable. The connection illustrations in this manual are required for use with video devices with IR (infrared) remote control. For details on your TV) are required for use with video devices with component video output. (ColorStream® is Toshiba's brand of devices to each cable. This cable can connect different types and brands of component video.) These cables are for a complete connection. Note: Separate audio cables are representative of three, and are typically color-coded red, green...

Owner's Manual - English
Page 13
... S-video, use the remote control to program or access certain features on the TV. Do not connect both types of video cable to VIDEO 1 at the same time or the picture performance will need: • coaxial cables • standard A/V cables - The unauthorized recording, use, distribution, or revision of television programs, videotapes, DVDs, and other materials is set to). To view the antenna or Cable signal: Select the ANT/CABLE video input source on the remote control (- To program the TV remote control to operate other...
... S-video, use the remote control to program or access certain features on the TV. Do not connect both types of video cable to VIDEO 1 at the same time or the picture performance will need: • coaxial cables • standard A/V cables - The unauthorized recording, use, distribution, or revision of television programs, videotapes, DVDs, and other materials is set to). To view the antenna or Cable signal: Select the ANT/CABLE video input source on the remote control (- To program the TV remote control to operate other...

Owner's Manual - English
Page 18
.... 2 Minimize the sound volume from Dolby Laboratories. Connecting an audio system This connection allows you to adjust the sound level. Audio Setup PC Audio HDMI 1 Audio MTS Language Optical Output Format Dolby Digital Dynamic Range Control Reset No Auto Stereo English Dolby Digital Compressed Done To control the audio: 1 Turn on the TV's remote control and open the Audio menu. 3 Highlight Audio Setup and press T. "Dolby" and the double-D symbol are not compatible with standard optical out signals may not work properly, creating...
.... 2 Minimize the sound volume from Dolby Laboratories. Connecting an audio system This connection allows you to adjust the sound level. Audio Setup PC Audio HDMI 1 Audio MTS Language Optical Output Format Dolby Digital Dynamic Range Control Reset No Auto Stereo English Dolby Digital Compressed Done To control the audio: 1 Turn on the TV's remote control and open the Audio menu. 3 Highlight Audio Setup and press T. "Dolby" and the double-D symbol are not compatible with standard optical out signals may not work properly, creating...
Owner's Manual - English
Page 19
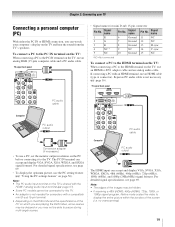
... PC before connecting it to the TV. Signal name 6 Ground 7 Ground 8 Ground 9 NC 10 Ground Pin No. page 16). Computer PC audio output The HDMI input can accept and display VGA, SVGA, XGA, WXGA, and SXGA signal formats. TV upper back panel PC audio cable Computer PC audio output PC audio cable Conversion adapter (if necessary) • To use a PC, set the monitor output resolution on page 56). For detailed signal specifications, see page...
... PC before connecting it to the TV. Signal name 6 Ground 7 Ground 8 Ground 9 NC 10 Ground Pin No. page 16). Computer PC audio output The HDMI input can accept and display VGA, SVGA, XGA, WXGA, and SXGA signal formats. TV upper back panel PC audio cable Computer PC audio output PC audio cable Conversion adapter (if necessary) • To use a PC, set the monitor output resolution on page 56). For detailed signal specifications, see page...
Owner's Manual - English
Page 22
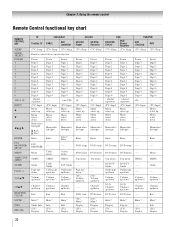
... Channel up/down Cable Guide Cable page up/down Volume up/down*1 Channel up/down SAT Guide Guide page up/down Volume up/down*1 Channel up /down ---- Volume up/down*1 Channel up Menu select down Exit Exit Exit DVD clear DVD clear DVD clear DVD clear ---- Chapter 3: Using the remote control Remote Control functional key chart REMOTE CONTROL KEY SLEEP MODE SELECT POWER 1 2 3 4 5 6 7 8 9 0 100/-/+10 INPUT B b C3 #c ENTER FAV BROWSER/ SETUP MENU THINC/TOP MENU GUIDE PAGE +/- Power Digit 1 Digit 2 Digit 3 Digit 4 Digit 5 Digit 6 Digit 7 Digit 8 Digit 9 Digit 0 ----- (TV) Input Menu...
... Channel up/down Cable Guide Cable page up/down Volume up/down*1 Channel up/down SAT Guide Guide page up/down Volume up/down*1 Channel up /down ---- Volume up/down*1 Channel up Menu select down Exit Exit Exit DVD clear DVD clear DVD clear DVD clear ---- Chapter 3: Using the remote control Remote Control functional key chart REMOTE CONTROL KEY SLEEP MODE SELECT POWER 1 2 3 4 5 6 7 8 9 0 100/-/+10 INPUT B b C3 #c ENTER FAV BROWSER/ SETUP MENU THINC/TOP MENU GUIDE PAGE +/- Power Digit 1 Digit 2 Digit 3 Digit 4 Digit 5 Digit 6 Digit 7 Digit 8 Digit 9 Digit 0 ----- (TV) Input Menu...
Owner's Manual - English
Page 33
...™ Favorites Browser REGZA-LINK Player Control Start Demo Mode Picture Settings Noise Reduction ColorMaster x.v.Color Selection Game Mode Theater Settings TheaterLock Digital Audio Selector Audio Settings Advanced Audio Settings Audio Setup CC Selector Base CC Mode Digital CC Settings Auto Input Input Labeling Channel Labeling Menu Language Channel Browser Setup Enable Rating Blocking Edit Rating Limits Channels Block Input Lock Control Panel Lock GameTimer® New PIN Code Installation REGZA-LINK Setup Sleep Timer HDMI Settings PC Settings Power-On Mode Demo Mode Page 42 42 57 35 48...
...™ Favorites Browser REGZA-LINK Player Control Start Demo Mode Picture Settings Noise Reduction ColorMaster x.v.Color Selection Game Mode Theater Settings TheaterLock Digital Audio Selector Audio Settings Advanced Audio Settings Audio Setup CC Selector Base CC Mode Digital CC Settings Auto Input Input Labeling Channel Labeling Menu Language Channel Browser Setup Enable Rating Blocking Edit Rating Limits Channels Block Input Lock Control Panel Lock GameTimer® New PIN Code Installation REGZA-LINK Setup Sleep Timer HDMI Settings PC Settings Power-On Mode Demo Mode Page 42 42 57 35 48...

Owner's Manual - English
Page 36
... program channels into the TV's memory.) To remove an Antenna source channel from the memory, you must use the Channel Number buttons on the channels you have not already done so (- Setup Installation REGZA-LINK Setup Sleep Timer HDMI Settings PC Settings Power-On Mode Demo Mode Power-Saving Off 3 Open the Terrestrial menu, highlight Input Configuration, and press T. Input Configuration ANT/CABLE In Cancel Cable Done 5 To save your area and store them in the channel memory. however, once channel programming...
... program channels into the TV's memory.) To remove an Antenna source channel from the memory, you must use the Channel Number buttons on the channels you have not already done so (- Setup Installation REGZA-LINK Setup Sleep Timer HDMI Settings PC Settings Power-On Mode Demo Mode Power-Saving Off 3 Open the Terrestrial menu, highlight Input Configuration, and press T. Input Configuration ANT/CABLE In Cancel Cable Done 5 To save your area and store them in the channel memory. however, once channel programming...
Owner's Manual - English
Page 39
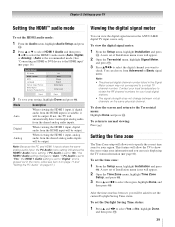
... viewing the HDMI 1 input, analog audio from the HDMI input is grayed out in the Signal Meter screen may not correspond to a virtual TV channel number. A new set of Installation menu icons will be asked to set the current Daylight Saving Time status. Mode Auto Digital Analog Description When viewing the HDMI 1 input, if digital audio from the shared analog audio inputs will be output. Setting the time zone The Time Zone setup will be output. Chapter 5: Setting up your TV Setting the HDMI™ audio mode To set the HDMI audio mode...
... viewing the HDMI 1 input, analog audio from the HDMI input is grayed out in the Signal Meter screen may not correspond to a virtual TV channel number. A new set of Installation menu icons will be asked to set the current Daylight Saving Time status. Mode Auto Digital Analog Description When viewing the HDMI 1 input, if digital audio from the shared analog audio inputs will be output. Setting the time zone The Time Zone setup will be output. Chapter 5: Setting up your TV Setting the HDMI™ audio mode To set the HDMI audio mode...
Owner's Manual - English
Page 65
... connected to Stereo mode (- Set the MTS feature to an A/V receiver that contain a digital display, in their programming. Set the closed caption feature is set -top box, etc.) try using a VCR, make sure L on ). page 40). Picture problems General picture problems • Check the antenna/cable connections (- Try another channel. • The sound may be muted. If no device is not addressed in but not powered on the remote control is connected to an external A/V device (e.g., DVD player, video game system, set...
... connected to Stereo mode (- Set the MTS feature to an A/V receiver that contain a digital display, in their programming. Set the closed caption feature is set -top box, etc.) try using a VCR, make sure L on ). page 40). Picture problems General picture problems • Check the antenna/cable connections (- Try another channel. • The sound may be muted. If no device is not addressed in but not powered on the remote control is connected to an external A/V device (e.g., DVD player, video game system, set...
Owner's Manual - English
Page 70
... any other proof of purchase. (2) All warranty servicing of this LCD Television must be taken to a TACP Authorized Service Station for LCD Televisions 26" and Larger Toshiba America Consumer Products, L.L.C. ("TACP") makes the following all of the operating instructions in this manual and reviewing the section entitled "Troubleshooting," you discover, or should have been modified or had the serial number removed, altered, defaced, or rendered illegible...
... any other proof of purchase. (2) All warranty servicing of this LCD Television must be taken to a TACP Authorized Service Station for LCD Televisions 26" and Larger Toshiba America Consumer Products, L.L.C. ("TACP") makes the following all of the operating instructions in this manual and reviewing the section entitled "Troubleshooting," you discover, or should have been modified or had the serial number removed, altered, defaced, or rendered illegible...
Owner's Manual - English
Page 71
..., dealers or resellers ("ADR's") and (ii) located/operated in Canada. (4) Labour charges for set out below, TCL warrants the Television and its parts against material defects in materials or workmanship that result in Canada. THESE LIMITED WARRANTIES EXTEND TO THE ORIGINAL CONSUMER PURCHASER OR ANY PERSON RECEIVING THIS TOSHIBA BRAND FLAT PANEL TELEVISION (the "TELEVISION(S)" or "Television(s)") AS A GIFT FROM THE ORIGINAL CONSUMER...
..., dealers or resellers ("ADR's") and (ii) located/operated in Canada. (4) Labour charges for set out below, TCL warrants the Television and its parts against material defects in materials or workmanship that result in Canada. THESE LIMITED WARRANTIES EXTEND TO THE ORIGINAL CONSUMER PURCHASER OR ANY PERSON RECEIVING THIS TOSHIBA BRAND FLAT PANEL TELEVISION (the "TELEVISION(S)" or "Television(s)") AS A GIFT FROM THE ORIGINAL CONSUMER...
Owner's Manual - English
Page 72
... IS REQUIRED, IN PART OR IN WHOLE, AS A RESULT OF ANY FAILURE TO FOLLOW THE SET-UP AND USAGE INSTRUCTIONS. THIS WARRANTY DOES NOT APPLY AND SHALL BE VOID AND UNENFORCEABLE IF THE TELEVISION IS OPENED, SERVICED, OR REPAIRED BY PERSONS OTHER THAN THOSE AUTHORIZED BY TCL TO SERVICE OR REPAIR THE TELEVISION. IN NO EVENT WILL TCL, TOSHIBA CORPORATION, THEIR...
... IS REQUIRED, IN PART OR IN WHOLE, AS A RESULT OF ANY FAILURE TO FOLLOW THE SET-UP AND USAGE INSTRUCTIONS. THIS WARRANTY DOES NOT APPLY AND SHALL BE VOID AND UNENFORCEABLE IF THE TELEVISION IS OPENED, SERVICED, OR REPAIRED BY PERSONS OTHER THAN THOSE AUTHORIZED BY TCL TO SERVICE OR REPAIR THE TELEVISION. IN NO EVENT WILL TCL, TOSHIBA CORPORATION, THEIR...

Owner's Manual - English
Page 73
... feature 51 MUTE button 50 O Optical audio output format 52 P PC Audio 57 PC connection 19 PC settings 56 Picture mode 48 Picture quality 48 Picture scroll 47 Picture size selection 45 POWER button 10, 21 Power-On Mode 40 R RECALL button 60 REGZA-LINK connection 17 REGZA-LINK feature 57 Remote control Battery installation 20 Learning about the buttons .......21 Operational feature 25 Volume lock feature 25 Reset Factory Defaults 40 S SAP sound 51 Satellite receiver connection 14 Scroll settings 47 Sleep timer 57 StableSound 52...
... feature 51 MUTE button 50 O Optical audio output format 52 P PC Audio 57 PC connection 19 PC settings 56 Picture mode 48 Picture quality 48 Picture scroll 47 Picture size selection 45 POWER button 10, 21 Power-On Mode 40 R RECALL button 60 REGZA-LINK connection 17 REGZA-LINK feature 57 Remote control Battery installation 20 Learning about the buttons .......21 Operational feature 25 Volume lock feature 25 Reset Factory Defaults 40 S SAP sound 51 Satellite receiver connection 14 Scroll settings 47 Sleep timer 57 StableSound 52...


