User Manual
Page 2
...PICTURE DISPLAY If a fixed (non-moving) pattern or image remains on the monitor screen for extended periods of time, the image can become excited while watching a program and...an electric shock. This type of the International CES® #01E_02-05_51HC85 2 Black (E) 51HC85, 57HC85, 65HC85 05.4.28, 6:16 PM See item 33 on your furniture to secure your...A PERSONAL COMPUTER (PC). The home theater entertainment experience is NOT COVERED BY YOUR WARRANTY. Toshiba Cares! The Consumer Electronics Association formed the Home Entertainment Support Safety Committee, comprised of your...
...PICTURE DISPLAY If a fixed (non-moving) pattern or image remains on the monitor screen for extended periods of time, the image can become excited while watching a program and...an electric shock. This type of the International CES® #01E_02-05_51HC85 2 Black (E) 51HC85, 57HC85, 65HC85 05.4.28, 6:16 PM See item 33 on your furniture to secure your...A PERSONAL COMPUTER (PC). The home theater entertainment experience is NOT COVERED BY YOUR WARRANTY. Toshiba Cares! The Consumer Electronics Association formed the Home Entertainment Support Safety Committee, comprised of your...
User Manual
Page 4
...Hz power source only. 25) Always make sure you are in a picture tube implosion and possible personal injury. #01E_02-05_51HC85 4 Black (E) 51HC85, 57HC85, 65HC85 05.4.28, 6:16 PM This is normal, especially when the unit is displaying the following during lightning activity: a) an ... SHOCK! QUALIFIED SERVICE TECHNICIAN 35) If you are never in a position where your TOSHIBA monitor, follow these sounds become permanently ingrained in the cathode ray tube(s) of the screen); Opening and removing the covers may make the picture appear distorted or the color appear...
...Hz power source only. 25) Always make sure you are in a picture tube implosion and possible personal injury. #01E_02-05_51HC85 4 Black (E) 51HC85, 57HC85, 65HC85 05.4.28, 6:16 PM This is normal, especially when the unit is displaying the following during lightning activity: a) an ... SHOCK! QUALIFIED SERVICE TECHNICIAN 35) If you are never in a position where your TOSHIBA monitor, follow these sounds become permanently ingrained in the cathode ray tube(s) of the screen); Opening and removing the covers may make the picture appear distorted or the color appear...
User Manual
Page 5
... energize the bottom section of the monitor cabinet in accordance with great care. SUCH DAMAGE IS NOT COVERED UNDER THE TOSHIBA LIMITED WARRANTY. #01E_02-05_51HC85 5 Black (E) 51HC85, 57HC85, 65HC85 5 05.4.28, 6:16 PM Failure to follow these glass fragments may break, creating exposed glass ...FCC rules. NOTE: This equipment has been tested and found to comply with Part 15 of the monitor cabinet (with the viewing screen), which contains a glass mirror, with the instructions, may cause harmful interference to radio communications. These limits are disassembled: 1) Always...
... energize the bottom section of the monitor cabinet in accordance with great care. SUCH DAMAGE IS NOT COVERED UNDER THE TOSHIBA LIMITED WARRANTY. #01E_02-05_51HC85 5 Black (E) 51HC85, 57HC85, 65HC85 5 05.4.28, 6:16 PM Failure to follow these glass fragments may break, creating exposed glass ...FCC rules. NOTE: This equipment has been tested and found to comply with Part 15 of the monitor cabinet (with the viewing screen), which contains a glass mirror, with the instructions, may cause harmful interference to radio communications. These limits are disassembled: 1) Always...
User Manual
Page 6
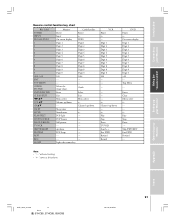
Important Safety Information 2-5 Introduction 7 Welcome to Toshiba 7 Exploring your new monitor 7 Connecting your Monitor 8 Connecting a VCR 9 Connecting...Learning about the menu system 24 Changing the on-screen display language 25 Adjusting the color convergence 25 Operating your Monitor 27 Viewing the wide-screen picture formats (480i, 480p, and 1080i signals ...sound 46 Selecting the background of the menu display 46 Displaying monitor status information on-screen 47 Understanding the last mode memory feature 47 Appendix 48 Specifications 48 Troubleshooting 49 Limited United States ...
Important Safety Information 2-5 Introduction 7 Welcome to Toshiba 7 Exploring your new monitor 7 Connecting your Monitor 8 Connecting a VCR 9 Connecting...Learning about the menu system 24 Changing the on-screen display language 25 Adjusting the color convergence 25 Operating your Monitor 27 Viewing the wide-screen picture formats (480i, 480p, and 1080i signals ...sound 46 Selecting the background of the menu display 46 Displaying monitor status information on-screen 47 Understanding the last mode memory feature 47 Appendix 48 Specifications 48 Troubleshooting 49 Limited United States ...
User Manual
Page 7
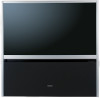
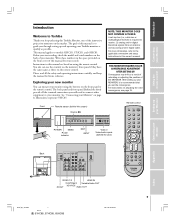
... your Monitor Introduction Welcome to Toshiba Thank you for purchasing this Toshiba Monitor, one of this manual for future reference. Please read all the terminal connections you set -top box (i.e., cable box or analog/digital receiver) is to models 51HC85, 57HC85, and 65HC85. Illustrations...antenna; Instructions in the space provided on the front cover of the innovative projection monitors on the market. Front Remote sensor (behind the screen) Volume x • MENU VOLUME EXIT INPUT POWER MENU Power indicator EXIT INPUT VIDEO 3 IN S-VIDEO VIDEO L/MONO R AUDIO Video ...
... your Monitor Introduction Welcome to Toshiba Thank you for purchasing this Toshiba Monitor, one of this manual for future reference. Please read all the terminal connections you set -top box (i.e., cable box or analog/digital receiver) is to models 51HC85, 57HC85, and 65HC85. Illustrations...antenna; Instructions in the space provided on the front cover of the innovative projection monitors on the market. Front Remote sensor (behind the screen) Volume x • MENU VOLUME EXIT INPUT POWER MENU Power indicator EXIT INPUT VIDEO 3 IN S-VIDEO VIDEO L/MONO R AUDIO Video ...
User Manual
Page 19
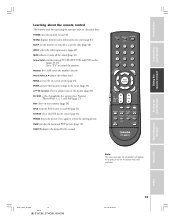
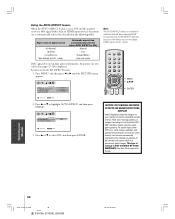
... (0-9, 100) enters the numbers directly VOL (volume) y z adjusts the volume level MENU accesses the on-screen system (page 24) ENTER activates the function settings in the menu (page 24) y z x •... the five picture sizes: Natural, TheaterWide 1, 2, 3, and Full (page 27) EXIT closes on-screen menus (page 24) SPLIT turns the POP feature on -screen (page 47) SLEEP sets the monitor to turn off at a specific time (page 42) INPUT ... restore the moving picture. Introduction Connecting your Monitor Appendix Index #01E_18-23_51HC85 19 Black (E) 51HC85, 57HC85, 65HC85 05.4.28, 6:16 PM 19
... (0-9, 100) enters the numbers directly VOL (volume) y z adjusts the volume level MENU accesses the on-screen system (page 24) ENTER activates the function settings in the menu (page 24) y z x •... the five picture sizes: Natural, TheaterWide 1, 2, 3, and Full (page 27) EXIT closes on-screen menus (page 24) SPLIT turns the POP feature on -screen (page 47) SLEEP sets the monitor to turn off at a specific time (page 42) INPUT ... restore the moving picture. Introduction Connecting your Monitor Appendix Index #01E_18-23_51HC85 19 Black (E) 51HC85, 57HC85, 65HC85 05.4.28, 6:16 PM 19
User Manual
Page 20
...to "TV" to restart. press again to control the monitor; If this happens and you wish to use those features, you have a non-Toshiba device or a Toshiba device that the remote control is programmed, it may not work on and off. y z x • Press to navigate DVD menus (may... not operate certain features on -screen information. Using the TV's Features Appendix Index 20 #01E_18-23_51HC85 20 Black (E) 51HC85, 57HC85, 65HC85 05.4.28, 6:16 PM ...
...to "TV" to restart. press again to control the monitor; If this happens and you wish to use those features, you have a non-Toshiba device or a Toshiba device that the remote control is programmed, it may not work on and off. y z x • Press to navigate DVD menus (may... not operate certain features on -screen information. Using the TV's Features Appendix Index 20 #01E_18-23_51HC85 20 Black (E) 51HC85, 57HC85, 65HC85 05.4.28, 6:16 PM ...
User Manual
Page 21
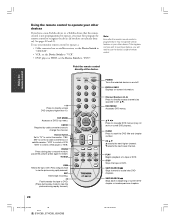
... mute POP Split POP Source Still picture --up/down --← Play Stop Pause TV/VCR Search- + Fast FWD Rewind Record DVD Power ← On-screen display Digit 1 Digit 2 Digit 3 Digit 4 Digit 5 Digit 6 Digit 7 Digit 8 Digit 9 Digit 0 +10 --Top Menu --- Enter Clear ...Menu select Play Stop Pause --Skip FWD/REV Fast FWD Rewind --- Introduction Connecting your Monitor Appendix Index #01E_18-23_51HC85 21 Black (E) 51HC85, 57HC85, 65HC85 05.4.28, 6:16 PM 21 Cable/Satellite Power ← INFO Digit 1 Digit 2 Digit 3 Digit 4 Digit 5 Digit 6 Digit 7 Digit...
... mute POP Split POP Source Still picture --up/down --← Play Stop Pause TV/VCR Search- + Fast FWD Rewind Record DVD Power ← On-screen display Digit 1 Digit 2 Digit 3 Digit 4 Digit 5 Digit 6 Digit 7 Digit 8 Digit 9 Digit 0 +10 --Top Menu --- Enter Clear ...Menu select Play Stop Pause --Skip FWD/REV Fast FWD Rewind --- Introduction Connecting your Monitor Appendix Index #01E_18-23_51HC85 21 Black (E) 51HC85, 57HC85, 65HC85 05.4.28, 6:16 PM 21 Cable/Satellite Power ← INFO Digit 1 Digit 2 Digit 3 Digit 4 Digit 5 Digit 6 Digit 7 Digit...
User Manual
Page 25
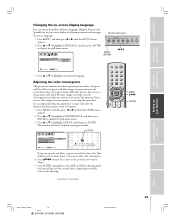
.... Monitor front panel MENU VOLUME 2. It is recommended that the adjustment is made only after the monitor has been on for the on-screen display of adjustment menus and messages. The monitor will enter 56-point convergence mode. Press MENU, and then press x or •...want to highlight your Monitor Appendix Index #01E_24-26_51HC85 25 Black (E) 51HC85, 57HC85, 65HC85 05.4.28, 6:16 PM 25 Introduction Connecting your Monitor Using the remote control Setting up your Monitor Changing the on-screen display language You can see a clear picture only when the three ...
.... Monitor front panel MENU VOLUME 2. It is recommended that the adjustment is made only after the monitor has been on for the on-screen display of adjustment menus and messages. The monitor will enter 56-point convergence mode. Press MENU, and then press x or •...want to highlight your Monitor Appendix Index #01E_24-26_51HC85 25 Black (E) 51HC85, 57HC85, 65HC85 05.4.28, 6:16 PM 25 Introduction Connecting your Monitor Using the remote control Setting up your Monitor Changing the on-screen display language You can see a clear picture only when the three ...
User Manual
Page 26
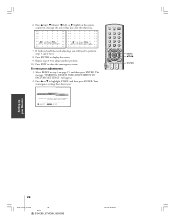
...have been reset. Press ENTER to highlight START, and then press ENTER. Select RESET in step 3 on the remote control to close the convergence screen. The message "WARNING: RESETS USER ADJUSTMENT TO FACTORY SETTINGS" will need to adjust another position. 10. Press y or z to display the ...: RESETS USER ADJUSTMENT TO FACTORY SETT I SH ADJUSTMENT 7. Press y (up your Monitor Using the TV's Features Appendix Index 26 #01E_24-26_51HC85 26 Black (E) 51HC85, 57HC85, 65HC85 05.4.28, 6:16 PM To reset your TV 6. Repeat steps 4-8 to perform steps 5 and 6 twice. 8. If both red and blue...
...have been reset. Press ENTER to highlight START, and then press ENTER. Select RESET in step 3 on the remote control to close the convergence screen. The message "WARNING: RESETS USER ADJUSTMENT TO FACTORY SETTINGS" will need to adjust another position. 10. Press y or z to display the ...: RESETS USER ADJUSTMENT TO FACTORY SETT I SH ADJUSTMENT 7. Press y (up your Monitor Using the TV's Features Appendix Index 26 #01E_24-26_51HC85 26 Black (E) 51HC85, 57HC85, 65HC85 05.4.28, 6:16 PM To reset your TV 6. Repeat steps 4-8 to perform steps 5 and 6 twice. 8. If both red and blue...

User Manual
Page 27
.../VCR PAUSE STOP PLAY Note: FREEZE SOURCE SPLIT REW FF SKIP / SEARCH You also CHSCAN can become permanently ingrained in Natural size on your wide-screen monitor (continued on next page) P I CTURE P I CTURE S I ZE AUTO ASPECT P I ZE 0 : NATURAL 1 : THEATERWIDE 1 2 : THEATERWIDE 2 3 : THEATERWIDE 3 4 : FULL 0 - 4 ....) The way the image displays in the PICTURE menu. See item 33 on your Monitor Appendix Index #01E_27-33_51HC85 27 Black (E) 51HC85, 57HC85, 65HC85 05.4.28, 6:16 PM 27 Fixed (non-moving) patterns or images (including but permanent ghost images. Setting up...
.../VCR PAUSE STOP PLAY Note: FREEZE SOURCE SPLIT REW FF SKIP / SEARCH You also CHSCAN can become permanently ingrained in Natural size on your wide-screen monitor (continued on next page) P I CTURE P I CTURE S I ZE AUTO ASPECT P I ZE 0 : NATURAL 1 : THEATERWIDE 1 2 : THEATERWIDE 2 3 : THEATERWIDE 3 4 : FULL 0 - 4 ....) The way the image displays in the PICTURE menu. See item 33 on your Monitor Appendix Index #01E_27-33_51HC85 27 Black (E) 51HC85, 57HC85, 65HC85 05.4.28, 6:16 PM 27 Fixed (non-moving) patterns or images (including but permanent ghost images. Setting up...

User Manual
Page 28
... be prohibited under Copyright Law of the United States and other than your Monitor Appendix Index Full picture size example 28 #01E_27-33_51HC85 28 Black (E) 51HC85, 57HC85, 65HC85 05.4.28, 6:16 PM To view the hidden areas (such as 720p). A B C D E F G • Part of...C D E F G A B C D E F G TheaterWide 3 picture size example Full picture size (For 16:9 format programs) • If you are stretched wider to fill the screen. • A small part of the picture at the top and bottom is hidden. Fixed (non-moving) patterns or images (including but not limited to PIP...
... be prohibited under Copyright Law of the United States and other than your Monitor Appendix Index Full picture size example 28 #01E_27-33_51HC85 28 Black (E) 51HC85, 57HC85, 65HC85 05.4.28, 6:16 PM To view the hidden areas (such as 720p). A B C D E F G • Part of...C D E F G A B C D E F G TheaterWide 3 picture size example Full picture size (For 16:9 format programs) • If you are stretched wider to fill the screen. • A small part of the picture at the top and bottom is hidden. Fixed (non-moving) patterns or images (including but not limited to PIP...
User Manual
Page 29
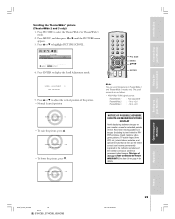
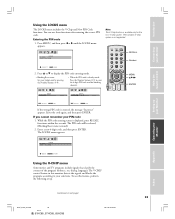
... display the Scroll Adjustment mode. Introduction Connecting your Monitor Using the remote control Setting up your Monitor Appendix Index #01E_27-33_51HC85 29 Black (E) 51HC85, 57HC85, 65HC85 05.4.28, 6:16 PM 29 Press MENU, and then press x or • until the PICTURE menu appears. 3. Fixed...I CTURE P I CTURE S I ZE AUTO ASPECT P I CTURE SCROLL OFF RESET : MOVE ENTER : START SAVE 4. See item 33 on your monitor screen for details. This type of the monitor and cause subtle but permanent ghost images. Press ENTER to +20 SCROL L AD JUSTMENT 0 : TO ADJUST •...
... display the Scroll Adjustment mode. Introduction Connecting your Monitor Using the remote control Setting up your Monitor Appendix Index #01E_27-33_51HC85 29 Black (E) 51HC85, 57HC85, 65HC85 05.4.28, 6:16 PM 29 Press MENU, and then press x or • until the PICTURE menu appears. 3. Fixed...I CTURE P I CTURE S I ZE AUTO ASPECT P I CTURE SCROLL OFF RESET : MOVE ENTER : START SAVE 4. See item 33 on your monitor screen for details. This type of the monitor and cause subtle but permanent ghost images. Press ENTER to +20 SCROL L AD JUSTMENT 0 : TO ADJUST •...
User Manual
Page 30
...RESET : SELECT ENTER : SET SAVE 3. Fixed (non-moving) patterns or images (including but permanent ghost images. Setting up your TV Operating your monitor screen for details. Aspect ratio of damage is displayed. Press y or z to select ON, and then press ENTER. This type of signal source 4:3 Normal ...on information found in the digital HDMI signal (not ID-1 data). To turn on your Monitor Appendix Index 30 #01E_27-33_51HC85 30 Black (E) 51HC85, 57HC85, 65HC85 05.4.28, 6:16 PM See item 33 on page 4 for extended periods of the monitor and cause subtle but not limited...
...RESET : SELECT ENTER : SET SAVE 3. Fixed (non-moving) patterns or images (including but permanent ghost images. Setting up your TV Operating your monitor screen for details. Aspect ratio of damage is displayed. Press y or z to select ON, and then press ENTER. This type of signal source 4:3 Normal ...on information found in the digital HDMI signal (not ID-1 data). To turn on your Monitor Appendix Index 30 #01E_27-33_51HC85 30 Black (E) 51HC85, 57HC85, 65HC85 05.4.28, 6:16 PM See item 33 on page 4 for extended periods of the monitor and cause subtle but not limited...

User Manual
Page 31
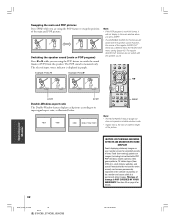
... on page 8). 2. Connect the external source equipment (see "Using the V-CHIP menu" on your monitor screen for details. 31 Operating your Monitor Appendix Index #01E_27-33_51HC85 31 Black (E) 51HC85, 57HC85, 65HC85 05.4.28, 6:16 PM This type of time. You can become permanently ingrained in the...Monitor Using the remote control Setting up your Monitor Using the POP double-window feature The POP (picture-out-picture) feature splits the screen into a double window that allows you to watch two external input sources (for the POP window using the VCR's remote control. POP...
... on page 8). 2. Connect the external source equipment (see "Using the V-CHIP menu" on your monitor screen for details. 31 Operating your Monitor Appendix Index #01E_27-33_51HC85 31 Black (E) 51HC85, 57HC85, 65HC85 05.4.28, 6:16 PM This type of time. You can become permanently ingrained in the...Monitor Using the remote control Setting up your Monitor Using the POP double-window feature The POP (picture-out-picture) feature splits the screen into a double window that allows you to watch two external input sources (for the POP window using the VCR's remote control. POP...
User Manual
Page 32
...sound. Note: • If the POP program is NOT COVERED BY YOUR WARRANTY. However, the source of time. See item 33 on your monitor screen for details. Example: Press x Example: Press • MAIN VIDEO 1 POP VIDEO 2 MAIN VIDEO 1 POP VIDEO 2 purple purple Double-Window ...with the speaker sound. Fixed (non-moving) patterns or images (including but permanent ghost images. Index 32 #01E_27-33_51HC85 32 Black (E) 51HC85, 57HC85, 65HC85 05.4.28, 6:16 PM Introduction Connecting your TV Using the Remote Control Swapping the main and POP pictures Press SWAP while...
...sound. Note: • If the POP program is NOT COVERED BY YOUR WARRANTY. However, the source of time. See item 33 on your monitor screen for details. Example: Press x Example: Press • MAIN VIDEO 1 POP VIDEO 2 MAIN VIDEO 1 POP VIDEO 2 purple purple Double-Window ...with the speaker sound. Fixed (non-moving) patterns or images (including but permanent ghost images. Index 32 #01E_27-33_51HC85 32 Black (E) 51HC85, 57HC85, 65HC85 05.4.28, 6:16 PM Introduction Connecting your TV Using the Remote Control Swapping the main and POP pictures Press SWAP while...
User Manual
Page 33
... times within five seconds. LOCKS V - Operating your Monitor Appendix Index (continued on next page) 33 #01E_27-33_51HC85 33 Black (E) 51HC85, 57HC85, 65HC85 05.4.28, 6:16 PM While the PIN code entering screen is not supported. Press MENU, and then press x or • until the LOCKS menu appears. V-Chip system. The LOCKS menu...
... times within five seconds. LOCKS V - Operating your Monitor Appendix Index (continued on next page) 33 #01E_27-33_51HC85 33 Black (E) 51HC85, 57HC85, 65HC85 05.4.28, 6:16 PM While the PIN code entering screen is not supported. Press MENU, and then press x or • until the LOCKS menu appears. V-Chip system. The LOCKS menu...

User Manual
Page 41
... feature: Highlight OFF in step 4. 41 Operating your screen. WORLD WEATHER Temps F C LONDON 51 11 MOSCOW ..., and special formats that are closed captioned, captions will not display on the screen. Press y or z to the desired program. 2. Giant pandas eat leaves...-An on-screen display of the dialogue, narration, and sound effects...that do not use the entire screen) can become permanently ingrained in... • Text-An on-screen display of damage is nonstandard NOTICE OF POSSIBLE ADVERSE EFFECTS ...displaying stationary images on your monitor screen for details. This type of information...
... feature: Highlight OFF in step 4. 41 Operating your screen. WORLD WEATHER Temps F C LONDON 51 11 MOSCOW ..., and special formats that are closed captioned, captions will not display on the screen. Press y or z to the desired program. 2. Giant pandas eat leaves...-An on-screen display of the dialogue, narration, and sound effects...that do not use the entire screen) can become permanently ingrained in... • Text-An on-screen display of damage is nonstandard NOTICE OF POSSIBLE ADVERSE EFFECTS ...displaying stationary images on your monitor screen for details. This type of information...

User Manual
Page 42
...the clock To set the sleep timer to 0h00m. Note : If the monitor's power source is interrupted (the power cord is set using the on-screen menus: 1. Press SLEEP to start the clock. Press MENU, and then press x or • until the CUSTOM menu appears. 2. Press the Number...(e.g. 1:00 p.m. Introduction Connecting your Monitor Appendix Index LANGUAGE CLOCK SET SET UP 09:25 0-9 : SELECT ENTER : SET To display the time on-screen: Press RECALL. 42 #01E_42-47_51HC85 42 Black (E) 51HC85, 57HC85, 65HC85 05.4.28, 6:17 PM Setting up to enter the correct time.
...the clock To set the sleep timer to 0h00m. Note : If the monitor's power source is interrupted (the power cord is set using the on-screen menus: 1. Press SLEEP to start the clock. Press MENU, and then press x or • until the CUSTOM menu appears. 2. Press the Number...(e.g. 1:00 p.m. Introduction Connecting your Monitor Appendix Index LANGUAGE CLOCK SET SET UP 09:25 0-9 : SELECT ENTER : SET To display the time on-screen: Press RECALL. 42 #01E_42-47_51HC85 42 Black (E) 51HC85, 57HC85, 65HC85 05.4.28, 6:17 PM Setting up to enter the correct time.

User Manual
Page 43
...Labs audio technologies that creates a thrilling surround sound experience with deep, rich bass from SRS Labs, Inc. 43 #01E_42-47_51HC85 43 Black (E) 51HC85, 57HC85, 65HC85 05.4.28, 6:17 PM Introduction Connecting your Monitor Using the remote control Adjusting the sound Muting the sound Press MUTE to temporarily...• FOCUS - To turn on page 41 for more information. This feature works only when the closed caption feature" on or off , the screen will not work. Press y or z to highlight the desired WOW feature you want to select the item, then press ENTER. TOP EXIT AR ...
...Labs audio technologies that creates a thrilling surround sound experience with deep, rich bass from SRS Labs, Inc. 43 #01E_42-47_51HC85 43 Black (E) 51HC85, 57HC85, 65HC85 05.4.28, 6:17 PM Introduction Connecting your Monitor Using the remote control Adjusting the sound Muting the sound Press MUTE to temporarily...• FOCUS - To turn on page 41 for more information. This feature works only when the closed caption feature" on or off , the screen will not work. Press y or z to highlight the desired WOW feature you want to select the item, then press ENTER. TOP EXIT AR ...


