

Owners Manual
Page 2
...LAMES PEUVENT ÊTRE INSÉRÉS À FOND SANS EN LAISSER AUCUNE PARTIE À DÉCOUVERT. Do not tamper with the power on the screen. In such a case, simply wait a while (with the plug or try turning it is provided to call the CATV system installer's attention to Article ... not fit into the outlet, try to allow proper ventilation. Note to CATV system installers in the USA This reminder is the result of the screen will cause the picture to cause an electric shock. Avoid dusty areas too. • Damage may be replaced by a POP double-window display, ...
...LAMES PEUVENT ÊTRE INSÉRÉS À FOND SANS EN LAISSER AUCUNE PARTIE À DÉCOUVERT. Do not tamper with the power on the screen. In such a case, simply wait a while (with the plug or try turning it is provided to call the CATV system installer's attention to Article ... not fit into the outlet, try to allow proper ventilation. Note to CATV system installers in the USA This reminder is the result of the screen will cause the picture to cause an electric shock. Avoid dusty areas too. • Damage may be replaced by a POP double-window display, ...
Owners Manual
Page 3
Introduction 4 Welcome to Toshiba 4 Exploring your new TV 4 Connecting your TV 5 Connecting a VCR 5 Connecting a cable converter...settings 28 Switching between two channels 28 Programming your favorite channels 28 Labeling channels 29 Viewing the wide-screen picture formats 31 Selecting the picture size 31 Scrolling the Theater Wide picture (Theater Wide 2 and ... 52 Using the StableSoundTM feature 53 Selecting the background of the menu display 53 Displaying on-screen information 53 Viewing the demonstration mode 54 Understanding the auto power off feature 54 Understanding the ...
Introduction 4 Welcome to Toshiba 4 Exploring your new TV 4 Connecting your TV 5 Connecting a VCR 5 Connecting a cable converter...settings 28 Switching between two channels 28 Programming your favorite channels 28 Labeling channels 29 Viewing the wide-screen picture formats 31 Selecting the picture size 31 Scrolling the Theater Wide picture (Theater Wide 2 and ... 52 Using the StableSoundTM feature 53 Selecting the background of the menu display 53 Displaying on-screen information 53 Viewing the demonstration mode 54 Understanding the auto power off feature 54 Understanding the ...
Owners Manual
Page 4
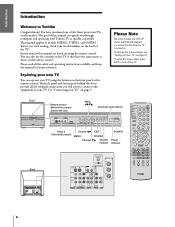
...Connecting your TV" on page 22. To change the menu settings, see "Setting Up Your TV" on page 5. Front Remote sensor (Behind the screen) Behind the door VIDEO-3 IN S-VIDEO VIDEO AUDIO L/MONO R Menu x •zy Automatic Light Sensor MENU VOLUME CHANNEL EXIT TV/VIDEO TOUCH ...same name as possible. To close the menu, either press EXIT or turn off the TV. This manual applies to Toshiba Congratulations! Introduction Connecting your TV Using the Remote Control Introduction Welcome to models 50HX81, 57HX81, and 65HX81. You can operate your TV using the remote control.
...Connecting your TV" on page 22. To change the menu settings, see "Setting Up Your TV" on page 5. Front Remote sensor (Behind the screen) Behind the door VIDEO-3 IN S-VIDEO VIDEO AUDIO L/MONO R Menu x •zy Automatic Light Sensor MENU VOLUME CHANNEL EXIT TV/VIDEO TOUCH ...same name as possible. To close the menu, either press EXIT or turn off the TV. This manual applies to Toshiba Congratulations! Introduction Connecting your TV Using the Remote Control Introduction Welcome to models 50HX81, 57HX81, and 65HX81. You can operate your TV using the remote control.
Owners Manual
Page 13
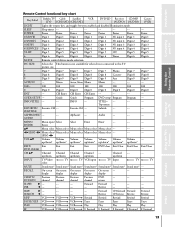
...Digit 0 Digit 0 Digit 0 Digit 0 Digit 0 Digit 0 Digit 0 ENT --- Audio --- --- --- Channel --- --- RECALL On-screen On-screen On-screen On-screen On-screen --- --- --- Reverse --- --- --- Reverse CH reverse Reverse Reverse REW VCR VCR VCR Rewind Rewind Rewind Rewind Rewind PAUSE/STEP VCR VCR...Enter Enter --- --- --- INFO --- Forward Forward --- --- --- Introduction Connecting your TV Remote Control functional key chart Key Label Toshiba TV Cable Satellite (TV) (CBL/SAT) (CBL/SAT) VCR DVD/LD Receiver CD/MD Cassete (AUDIO) (AUDIO) (VCR...
...Digit 0 Digit 0 Digit 0 Digit 0 Digit 0 Digit 0 Digit 0 ENT --- Audio --- --- --- Channel --- --- RECALL On-screen On-screen On-screen On-screen On-screen --- --- --- Reverse --- --- --- Reverse CH reverse Reverse Reverse REW VCR VCR VCR Rewind Rewind Rewind Rewind Rewind PAUSE/STEP VCR VCR...Enter Enter --- --- --- INFO --- Forward Forward --- --- --- Introduction Connecting your TV Remote Control functional key chart Key Label Toshiba TV Cable Satellite (TV) (CBL/SAT) (CBL/SAT) VCR DVD/LD Receiver CD/MD Cassete (AUDIO) (AUDIO) (VCR...
Owners Manual
Page 21
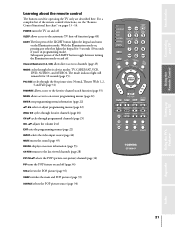
...picture sizes: Normal, Theater Wide 1, 2, 3 and Full (page 31) FAVORITE allows access to the favorite channel search function (page 35) MENU allows access to on-screen programming menus (page 22) ENTER sets programming menu information (page 22) yz x • select or adjust programming menus (page 22) (FAV) x • ...EXIT exits the programming menus (page 22) INPUT selects the video input source (page 46) MUTE mutes the sound (page 49) RECALL displays on-screen information (page 53) CH RTN returns to the last viewed channels (page 28) PIP CH yz selects the POP (picture-out-picture) channel (...
...picture sizes: Normal, Theater Wide 1, 2, 3 and Full (page 31) FAVORITE allows access to the favorite channel search function (page 35) MENU allows access to on-screen programming menus (page 22) ENTER sets programming menu information (page 22) yz x • select or adjust programming menus (page 22) (FAV) x • ...EXIT exits the programming menus (page 22) INPUT selects the video input source (page 46) MUTE mutes the sound (page 49) RECALL displays on-screen information (page 53) CH RTN returns to the last viewed channels (page 28) PIP CH yz selects the POP (picture-out-picture) channel (...
Owners Manual
Page 22
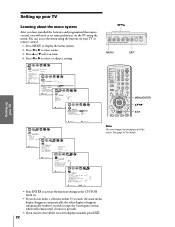
... make a selection within 6 seconds (except the Convergence menu, which will remain until a button is pressed). • If you will need to set some preferences on -screen displays instantly, press EXIT. 22 Appendix Index Press x or • to display the menu system. 2. See page 53 for details. : SELECT CUSTOM T I MER CC FAVOR...
... make a selection within 6 seconds (except the Convergence menu, which will remain until a button is pressed). • If you will need to set some preferences on -screen displays instantly, press EXIT. 22 Appendix Index Press x or • to display the menu system. 2. See page 53 for details. : SELECT CUSTOM T I MER CC FAVOR...

Owners Manual
Page 23
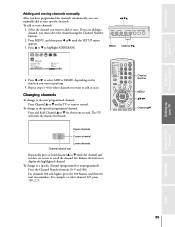
Press x or • to highlight your TV Changing the on-screen display language You can connect to use. Continue pressing INPUT or TV/VIDEO button to highlight the SET UP menu. 2. To select a language: 1. Press MENU, ... displays in purple. 2. Press MENU, and then press x or • to select ANT 1 or ANT 2. Press INPUT on the remote control or TV/VIDEO on -screen display of adjustment menus and messages. To select the antenna input using the menu system: 1. x •zy MENU VOLUME CHANNEL EXIT TV/VIDEO TOUCH FOCUS...
Press x or • to highlight your TV Changing the on-screen display language You can connect to use. Continue pressing INPUT or TV/VIDEO button to highlight the SET UP menu. 2. To select a language: 1. Press MENU, ... displays in purple. 2. Press MENU, and then press x or • to select ANT 1 or ANT 2. Press INPUT on the remote control or TV/VIDEO on -screen display of adjustment menus and messages. To select the antenna input using the menu system: 1. x •zy MENU VOLUME CHANNEL EXIT TV/VIDEO TOUCH FOCUS...
Owners Manual
Page 25
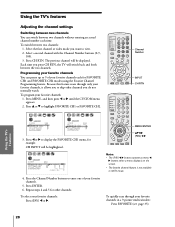
.... Repeat steps 1-4 for about one second. To change to the specific programmed channel: Press and hold channel y or z while the channel surf mode is on-screen to add or erase. The TV will enter the channel surf mode. Release the button to select channel 125, press 100, 2, 5. Changing channels To change...
.... Repeat steps 1-4 for about one second. To change to the specific programmed channel: Press and hold channel y or z while the channel surf mode is on-screen to add or erase. The TV will enter the channel surf mode. Release the button to select channel 125, press 100, 2, 5. Changing channels To change...
Owners Manual
Page 26
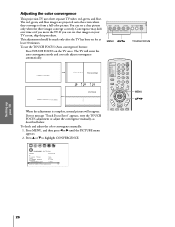
... described below. To check and adjust the color convergence manually: 1. Convergence may drift over time or if you can see clear images on your TV screen, skip this procedure. The TV will reappear. Press MENU, and then press x or • until the PICTURE menu appears. 2. You can see a clear picture only... Connecting your TV Using the TV's Features Appendix Index 26 If you move the TV. The red, green, and blue images are projected onto the screen where they converge to highlight CONVERGENCE. 1 2 3 4 5 6 7 8 9 10 11 12 13 14 15 16 17 18 19 20 21 22 23 24 25 26 27 28...
... described below. To check and adjust the color convergence manually: 1. Convergence may drift over time or if you can see clear images on your TV screen, skip this procedure. The TV will reappear. Press MENU, and then press x or • until the PICTURE menu appears. 2. You can see a clear picture only... Connecting your TV Using the TV's Features Appendix Index 26 If you move the TV. The red, green, and blue images are projected onto the screen where they converge to highlight CONVERGENCE. 1 2 3 4 5 6 7 8 9 10 11 12 13 14 15 16 17 18 19 20 21 22 23 24 25 26 27 28...
Owners Manual
Page 28
... CH RTN MENU/ENTER yzx • (FAV) x • Notes: • The (FAV) x • buttons operate as menu x • buttons when a menu display is on the screen. • The favorite channel feature is not available in a 9-picture multi-window: Press FAVORITE (see page 35). To quickly scan through only your favorite channels...
... CH RTN MENU/ENTER yzx • (FAV) x • Notes: • The (FAV) x • buttons operate as menu x • buttons when a menu display is on the screen. • The favorite channel feature is not available in a 9-picture multi-window: Press FAVORITE (see page 35). To quickly scan through only your favorite channels...
Owners Manual
Page 29
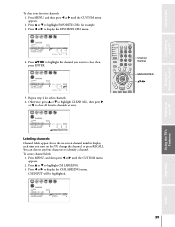
Press yzx • to highlight the channel you turn on -screen channel number display each time you want to clear, then press ENTER. 1 2 3 4 5 6 7 8 9 10 11 12 13 14 15 16 17 18 19 20 21 22 ...
Press yzx • to highlight the channel you turn on -screen channel number display each time you want to clear, then press ENTER. 1 2 3 4 5 6 7 8 9 10 11 12 13 14 15 16 17 18 19 20 21 22 ...

Owners Manual
Page 31
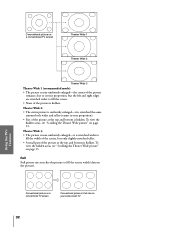
..., Theater Wide 1, Theater Wide 2, Theater Wide 3, or Full picture size, as "letter box" format, with bars at top and bottom) Wide-screen picture in Theater Wide size on your wide-screen TV Setting up your TV Using the TV's Features Appendix Index 31 Selecting the picture size Repeatedly press PIC SIZE to... 19 20 21 22 23 24 25 26 27 28 29 30 31 32 33 34 35 While the above menu is on your wide-screen TV Theater Wide 1, 2, 3 The Theater Wide picture size enlarges the picture to select either scroll the picture (see page 33) or select Theater Wide 1, which...
..., Theater Wide 1, Theater Wide 2, Theater Wide 3, or Full picture size, as "letter box" format, with bars at top and bottom) Wide-screen picture in Theater Wide size on your wide-screen TV Setting up your TV Using the TV's Features Appendix Index 31 Selecting the picture size Repeatedly press PIC SIZE to... 19 20 21 22 23 24 25 26 27 28 29 30 31 32 33 34 35 While the above menu is on your wide-screen TV Theater Wide 1, 2, 3 The Theater Wide picture size enlarges the picture to select either scroll the picture (see page 33) or select Theater Wide 1, which...
Owners Manual
Page 32
... the top and bottom is hidden. Setting up your TV Using the TV's Features Appendix Index Conventional picture on a conventional TV screen Conventional picture in Full size on your TV Using the Remote Control Conventional picture on page 33. To view the hidden areas, see... "Scrolling the Theater Wide picture" on a conventional TV screen Theater Wide 1 Theater Wide 2 Theater Wide 3 Theater Wide 1 (recommended mode): • The picture is non-uniformly enlarged-the center of ...
... the top and bottom is hidden. Setting up your TV Using the TV's Features Appendix Index Conventional picture on a conventional TV screen Conventional picture in Full size on your TV Using the Remote Control Conventional picture on page 33. To view the hidden areas, see... "Scrolling the Theater Wide picture" on a conventional TV screen Theater Wide 1 Theater Wide 2 Theater Wide 3 Theater Wide 1 (recommended mode): • The picture is non-uniformly enlarged-the center of ...
Owners Manual
Page 34
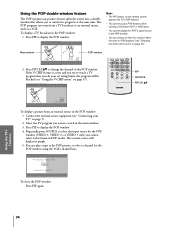
... window POP 12 2. Introduction Connecting your TV Using the Remote Control Using the POP double-window feature The POP (picture-out-picture) feature splits the screen into a double window that exceeds your set rating limits, the program will display in the POP window: 1.
... window POP 12 2. Introduction Connecting your TV Using the Remote Control Using the POP double-window feature The POP (picture-out-picture) feature splits the screen into a double window that exceeds your set rating limits, the program will display in the POP window: 1.
Owners Manual
Page 47
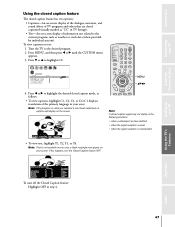
... Introduction Connecting your TV Using the Remote Control Using the closed caption feature The closed caption feature has two options: • Captions-An on-screen display of the dialogue, narration, and sound effects of TV programs and videos that are closed captioned (usually marked as "CC" in TV ...listings). • Text-An on-screen display of the primary language in your area). To view captions or text: 1. Note: If text is nonstandard Giant pandas eat leaves. •...
... Introduction Connecting your TV Using the Remote Control Using the closed caption feature The closed caption feature has two options: • Captions-An on-screen display of the dialogue, narration, and sound effects of TV programs and videos that are closed captioned (usually marked as "CC" in TV ...listings). • Text-An on-screen display of the primary language in your area). To view captions or text: 1. Note: If text is nonstandard Giant pandas eat leaves. •...
Owners Manual
Page 48
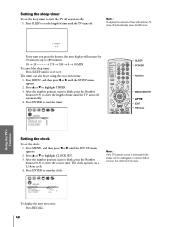
... 16 17 18 19 20 21 22 23 24 25 26 27 28 29 30 31 32 33 34 35 To display the time on-screen: Press RECALL. After the number position starts to blink, press the Number buttons (0-9) to highlight CLOCK SET. 3. Press ENTER to turn the TV off automatically... clock must be set the length of time until the TV turns off automatically: 1. Press y or z to enter the correct time. The clock operates on -screen menu: 1. Index 48 Introduction Connecting your TV Using the TV's Features Appendix Setting the clock To set the clock: 1. The timer can also be reset...
... 16 17 18 19 20 21 22 23 24 25 26 27 28 29 30 31 32 33 34 35 To display the time on-screen: Press RECALL. After the number position starts to blink, press the Number buttons (0-9) to highlight CLOCK SET. 3. Press ENTER to turn the TV off automatically... clock must be set the length of time until the TV turns off automatically: 1. Press y or z to enter the correct time. The clock operates on -screen menu: 1. Index 48 Introduction Connecting your TV Using the TV's Features Appendix Setting the clock To set the clock: 1. The timer can also be reset...

Owners Manual
Page 49
...watching is automatically activated. Introduction Connecting your TV Using the Remote Control Adjusting the sound Muting the sound Press MUTE to temporarily turn off , the screen will display the word "1/2 MUTE" or "MUTE" in the lower right corner. The MTS feature is not available when the TV is pressed...station might broadcast music as a second audio program. When the TV receives a stereo or SAP broadcast, the word STEREO or SAP appears on-screen every time the TV is turned on those TV stations that offer it will automatically output the type of the program's normal audio. To listen...
...watching is automatically activated. Introduction Connecting your TV Using the Remote Control Adjusting the sound Muting the sound Press MUTE to temporarily turn off , the screen will display the word "1/2 MUTE" or "MUTE" in the lower right corner. The MTS feature is not available when the TV is pressed...station might broadcast music as a second audio program. When the TV receives a stereo or SAP broadcast, the word STEREO or SAP appears on-screen every time the TV is turned on those TV stations that offer it will automatically output the type of the program's normal audio. To listen...
Owners Manual
Page 53
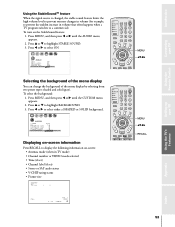
To turn on -screen: • Antenna mode (when in volume that often happens when a TV program switches to select ON. 1 2 3 4 5 6 7 8 9 10 11 12 13 14 15 16 17 18 ... 13 14 15 16 17 18 19 20 21 22 23 24 25 26 27 28 29 30 31 32 33 34 35 Displaying on-screen information Press RECALL to display the following information on the StableSound feature: 1. PG FULL 33 34 35 1 2 3 L V 4 5 6 7 8 9 10 11 12 13 14 ANT 1 15 ABCD...
To turn on -screen: • Antenna mode (when in volume that often happens when a TV program switches to select ON. 1 2 3 4 5 6 7 8 9 10 11 12 13 14 15 16 17 18 ... 13 14 15 16 17 18 19 20 21 22 23 24 25 26 27 28 29 30 31 32 33 34 35 Displaying on-screen information Press RECALL to display the following information on the StableSound feature: 1. PG FULL 33 34 35 1 2 3 L V 4 5 6 7 8 9 10 11 12 13 14 ANT 1 15 ABCD...
Owners Manual
Page 56
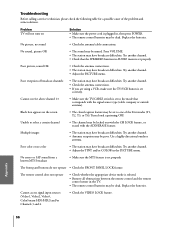
.... No stereo or SAP sound from a known MTS broadcast • Make sure the MTS feature is set properly. Problem TV will not turn on the screen • The closed captioning OFF. No picture, no color • The station may have broadcast difficulties. Unable to select a certain channel • The channel may...
.... No stereo or SAP sound from a known MTS broadcast • Make sure the MTS feature is set properly. Problem TV will not turn on the screen • The closed captioning OFF. No picture, no color • The station may have broadcast difficulties. Unable to select a certain channel • The channel may...


