
Owners Manual
Page 2
... power on) and the condensation will cause the picture to display still images, reduce brightness and contrast settings. If you that the cable ground shall be strong enough to force it into the outlet, try to cause an electric shock. Stationary patterns generated by the weight of the building, as practical. Never leave a PIP, Multi-Window, computer, or video game display...
... power on) and the condensation will cause the picture to display still images, reduce brightness and contrast settings. If you that the cable ground shall be strong enough to force it into the outlet, try to cause an electric shock. Stationary patterns generated by the weight of the building, as practical. Never leave a PIP, Multi-Window, computer, or video game display...
Owners Manual
Page 3
... Installing the remote control batteries 11 Using the remote control with a Toshiba VCR or cable TV converter 11 Programming the remote control for use with a non-Toshiba VCR or cable TV converter 12 VCR code table 13 Cable TV converter code table 14 Learning about the remote control 15 Setting up your TV 16 Changing the on-screen display language 17 Selecting the antenna input 17 Adding channels to the TV's memory 18 Programming channels automatically 18 Adding and erasing channels manually 19 Changing channels 19 Channel surf 19 Adjusting the color convergence 20 Using...
... Installing the remote control batteries 11 Using the remote control with a Toshiba VCR or cable TV converter 11 Programming the remote control for use with a non-Toshiba VCR or cable TV converter 12 VCR code table 13 Cable TV converter code table 14 Learning about the remote control 15 Setting up your TV 16 Changing the on-screen display language 17 Selecting the antenna input 17 Adding channels to the TV's memory 18 Programming channels automatically 18 Adding and erasing channels manually 19 Changing channels 19 Channel surf 19 Adjusting the color convergence 20 Using...
Owners Manual
Page 4
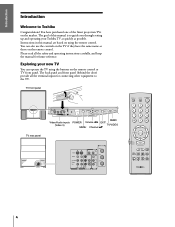
Instructions in this manual is to guide you through setting up your TV Using the Remote Control Introduction Welcome to the TV. Exploring your Toshiba TV as quickly as those on the market. TV front panel TV rear panel CH MENU VOL VOL TV/ DEMO EXIT VIDEO LIFT CH Video/Audio inputs (Video 3) DEMO POWER Volume x • EXIT TV/VIDEO MENU Channel yz ANT( 75 ) S-VIDEO OUT R L VAR AUDIO Y VIDEO L/ MONO PB L AUDIO R AUDIO PR COLOR R VIDEO 1 VIDEO 2 STREAM INPUT IN DVD IN VIDEO L/ MONO AUDIO R OUT ANT-1 OUT ANT-2 RECALL MUTE POWER 123...
Instructions in this manual is to guide you through setting up your TV Using the Remote Control Introduction Welcome to the TV. Exploring your Toshiba TV as quickly as those on the market. TV front panel TV rear panel CH MENU VOL VOL TV/ DEMO EXIT VIDEO LIFT CH Video/Audio inputs (Video 3) DEMO POWER Volume x • EXIT TV/VIDEO MENU Channel yz ANT( 75 ) S-VIDEO OUT R L VAR AUDIO Y VIDEO L/ MONO PB L AUDIO R AUDIO PR COLOR R VIDEO 1 VIDEO 2 STREAM INPUT IN DVD IN VIDEO L/ MONO AUDIO R OUT ANT-1 OUT ANT-2 RECALL MUTE POWER 123...
Owners Manual
Page 5
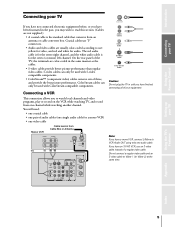
... to watch local channels and video programs, play or record on the VCR while watching TV, and record from an antenna or cable converter box. Do not connect a regular video cable and an S-video cable to Video-1 (or Video-2) at the same time. If you have an S-VHS VCR, use : yellow for video, and red and white for a mono VCR) • one single audio cable for audio. Introduction Connecting your TV Using the Remote Control Connecting your TV If you have...
... to watch local channels and video programs, play or record on the VCR while watching TV, and record from an antenna or cable converter box. Do not connect a regular video cable and an S-video cable to Video-1 (or Video-2) at the same time. If you have an S-VHS VCR, use : yellow for video, and red and white for a mono VCR) • one single audio cable for audio. Introduction Connecting your TV Using the Remote Control Connecting your TV If you have...
Owners Manual
Page 6
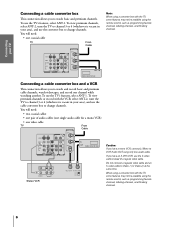
... another. Introduction Connecting your TV Using the Remote Control Connecting a cable converter box This connection allows you to Video-1 (or Video-2) at the same time. To use the cable converter box to watch and record basic and premium cable channels, watch basic and premium channels. Do not connect a regualar video cable and an S-video cable to watch videotapes, and record one coaxial cable TV From Cable S-VIDEO OUT R L VAR AUDIO VIDEO L/ MONO Y PB L VIDEO L/ MONO AUDIO AUDIO PR R COLOR R VIDEO 1 VIDEO 2 STREAM INPUT IN DVD IN AUDIO R OUT ANT...
... another. Introduction Connecting your TV Using the Remote Control Connecting a cable converter box This connection allows you to Video-1 (or Video-2) at the same time. To use the cable converter box to watch and record basic and premium cable channels, watch basic and premium channels. Do not connect a regualar video cable and an S-video cable to watch videotapes, and record one coaxial cable TV From Cable S-VIDEO OUT R L VAR AUDIO VIDEO L/ MONO Y PB L VIDEO L/ MONO AUDIO AUDIO PR R COLOR R VIDEO 1 VIDEO 2 STREAM INPUT IN DVD IN AUDIO R OUT ANT...
Owners Manual
Page 8
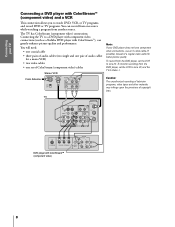
... one pair of audio cables for better picture quality. TV S-VIDEO VIDEO L/ MONO OUT R L VAR AUDIO Y PB L VIDEO L/ MONO AUDIO AUDIO PR R COLOR R VIDEO 1 VIDEO 2 STREAM INPUT IN DVD IN AUDIO R OUT ANT( 75 ) ANT-1 OUT ANT-2 Y Pb Pr S-VIDEO COLOR STREAM AUDIO OUT L L VIDEO R R OUT DVD player with ColorStream™ (component video) Setting up your DVD player does not have component video connections, use an S-video cable (if possible) instead of copyright laws. Caution: The unauthorized recording of television programs, video tapes and...
... one pair of audio cables for better picture quality. TV S-VIDEO VIDEO L/ MONO OUT R L VAR AUDIO Y PB L VIDEO L/ MONO AUDIO AUDIO PR R COLOR R VIDEO 1 VIDEO 2 STREAM INPUT IN DVD IN AUDIO R OUT ANT( 75 ) ANT-1 OUT ANT-2 Y Pb Pr S-VIDEO COLOR STREAM AUDIO OUT L L VIDEO R R OUT DVD player with ColorStream™ (component video) Setting up your DVD player does not have component video connections, use an S-video cable (if possible) instead of copyright laws. Caution: The unauthorized recording of television programs, video tapes and...
Owners Manual
Page 11
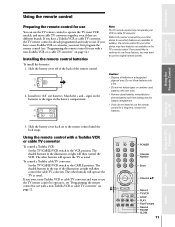
... remote control for your other buttons will operate the TV as usual. Caution: • Dispose of the remote control. 2. Using the remote control with a non-Toshiba VCR or a cable TV converter" on page 12. RECALL MUTE POWER 123 456 78 9 CH RTN 100 0 ENT POWER Channel Number Enter CH MENU/ VOL ENTER VOL TV CABLE VCR CH EX I T FAV CH TV/VIDEO REC TV/VCR STOP PLAY STILL SOURCE PIP SLOW PAUSE REW FF PIP CH LOCATE SWAP Channel...
... remote control for your other buttons will operate the TV as usual. Caution: • Dispose of the remote control. 2. Using the remote control with a non-Toshiba VCR or a cable TV converter" on page 12. RECALL MUTE POWER 123 456 78 9 CH RTN 100 0 ENT POWER Channel Number Enter CH MENU/ VOL ENTER VOL TV CABLE VCR CH EX I T FAV CH TV/VIDEO REC TV/VCR STOP PLAY STILL SOURCE PIP SLOW PAUSE REW FF PIP CH LOCATE SWAP Channel...
Owners Manual
Page 12
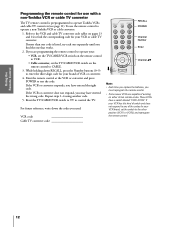
... RECALL POWER Channel Number Enter CH MENU/ VOL ENTER VOL TV CABLE VCR CH EX I T Channel yz Note: • Each time you replace the batteries, you must reprogram the remote control. • Some newer VCRs are programming the remote control to operate Toshiba VCRs and cable TV converters (see page 11). Reset the TV/CABLE/VCR switch to TV to test the code. Using the Remote Control Setting up your VCR brand, set the switch to VCR. • Cable converter, set the TV/CABLE/VCR switch on the remote control...
... RECALL POWER Channel Number Enter CH MENU/ VOL ENTER VOL TV CABLE VCR CH EX I T Channel yz Note: • Each time you replace the batteries, you must reprogram the remote control. • Some newer VCRs are programming the remote control to operate Toshiba VCRs and cable TV converters (see page 11). Reset the TV/CABLE/VCR switch to TV to test the code. Using the Remote Control Setting up your VCR brand, set the switch to VCR. • Cable converter, set the TV/CABLE/VCR switch on the remote control...
Owners Manual
Page 15
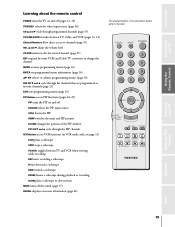
... in slow motion MUTE turns off SOURCE selects the PIP input source STILL freezes the PIP SWAP switches the main and PIP pictures LOCATE changes the position of the PIP window PIP CH z and y cycle through the PIP channels VCR Buttons access VCR functions (in the dark. Introduction Connecting your TV Using the Remote Control Setting up your TV Learning about the remote control POWER turns the TV on -screen information (page 42) The shaded buttons in the illustration below...
... in slow motion MUTE turns off SOURCE selects the PIP input source STILL freezes the PIP SWAP switches the main and PIP pictures LOCATE changes the position of the PIP window PIP CH z and y cycle through the PIP channels VCR Buttons access VCR functions (in the dark. Introduction Connecting your TV Using the Remote Control Setting up your TV Learning about the remote control POWER turns the TV on -screen information (page 42) The shaded buttons in the illustration below...
Owners Manual
Page 17
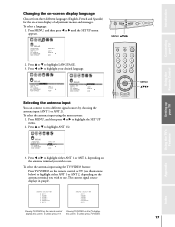
... ANT 1 or ANT 2, depending on the remote control displays this screen. To select the antenna input using the TV/VIDEO button: Press TV/VIDEO on the remote control or TV (see illustrations below) to highlight your TV Introduction The current signal source displays in purple. 1 2 3 4 5 6...antenna input using the menu system: 1. CH MENU VOL CH VOL TV/ DEMO EXIT VIDEO MENU yzx • RECALL MUTE POWER 123 456 78 9 CH RTN 100 0 ENT CH MENU/ VOL ENTER VOL TV CABLE VCR CH EX I SH 9 10 CLOCK SET 10 11 ANT 1 / 2 ANT1 / ANT2 11 12 TV / CABLE CABLE 12 13 CH PROGRAM...
... ANT 1 or ANT 2, depending on the remote control displays this screen. To select the antenna input using the TV/VIDEO button: Press TV/VIDEO on the remote control or TV (see illustrations below) to highlight your TV Introduction The current signal source displays in purple. 1 2 3 4 5 6...antenna input using the menu system: 1. CH MENU VOL CH VOL TV/ DEMO EXIT VIDEO MENU yzx • RECALL MUTE POWER 123 456 78 9 CH RTN 100 0 ENT CH MENU/ VOL ENTER VOL TV CABLE VCR CH EX I SH 9 10 CLOCK SET 10 11 ANT 1 / 2 ANT1 / ANT2 11 12 TV / CABLE CABLE 12 13 CH PROGRAM...
Owners Manual
Page 20
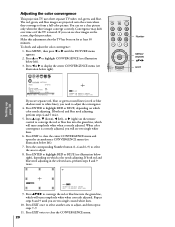
... PICTURE menu appears. 2. Press EXIT twice to display the center CONVERGENCE menu (see illustration below left). 3. If you will see two single crossed white lines. 10. Press y (up your TV Using the Remote Control Connecting your TV Introduction Adjusting the color convergence This projection TV uses three separate TV tubes: red, green, and blue. Press EXIT to converge the red or blue line into the green line, which color needs adjusting. Make this procedure. Press yzx • to adjust the convergence. 4. Index Appendix Using the TV's Features Setting...
... PICTURE menu appears. 2. Press EXIT twice to display the center CONVERGENCE menu (see illustration below left). 3. If you will see two single crossed white lines. 10. Press y (up your TV Using the Remote Control Connecting your TV Introduction Adjusting the color convergence This projection TV uses three separate TV tubes: red, green, and blue. Press EXIT to converge the red or blue line into the green line, which color needs adjusting. Make this procedure. Press yzx • to adjust the convergence. 4. Index Appendix Using the TV's Features Setting...

Owners Manual
Page 21
... 34 35 4. Using the TV's features Adjusting the channel settings Switching between two channels You can switch between two channels without entering an actual channel number each for FAVORITE CH1 and FAVORITE CH2 modes using the Channel Number buttons (0-9 and 100). 3. To switch between the two channels. Select the first channel you press CH RTN, the TV will not operate until the CUSTOM menu appears. 2. You can still use Channel y z to scan through only your...
... 34 35 4. Using the TV's features Adjusting the channel settings Switching between two channels You can switch between two channels without entering an actual channel number each for FAVORITE CH1 and FAVORITE CH2 modes using the Channel Number buttons (0-9 and 100). 3. To switch between the two channels. Select the first channel you press CH RTN, the TV will not operate until the CUSTOM menu appears. 2. You can still use Channel y z to scan through only your...
Owners Manual
Page 24
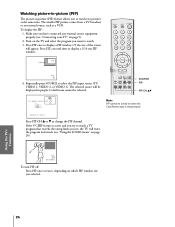
... "Using the LOCKS menu" on page 26). Press PIP once to display a 1/16 size PIP window. 1/16 1/9 PIP 6 4. Press PIP a second time to display a PIP window 1/9 the size of the screen will appear. The selected source will enter the program lock mode (see "Connecting your TV" on when the ColorStream input is active and you try to select the PIP input source (TV, VIDEO 1, VIDEO 2, or VIDEO 3). If the V-CHIP feature is being viewed. To display the PIP: 1. The smaller PIP picture comes...
... "Using the LOCKS menu" on page 26). Press PIP once to display a 1/16 size PIP window. 1/16 1/9 PIP 6 4. Press PIP a second time to display a PIP window 1/9 the size of the screen will appear. The selected source will enter the program lock mode (see "Connecting your TV" on when the ColorStream input is active and you try to select the PIP input source (TV, VIDEO 1, VIDEO 2, or VIDEO 3). If the V-CHIP feature is being viewed. To display the PIP: 1. The smaller PIP picture comes...
Owners Manual
Page 31
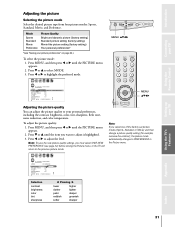
... COLOR 50 13 14 T I T FAV CH TV/VIDEO MENU yzx • Note: If you select one of the factory-set picture modes (Sports, Standard, or Movie) and then change a picture quality setting (for example, increase the contrast), the picture mode automatically changes to PREFERENCE in the Picture menu. Press MENU, and then press x or • until the PICTURE menu appears. 2. Press x or • to adjust is highlighted. 3. Introduction Connecting your TV Using the Remote Control Setting...
... COLOR 50 13 14 T I T FAV CH TV/VIDEO MENU yzx • Note: If you select one of the factory-set picture modes (Sports, Standard, or Movie) and then change a picture quality setting (for example, increase the contrast), the picture mode automatically changes to PREFERENCE in the Picture menu. Press MENU, and then press x or • until the PICTURE menu appears. 2. Press x or • to adjust is highlighted. 3. Introduction Connecting your TV Using the Remote Control Setting...
Owners Manual
Page 33
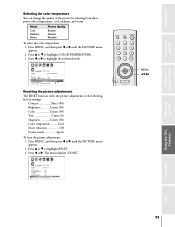
... CH TV/VIDEO MENU yzx • Setting up your TV Using the Remote Control Selecting the color temperature You can change the quality of the picture by selecting from three preset color temperatures: cool, medium, and warm. Cool Noise reduction Off Picture mode Sports To reset the picture adjustments: 1. Press y or z to the following factory settings: Contrast Max (100) Brightness Center (50) Color Center (50) Tint Center (0) Sharpness Center (50) Color temperature ......... Introduction Connecting your TV Using the TV...
... CH TV/VIDEO MENU yzx • Setting up your TV Using the Remote Control Selecting the color temperature You can change the quality of the picture by selecting from three preset color temperatures: cool, medium, and warm. Cool Noise reduction Off Picture mode Sports To reset the picture adjustments: 1. Press y or z to the following factory settings: Contrast Max (100) Brightness Center (50) Color Center (50) Tint Center (0) Sharpness Center (50) Color temperature ......... Introduction Connecting your TV Using the TV...
Owners Manual
Page 34
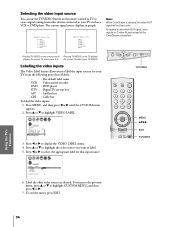
... to view a signal coming from the following preset list of the ColorStream connections. To exit the menu, press EXIT. To select, press 0-5. 1 2 3 4 5 6 7 8 9 10 11 12 13 14 15 16 17 18 19 20 21 22 23 24 25 26 27 28 29 30 31 32 33 Pressing TV/VIDEO on the remote control displays this screen. To receive a color video OUT signal, use the TV/VIDEO button on the remote control or TV...
... to view a signal coming from the following preset list of the ColorStream connections. To exit the menu, press EXIT. To select, press 0-5. 1 2 3 4 5 6 7 8 9 10 11 12 13 14 15 16 17 18 19 20 21 22 23 24 25 26 27 28 29 30 31 32 33 Pressing TV/VIDEO on the remote control displays this screen. To receive a color video OUT signal, use the TV/VIDEO button on the remote control or TV...
Owners Manual
Page 37
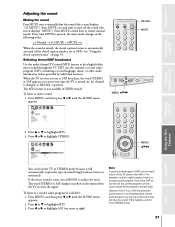
... appears on-screen every time the TV is turned on , you will see the current program but may not hear any sound. To listen to highlight MTS. 3. Using the TV's Features Appendix Index 37 Press y or z to a second audio program (if available): 1. For example, a station might broadcast music as a second audio program. Introduction Connecting your TV Using the Remote Control Setting up your TV Adjusting the sound Muting the sound Press MUTE...
... appears on-screen every time the TV is turned on , you will see the current program but may not hear any sound. To listen to highlight MTS. 3. Using the TV's Features Appendix Index 37 Press y or z to a second audio program (if available): 1. For example, a station might broadcast music as a second audio program. Introduction Connecting your TV Using the Remote Control Setting up your TV Adjusting the sound Muting the sound Press MUTE...
Owners Manual
Page 45
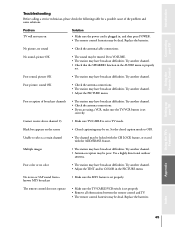
.... Try another channel. Replace the batteries. Problem TV will not turn on Solution • Make sure the power cord is set properly. • Remove all obstructions between the remote control and TV. • The remote control batteries may be poor. No sound, picture OK • The sound may be on the screen • Closed captioning may be muted. Try another channel. • Adjust the TINT and/or COLOR in the AUDIO menu is set . Multiple images •...
.... Try another channel. Replace the batteries. Problem TV will not turn on Solution • Make sure the power cord is set properly. • Remove all obstructions between the remote control and TV. • The remote control batteries may be poor. No sound, picture OK • The sound may be on the screen • Closed captioning may be muted. Try another channel. • Adjust the TINT and/or COLOR in the AUDIO menu is set . Multiple images •...

Owners Manual
Page 46
... God, such as lightning or fluctuations in electric power, improper installation, improper maintenance or use have a limited ninety (90) day warranty for all of the operating instructions in this manual and checking the "Troubleshooting" section, you find the nearest TOSHIBA Authorized Service Station. Commercial Units Products sold and used for commercial use in any parts. You should have been lost or discarded by...
... God, such as lightning or fluctuations in electric power, improper installation, improper maintenance or use have a limited ninety (90) day warranty for all of the operating instructions in this manual and checking the "Troubleshooting" section, you find the nearest TOSHIBA Authorized Service Station. Commercial Units Products sold and used for commercial use in any parts. You should have been lost or discarded by...

Owners Manual
Page 47
... PIP CH y z buttons 24 SOURCE button 24 STILL button 25 SWAP button 25 PIN code 26 R RECALL button 42 Remote control Battery installation 11 CABLE code table 14 CABLE box control buttons 12 Learning about the buttons 15 Programming 12 VCR code table 13 VCR control buttons 11 RESET 33, 39 S SAP sound 37 Satellite receiver connection 7 Sleep timer 36 Sound quality adjustments 39 SPEAKERS on/off 40 Specifications 44 Stereo sound 37 Sub-Bass System 40 Surf, channel 19 Surround sound 38 S-video cables 5 T TIMER 36 Troubleshooting...
... PIP CH y z buttons 24 SOURCE button 24 STILL button 25 SWAP button 25 PIN code 26 R RECALL button 42 Remote control Battery installation 11 CABLE code table 14 CABLE box control buttons 12 Learning about the buttons 15 Programming 12 VCR code table 13 VCR control buttons 11 RESET 33, 39 S SAP sound 37 Satellite receiver connection 7 Sleep timer 36 Sound quality adjustments 39 SPEAKERS on/off 40 Specifications 44 Stereo sound 37 Sub-Bass System 40 Surf, channel 19 Surround sound 38 S-video cables 5 T TIMER 36 Troubleshooting...


