
User Guide
Page 3
... TV is dropped and the cabinet or enclosure surface has been damaged or the TV does not operate normally, take the following precautions: • ALWAYS turn off the TV and unplug the power cord to avoid possible electric shock or fire. • NEVER allow your body to come into contact with...
... TV is dropped and the cabinet or enclosure surface has been damaged or the TV does not operate normally, take the following precautions: • ALWAYS turn off the TV and unplug the power cord to avoid possible electric shock or fire. • NEVER allow your body to come into contact with...
User Guide
Page 5
... screen with a sharp or heavy object. 44) • The LCD screen of current is being turned on /off . Leave the bottom of the unit protruding over the edge of the TV. 3) ...wall bracket. If these sounds become frequent or continuous, unplug the power cord and contact a Toshiba Authorized Service Provider. 43) WARNING: RISK OF SERIOUS PERSONAL INJURY OR EQUIPMENT DAMAGE! When selecting.... 7) VESA Mounting Pattern TV Size Hole Pattern (HxV) Screw Size 42L6200U 400x400 mm M6 47L6200U 400x400 mm M6 55L6200U 400x400 mm M6 47L7200U 400x400 mm M6 55L7200U 400x400 mm M6 (unit ...
... screen with a sharp or heavy object. 44) • The LCD screen of current is being turned on /off . Leave the bottom of the unit protruding over the edge of the TV. 3) ...wall bracket. If these sounds become frequent or continuous, unplug the power cord and contact a Toshiba Authorized Service Provider. 43) WARNING: RISK OF SERIOUS PERSONAL INJURY OR EQUIPMENT DAMAGE! When selecting.... 7) VESA Mounting Pattern TV Size Hole Pattern (HxV) Screw Size 42L6200U 400x400 mm M6 47L6200U 400x400 mm M6 55L6200U 400x400 mm M6 47L7200U 400x400 mm M6 55L7200U 400x400 mm M6 (unit ...

User Guide
Page 6
... wear 3D glasses or watch 3D images from viewing 3D images, and consult your health care provider as sunglasses. • If your nose or temple turns red, or you or your TV near objects that could result in the below diagram. Watching 3D images without appropriate eyewear may cause eye strain...
... wear 3D glasses or watch 3D images from viewing 3D images, and consult your health care provider as sunglasses. • If your nose or temple turns red, or you or your TV near objects that could result in the below diagram. Watching 3D images without appropriate eyewear may cause eye strain...
User Guide
Page 15
... HDMI® signal information 102 Using your computer with the TV 102 Adjusting the image 102 Setting the computer audio 103 Setting the timer to turn on the TV 104 Setting the sleep timer 105 Setting No Signal Power Down 106 Displaying TV status information 106 Viewing support information 107 Resetting...
... HDMI® signal information 102 Using your computer with the TV 102 Adjusting the image 102 Setting the computer audio 103 Setting the timer to turn on the TV 104 Setting the sleep timer 105 Setting No Signal Power Down 106 Displaying TV status information 106 Viewing support information 107 Resetting...
User Guide
Page 22
.... 5 Connect your TV and other objects to allow proper ventilation. THIS TYPE OF DAMAGE IS NOT COVERED UNDER THE TOSHIBA WARRANTY. 3 Do not plug in any power cords until after you cannot turn on the TV. Keep this manual for future reference. 2 To choose a location for your other electronic device(s) to the... features. 1 Carefully read the important safety, installation, care, and service information. Then press the POWER button on the TV control panel or remote control to turn the TV off or
.... 5 Connect your TV and other objects to allow proper ventilation. THIS TYPE OF DAMAGE IS NOT COVERED UNDER THE TOSHIBA WARRANTY. 3 Do not plug in any power cords until after you cannot turn on the TV. Keep this manual for future reference. 2 To choose a location for your other electronic device(s) to the... features. 1 Carefully read the important safety, installation, care, and service information. Then press the POWER button on the TV control panel or remote control to turn the TV off or
User Guide
Page 25
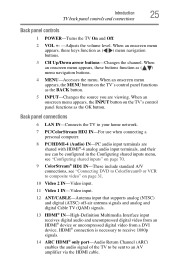
... video from an HDMI® device or uncompressed digital video from a DVI device. Introduction TV back panel controls and connections 25 Back panel controls 1 POWER-Turns the TV On and Off. 2 VOL +- -Adjusts the volume level.
... video from an HDMI® device or uncompressed digital video from a DVI device. Introduction TV back panel controls and connections 25 Back panel controls 1 POWER-Turns the TV On and Off. 2 VOL +- -Adjusts the volume level.

User Guide
Page 31
... source, press the INPUT button on the remote control, see "Selecting the video input to composite video 31 To view the VCR or camcorder video: Turn On the VCR or camcorder video. NOTE The unauthorized recording, use, distribution, or revision of the DVD player in the TV.
... source, press the INPUT button on the remote control, see "Selecting the video input to composite video 31 To view the VCR or camcorder video: Turn On the VCR or camcorder video. NOTE The unauthorized recording, use, distribution, or revision of the DVD player in the TV.

User Guide
Page 32
...to view" on page 86. Select the ColorStream® HD video input source on the TV.* To record a TV program while watching a DVD: Turn ON the VCR. NOTE The unauthorized recording, use, distribution, or revision of television programs, videotapes, DVDs, and other materials is prohibited under the ...or similar cabinet. Items needed: Select the VIDEO video input source on the TV.* To view satellite programs using the component video connections: Turn ON the satellite receiver. Tune the VCR to the channel to watch. NOTE When you to the AUDIO/VIDEO terminal. If your DVD ...
...to view" on page 86. Select the ColorStream® HD video input source on the TV.* To record a TV program while watching a DVD: Turn ON the VCR. NOTE The unauthorized recording, use, distribution, or revision of television programs, videotapes, DVDs, and other materials is prohibited under the ...or similar cabinet. Items needed: Select the VIDEO video input source on the TV.* To view satellite programs using the component video connections: Turn ON the satellite receiver. Tune the VCR to the channel to watch. NOTE When you to the AUDIO/VIDEO terminal. If your DVD ...
User Guide
Page 34
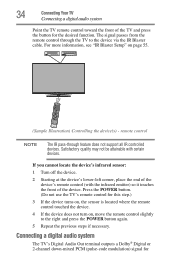
...174; Digital or 2-channel down-mixed PCM (pulse-code modulation) signal for the desired function. If you cannot locate the device's infrared sensor: 1 Turn off the device. 2 Starting at the device's lower-left corner, place the end of the device's remote control (with certain devices. Press the ...POWER button. (Do not use the TV's remote control for this step.) 3 If the device turns on, the sensor is located where the remote control touched the device. 4 If the device does not turn on page 55. (Sample Illustration) Controlling the device(s) - 34 Connecting Your TV Connecting a digital...
...174; Digital or 2-channel down-mixed PCM (pulse-code modulation) signal for the desired function. If you cannot locate the device's infrared sensor: 1 Turn off the device. 2 Starting at the device's lower-left corner, place the end of the device's remote control (with certain devices. Press the ...POWER button. (Do not use the TV's remote control for this step.) 3 If the device turns on, the sensor is located where the remote control touched the device. 4 If the device does not turn on page 55. (Sample Illustration) Controlling the device(s) - 34 Connecting Your TV Connecting a digital...

User Guide
Page 37
...device NOTE [1] EIA/CEA-861-D compliance covers the transmission of highdefinition video signals. The recommended length is reset properly: ❖ When turning on your electronic components, turn on page 86. Separate analog audio cables are required (see "Selecting the video input to view" on the TV first, and ...then the HDMI® or DVI device. ❖ When turning off your electronic components, turn off the HDMI® or DVI device first, and then the TV. Connecting Your TV Using the TV remote and HDMI®...
...device NOTE [1] EIA/CEA-861-D compliance covers the transmission of highdefinition video signals. The recommended length is reset properly: ❖ When turning on your electronic components, turn on page 86. Separate analog audio cables are required (see "Selecting the video input to view" on the TV first, and ...then the HDMI® or DVI device. ❖ When turning off your electronic components, turn off the HDMI® or DVI device first, and then the TV. Connecting Your TV Using the TV remote and HDMI®...

User Guide
Page 50
...mode key: TV, CABLE/SAT, BD/DVD, or AUX. 8 Channel Number Directly tunes channels. Item: Description: Function: Item: Description: Function: 1 POWER button Turns the TV On and Off. When the TV is on, the power LED indicator on -screen. 40 SLEEP button Accesses the sleep timer. Used for... playback Used for a function that is on -screen. Accesses the main TV menu system. (Model L7200U) Closes on the screen. Reduces or turns off the sound. 35 CC button Accesses the closed-caption feature. 15 INFO button Displays TV status information as program details, when available. 37 PIC...
...mode key: TV, CABLE/SAT, BD/DVD, or AUX. 8 Channel Number Directly tunes channels. Item: Description: Function: Item: Description: Function: 1 POWER button Turns the TV On and Off. When the TV is on, the power LED indicator on -screen. 40 SLEEP button Accesses the sleep timer. Used for... playback Used for a function that is on -screen. Accesses the main TV menu system. (Model L7200U) Closes on the screen. Reduces or turns off the sound. 35 CC button Accesses the closed-caption feature. 15 INFO button Displays TV status information as program details, when available. 37 PIC...
User Guide
Page 51
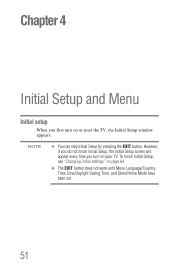
However, if you do not finish Initial Setup, the Initial Setup screen will appear every time you first turn on page 64. ❖ The EXIT button does not work until Menu Language/Country, Time Zone/Daylight Saving Time, and Store/Home Mode have been set. 51 To finish Initial Setup, see "Changing initial settings" on your TV. NOTE ❖ You can stop Initial Setup by pressing the EXIT button. Chapter 4 Initial Setup and Menu Initial setup When you turn on or reset the TV, the Initial Setup window appears.
However, if you do not finish Initial Setup, the Initial Setup screen will appear every time you first turn on page 64. ❖ The EXIT button does not work until Menu Language/Country, Time Zone/Daylight Saving Time, and Store/Home Mode have been set. 51 To finish Initial Setup, see "Changing initial settings" on your TV. NOTE ❖ You can stop Initial Setup by pressing the EXIT button. Chapter 4 Initial Setup and Menu Initial setup When you turn on or reset the TV, the Initial Setup window appears.
User Guide
Page 68
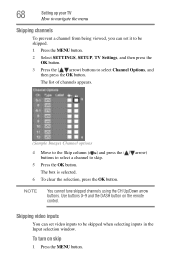
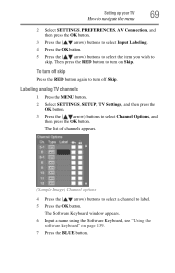
... menu Skipping channels To prevent a channel from being viewed, you can set it to be skipped when selecting inputs in the Input selection window. To turn on the remote control. The list of channels appears. (Sample Image) Channel options 4 Move to the Skip column ( ) and press the ( / arrow) buttons to select...
... menu Skipping channels To prevent a channel from being viewed, you can set it to be skipped when selecting inputs in the Input selection window. To turn on the remote control. The list of channels appears. (Sample Image) Channel options 4 Move to the Skip column ( ) and press the ( / arrow) buttons to select...
User Guide
Page 69
The list of channels appears. (Sample Image) Channel options 4 Press the ( / arrow) buttons to select a channel to turn off Skip. To turn on page 139. 7 Press the BLUE button. Setting up your TV How to navigate the menu 69 2 Select SETTINGS, PREFERENCES, AV Connection, and then press ... skip. The Software Keyboard window appears. 6 Input a name using the Software Keyboard, see "Using the software keyboard" on Skip. Then press the RED button to turn off skip Press the RED button again to label. 5 Press the OK button.
The list of channels appears. (Sample Image) Channel options 4 Press the ( / arrow) buttons to select a channel to turn off Skip. To turn on page 139. 7 Press the BLUE button. Setting up your TV How to navigate the menu 69 2 Select SETTINGS, PREFERENCES, AV Connection, and then press ... skip. The Software Keyboard window appears. 6 Input a name using the Software Keyboard, see "Using the software keyboard" on Skip. Then press the RED button to turn off skip Press the RED button again to label. 5 Press the OK button.
User Guide
Page 71
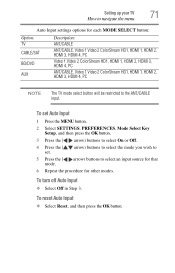
... navigate the menu 71 Auto Input settings options for other modes. To reset Auto Input ❖ Select Reset, and then press the OK button. To turn off Auto Input ❖ Select Off in Step 3. Setting up your TV How to the ANT/CABLE input.
... navigate the menu 71 Auto Input settings options for other modes. To reset Auto Input ❖ Select Reset, and then press the OK button. To turn off Auto Input ❖ Select Off in Step 3. Setting up your TV How to the ANT/CABLE input.
User Guide
Page 87
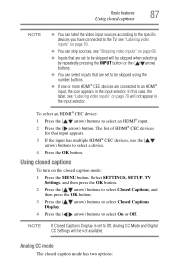
... mode: 1 Press the MENU button. To select an HDMI® CEC device: 1 Press the ( / arrow) buttons to select On or Off. Using closed captions To turn on the closed caption mode has two options: NOTE If Closed Captions Display is set to Off, Analog CC Mode and Digital CC Settings will...
... mode: 1 Press the MENU button. To select an HDMI® CEC device: 1 Press the ( / arrow) buttons to select On or Off. Using closed captions To turn on the closed caption mode has two options: NOTE If Closed Captions Display is set to Off, Analog CC Mode and Digital CC Settings will...
User Guide
Page 97
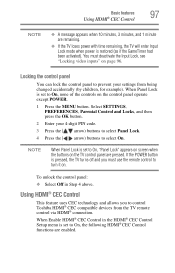
.... 3 Press the ( / arrow) buttons to select Panel Lock. 4 Press the ( / arrow) buttons to select On. When Panel Lock is pressed, the TV turns off and you to control Toshiba HDMI® CEC compatible devices from being changed accidentally (by children, for example). To unlock the control panel: ❖ Select Off in the...
.... 3 Press the ( / arrow) buttons to select Panel Lock. 4 Press the ( / arrow) buttons to select On. When Panel Lock is pressed, the TV turns off and you to control Toshiba HDMI® CEC compatible devices from being changed accidentally (by children, for example). To unlock the control panel: ❖ Select Off in the...
User Guide
Page 99
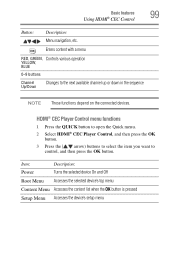
... sequence NOTE These functions depend on the connected devices. Basic features Using HDMI® CEC Control 99 Button: Description: Menu navigation, etc. Item: Description: Power Turns the selected device On and Off Root Menu Accesses the selected device's top menu Content Menu Accesses the content list when the OK button is...
... sequence NOTE These functions depend on the connected devices. Basic features Using HDMI® CEC Control 99 Button: Description: Menu navigation, etc. Item: Description: Power Turns the selected device On and Off Root Menu Accesses the selected device's top menu Content Menu Accesses the content list when the OK button is...
User Guide
Page 100
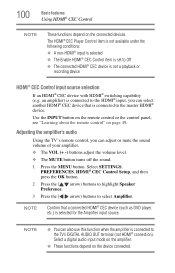
.... NOTE ❖ You can adjust or mute the sound volume of your amplifier. ❖ The VOL (+ -) buttons adjust the volume level. ❖ The MUTE button turns off the sound. 1 Press the MENU button. an amplifier) is connected to Off ❖ The connected HDMI® CEC device is connected to the master...
.... NOTE ❖ You can adjust or mute the sound volume of your amplifier. ❖ The VOL (+ -) buttons adjust the volume level. ❖ The MUTE button turns off the sound. 1 Press the MENU button. an amplifier) is connected to Off ❖ The connected HDMI® CEC device is connected to the master...
User Guide
Page 101
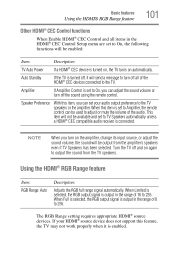
..., the RGB output signal is output in the range of 16 to 235. Speaker Preference With this item, you can adjust the sound volume or turn off and on again to output the sound from the amplifier's speakers even if TV Speakers has been selected. This item will not be output... speakers. Amplifier If Amplifier Control is set to On, you can be enabled: Item: Description: TV Auto Power If a HDMI® CEC device is enabled. Turn the TV off the sound using the remote control. If your audio output preference to the TV speakers or the amplifier. When Limited is selected...
..., the RGB output signal is output in the range of 16 to 235. Speaker Preference With this item, you can adjust the sound volume or turn off and on again to output the sound from the amplifier's speakers even if TV Speakers has been selected. This item will not be output... speakers. Amplifier If Amplifier Control is set to On, you can be enabled: Item: Description: TV Auto Power If a HDMI® CEC device is enabled. Turn the TV off the sound using the remote control. If your audio output preference to the TV speakers or the amplifier. When Limited is selected...

