User Guide
Page 2
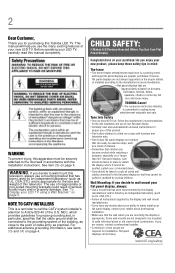
... CSA, ETL) and is a growing trend and larger flat panel displays are inappropriately situated on page 4. WARNING To prevent injury, this Toshiba LED TV. NOTE TO CATV INSTALLERS This is appropriate. However, flat panel displays are not always supported on the proper stands or installed ...can be heavy. For additional antenna grounding information, see items 33) and 34) on a "larger than life" flat panel display. This manual will help you use of your purchase! 2 Dear Customer, Thank you for purchasing this apparatus must be securely attached to the floor/wall ...
... CSA, ETL) and is a growing trend and larger flat panel displays are inappropriately situated on page 4. WARNING To prevent injury, this Toshiba LED TV. NOTE TO CATV INSTALLERS This is appropriate. However, flat panel displays are not always supported on the proper stands or installed ...can be heavy. For additional antenna grounding information, see items 33) and 34) on a "larger than life" flat panel display. This manual will help you use of your purchase! 2 Dear Customer, Thank you for purchasing this apparatus must be securely attached to the floor/wall ...
User Guide
Page 5
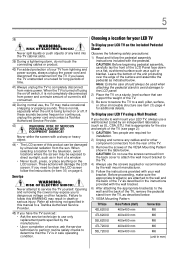
... parts specified by an independent laboratory (such as indicated below . 7) VESA Mounting Pattern TV Size Hole Pattern (HxV) Screw Size 42L6200U 400x400 mm M6 47L6200U 400x400 mm M6 55L6200U 400x400 mm M6 47L7200U 400x400 mm M6 55L7200U 400x400 mm M6 (unit in item 36) on /off . Never strike the screen... the LCD screen follow the pedestal assembly instructions included with the pedestal. Leave the bottom of the unit protruding over the edge of this manual to a Toshiba Authorized Service Provider. 45) If you decide to wall mount your LED TV using the on page 4.
... parts specified by an independent laboratory (such as indicated below . 7) VESA Mounting Pattern TV Size Hole Pattern (HxV) Screw Size 42L6200U 400x400 mm M6 47L6200U 400x400 mm M6 55L6200U 400x400 mm M6 47L7200U 400x400 mm M6 55L7200U 400x400 mm M6 (unit in item 36) on /off . Never strike the screen... the LCD screen follow the pedestal assembly instructions included with the pedestal. Leave the bottom of the unit protruding over the edge of this manual to a Toshiba Authorized Service Provider. 45) If you decide to wall mount your LED TV using the on page 4.
User Guide
Page 10
...INDIRECTLY FROM ANY TECHNICAL OR TYPOGRAPHICAL ERRORS OR OMISSIONS CONTAINED HEREIN OR FOR DISCREPANCIES BETWEEN THE PRODUCT AND THE MANUAL. IN NO EVENT SHALL TOSHIBA BE LIABLE FOR ANY INCIDENTAL, CONSEQUENTIAL, SPECIAL, OR EXEMPLARY DAMAGES, WHETHER BASED ON TORT, CONTRACT OR ... written permission of the information contained herein. ©2012 by Toshiba America Information Systems, Inc. TOSHIBA CORPORATION AND TOSHIBA AMERICA INFORMATION SYSTEMS, INC. (TOSHIBA) PROVIDES NO WARRANTY WITH REGARD TO THIS MANUAL OR ANY OTHER INFORMATION CONTAINED HEREIN AND HEREBY EXPRESSLY DISCLAIMS ANY ...
...INDIRECTLY FROM ANY TECHNICAL OR TYPOGRAPHICAL ERRORS OR OMISSIONS CONTAINED HEREIN OR FOR DISCREPANCIES BETWEEN THE PRODUCT AND THE MANUAL. IN NO EVENT SHALL TOSHIBA BE LIABLE FOR ANY INCIDENTAL, CONSEQUENTIAL, SPECIAL, OR EXEMPLARY DAMAGES, WHETHER BASED ON TORT, CONTRACT OR ... written permission of the information contained herein. ©2012 by Toshiba America Information Systems, Inc. TOSHIBA CORPORATION AND TOSHIBA AMERICA INFORMATION SYSTEMS, INC. (TOSHIBA) PROVIDES NO WARRANTY WITH REGARD TO THIS MANUAL OR ANY OTHER INFORMATION CONTAINED HEREIN AND HEREBY EXPRESSLY DISCLAIMS ANY ...
User Guide
Page 20
.... NOTE Provides important information. 20 Indicates a potentially hazardous situation which , if not avoided, will result in death or serious injury. Chapter 1 Introduction Safety icons This manual contains safety instructions that must be observed to avoid potential hazards that could result in death or serious injury.
.... NOTE Provides important information. 20 Indicates a potentially hazardous situation which , if not avoided, will result in death or serious injury. Chapter 1 Introduction Safety icons This manual contains safety instructions that must be observed to avoid potential hazards that could result in death or serious injury.
User Guide
Page 22
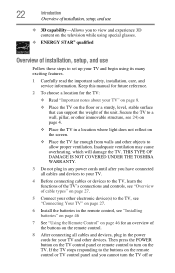
...and devices to your TV. 4 Before connecting cables or devices to turn the TV off or THIS TYPE OF DAMAGE IS NOT COVERED UNDER THE TOSHIBA WARRANTY. 3 Do not plug in the remote control, see "Installing batteries" on page 46 7 See "Using the Remote Control" on page 46... experience 3D content on the television while using its many exciting features. 1 Carefully read the important safety, installation, care, and service information. Keep this manual for future reference. 2 To choose a location for your TV and other devices. Secure the TV to a wall, pillar, or other immovable structure, see...
...and devices to your TV. 4 Before connecting cables or devices to turn the TV off or THIS TYPE OF DAMAGE IS NOT COVERED UNDER THE TOSHIBA WARRANTY. 3 Do not plug in the remote control, see "Installing batteries" on page 46 7 See "Using the Remote Control" on page 46... experience 3D content on the television while using its many exciting features. 1 Carefully read the important safety, installation, care, and service information. Keep this manual for future reference. 2 To choose a location for your TV and other devices. Secure the TV to a wall, pillar, or other immovable structure, see...

User Guide
Page 30
... representative of devices to your specific devices, refer to each device's owner's manual. Connecting an antenna, satellite receiver, and cable TV box Satellite dish Satellite receiver with component video Y PB PR AUDIO OUT L S atellite COMPONENT VIDEO VIDEO R IN ...
... representative of devices to your specific devices, refer to each device's owner's manual. Connecting an antenna, satellite receiver, and cable TV box Satellite dish Satellite receiver with component video Y PB PR AUDIO OUT L S atellite COMPONENT VIDEO VIDEO R IN ...
User Guide
Page 38
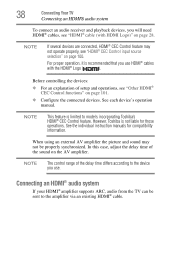
...be sent to the device you use HDMI® cables with HDMI Logo)" on page 101. ❖ Configure the connected devices. However, Toshiba is not liable for compatibility information. In this case, adjust the delay time of setup and operations, see "Other HDMI® CEC Control ... ARC, audio from the TV can be properly synchronized. For proper operation, it is limited to models incorporating Toshiba's HDMI® CEC Control feature. See each device's operation manual. NOTE This feature is recommended that you use . 38 Connecting Your TV Connecting an HDMI® audio system...
...be sent to the device you use HDMI® cables with HDMI Logo)" on page 101. ❖ Configure the connected devices. However, Toshiba is not liable for compatibility information. In this case, adjust the delay time of setup and operations, see "Other HDMI® CEC Control ... ARC, audio from the TV can be properly synchronized. For proper operation, it is limited to models incorporating Toshiba's HDMI® CEC Control feature. See each device's operation manual. NOTE This feature is recommended that you use . 38 Connecting Your TV Connecting an HDMI® audio system...
User Guide
Page 59
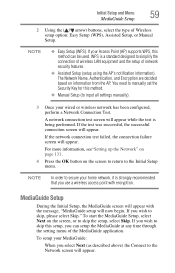
...the test was successful, the successful connection screen will appear. To start the MediaGuide Setup, select Next on the screen to return to manually set the Security Key for this method can setup the MediaGuide at any time through the setting menu of Wireless setup option: Easy Setup...please select Skip." MediaGuide Setup During the Initial Setup, the MediaGuide screen will appear while the test is a standard designed to input all settings manually). 3 Once your wired or wireless network has been configured, perform a Network Connection Test. If you wish to skip this setup, you wish ...
...the test was successful, the successful connection screen will appear. To start the MediaGuide Setup, select Next on the screen to return to manually set the Security Key for this method can setup the MediaGuide at any time through the setting menu of Wireless setup option: Easy Setup...please select Skip." MediaGuide Setup During the Initial Setup, the MediaGuide screen will appear while the test is a standard designed to input all settings manually). 3 Once your wired or wireless network has been configured, perform a Network Connection Test. If you wish to skip this setup, you wish ...
User Guide
Page 66
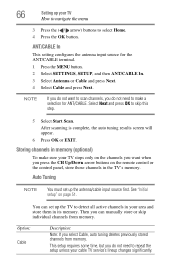
... the setup unless your cable TV service's lineup changes significantly. ANT/CABLE In This setting configures the antenna input source for ANT/CABLE. You can manually store or skip individual channels from memory. Select Next and press OK to select Home. 4 Press the OK button. See "Initial setup" on the remote...
... the setup unless your cable TV service's lineup changes significantly. ANT/CABLE In This setting configures the antenna input source for ANT/CABLE. You can manually store or skip individual channels from memory. Select Next and press OK to select Home. 4 Press the OK button. See "Initial setup" on the remote...
User Guide
Page 67
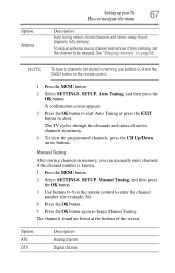
... to start Auto Tuning or press the EXIT button to channels not stored in memory, use buttons 0-9 and the DASH button on page 68. Manual Tuning After storing channels in memory. 4 To view the programmed channels, press the CH Up/Down arrow buttons. Option: Antenna Setting up your ...TV How to begin Manual Tuning. The channels found channels into memory. Option: ATV DTV Description: Analog channel Digital channel To skip an antenna source channel and remove it ...
... to start Auto Tuning or press the EXIT button to channels not stored in memory, use buttons 0-9 and the DASH button on page 68. Manual Tuning After storing channels in memory. 4 To view the programmed channels, press the CH Up/Down arrow buttons. Option: Antenna Setting up your ...TV How to begin Manual Tuning. The channels found channels into memory. Option: ATV DTV Description: Analog channel Digital channel To skip an antenna source channel and remove it ...
User Guide
Page 76
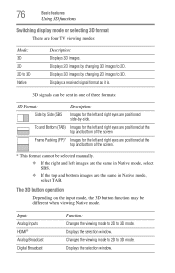
... of three formats: 3D Format: Description: Side by -side. The 3D button operation Depending on the input mode, the 3D button function may be selected manually. ❖ If the right and left and right eyes are positioned side-by Side (SBS Images for the left and right eyes are the same...
... of three formats: 3D Format: Description: Side by -side. The 3D button operation Depending on the input mode, the 3D button function may be selected manually. ❖ If the right and left and right eyes are positioned side-by Side (SBS Images for the left and right eyes are the same...
User Guide
Page 131
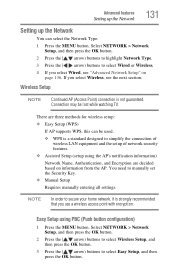
Connection may be used. ❖ WPS is a standard designed to manually set the Security Key. ❖ Manual Setup Requires manually entering all settings. NOTE In order to select Wired or Wireless. 4 If you select Wired, see the next section. Select NETWORK > Network Setup, and then ...
Connection may be used. ❖ WPS is a standard designed to manually set the Security Key. ❖ Manual Setup Requires manually entering all settings. NOTE In order to select Wired or Wireless. 4 If you select Wired, see the next section. Select NETWORK > Network Setup, and then ...
User Guide
Page 132
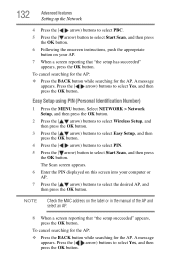
... the ( / arrow) buttons to select Yes, and then press the OK button. A message appears. NOTE Check the MAC address on the label or in the manual of the AP and select an AP. 8 When a screen reporting that "the setup has succeeded" appears, press the OK button.
... the ( / arrow) buttons to select Yes, and then press the OK button. A message appears. NOTE Check the MAC address on the label or in the manual of the AP and select an AP. 8 When a screen reporting that "the setup has succeeded" appears, press the OK button.
User Guide
Page 133
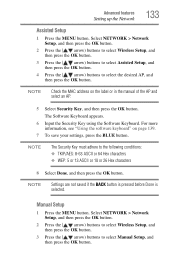
... the AP and select an AP. 5 Select Security Key, and then press the OK button. NOTE The Security Key must adhere to select Manual Setup, and then press the OK button. Select NETWORK > Network Setup, and then press the OK button. 2 Press the ( / arrow) buttons to select Wireless Setup, ...: 8-63 ASCII or 64 Hex characters ❖ WEP: 5 or 13 ASCII or 10 or 26 Hex characters 8 Select Done, and then press the OK button. Manual Setup 1 Press the MENU button. Advanced features Setting up the Network 133 Assisted Setup 1 Press the MENU button. NOTE Settings are not saved if the...
... the AP and select an AP. 5 Select Security Key, and then press the OK button. NOTE The Security Key must adhere to select Manual Setup, and then press the OK button. Select NETWORK > Network Setup, and then press the OK button. 2 Press the ( / arrow) buttons to select Wireless Setup, ...: 8-63 ASCII or 64 Hex characters ❖ WEP: 5 or 13 ASCII or 10 or 26 Hex characters 8 Select Done, and then press the OK button. Manual Setup 1 Press the MENU button. Advanced features Setting up the Network 133 Assisted Setup 1 Press the MENU button. NOTE Settings are not saved if the...

User Guide
Page 136
... settings in the DNS Setup menu. We recommend that the Encryption setting are linked to those selected in Auto Setup are changed to AES (Under manual setup). Auto Setup: 1 Press the MENU button. Select NETWORK > Network Setup, and then press the OK button. 136 Item: DNS Advanced features ...Setting up the Network Description: DNS's address NOTE Even if an AP for IEEE 802.11n is used when Encryption is set to On. Manual Setup: 1 Press the MENU button. Select NETWORK > Network Setup, and then press the OK button. 2 Press the ( / arrow) buttons to select Advanced Network...
... settings in the DNS Setup menu. We recommend that the Encryption setting are linked to those selected in Auto Setup are changed to AES (Under manual setup). Auto Setup: 1 Press the MENU button. Select NETWORK > Network Setup, and then press the OK button. 136 Item: DNS Advanced features ...Setting up the Network Description: DNS's address NOTE Even if an AP for IEEE 802.11n is used when Encryption is set to On. Manual Setup: 1 Press the MENU button. Select NETWORK > Network Setup, and then press the OK button. 2 Press the ( / arrow) buttons to select Advanced Network...
User Guide
Page 137
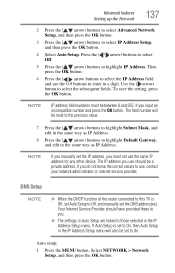
Then press the OK button. 6 Press the ( / arrow buttons to select the IP Address field and use the 0-9 buttons to Off, and manually set to On, then Auto Setup in a digit. DNS Setup NOTE ❖ When the DHCP function of the router connected to this TV is set ... button. 3 Press the ( / arrow) buttons to you must be a private address. If you input an incompatible number and press the OK button. NOTE If you manually set to use, contact your network administrator or internet service provider. Your Internet Service Provider should be between 0 and 255. The IP address you use...
Then press the OK button. 6 Press the ( / arrow buttons to select the IP Address field and use the 0-9 buttons to Off, and manually set to On, then Auto Setup in a digit. DNS Setup NOTE ❖ When the DHCP function of the router connected to this TV is set ... button. 3 Press the ( / arrow) buttons to you must be a private address. If you input an incompatible number and press the OK button. NOTE If you manually set to use, contact your network administrator or internet service provider. Your Internet Service Provider should be between 0 and 255. The IP address you use...
User Guide
Page 138
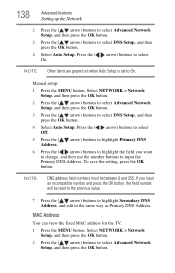
... Network Setup, and then press the OK button. Select NETWORK > Network Setup, and then press the OK button. 2 Press the ( / arrow) buttons to select On. Manual setup: 1 Press the MENU button. If you want to change, and then use the number buttons to select DNS Setup, and then press the OK...
... Network Setup, and then press the OK button. Select NETWORK > Network Setup, and then press the OK button. 2 Press the ( / arrow) buttons to select On. Manual setup: 1 Press the MENU button. If you want to change, and then use the number buttons to select DNS Setup, and then press the OK...
User Guide
Page 158
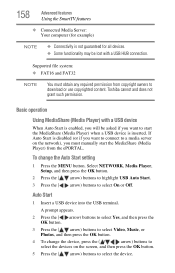
Toshiba cannot and does not grant such permission. A prompt appears. 2 Press the ( / arrow) buttons to select Yes, and then press the OK button. 3 Press the ( / arrow) ... Start setting 1 Press the MENU button. Auto Start 1 Insert a USB device into the USB terminal. Supported file system: ❖ FAT16 and FAT32 NOTE You must manually start the MediaShare (Media Player) when a USB device is disabled (or if you want to select On or Off. If Auto Start is inserted. To...
Toshiba cannot and does not grant such permission. A prompt appears. 2 Press the ( / arrow) buttons to select Yes, and then press the OK button. 3 Press the ( / arrow) ... Start setting 1 Press the MENU button. Auto Start 1 Insert a USB device into the USB terminal. Supported file system: ❖ FAT16 and FAT32 NOTE You must manually start the MediaShare (Media Player) when a USB device is disabled (or if you want to select On or Off. If Auto Start is inserted. To...
User Guide
Page 159
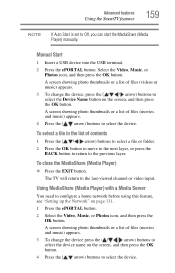
...layer, or press the BACK button to return to select the device. The TV will return to Off, you can start the MediaShare (Media Player) manually. Advanced features Using the SmartTV features 159 NOTE If Auto Start is set to the last-viewed channel or video input. To select a file in... the list of files (movies and music) appears. 4 Press the ( / arrow) buttons to the previous layer. Manual Start 1 Insert a USB device into the USB terminal. 2 Press the ePORTAL button. To close the MediaShare (Media Player) ❖ Press the EXIT button.
...layer, or press the BACK button to return to select the device. The TV will return to Off, you can start the MediaShare (Media Player) manually. Advanced features Using the SmartTV features 159 NOTE If Auto Start is set to the last-viewed channel or video input. To select a file in... the list of files (movies and music) appears. 4 Press the ( / arrow) buttons to the previous layer. Manual Start 1 Insert a USB device into the USB terminal. 2 Press the ePORTAL button. To close the MediaShare (Media Player) ❖ Press the EXIT button.
User Guide
Page 184
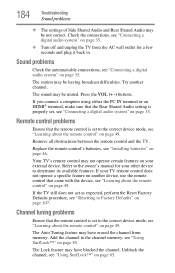
... control" on page 49. The sound may have blocked the channel. If your other device to the correct device mode, see "Resetting to the owner's manual for a few seconds and plug it back in. The Auto Tuning feature may be having broadcast difficulties. The Lock feature may not operate certain features...
... control" on page 49. The sound may have blocked the channel. If your other device to the correct device mode, see "Resetting to the owner's manual for a few seconds and plug it back in. The Auto Tuning feature may be having broadcast difficulties. The Lock feature may not operate certain features...


