Brochure
Page 2
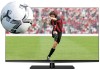
MediaShare (DLNA®) - Send & Play - Audyssey Dynamic Volume® (Day/Night Modes) - Audyssey Volume Extension • Ported Speakers • Speaker Output: 20W Connectivity • HDMI® with CEC5: 4 Ports • USB Video: 2 • High Definition PC Input: 1 • 3.5mm PC Audio Out: 1 • ColorStream® Component Video: 1 • Composite: 1 • Ethernet (LAN) Port: 1 • IR Out: 1 Remote Control (CT-90408) Back L6200U Series Rear Panel Connector Diagram Product and Packaging • VESA Mounting Pattern6: 400mm x 400mm •...
MediaShare (DLNA®) - Send & Play - Audyssey Dynamic Volume® (Day/Night Modes) - Audyssey Volume Extension • Ported Speakers • Speaker Output: 20W Connectivity • HDMI® with CEC5: 4 Ports • USB Video: 2 • High Definition PC Input: 1 • 3.5mm PC Audio Out: 1 • ColorStream® Component Video: 1 • Composite: 1 • Ethernet (LAN) Port: 1 • IR Out: 1 Remote Control (CT-90408) Back L6200U Series Rear Panel Connector Diagram Product and Packaging • VESA Mounting Pattern6: 400mm x 400mm •...

User Guide
Page 2
... antenna grounding information, see items 33) and 34) on page 4. Follow the manufacturer's recommendations for proper grounding and, in accordance with furniture and television sets. • Don't place flat panel displays on or play with the installation instructions. WARNING: If you decide to wall mount this television, always use of this product. • Don't allow children to wall mount your flat panel display, always: • Use a mount that has been Listed...
... antenna grounding information, see items 33) and 34) on page 4. Follow the manufacturer's recommendations for proper grounding and, in accordance with furniture and television sets. • Don't place flat panel displays on or play with the installation instructions. WARNING: If you decide to wall mount this television, always use of this product. • Don't allow children to wall mount your flat panel display, always: • Use a mount that has been Listed...
User Guide
Page 5
... . 7) VESA Mounting Pattern TV Size Hole Pattern (HxV) Screw Size 42L6200U 400x400 mm M6 47L6200U 400x400 mm M6 55L6200U 400x400 mm M6 47L7200U 400x400 mm M6 55L7200U 400x400 mm M6 (unit in death or serious injury. CAUTION: Do not use the screws removed from the back cover to attach the wall mount bracket to the wall and the back of the TV, remove the pedestal stand from power...
... . 7) VESA Mounting Pattern TV Size Hole Pattern (HxV) Screw Size 42L6200U 400x400 mm M6 47L6200U 400x400 mm M6 55L6200U 400x400 mm M6 47L7200U 400x400 mm M6 55L7200U 400x400 mm M6 (unit in death or serious injury. CAUTION: Do not use the screws removed from the back cover to attach the wall mount bracket to the wall and the back of the TV, remove the pedestal stand from power...
User Guide
Page 18
... 181 Picture problems 182 Sound problems 184 Remote control problems 184 Channel tuning problems 184 Closed caption problems 185 Rating blocking (V-Chip) problems 185 HDMI® CEC Control operation 185 HDMI® problems 186 Network problems 186 Wireless network problems 188 MediaShare (Media Player) problems 188 Light Indicator 189 Power On/Standby light 189 If the problem persists after trying the solutions ..190 Appendix A: Specifications 191 Television system 191 Channel coverage 191 Power source 192 Power consumption 192 Audio power 192 Speaker type 192 Video/audio...
... 181 Picture problems 182 Sound problems 184 Remote control problems 184 Channel tuning problems 184 Closed caption problems 185 Rating blocking (V-Chip) problems 185 HDMI® CEC Control operation 185 HDMI® problems 186 Network problems 186 Wireless network problems 188 MediaShare (Media Player) problems 188 Light Indicator 189 Power On/Standby light 189 If the problem persists after trying the solutions ..190 Appendix A: Specifications 191 Television system 191 Channel coverage 191 Power source 192 Power consumption 192 Audio power 192 Speaker type 192 Video/audio...

User Guide
Page 30
... 1 HDMI 3 TV back panel Component video cable VHF/UHF Antenna AV Component adapter cable (supplied) Cable TV Cable box CH 3 CH 4 IN OUT Coaxial cable (Sample Illustration) L6200U/L7200U Series-Connecting to your TV in this manual are representative of devices to an antenna, satellite receiver, and cable TV box Items needed: ❖ Coaxial cables ❖ Standard AV cables ❖ Component video cables (red/green/blue) NOTE When you use the remote control to program or access certain features on your specific devices, refer to change channels...
... 1 HDMI 3 TV back panel Component video cable VHF/UHF Antenna AV Component adapter cable (supplied) Cable TV Cable box CH 3 CH 4 IN OUT Coaxial cable (Sample Illustration) L6200U/L7200U Series-Connecting to your TV in this manual are representative of devices to an antenna, satellite receiver, and cable TV box Items needed: ❖ Coaxial cables ❖ Standard AV cables ❖ Component video cables (red/green/blue) NOTE When you use the remote control to program or access certain features on your specific devices, refer to change channels...
User Guide
Page 38
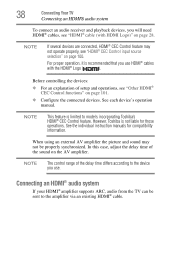
...; cable. See each device's operation manual. Connecting an HDMI® audio system If your HDMI® amplifier supports ARC, audio from the TV can be properly synchronized. NOTE This feature is limited to the device you use HDMI® cables with HDMI Logo)" on the AV amplifier. However, Toshiba is recommended that you use . Before controlling the devices: ❖ For an explanation of setup and operations, see "HDMI® CEC Control input source...
...; cable. See each device's operation manual. Connecting an HDMI® audio system If your HDMI® amplifier supports ARC, audio from the TV can be properly synchronized. NOTE This feature is limited to the device you use HDMI® cables with HDMI Logo)" on the AV amplifier. However, Toshiba is recommended that you use . Before controlling the devices: ❖ For an explanation of setup and operations, see "HDMI® CEC Control input source...

User Guide
Page 50
... power LED indicator on -screen. Returns to each mode key: TV, CABLE/SAT, BD/DVD, or AUX. 8 Channel Number Directly tunes channels. Used for TV, Cable/Sat, BD/DVD, Aux devices Stops playback Used for TV, Cable/Sat, BD/DVD, Aux devices Pauses playback 13 CH ( / ) buttons Cycles through the picture sizes. as well 36 PIC SIZE button Cycles through programmed 34 QUICK button Launches the Quick menu. 14 MUTE button channels. on -screen. buttons (0-9) 9 (-) button Enters 2-part channel numbers. 10 INPUT button Selects the video input source...
... power LED indicator on -screen. Returns to each mode key: TV, CABLE/SAT, BD/DVD, or AUX. 8 Channel Number Directly tunes channels. Used for TV, Cable/Sat, BD/DVD, Aux devices Stops playback Used for TV, Cable/Sat, BD/DVD, Aux devices Pauses playback 13 CH ( / ) buttons Cycles through the picture sizes. as well 36 PIC SIZE button Cycles through programmed 34 QUICK button Launches the Quick menu. 14 MUTE button channels. on -screen. buttons (0-9) 9 (-) button Enters 2-part channel numbers. 10 INPUT button Selects the video input source...
User Guide
Page 66
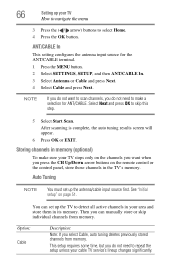
.../Down arrow buttons on the remote control or the control panel, store those channels in memory (optional) To make a selection for the ANT/CABLE terminal. 1 Press the MENU button. 2 Select SETTINGS, SETUP, and then ANT/CABLE In. 3 Select Antenna or Cable and press Next. 4 Select Cable and press Next. Auto Tuning NOTE You must set up your cable TV service's lineup changes significantly. ANT/CABLE In This setting configures the antenna input source for ANT...
.../Down arrow buttons on the remote control or the control panel, store those channels in memory (optional) To make a selection for the ANT/CABLE terminal. 1 Press the MENU button. 2 Select SETTINGS, SETUP, and then ANT/CABLE In. 3 Select Antenna or Cable and press Next. 4 Select Cable and press Next. Auto Tuning NOTE You must set up your cable TV service's lineup changes significantly. ANT/CABLE In This setting configures the antenna input source for ANT...
User Guide
Page 67
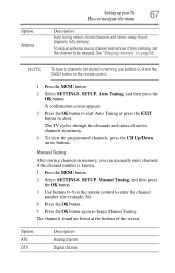
... MENU button. 2 Select SETTINGS, SETUP, Manual Tuning, and then press the OK button. 3 Use buttons 0-9 on the remote control to enter the channel number (for example, 56). 4 Press the OK button. 5 Press the OK button again to begin Manual Tuning. Option: ATV DTV Description: Analog channel Digital channel NOTE To tune to navigate the menu 67 Description: Auto tuning retains stored channels and stores newly found are listed at the bottom of the screen...
... MENU button. 2 Select SETTINGS, SETUP, Manual Tuning, and then press the OK button. 3 Use buttons 0-9 on the remote control to enter the channel number (for example, 56). 4 Press the OK button. 5 Press the OK button again to begin Manual Tuning. Option: ATV DTV Description: Analog channel Digital channel NOTE To tune to navigate the menu 67 Description: Auto tuning retains stored channels and stores newly found are listed at the bottom of the screen...
User Guide
Page 68
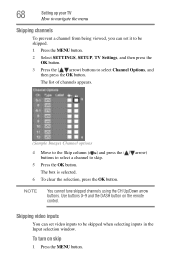
Use buttons 0-9 and the DASH button on skip 1 Press the MENU button. To turn on the remote control. 68 Setting up your TV How to navigate the menu Skipping channels To prevent a channel from being viewed, you can set it to be skipped when selecting inputs in the Input selection window. NOTE You cannot tune skipped channels using the CH Up/Down arrow buttons. The list of channels appears. (Sample Image) Channel options...
Use buttons 0-9 and the DASH button on skip 1 Press the MENU button. To turn on the remote control. 68 Setting up your TV How to navigate the menu Skipping channels To prevent a channel from being viewed, you can set it to be skipped when selecting inputs in the Input selection window. NOTE You cannot tune skipped channels using the CH Up/Down arrow buttons. The list of channels appears. (Sample Image) Channel options...
User Guide
Page 87
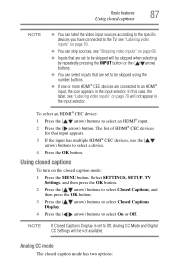
... OK button. The list of HDMI® CEC devices for that are set to Off, Analog CC Mode and Digital CC Settings will not appear in the input selector. Basic features Using closed captions 87 NOTE ❖ You can label the video input sources according to the specific devices you have connected to the TV, see "Labeling video inputs" on page 70. ❖ You can skip sources, see "Labeling video inputs" on...
... OK button. The list of HDMI® CEC devices for that are set to Off, Analog CC Mode and Digital CC Settings will not appear in the input selector. Basic features Using closed captions 87 NOTE ❖ You can label the video input sources according to the specific devices you have connected to the TV, see "Labeling video inputs" on page 70. ❖ You can skip sources, see "Labeling video inputs" on...
User Guide
Page 90
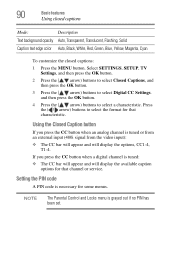
... color Auto, Black, White, Red, Green, Blue, Yellow, Magenta, Cyan To customize the closed captions: 1 Press the MENU button. Using the Closed Caption button If you press the CC button when a digital channel is necessary for that channel or service. Setting the PIN code A PIN code is tuned: ❖ The CC bar will appear and will display the options, CC1-4, T1-4. Press the ( / arrow) buttons to select the format for some menus. NOTE The Parental Control and Locks menu...
... color Auto, Black, White, Red, Green, Blue, Yellow, Magenta, Cyan To customize the closed captions: 1 Press the MENU button. Using the Closed Caption button If you press the CC button when a digital channel is necessary for that channel or service. Setting the PIN code A PIN code is tuned: ❖ The CC bar will appear and will display the options, CC1-4, T1-4. Press the ( / arrow) buttons to select the format for some menus. NOTE The Parental Control and Locks menu...

User Guide
Page 105
... time (maximum = 12 hours). Using the onscreen menus: 1 Press the MENU button. To display the time remaining until it is set the TV to turn off after powering on by On Timer) ❖ No signal auto power off . ❖ Use the number buttons. ❖ Press the ( / arrow) buttons to select Off. Setting the sleep timer You can set for the nearest time will function. ❖ Sleep Timer ❖ Auto shutdown after 1 hour of inactivity (after a specific...
... time (maximum = 12 hours). Using the onscreen menus: 1 Press the MENU button. To display the time remaining until it is set the TV to turn off after powering on by On Timer) ❖ No signal auto power off . ❖ Use the number buttons. ❖ Press the ( / arrow) buttons to select Off. Setting the sleep timer You can set for the nearest time will function. ❖ Sleep Timer ❖ Auto shutdown after 1 hour of inactivity (after a specific...
User Guide
Page 107
... following additional information (only available for ANT/CABLE input) will remove the entire banner. (Sample Illustration) Banner Viewing support information 1 Press the MENU button. Basic features Viewing support information 107 ❖ Channel Label (if set ). 3 A confirmation screen appears. Select SETTINGS, SETUP, Reset TV, and then press the OK button. 2 Enter your PIN code (if a PIN code has been set or received) ❖ Current display mode (Side by Side, Top and Bottom, or...
... following additional information (only available for ANT/CABLE input) will remove the entire banner. (Sample Illustration) Banner Viewing support information 1 Press the MENU button. Basic features Viewing support information 107 ❖ Channel Label (if set ). 3 A confirmation screen appears. Select SETTINGS, SETUP, Reset TV, and then press the OK button. 2 Enter your PIN code (if a PIN code has been set or received) ❖ Current display mode (Side by Side, Top and Bottom, or...

User Guide
Page 125
... can adjust the audio balance. 1 Press the MENU button. Each time you select MUTE mode, the closed captioning, press the VOL (-) button to set to Off when you press the MUTE button, the mute mode changes in the SOUND menu while Mute is active, Mute is pressed. To mute the audio without activating the closed caption feature becomes active if the TV program is only available for analog signals on screen when...
... can adjust the audio balance. 1 Press the MENU button. Each time you select MUTE mode, the closed captioning, press the VOL (-) button to set to Off when you press the MUTE button, the mute mode changes in the SOUND menu while Mute is active, Mute is pressed. To mute the audio without activating the closed caption feature becomes active if the TV program is only available for analog signals on screen when...

User Guide
Page 126
.... 126 Picture and Sound Controls Adjusting the audio Adjusting the range You can switch from digital to analog broadcasts at the same dynamic range. 1 Press the MENU button. Selecting the optical audio output format You can select the optical audio output format when you can adjust bass and treble. 1 Press the MENU button. Select SETTINGS, PREFERENCES, AV Connection, and then press the OK button. 3 Press the ( / arrow) buttons to select Digital Audio Output. 4 Press the ( / arrow) buttons to select Auto or...
.... 126 Picture and Sound Controls Adjusting the audio Adjusting the range You can switch from digital to analog broadcasts at the same dynamic range. 1 Press the MENU button. Selecting the optical audio output format You can select the optical audio output format when you can adjust bass and treble. 1 Press the MENU button. Select SETTINGS, PREFERENCES, AV Connection, and then press the OK button. 3 Press the ( / arrow) buttons to select Digital Audio Output. 4 Press the ( / arrow) buttons to select Auto or...
User Guide
Page 185
... channel list and reprogram channels into memory, see "Resetting to controls." If text is not available, a black rectangle may not display correctly under the following circumstances: ❖ The recording is dubbed ❖ The signal reception is weak ❖ The signal reception is not closed captions" on page 181. The HDMI® CEC operation is available for Toshiba HDMI® CEC compatible devices. If the problem persists, use the Reset Factory Defaults...
... channel list and reprogram channels into memory, see "Resetting to controls." If text is not available, a black rectangle may not display correctly under the following circumstances: ❖ The recording is dubbed ❖ The signal reception is weak ❖ The signal reception is not closed captions" on page 181. The HDMI® CEC operation is available for Toshiba HDMI® CEC compatible devices. If the problem persists, use the Reset Factory Defaults...

User Guide
Page 202
... (F-type) 27 component video (red/green/blue) 28 Dual-wand IR blaster cable 29 HDMI® 28 LAN 30 optical audio 29 overview of cables 27 standard A/V (red/white/yellow) 27 channel return 85 channels auto tuning 66 labeling analog TV channels 69 labeling video inputs 70 locking specific channels 95 manual tuning 67 next programmed channel 85 skipping 68 skipping video inputs 68 specific channel 85 storing in memory 66 closed captions Analog CC mode 87 button 90 Digital CC settings 89 using 87 computer adjusting image...
... (F-type) 27 component video (red/green/blue) 28 Dual-wand IR blaster cable 29 HDMI® 28 LAN 30 optical audio 29 overview of cables 27 standard A/V (red/white/yellow) 27 channel return 85 channels auto tuning 66 labeling analog TV channels 69 labeling video inputs 70 locking specific channels 95 manual tuning 67 next programmed channel 85 skipping 68 skipping video inputs 68 specific channel 85 storing in memory 66 closed captions Analog CC mode 87 button 90 Digital CC settings 89 using 87 computer adjusting image...

User Guide
Page 204
... picture mode selecting 115 picture settings locking 124 picture size 4/3 111 Dot by Dot 113 Full 111 Native 110 Normal 113 selecting 109 TheaterWide 1 112 TheaterWide 2 112 TheaterWide 3 112 pin code changing 91 deleting 91 entering new pin code 91 forgotten 91 setting pin code 90 power failure 108 program ratings displaying 95 unlocking programs 95 Q quick setup ANT/CABLE IN 66 local time 65 location 65 menu language 65 R rating system 93 downloading...
... picture mode selecting 115 picture settings locking 124 picture size 4/3 111 Dot by Dot 113 Full 111 Native 110 Normal 113 selecting 109 TheaterWide 1 112 TheaterWide 2 112 TheaterWide 3 112 pin code changing 91 deleting 91 entering new pin code 91 forgotten 91 setting pin code 90 power failure 108 program ratings displaying 95 unlocking programs 95 Q quick setup ANT/CABLE IN 66 local time 65 location 65 menu language 65 R rating system 93 downloading...
User Guide
Page 205
... 178 search 178 TV listings 177 Toshiba Send & Play App 178 launching 179 text input 180 troubleshooting 181 channel tuning problems 184 closed caption problems 185 contact Toshiba 190 HDMI® 186 HDMI® CEC Control problems 185 light indicator 189 light indicator functions 189 MediaShare (Media Player) problems 188 network problems 186 picture problems 182 Rating blocking problems 185 remote control problems 184 sound problems 184 wireless network problems 188 TV connections front 23 side 23 TV panel connections back 24 TV panel controls front 23 left...
... 178 search 178 TV listings 177 Toshiba Send & Play App 178 launching 179 text input 180 troubleshooting 181 channel tuning problems 184 closed caption problems 185 contact Toshiba 190 HDMI® 186 HDMI® CEC Control problems 185 light indicator 189 light indicator functions 189 MediaShare (Media Player) problems 188 network problems 186 picture problems 182 Rating blocking problems 185 remote control problems 184 sound problems 184 wireless network problems 188 TV connections front 23 side 23 TV panel connections back 24 TV panel controls front 23 left...


