
Brochure
Page 1
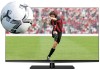
... with New Bezel-less Aero™ Design Edge LED provides superior picture quality, and ultrathin depth. Key Media Apps, such as TRAC Tablet Remote App Capability, Send & Play capability, and more. MediaShare; ClearScan® 120Hz for Clear, Fast Motion Reduces blurring caused by fast-action ... Quality Dual Core engine helps create enhanced picture quality and smoother, more ; Easily enjoy home movies, photos and music. New Smart TV Toshiba's new comprehensive Smart TV suite gets you to highdefinition video and amazingly immersive surround sound in the box, so you can do and enjoy...
... with New Bezel-less Aero™ Design Edge LED provides superior picture quality, and ultrathin depth. Key Media Apps, such as TRAC Tablet Remote App Capability, Send & Play capability, and more. MediaShare; ClearScan® 120Hz for Clear, Fast Motion Reduces blurring caused by fast-action ... Quality Dual Core engine helps create enhanced picture quality and smoother, more ; Easily enjoy home movies, photos and music. New Smart TV Toshiba's new comprehensive Smart TV suite gets you to highdefinition video and amazingly immersive surround sound in the box, so you can do and enjoy...
Brochure
Page 2
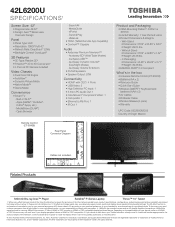
... according to obtain such permission. 4. 1080p/24 fps encoded content and an HD display capable of the television. and/or Toshiba Corporation. eManual • TRAC (Tablet Remote App Capability) • Control4™ Capable Audio • Audyssey Premium Television™ - Audyssey EQ® (Wall/Table...24.85" x 8.43" • Weight: 29.54 lbs. - Care should be pushed, pulled over, or knocked down. © 2012 Toshiba America Information Systems, Inc. All rights reserved. While every effort has been made at the time of publication to wall mount your personal preference. ...
... according to obtain such permission. 4. 1080p/24 fps encoded content and an HD display capable of the television. and/or Toshiba Corporation. eManual • TRAC (Tablet Remote App Capability) • Control4™ Capable Audio • Audyssey Premium Television™ - Audyssey EQ® (Wall/Table...24.85" x 8.43" • Weight: 29.54 lbs. - Care should be pushed, pulled over, or knocked down. © 2012 Toshiba America Information Systems, Inc. All rights reserved. While every effort has been made at the time of publication to wall mount your personal preference. ...
User Guide
Page 12
... 30 Connecting an antenna, satellite receiver, and cable TV box 30 Connecting DVD to ColorStream® or VCR to composite video 31 Connecting remote IR devices 33 Using the IR blaster OUT terminal 33 Connecting a digital audio system 35 Connecting an HDMI® or DVI device to ...the HDMI® input 36 Using the TV remote and HDMI® CEC Control to control other devices 46 Installing batteries 46 Remote control effective range 48 Learning about the remote control 49 Chapter 4: Initial Setup and Menu 51
... 30 Connecting an antenna, satellite receiver, and cable TV box 30 Connecting DVD to ColorStream® or VCR to composite video 31 Connecting remote IR devices 33 Using the IR blaster OUT terminal 33 Connecting a digital audio system 35 Connecting an HDMI® or DVI device to ...the HDMI® input 36 Using the TV remote and HDMI® CEC Control to control other devices 46 Installing batteries 46 Remote control effective range 48 Learning about the remote control 49 Chapter 4: Initial Setup and Menu 51
User Guide
Page 18
... 172 Controlling devices 173 Mouse control 175 Touchpad control 176 Combo 176 Toshiba MediaGuide app 177 Toshiba Send & Play App 178 Launching the app 179 Text input 180 Chapter 9: Troubleshooting 181 General troubleshooting 181 Picture problems 182 Sound problems 184 Remote control problems 184 Channel tuning problems 184 Closed caption problems 185 Rating...
... 172 Controlling devices 173 Mouse control 175 Touchpad control 176 Combo 176 Toshiba MediaGuide app 177 Toshiba Send & Play App 178 Launching the app 179 Text input 180 Chapter 9: Troubleshooting 181 General troubleshooting 181 Picture problems 182 Sound problems 184 Remote control problems 184 Channel tuning problems 184 Closed caption problems 185 Rating...
User Guide
Page 21
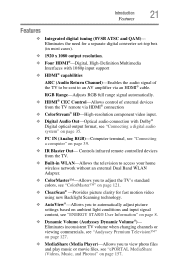
... devices from the TV remote via an HDMI® cable. Introduction Features 21 Features ❖ Integrated digital tuning (8VSB ATSC and QAM)- Eliminates inconsistent TV volume when changing channels or ...
... devices from the TV remote via an HDMI® cable. Introduction Features 21 Features ❖ Integrated digital tuning (8VSB ATSC and QAM)- Eliminates inconsistent TV volume when changing channels or ...
User Guide
Page 22
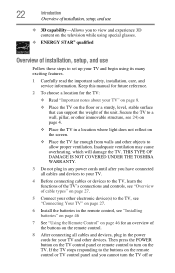
...Then press the POWER button on the TV control panel or remote control to turn the TV off or THIS TYPE OF DAMAGE IS NOT COVERED UNDER THE TOSHIBA WARRANTY. 3 Do not plug in any power cords until... after you cannot turn on the TV. If the TV stops responding to the buttons on the remote control or TV control ...other electronic device(s) to the TV, see "Connecting Your TV" on page 27. 6 Install the batteries in the remote control, see 24) on page 4. ❖ Place the TV in the power cords for the TV: ❖ ...
...Then press the POWER button on the TV control panel or remote control to turn the TV off or THIS TYPE OF DAMAGE IS NOT COVERED UNDER THE TOSHIBA WARRANTY. 3 Do not plug in any power cords until... after you cannot turn on the TV. If the TV stops responding to the buttons on the remote control or TV control ...other electronic device(s) to the TV, see "Connecting Your TV" on page 27. 6 Install the batteries in the remote control, see 24) on page 4. ❖ Place the TV in the power cords for the TV: ❖ ...

User Guide
Page 23
... TV's features, see chapters 6, 7, and 8. 12 For help, refer to "Troubleshooting" on page 181. 13 For technical specifications, see "Remote control effective range" on page 191. TV front and side panel controls and connections Digital Audio jack 2 USB ports 1 IR Blaster Out 1 Analog... Audio port 3 HDMI® ports Brightness sensor Remote sensor Power LED (Sample Illustration) L6200U/L7200U Series front and side panel controls and connections Front panel 1 Power On/Standby LED-Power indicator...
... TV's features, see chapters 6, 7, and 8. 12 For help, refer to "Troubleshooting" on page 181. 13 For technical specifications, see "Remote control effective range" on page 191. TV front and side panel controls and connections Digital Audio jack 2 USB ports 1 IR Blaster Out 1 Analog... Audio port 3 HDMI® ports Brightness sensor Remote sensor Power LED (Sample Illustration) L6200U/L7200U Series front and side panel controls and connections Front panel 1 Power On/Standby LED-Power indicator...

User Guide
Page 24
... 2 IN Video 1 IN Antenna/Cable (Sample Illustration) L6200U/L7200U Series back panel controls and connections HDMI® connection is necessary to connect and control infrared remote-controlled devices. 6 Digital Audio Jack-Optical audio output in Dolby® Digital or PCM (pulse-code modulation) format for connecting an external Dolby® Digital...
... 2 IN Video 1 IN Antenna/Cable (Sample Illustration) L6200U/L7200U Series back panel controls and connections HDMI® connection is necessary to connect and control infrared remote-controlled devices. 6 Digital Audio Jack-Optical audio output in Dolby® Digital or PCM (pulse-code modulation) format for connecting an external Dolby® Digital...

User Guide
Page 26
... external Dolby® Digital decoder, amplifier, A/V receiver, or home theater system with optical audio input. 17 IR Blaster OUT-Used to connect and control infrared remote controlled devices. 18 2 USB ports-To access video, music, or photo files with USB device.
... external Dolby® Digital decoder, amplifier, A/V receiver, or home theater system with optical audio input. 17 IR Blaster OUT-Used to connect and control infrared remote controlled devices. 18 2 USB ports-To access video, music, or photo files with USB device.
User Guide
Page 29
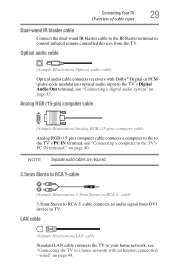
... the TV. LAN cable (Sample Illustration) LAN cable Standard LAN cable connects the TV to your home network, see "Connecting the TV to control infrared remote controlled devices from DVI device to the TV's Digital Audio Out terminal, see "Connecting a computer to RCA Y- Connecting Your TV Overview of cable types 29...
... the TV. LAN cable (Sample Illustration) LAN cable Standard LAN cable connects the TV to your home network, see "Connecting the TV to control infrared remote controlled devices from DVI device to the TV's Digital Audio Out terminal, see "Connecting a computer to RCA Y- Connecting Your TV Overview of cable types 29...

User Guide
Page 30
For details on connecting and using your devices may not be able to use the remote control to a computer without an Internet connection" on page 43. The input/output terminals on your specific devices, refer to your TV in this manual ...
For details on connecting and using your devices may not be able to use the remote control to a computer without an Internet connection" on page 43. The input/output terminals on your specific devices, refer to your TV in this manual ...

User Guide
Page 31
... VCR to view" on page 86. Select VIDEO input source on the TV.* *To select the video input source, press the INPUT button on the remote control, see "Selecting the video input to composite video 31 To view the VCR or camcorder video: Turn On the VCR or camcorder video. NOTE...
... VCR to view" on page 86. Select VIDEO input source on the TV.* *To select the video input source, press the INPUT button on the remote control, see "Selecting the video input to composite video 31 To view the VCR or camcorder video: Turn On the VCR or camcorder video. NOTE...

User Guide
Page 32
...while watching a DVD: Turn ON the VCR. Tune the VCR to the channel to the AUDIO/VIDEO terminal. 32 Connecting Your TV Connecting remote IR devices ❖ If your DVD player has HDMI® video, see "Selecting the video input to watch. Select the VIDEO video ... OUT terminal to the appropriate AV mode. NOTE The unauthorized recording, use ColorStream® HD or Video, please switch to remotely operate many infrared remote-controlled devices enclosed in an entertainment center or similar cabinet. Items needed: If your DVD player or satellite receiver does not ...
...while watching a DVD: Turn ON the VCR. Tune the VCR to the channel to the AUDIO/VIDEO terminal. 32 Connecting Your TV Connecting remote IR devices ❖ If your DVD player has HDMI® video, see "Selecting the video input to watch. Select the VIDEO video ... OUT terminal to the appropriate AV mode. NOTE The unauthorized recording, use ColorStream® HD or Video, please switch to remotely operate many infrared remote-controlled devices enclosed in an entertainment center or similar cabinet. Items needed: If your DVD player or satellite receiver does not ...
User Guide
Page 33
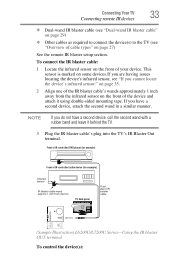
... devices.If you are having issues locating the device's infrared sensor, see "Overview of cable types" on page 27) See the remote IR blaster setup section. Connecting Your TV Connecting remote IR devices 33 ❖ Dual-wand IR blaster cable (see "Dual-wand IR blaster cable" on page 29) ❖ Other cables...
... devices.If you are having issues locating the device's infrared sensor, see "Overview of cable types" on page 27) See the remote IR blaster setup section. Connecting Your TV Connecting remote IR devices 33 ❖ Dual-wand IR blaster cable (see "Dual-wand IR blaster cable" on page 29) ❖ Other cables...
User Guide
Page 34
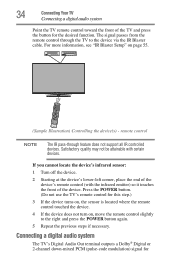
...the device's infrared sensor: 1 Turn off the device. 2 Starting at the device's lower-left corner, place the end of the device's remote control (with certain devices. remote control NOTE The IR pass-through the TV to the right and press the POWER button again. 5 Repeat the previous steps if necessary... or 2-channel down-mixed PCM (pulse-code modulation) signal for this step.) 3 If the device turns on, the sensor is located where the remote control touched the device. 4 If the device does not turn on page 55. (Sample Illustration) Controlling the device(s) - The signal passes from the...
...the device's infrared sensor: 1 Turn off the device. 2 Starting at the device's lower-left corner, place the end of the device's remote control (with certain devices. remote control NOTE The IR pass-through the TV to the right and press the POWER button again. 5 Repeat the previous steps if necessary... or 2-channel down-mixed PCM (pulse-code modulation) signal for this step.) 3 If the device turns on, the sensor is located where the remote control touched the device. 4 If the device does not turn on page 55. (Sample Illustration) Controlling the device(s) - The signal passes from the...

User Guide
Page 36
... To view the HDMI® device video: Select HDMI 1, HDMI 2, HDMI 3 or HDMI 4 video input source on the TV. (Press the INPUT button on the remote control. A conventional HDMI®/DVI cable may not work properly. ❖ HDMI® cables transfer both video and audio. 36 Connecting Your TV Connecting an...
... To view the HDMI® device video: Select HDMI 1, HDMI 2, HDMI 3 or HDMI 4 video input source on the TV. (Press the INPUT button on the remote control. A conventional HDMI®/DVI cable may not work properly. ❖ HDMI® cables transfer both video and audio. 36 Connecting Your TV Connecting an...

User Guide
Page 37
...operate properly with high-bandwidth digital content protection, which is being standardized for reception of connected audio/video devices using the TV's remote control, connect an HDMI® CEC compatible audio receiver or playback device. NOTE [1] EIA/CEA-861-D compliance covers the transmission... (Sample Illustration) L6200U/L7200U Series-Connecting an HDMI® CEC compatible audio receiver and playback device Connecting Your TV Using the TV remote and HDMI® CEC Control to control 37 more information, see illustration). To connect a DVI device, you will need: ❖...
...operate properly with high-bandwidth digital content protection, which is being standardized for reception of connected audio/video devices using the TV's remote control, connect an HDMI® CEC compatible audio receiver or playback device. NOTE [1] EIA/CEA-861-D compliance covers the transmission... (Sample Illustration) L6200U/L7200U Series-Connecting an HDMI® CEC compatible audio receiver and playback device Connecting Your TV Using the TV remote and HDMI® CEC Control to control 37 more information, see illustration). To connect a DVI device, you will need: ❖...
User Guide
Page 46
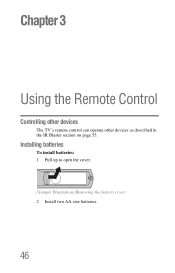
Installing batteries To install batteries: 1 Pull up to open the cover. (Sample Illustration) Removing the battery cover 2 Install two AA size batteries. 46 Chapter 3 Using the Remote Control Controlling other devices The TV's remote control can operate other devices as described in the IR Blaster section on page 55.
Installing batteries To install batteries: 1 Pull up to open the cover. (Sample Illustration) Removing the battery cover 2 Install two AA size batteries. 46 Chapter 3 Using the Remote Control Controlling other devices The TV's remote control can operate other devices as described in the IR Blaster section on page 55.
User Guide
Page 47
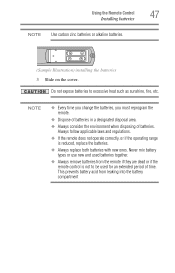
... not expose batteries to be used for an extended period of batteries. This prevents battery acid from the remote if they are dead or if the remote control is reduced, replace the batteries. ❖ Always replace both batteries with new ones. Never mix battery.... ❖ Always remove batteries from leaking into the battery compartment NOTE ❖ Every time you change the batteries, you must reprogram the remote. ❖ Dispose of batteries in a designated disposal area. ❖ Always consider the environment when disposing of time. Always follow applicable laws...
... not expose batteries to be used for an extended period of batteries. This prevents battery acid from the remote if they are dead or if the remote control is reduced, replace the batteries. ❖ Always replace both batteries with new ones. Never mix battery.... ❖ Always remove batteries from leaking into the battery compartment NOTE ❖ Every time you change the batteries, you must reprogram the remote. ❖ Dispose of batteries in a designated disposal area. ❖ Always consider the environment when disposing of time. Always follow applicable laws...
User Guide
Page 48
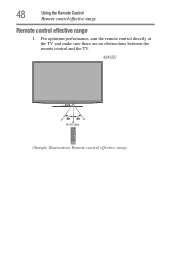
48 Using the Remote Control Remote control effective range Remote control effective range 1 For optimum performance, aim the remote control directly at the TV and make sure there are no obstructions between the remote control and the TV. 42/47/55" 16.4 ft (5m) (Sample Illustration) Remote control effective range
48 Using the Remote Control Remote control effective range Remote control effective range 1 For optimum performance, aim the remote control directly at the TV and make sure there are no obstructions between the remote control and the TV. 42/47/55" 16.4 ft (5m) (Sample Illustration) Remote control effective range


