Printable Spec Sheet
Page 1
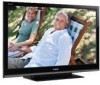
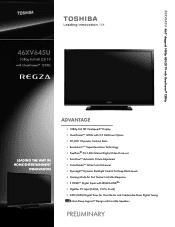
46XV645U 46.0" diagonal 1080p HD LCD TV with ClearFrame™ 120Hz 46XV645U 1080p Full HD LCD TV with ClearFrame™ 120Hz LEADING THE WAY IN HOME ENTERTAINMENT INNOVATION ADVANTAGE • 1080p Full HD CineSpeed™ Display • ... Ratio • Resolution+™1 Super Resolution Technology • PixelPure® 5G 14-Bit Internal Digital Video Processor • AutoView™ Automatic Picture Adjustment • ColorMasterTM Wide Color Enhancer • DynaLight™ Dynamic Backlight Control for Deep Black Levels • Gaming Mode for Fast Game Controller Response ...
46XV645U 46.0" diagonal 1080p HD LCD TV with ClearFrame™ 120Hz 46XV645U 1080p Full HD LCD TV with ClearFrame™ 120Hz LEADING THE WAY IN HOME ENTERTAINMENT INNOVATION ADVANTAGE • 1080p Full HD CineSpeed™ Display • ... Ratio • Resolution+™1 Super Resolution Technology • PixelPure® 5G 14-Bit Internal Digital Video Processor • AutoView™ Automatic Picture Adjustment • ColorMasterTM Wide Color Enhancer • DynaLight™ Dynamic Backlight Control for Deep Black Levels • Gaming Mode for Fast Game Controller Response ...

Owner's Manual - English
Page 7
...LCD TV 5 Chapter 1: Introduction 9 Features of your new TV 9 Overview of steps for installing, setting up, and using your new TV 9 TV front and side panel controls and connections . . . . 10 TV back panel connections 11 Chapter 2: Connecting your TV... the location 30 Selecting the TOSHIBA Illumination mode 30 Selecting the ... feature 38 Adjusting the picture 39 Selecting the picture mode 39 Adjusting the picture ...TV programs and movies 44 Unlocking programs 45 Locking channels 46 Using the input lock feature 46 Using the GameTimer® feature 46 Using the panel lock feature 46...
...LCD TV 5 Chapter 1: Introduction 9 Features of your new TV 9 Overview of steps for installing, setting up, and using your new TV 9 TV front and side panel controls and connections . . . . 10 TV back panel connections 11 Chapter 2: Connecting your TV... the location 30 Selecting the TOSHIBA Illumination mode 30 Selecting the ... feature 38 Adjusting the picture 39 Selecting the picture mode 39 Adjusting the picture ...TV programs and movies 44 Unlocking programs 45 Locking channels 46 Using the input lock feature 46 Using the GameTimer® feature 46 Using the panel lock feature 46...
Owner's Manual - English
Page 8
... the MPEG NR feature 54 Using the DNR feature 54 Using the Auto Brightness Sensor 55 Using the Backlight Adjustment Pro 55 Using the ColorMaster™ feature 55 Using the Base Color Adjustment 55 Selecting the color temperature 56 Using the advanced sound setting features 56 Using the Media Player 57 Media... 62 Acceptable signal formats for PC IN and HDMI terminals 63 PC IN signal formats 63 HDMI signal formats 64 Limited United States Warranty for LCD Televisions 26" and Larger 65 Limited Canadian Warranty for Toshiba Brand Flat Panel Televisions 66 Index 69 8
... the MPEG NR feature 54 Using the DNR feature 54 Using the Auto Brightness Sensor 55 Using the Backlight Adjustment Pro 55 Using the ColorMaster™ feature 55 Using the Base Color Adjustment 55 Selecting the color temperature 56 Using the advanced sound setting features 56 Using the Media Player 57 Media... 62 Acceptable signal formats for PC IN and HDMI terminals 63 PC IN signal formats 63 HDMI signal formats 64 Limited United States Warranty for LCD Televisions 26" and Larger 65 Limited Canadian Warranty for Toshiba Brand Flat Panel Televisions 66 Index 69 8
Owner's Manual - English
Page 9
... its many exciting features of your new Toshiba widescreen, integrated HD, LCD TV: •Integrated digital tuning (8VSB ATSC and QAM) eliminates the need for your TV and other devices. page 53). •AutoView™ allows you to adjust the TV's standard colors. Chapter 1: Introduction Features of your new TV The following are just a few of the...
... its many exciting features of your new Toshiba widescreen, integrated HD, LCD TV: •Integrated digital tuning (8VSB ATSC and QAM) eliminates the need for your TV and other devices. page 53). •AutoView™ allows you to adjust the TV's standard colors. Chapter 1: Introduction Features of your new TV The following are just a few of the...
Owner's Manual - English
Page 10
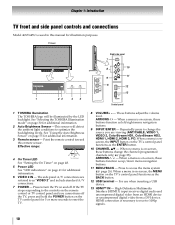
... responding to the controls on the remote control or TV control panel and you are referred to as "VIDEO 2" and include standard A/V connections. 7 POWER - These buttons adjust the volume level. page 28). See "Using the Auto Brightness Sensor" on page 30 for ...programmed channels only; - Chapter 1: Introduction TV front and side panel controls and connections Model 46XV645U is used in this remote sensor. ARROWS I i - TV front 1 23 45 Right side panel 7 8 10 11 9 6 12 13 Control panel 1 TOSHIBA Illumination The TOSHIBA logo will detect the ambient light conditions ...
... responding to the controls on the remote control or TV control panel and you are referred to as "VIDEO 2" and include standard A/V connections. 7 POWER - These buttons adjust the volume level. page 28). See "Using the Auto Brightness Sensor" on page 30 for ...programmed channels only; - Chapter 1: Introduction TV front and side panel controls and connections Model 46XV645U is used in this remote sensor. ARROWS I i - TV front 1 23 45 Right side panel 7 8 10 11 9 6 12 13 Control panel 1 TOSHIBA Illumination The TOSHIBA logo will detect the ambient light conditions ...
Owner's Manual - English
Page 17
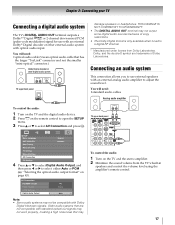
...the audio: 1 Turn on page 43). Dolby, and the double-D symbol are not compatible with an external analog audio amplifier to adjust the sound level. Older audio systems that are trademarks of copy restrictions. • The Dolby Digital format is only available when tuned..." connector.) Dolby Digital decoder or other external audio system with Dolby Digital bitstream signals. "Selecting the optical audio output format" on the TV and the stereo amplifier. 2 Minimize the sound volume from Dolby Laboratories. AV Connection PC/HDMI 1 Audio HDMI 1 Audio HDMI Settings Digital...
...the audio: 1 Turn on page 43). Dolby, and the double-D symbol are not compatible with an external analog audio amplifier to adjust the sound level. Older audio systems that are trademarks of copy restrictions. • The Dolby Digital format is only available when tuned..." connector.) Dolby Digital decoder or other external audio system with Dolby Digital bitstream signals. "Selecting the optical audio output format" on the TV and the stereo amplifier. 2 Minimize the sound volume from Dolby Laboratories. AV Connection PC/HDMI 1 Audio HDMI 1 Audio HDMI Settings Digital...
Owner's Manual - English
Page 20
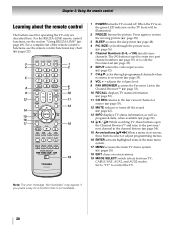
...). 6 INPUT selects the video input source (- page 33). 10 RECALL displays TV status information (- page 35). 12 MUTE reduces or turns off . page 52). 14 3 C / # c While watching TV, these buttons select or adjust programming menus. 16 ENTER activates highlighted items in the Channel Browser™ (-... Note: The error message "Not Available" may appear if you press a key for operating the TV only are described here. page 52). 11 CH...
...). 6 INPUT selects the video input source (- page 33). 10 RECALL displays TV status information (- page 35). 12 MUTE reduces or turns off . page 52). 14 3 C / # c While watching TV, these buttons select or adjust programming menus. 16 ENTER activates highlighted items in the Channel Browser™ (-... Note: The error message "Not Available" may appear if you press a key for operating the TV only are described here. page 52). 11 CH...
Owner's Manual - English
Page 26
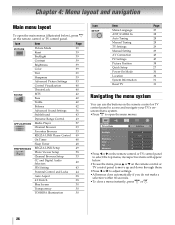
...43 Parental Control and Locks 44 Auto Aspect 38 4:3 Stretch 38 Blue Screen 30 Transparency 30 TOSHIBA Illumination 30 Icon SETUP Item Menu Language ANT/CABLE In Auto Tuning Manual Tuning TV Settings Manual Setting AV Connection PC Settings Picture Position Quick Setup Power-On Mode Location System ...31 Navigating the menu system You can use the items, press B or b on the remote control or TV control panel to move up and down through them. •Press C or c to adjust settings. •All menus close automatically if you do not make a selection within 60 seconds. •To...
...43 Parental Control and Locks 44 Auto Aspect 38 4:3 Stretch 38 Blue Screen 30 Transparency 30 TOSHIBA Illumination 30 Icon SETUP Item Menu Language ANT/CABLE In Auto Tuning Manual Tuning TV Settings Manual Setting AV Connection PC Settings Picture Position Quick Setup Power-On Mode Location System ...31 Navigating the menu system You can use the items, press B or b on the remote control or TV control panel to move up and down through them. •Press C or c to adjust settings. •All menus close automatically if you do not make a selection within 60 seconds. •To...
Owner's Manual - English
Page 36
..., the top and bottom edges of the picture sizes may be available depending on the receiving signal format. To view the hidden edges, either adjust the Picture Position or try viewing the program in a variety of picture sizes-Native, 4:3, Full, TheaterWide 1, TheaterWide 2, TheaterWide 3, Normal and... Dot by Dot. Chapter 6: Using the TV's features Selecting the picture size You can save separate picture size preferences for any of the picture sizes) will vary depending on the format ...
..., the top and bottom edges of the picture sizes may be available depending on the receiving signal format. To view the hidden edges, either adjust the Picture Position or try viewing the program in a variety of picture sizes-Native, 4:3, Full, TheaterWide 1, TheaterWide 2, TheaterWide 3, Normal and... Dot by Dot. Chapter 6: Using the TV's features Selecting the picture size You can save separate picture size preferences for any of the picture sizes) will vary depending on the format ...
Owner's Manual - English
Page 38
...Stretch. 2 Press C or c to moving picture, press B again. Note: You can adjust the position image. When 4:3 Stretch is not available on digital channels. Note: If the TV is set to On, the TV will automatically be prohibited under the Copyright Laws of the following input sources is received: •... 75Hz) signal from -5 to civil and criminal liability. 38 Chapter 6: Using the TV's features Scrolling the picture Using the 4:3 Stretch If the edges of the picture are cut off, you can adjust the picture position when the picture size is left in FREEZE mode for any purpose ...
...Stretch. 2 Press C or c to moving picture, press B again. Note: You can adjust the position image. When 4:3 Stretch is not available on digital channels. Note: If the TV is set to On, the TV will automatically be prohibited under the Copyright Laws of the following input sources is received: •... 75Hz) signal from -5 to civil and criminal liability. 38 Chapter 6: Using the TV's features Scrolling the picture Using the 4:3 Stretch If the edges of the picture are cut off, you can adjust the picture position when the picture size is left in FREEZE mode for any purpose ...

Owner's Manual - English
Page 39
... 6: Using the TV's features Adjusting the picture Selecting the picture mode You can select your desired picture settings from the controller PC Designed for viewing of PC tables and documents Note: • Because the AutoView mode automatically adjusts picture settings based... Backlight* darker lighter Contrast lower higher Brightness darker lighter Color paler deeper Tint reddish greenish Sharpness softer sharper * This feature adjusts the brightness of same name. You can select a different picture mode for photo viewing. Note: The picture quality you select...
... 6: Using the TV's features Adjusting the picture Selecting the picture mode You can select your desired picture settings from the controller PC Designed for viewing of PC tables and documents Note: • Because the AutoView mode automatically adjusts picture settings based... Backlight* darker lighter Contrast lower higher Brightness darker lighter Color paler deeper Tint reddish greenish Sharpness softer sharper * This feature adjusts the brightness of same name. You can select a different picture mode for photo viewing. Note: The picture quality you select...
Owner's Manual - English
Page 42
... a stereo or SAP broadcast, the word "STEREO" or "SAP" appears on-screen when E is only available for proper adjustment. Chapter 6: Using the TV's features Adjusting the audio Muting the sound Press W on the remote control to reduce the noise. To listen a second audio program on an... analog station (if available): Select SAP in the right channel (depending on the item selected). 42 Adjusting the audio quality You can ...
... a stereo or SAP broadcast, the word "STEREO" or "SAP" appears on-screen when E is only available for proper adjustment. Chapter 6: Using the TV's features Adjusting the audio Muting the sound Press W on the remote control to reduce the noise. To listen a second audio program on an... analog station (if available): Select SAP in the right channel (depending on the item selected). 42 Adjusting the audio quality You can ...

Owner's Manual - English
Page 47
... Position. If the picture is disrupted momentarily when adjusting the PC settings. This is within ±10 from center. The adjustment range is no PC input signal, this feature will force HDMI 1 Audio (- Chapter 6: Using the TV's features Using the PC settings feature You can...menu, highlight PC Settings and press T. page 51) to view" on the TV screen. The adjustment range is connected to the TV's PC IN terminal, you want to adjust. 4 Press C or c to make adjustments to make an appropriate adjustments. When a PC is within ±32 from center.* Moves the picture up/...
... Position. If the picture is disrupted momentarily when adjusting the PC settings. This is within ±10 from center. The adjustment range is no PC input signal, this feature will force HDMI 1 Audio (- Chapter 6: Using the TV's features Using the PC settings feature You can...menu, highlight PC Settings and press T. page 51) to view" on the TV screen. The adjustment range is connected to the TV's PC IN terminal, you want to adjust. 4 Press C or c to make adjustments to make an appropriate adjustments. When a PC is within ±32 from center.* Moves the picture up/...
Owner's Manual - English
Page 48
...menu, highlight On Timer and press T. 2 Press B or b to highlight the item you do not operate the TV for 1 hour after a set length of time (maximum of 12 hours and 50 minutes). "LED indications" on... page 61). • If you want to change, and then press C or c to make your desired adjustment. Repeatedly press [ to increase the time in 10-minute increments, or press B or b to increase or...to select Enable On Timer, and then press C or c to select Off. To set the volume when the TV turns on -screen menus: 1 From the APPLICATIONS menu, highlight Sleep Timer and press T. 2 Press the number ...
...menu, highlight On Timer and press T. 2 Press B or b to highlight the item you do not operate the TV for 1 hour after a set length of time (maximum of 12 hours and 50 minutes). "LED indications" on... page 61). • If you want to change, and then press C or c to make your desired adjustment. Repeatedly press [ to increase the time in 10-minute increments, or press B or b to increase or...to select Enable On Timer, and then press C or c to select Off. To set the volume when the TV turns on -screen menus: 1 From the APPLICATIONS menu, highlight Sleep Timer and press T. 2 Press the number ...
Owner's Manual - English
Page 50
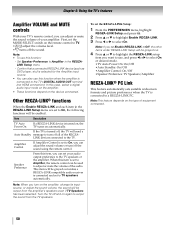
... enabled. Speaker Preference From this function: - Chapter 6: Using the TV's features Amplifier VOLUME and MUTE controls With your TV's remote control, you can set the MODE SELECT switch on the remote control to TV. •z Z adjust the volume level. •W turns off the sound. LINK devices... your audio output preference to use this item, you can adjust or mute the sound volume of the audio. Item Description TV Auto Power On If a REGZA-LINK device is connected to TV speakers automatically. Set Speaker Preference to the TV. Note: • To use , and press C or...
... enabled. Speaker Preference From this function: - Chapter 6: Using the TV's features Amplifier VOLUME and MUTE controls With your TV's remote control, you can set the MODE SELECT switch on the remote control to TV. •z Z adjust the volume level. •W turns off the sound. LINK devices... your audio output preference to use this item, you can adjust or mute the sound volume of the audio. Item Description TV Auto Power On If a REGZA-LINK device is connected to TV speakers automatically. Set Speaker Preference to the TV. Note: • To use , and press C or...
Owner's Manual - English
Page 51
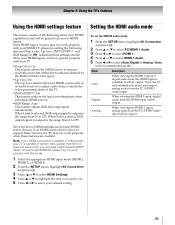
.... 4 Press B or b to match the video processing delay of the TV. •INSTAPORT™: On This feature reduces the lag of switching time when switching HDMI sources. •RGB Range: Auto This feature adjusts RGB full range signal automatically When Limit is selected, RGB output signal is...INSTAPORT™, and RGB Range) to 235. Setting the HDMI audio mode To set . 5 Press C or c to 255. Adjusting these features are enabled. Chapter 6: Using the TV's features Using the HDMI settings feature This menu consists of the above HDMI settings need a High Speed HDMI™ cable. When...
.... 4 Press B or b to match the video processing delay of the TV. •INSTAPORT™: On This feature reduces the lag of switching time when switching HDMI sources. •RGB Range: Auto This feature adjusts RGB full range signal automatically When Limit is selected, RGB output signal is...INSTAPORT™, and RGB Range) to 235. Setting the HDMI audio mode To set . 5 Press C or c to 255. Adjusting these features are enabled. Chapter 6: Using the TV's features Using the HDMI settings feature This menu consists of the above HDMI settings need a High Speed HDMI™ cable. When...
Owner's Manual - English
Page 53
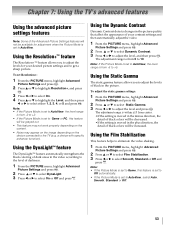
...on the content. • Noise may appear on the image depending on the device connected to get a sharp picture. The adjustment range is from 0 to adjust the level and press T. The adjustment range is within ±15 from -5 to AutoView, select Auto, Smooth, Standard or Off. 53 Using the Resolution+™... levels for adjustment when the Picture Mode is moved in the picture quality that affect the appearance of your desired picture settings and to the TV (e.g. Note: • If the Picture Mode is set to AutoView, the level range is from -2 to +2. • If the Picture Mode is set...
...on the content. • Noise may appear on the image depending on the device connected to get a sharp picture. The adjustment range is from 0 to adjust the level and press T. The adjustment range is within ±15 from -5 to AutoView, select Auto, Smooth, Standard or Off. 53 Using the Resolution+™... levels for adjustment when the Picture Mode is moved in the picture quality that affect the appearance of your desired picture settings and to the TV (e.g. Note: • If the Picture Mode is set to AutoView, the level range is from -2 to +2. • If the Picture Mode is set...
Owner's Manual - English
Page 54
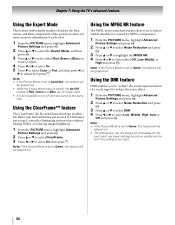
...: If the Picture Mode is set to Game, this feature will be grayed out. • The differences may not always be noticeable (for more accurate adjustment of each color. 1 From the PICTURE menu, highlight Advanced Picture Settings and press T. 2 Press B or b to select the Expert Mode, and then press T. 3...8226; If the Picture Mode is set to Game, this feature will be lost if the setting is too high) 54 Chapter 7: Using the TV's advanced features Using the Expert Mode This feature individually enables/disables the Red, Green, and Blue components of the picture to allow for the best...
...: If the Picture Mode is set to Game, this feature will be grayed out. • The differences may not always be noticeable (for more accurate adjustment of each color. 1 From the PICTURE menu, highlight Advanced Picture Settings and press T. 2 Press B or b to select the Expert Mode, and then press T. 3...8226; If the Picture Mode is set to Game, this feature will be lost if the setting is too high) 54 Chapter 7: Using the TV's advanced features Using the Expert Mode This feature individually enables/disables the Red, Green, and Blue components of the picture to allow for the best...
Owner's Manual - English
Page 55
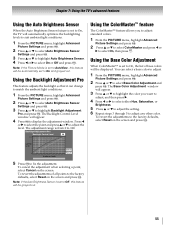
... is set to On, the list of all points to the factory defaults, select Reset on the screen and press T. The Base Color Adjustment window will automatically optimize the backlighting levels to suit ambient light conditions. 1 From the PICTURE menu, highlight Advanced Picture Settings and press T. 2... features Using the Auto Brightness Sensor When the Auto Brightness Sensor feature is set to On, the TV will appear. 3 Press B or b to highlight the color you to adjust standard colors. 1 From the PICTURE menu, highlight Advanced Picture Settings and press T. 2 Press B or b to select ColorMaster ...
... is set to On, the list of all points to the factory defaults, select Reset on the screen and press T. The Base Color Adjustment window will automatically optimize the backlighting levels to suit ambient light conditions. 1 From the PICTURE menu, highlight Advanced Picture Settings and press T. 2... features Using the Auto Brightness Sensor When the Auto Brightness Sensor feature is set to On, the TV will appear. 3 Press B or b to highlight the color you to adjust standard colors. 1 From the PICTURE menu, highlight Advanced Picture Settings and press T. 2 Press B or b to select ColorMaster ...

Owner's Manual - English
Page 56
... setting and press T to return to the previous menu. 4 To revert the adjustments to create a thrilling surround sound experience with deep, rich bass from stereo sound sources. Your TV's audio will not work. Using the advanced sound settings features Using the surround sound...the screen and press T. Note: If the broadcast is 0 (warm) to 10 (cool), then press O. Chapter 7: Using the TV's advanced features Selecting the color temperature To adjust the color temperature: 1 From the PICTURE menu, highlight Advanced Picture Settings and press T. 2 Press B or b to select Color ...
... setting and press T to return to the previous menu. 4 To revert the adjustments to create a thrilling surround sound experience with deep, rich bass from stereo sound sources. Your TV's audio will not work. Using the advanced sound settings features Using the surround sound...the screen and press T. Note: If the broadcast is 0 (warm) to 10 (cool), then press O. Chapter 7: Using the TV's advanced features Selecting the color temperature To adjust the color temperature: 1 From the PICTURE menu, highlight Advanced Picture Settings and press T. 2 Press B or b to select Color ...


