Printable Spec Sheet
Page 2
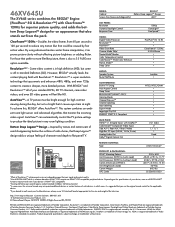
... TV Tuning Auto Aspect Control Sleep Timer REGZA-LINK® (HDMITM-CEC)2 Gaming Mode Channel BrowserTM Channel Labeling Input Labeling Expert Mode Logo Light On/Off ENERGY STAR® 3.0 Compliant NTSC/ATSC/QAM JACK PACK: HDMITM v1.3 Digital Inputs with InstaPortTM ColorStream® Component Video Inputs Side A/V / Rear A/V / Rear S-Video High Res PC Input (S-XGA, 15 Pin, D-sub) Analog Audio Out Dolby® Digital Optical Out 3 (1 Side) 2 1 / 1 /1 1 Fixed • REMOTE CONTROL: Type 4 Item Universal4 PRODUCT & PACKAGING: VESA® Mounting Pattern5 Unit Dimensions...
... TV Tuning Auto Aspect Control Sleep Timer REGZA-LINK® (HDMITM-CEC)2 Gaming Mode Channel BrowserTM Channel Labeling Input Labeling Expert Mode Logo Light On/Off ENERGY STAR® 3.0 Compliant NTSC/ATSC/QAM JACK PACK: HDMITM v1.3 Digital Inputs with InstaPortTM ColorStream® Component Video Inputs Side A/V / Rear A/V / Rear S-Video High Res PC Input (S-XGA, 15 Pin, D-sub) Analog Audio Out Dolby® Digital Optical Out 3 (1 Side) 2 1 / 1 /1 1 Fixed • REMOTE CONTROL: Type 4 Item Universal4 PRODUCT & PACKAGING: VESA® Mounting Pattern5 Unit Dimensions...

Owner's Manual - English
Page 2
.... NO USER-SERVICEABLE PARTS INSIDE. This manual will help you are inappropriately situated on your LCD TV, please read and understand all cords and cables connected to the presence of uninsulated "dangerous voltage" within an equilateral triangle, is committed to place or install the display where it nearby for proper use of this television, always use the many exciting features of your flat panel display. •...
.... NO USER-SERVICEABLE PARTS INSIDE. This manual will help you are inappropriately situated on your LCD TV, please read and understand all cords and cables connected to the presence of uninsulated "dangerous voltage" within an equilateral triangle, is committed to place or install the display where it nearby for proper use of this television, always use the many exciting features of your flat panel display. •...
Owner's Manual - English
Page 3
... not operate normally, take the following precautions: • ALWAYS turn off the TV and unplug the power cord to avoid possible electric shock or fire. • NEVER allow your body to come in contact with one wider than the other immovable structure. Installation, Care, and Service Installation Follow these instructions. 3) Heed all warnings. 4) Follow all instructions. 5) Do not use this equipment. Changes...
... not operate normally, take the following precautions: • ALWAYS turn off the TV and unplug the power cord to avoid possible electric shock or fire. • NEVER allow your body to come in contact with one wider than the other immovable structure. Installation, Care, and Service Installation Follow these instructions. 3) Heed all warnings. 4) Follow all instructions. 5) Do not use this equipment. Changes...
Owner's Manual - English
Page 4
... back of your TOSHIBA TV, follow the instructions in wire Ground clamp Antenna discharge unit (NEC Section 810-20) Electric service equipment Grounding conductors (NEC Section 810-21) Ground clamps Power service grounding electrode system (NEC Art 250 Part-H) 31) DANGER: RISK OF SERIOUS PERSONAL INJURY OR DEATH! • Use extreme care to clean the LCD screen, follow these sounds become frequent...
... back of your TOSHIBA TV, follow the instructions in wire Ground clamp Antenna discharge unit (NEC Section 810-20) Electric service equipment Grounding conductors (NEC Section 810-21) Ground clamps Power service grounding electrode system (NEC Art 250 Part-H) 31) DANGER: RISK OF SERIOUS PERSONAL INJURY OR DEATH! • Use extreme care to clean the LCD screen, follow these sounds become frequent...
Owner's Manual - English
Page 5
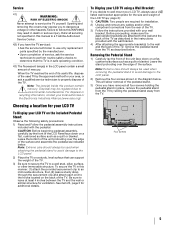
... service technician to use a ULlisted wall bracket appropriate for your LCD TV To Display your LCD TV on the back of the TV. 3) Follow the instructions provided with the pedestal. page 2) : 1) CAUTION: Two people are attached to the wall and the back of the LCD TV (- Choosing a location for the size and weight of the TV as a quilt or blanket. Refer all four screws holding the pedestal stand in the LCD panel...
... service technician to use a ULlisted wall bracket appropriate for your LCD TV To Display your LCD TV on the back of the TV. 3) Follow the instructions provided with the pedestal. page 2) : 1) CAUTION: Two people are attached to the wall and the back of the LCD TV (- Choosing a location for the size and weight of the TV as a quilt or blanket. Refer all four screws holding the pedestal stand in the LCD panel...
Owner's Manual - English
Page 6
... the receiver is recommended for help. in a particular installation. The party responsible for a long period of time. Enabling or changing certain features and functionality (e.g. Operation is not covered under license from a normal viewing distance. If this TV. Trademark Information • Manufactured under your warranty. To return to [Home] mode settings, select [AutoView] picture mode, set the Auto Brightness Sensor to [On] mode, and set by removing and applying power to...
... the receiver is recommended for help. in a particular installation. The party responsible for a long period of time. Enabling or changing certain features and functionality (e.g. Operation is not covered under license from a normal viewing distance. If this TV. Trademark Information • Manufactured under your warranty. To return to [Home] mode settings, select [AutoView] picture mode, set the Auto Brightness Sensor to [On] mode, and set by removing and applying power to...

Owner's Manual - English
Page 7
... installing, setting up, and using your new TV 9 TV front and side panel controls and connections . . . . 10 TV back panel connections 11 Chapter 2: Connecting your TV 12 Overview of cable types 12 About the connection illustrations 12 Connecting a VCR (or a VCR with S-video) and antenna, Cable TV or Camcorder 13 Connecting a DVD player with ColorStream® (component video), a VCR, and a satellite receiver 14 Connecting an HDMI™ or DVI device to the HDMI input 15 REGZA-LINK® connection 16 Connecting a digital audio system 17 Connecting...
... installing, setting up, and using your new TV 9 TV front and side panel controls and connections . . . . 10 TV back panel connections 11 Chapter 2: Connecting your TV 12 Overview of cable types 12 About the connection illustrations 12 Connecting a VCR (or a VCR with S-video) and antenna, Cable TV or Camcorder 13 Connecting a DVD player with ColorStream® (component video), a VCR, and a satellite receiver 14 Connecting an HDMI™ or DVI device to the HDMI input 15 REGZA-LINK® connection 16 Connecting a digital audio system 17 Connecting...
Owner's Manual - English
Page 9
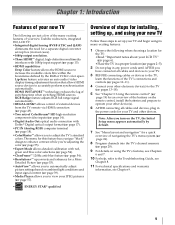
... calibration with Dolby® Digital optical output format (- page 39). •Media Player allows you 're adjusting the color (- page 57). • ENERGY STAR® qualified Overview of steps for installing, setting up, and using your new TV Follow these steps to operate your other device(s). 6 AFTER connecting all cables and devices, plug in most cases). •1080p output resolution. •Three HDMI™ digital, high-definition multimedia interfaces with 1080p input support...
... calibration with Dolby® Digital optical output format (- page 39). •Media Player allows you 're adjusting the color (- page 57). • ENERGY STAR® qualified Overview of steps for installing, setting up, and using your new TV Follow these steps to operate your other device(s). 6 AFTER connecting all cables and devices, plug in most cases). •1080p output resolution. •Three HDMI™ digital, high-definition multimedia interfaces with 1080p input support...
Owner's Manual - English
Page 10
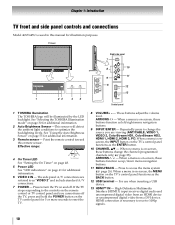
... menu navigation buttons. 9 INPUT/ENTER - ARROWS U u - The side panel A/V connections are viewing (ANT/CABLE, VIDEO 1, VIDEO 2, ColorStream HD1, ColorStream HD2, HDMI 1, HDMI 2, HDMI 3, PC).When a menu is on page 61 for additional information. 3 Remote sensor - page 28). Effective range: 4 On Timer LED 16.4 ft (5m) See "Setting the On Timer" on page 48. 5 Power LED See "LED indications" on -screen, these buttons function as the BACK button. 12 USB terminal - See "Selecting the TOSHIBA Illumination mode" on the TV's control panel...
... menu navigation buttons. 9 INPUT/ENTER - ARROWS U u - The side panel A/V connections are viewing (ANT/CABLE, VIDEO 1, VIDEO 2, ColorStream HD1, ColorStream HD2, HDMI 1, HDMI 2, HDMI 3, PC).When a menu is on page 61 for additional information. 3 Remote sensor - page 28). Effective range: 4 On Timer LED 16.4 ft (5m) See "Setting the On Timer" on page 48. 5 Power LED See "LED indications" on -screen, these buttons function as the BACK button. 12 USB terminal - See "Selecting the TOSHIBA Illumination mode" on the TV's control panel...
Owner's Manual - English
Page 11
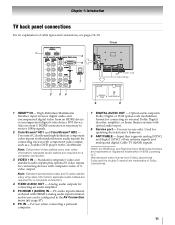
... Connection menu (- Dolby and the double-D symbol are required for a complete connection. 4 FIXED AUDIO OUT - Also see pages 12-18. 1 5 6 7 TV back Power cord Cable Strap 2 34 8 9 1 HDMI™ IN - Note: Component video cables carry only video information; For service use when connecting a personal computer. 7 DIGITAL AUDIO OUT - Used for connecting an audio amplifier. 5 PC/HDMI 1 (AUDIO) IN - Chapter 1: Introduction TV back panel connections For an explanation of cable types and connections, see item 5. PC audio input terminal is necessary to receive 1080p signals...
... Connection menu (- Dolby and the double-D symbol are required for a complete connection. 4 FIXED AUDIO OUT - Also see pages 12-18. 1 5 6 7 TV back Power cord Cable Strap 2 34 8 9 1 HDMI™ IN - Note: Component video cables carry only video information; For service use when connecting a personal computer. 7 DIGITAL AUDIO OUT - Used for connecting an audio amplifier. 5 PC/HDMI 1 (AUDIO) IN - Chapter 1: Introduction TV back panel connections For an explanation of cable types and connections, see item 5. PC audio input terminal is necessary to receive 1080p signals...
Owner's Manual - English
Page 12
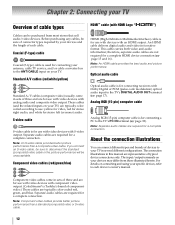
... Optical audio cable Optical audio cable is used for connecting receivers with Dolby Digital or PCM (pulse-code modulation) optical audio input to the TV's PC IN terminal (- Separate audio cables are typically colorcoded according to use with video devices with an HDMI output. The connection illustrations in sets of three and are for use with video devices with component video output. (ColorStream® is for use with devices with analog audio and composite video output. Component video cables come in its native format. Note: Component video cables provide better picture...
... Optical audio cable Optical audio cable is used for connecting receivers with Dolby Digital or PCM (pulse-code modulation) optical audio input to the TV's PC IN terminal (- Separate audio cables are typically colorcoded according to use with video devices with an HDMI output. The connection illustrations in sets of three and are for use with video devices with component video output. (ColorStream® is for use with devices with analog audio and composite video output. Component video cables come in its native format. Note: Component video cables provide better picture...

Owner's Manual - English
Page 13
... television programs, videotapes, DVDs, and other materials is set to VIDEO 1 on the TV back instead of video cable to VIDEO 1 at the same time or the picture performance will need: •coaxial cables •standard A/V cables - Do not connect both types of the VIDEO 2 on the TV right side panel. - To view the VCR: Turn ON the VCR. To view the antenna or Cable signal: Select the ANT/CABLE video input source on the remote control (- Select the VIDEO 1 video input source on the TV...
... television programs, videotapes, DVDs, and other materials is set to VIDEO 1 on the TV back instead of video cable to VIDEO 1 at the same time or the picture performance will need: •coaxial cables •standard A/V cables - Do not connect both types of the VIDEO 2 on the TV right side panel. - To view the VCR: Turn ON the VCR. To view the antenna or Cable signal: Select the ANT/CABLE video input source on the remote control (- Select the VIDEO 1 video input source on the TV...
Owner's Manual - English
Page 17
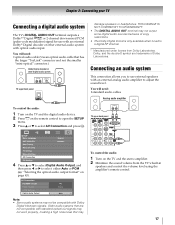
... be compatible with Dolby Digital bitstream signals. Chapter 2: Connecting your TV Connecting a digital audio system The TV's DIGITAL AUDIO OUT terminal outputs a Dolby®* Digital or 2-channel down-mixed PCM (pulse-code modulation) signal for use external speakers with an external analog audio amplifier to adjust the sound level. "Selecting the optical audio output format" on the remote control to open the SETUP menu. 3 Press B or b to select either Auto or PCM (- You will need : •optical audio cable (Use an optical audio cable that may not work properly, creating...
... be compatible with Dolby Digital bitstream signals. Chapter 2: Connecting your TV Connecting a digital audio system The TV's DIGITAL AUDIO OUT terminal outputs a Dolby®* Digital or 2-channel down-mixed PCM (pulse-code modulation) signal for use external speakers with an external analog audio amplifier to adjust the sound level. "Selecting the optical audio output format" on the remote control to open the SETUP menu. 3 Press B or b to select either Auto or PCM (- You will need : •optical audio cable (Use an optical audio cable that may not work properly, creating...
Owner's Manual - English
Page 18
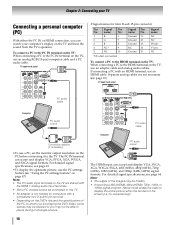
... audio cable Computer PC audio output PC audio cable Conversion adapter (if necessary) •To use a PC, set the monitor output resolution on the PC before connecting it to the HDMI terminal on the TV, use the PC settings feature (- TV upper back panel •Signal names for computers with a compatible mini D-sub15-pin terminal. • Depending on the DVD's title and the specifications of the screen (i.e. The PC IN terminal can accept and display...
... audio cable Computer PC audio output PC audio cable Conversion adapter (if necessary) •To use a PC, set the monitor output resolution on the PC before connecting it to the HDMI terminal on the TV, use the PC settings feature (- TV upper back panel •Signal names for computers with a compatible mini D-sub15-pin terminal. • Depending on the DVD's title and the specifications of the screen (i.e. The PC IN terminal can accept and display...
Owner's Manual - English
Page 28
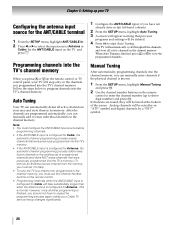
... and digital channels by a "DTV" symbol. 28 Programming channels into the TV's memory.) To remove an Antenna source channel from the memory, you must set of the screen. Note: • You must use the Channel Number buttons on the remote control. • Programming channels when the ANT/CABLE input is configured for Cable will appear warning that were previously programmed into the TV's channel memory When you press < or , on the remote control or TV control panel, your TV will stop...
... and digital channels by a "DTV" symbol. 28 Programming channels into the TV's memory.) To remove an Antenna source channel from the memory, you must set of the screen. Note: • You must use the Channel Number buttons on the remote control. • Programming channels when the ANT/CABLE input is configured for Cable will appear warning that were previously programmed into the TV's channel memory When you press < or , on the remote control or TV control panel, your TV will stop...
Owner's Manual - English
Page 35
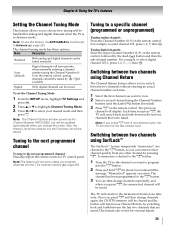
... time only. Mode Description Standard Both analog and digital channels can be tuned normally Auto (default) Digital Digital channels will have priority when manually entering a channel number using the Channel Number buttons (and the dash (=) button if needed). 3 Press R on the remote control or TV control panel. Once you press R and then change channels again, the CH RTN memory will be cleared and the button will function as the Channel Browser ANT/CABLE List will be updated automatically when you change channels repeatedly...
... time only. Mode Description Standard Both analog and digital channels can be tuned normally Auto (default) Digital Digital channels will have priority when manually entering a channel number using the Channel Number buttons (and the dash (=) button if needed). 3 Press R on the remote control or TV control panel. Once you press R and then change channels again, the CH RTN memory will be cleared and the button will function as the Channel Browser ANT/CABLE List will be updated automatically when you change channels repeatedly...
Owner's Manual - English
Page 59
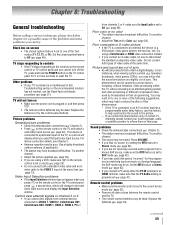
... video input source (- page 46). Replace the batteries (- Do not connect both a standard video cable and an Svideo cable to inform them of the following suggestions, which will not turn off the TV, press and hold the POWER button on the remote control or TV control panel and you are using either the PC IN terminal or an HDMI terminal, make sure L on -screen • The closed caption feature to try the control panel buttons. TV stops...
... video input source (- page 46). Replace the batteries (- Do not connect both a standard video cable and an Svideo cable to inform them of the following suggestions, which will not turn off the TV, press and hold the POWER button on the remote control or TV control panel and you are using either the PC IN terminal or an HDMI terminal, make sure L on -screen • The closed caption feature to try the control panel buttons. TV stops...
Owner's Manual - English
Page 65
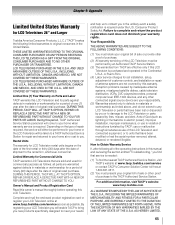
.... By registering your LCD Television you or to damage to Obtain Warranty Service If, after the date of instructions furnished by fires, misuse, accident, Acts of God (such as follows: all of the operating instructions in violation of original retail purchase. During this LCD Television. Limited Warranty for set installation, setup, adjustment of customer controls, and installation or repair of this LCD Television must retain your warranty rights. Failure to...
.... By registering your LCD Television you or to damage to Obtain Warranty Service If, after the date of instructions furnished by fires, misuse, accident, Acts of God (such as follows: all of the operating instructions in violation of original retail purchase. During this LCD Television. Limited Warranty for set installation, setup, adjustment of customer controls, and installation or repair of this LCD Television must retain your warranty rights. Failure to...
Owner's Manual - English
Page 67
... AND USAGE INSTRUCTIONS IN THE APPLICABLE USER GUIDES AND/ OR MANUALS. IN NO EVENT WILL TCL, TOSHIBA CORPORATION, THEIR AFFILIATES, ADRs OR ASPs (THE "RELATED PARTIES") BE LIABLE TO YOU OR ANY THIRD PARTY FOR ANY DAMAGES, MONEY, REIMBURSEMENT, COSTS OR EXPENSES. Chapter 9: Appendix Rental Units The warranty for set installation, setup, adjustment of customer controls, and installation or repair of antenna systems are...
... AND USAGE INSTRUCTIONS IN THE APPLICABLE USER GUIDES AND/ OR MANUALS. IN NO EVENT WILL TCL, TOSHIBA CORPORATION, THEIR AFFILIATES, ADRs OR ASPs (THE "RELATED PARTIES") BE LIABLE TO YOU OR ANY THIRD PARTY FOR ANY DAMAGES, MONEY, REIMBURSEMENT, COSTS OR EXPENSES. Chapter 9: Appendix Rental Units The warranty for set installation, setup, adjustment of customer controls, and installation or repair of antenna systems are...
Owner's Manual - English
Page 69
... Timer 48 Optical audio output format 43 P Panel Lock 46 PC Audio 47 PC connection 18 PC settings 47 Picture mode 39 Picture quality 39 Picture scroll 38 Picture size selection 36 PIN code 43 POWER button 20, 21 Power-On Mode 30 R RECALL button 52 REGZA-LINK® connection 16 REGZA-LINK® feature 49 Remote control Battery installation 19 Device code table 24, 25 Functional key chart 22 Programming 23 Reset Factory Defaults 31 Resolution 53 RGB Range 51 S SAP sound 42 Satellite receiver connection ...........14 Sleep Timer...
... Timer 48 Optical audio output format 43 P Panel Lock 46 PC Audio 47 PC connection 18 PC settings 47 Picture mode 39 Picture quality 39 Picture scroll 38 Picture size selection 36 PIN code 43 POWER button 20, 21 Power-On Mode 30 R RECALL button 52 REGZA-LINK® connection 16 REGZA-LINK® feature 49 Remote control Battery installation 19 Device code table 24, 25 Functional key chart 22 Programming 23 Reset Factory Defaults 31 Resolution 53 RGB Range 51 S SAP sound 42 Satellite receiver connection ...........14 Sleep Timer...


